Sharing notes/questions for my (likely slow) MP3DP v4 build, will periodically update as I make progress. Appreciate all the info people have been sharing, hoping my aggregated notes here helps others. This’ll be a lagged snapshot of what I’m frequently pushing to github.
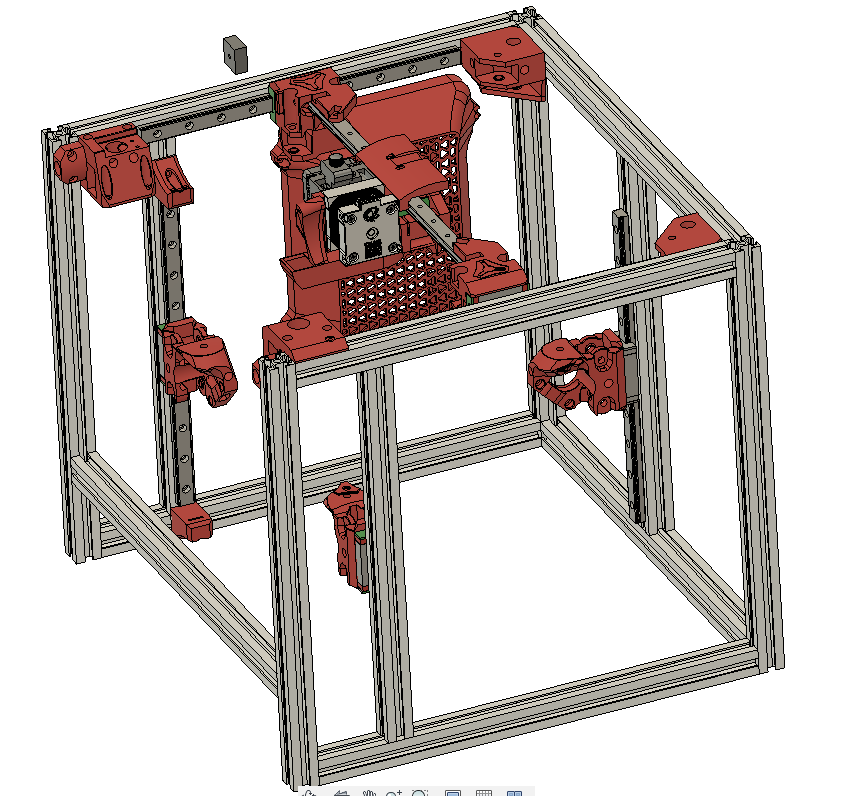
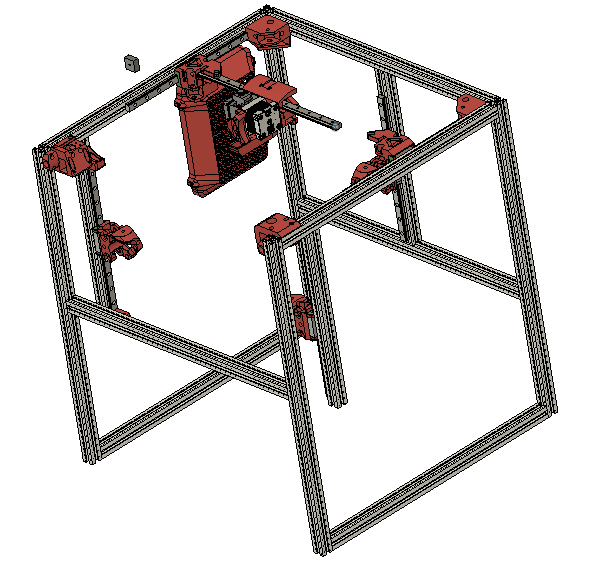
MP3DP v4 (aka Repeat v2) — 3D Printed, CNC’d CoreXY 3D Printer
Tracking plan/tasks/actions in my build Log. Intending this doc to end up evolving into fleshed out structured notes.
See Official V1E MP3DP V4 Docs, they reference :
- Repeat V2 forum thread containing design process/updates/feedback.
- Fusion 360 hosted Design, export/download and print these parts for latest greatest design. Related forum post is here.
- IF you open/import the model in Fusion 360 desktop app, you will be looking at a snapshot. The imported snapshot will not get updated if/when Ryan makes additional updates. So, you may need to reimport every so often if you’re wanting to absorb latest edits, and then make dimension/design changes for your build.
- Created export-components.py Python script, and topic showing How to Bulk Export parts to .STL files.
Included a snapshot of exported .STLs in the /models subfolder.- As-is models will need orienting before splicing and printing.
- Printable .STL files will be stable, but not latest.
Note: Until full Official v4 docs are available, reading through v3 docs (albeit a different design) for general guidance will help. For example v3 printed parts docs has info that applies to v4 too.
|
|
|
|
|
Pics from V1E.com |
||
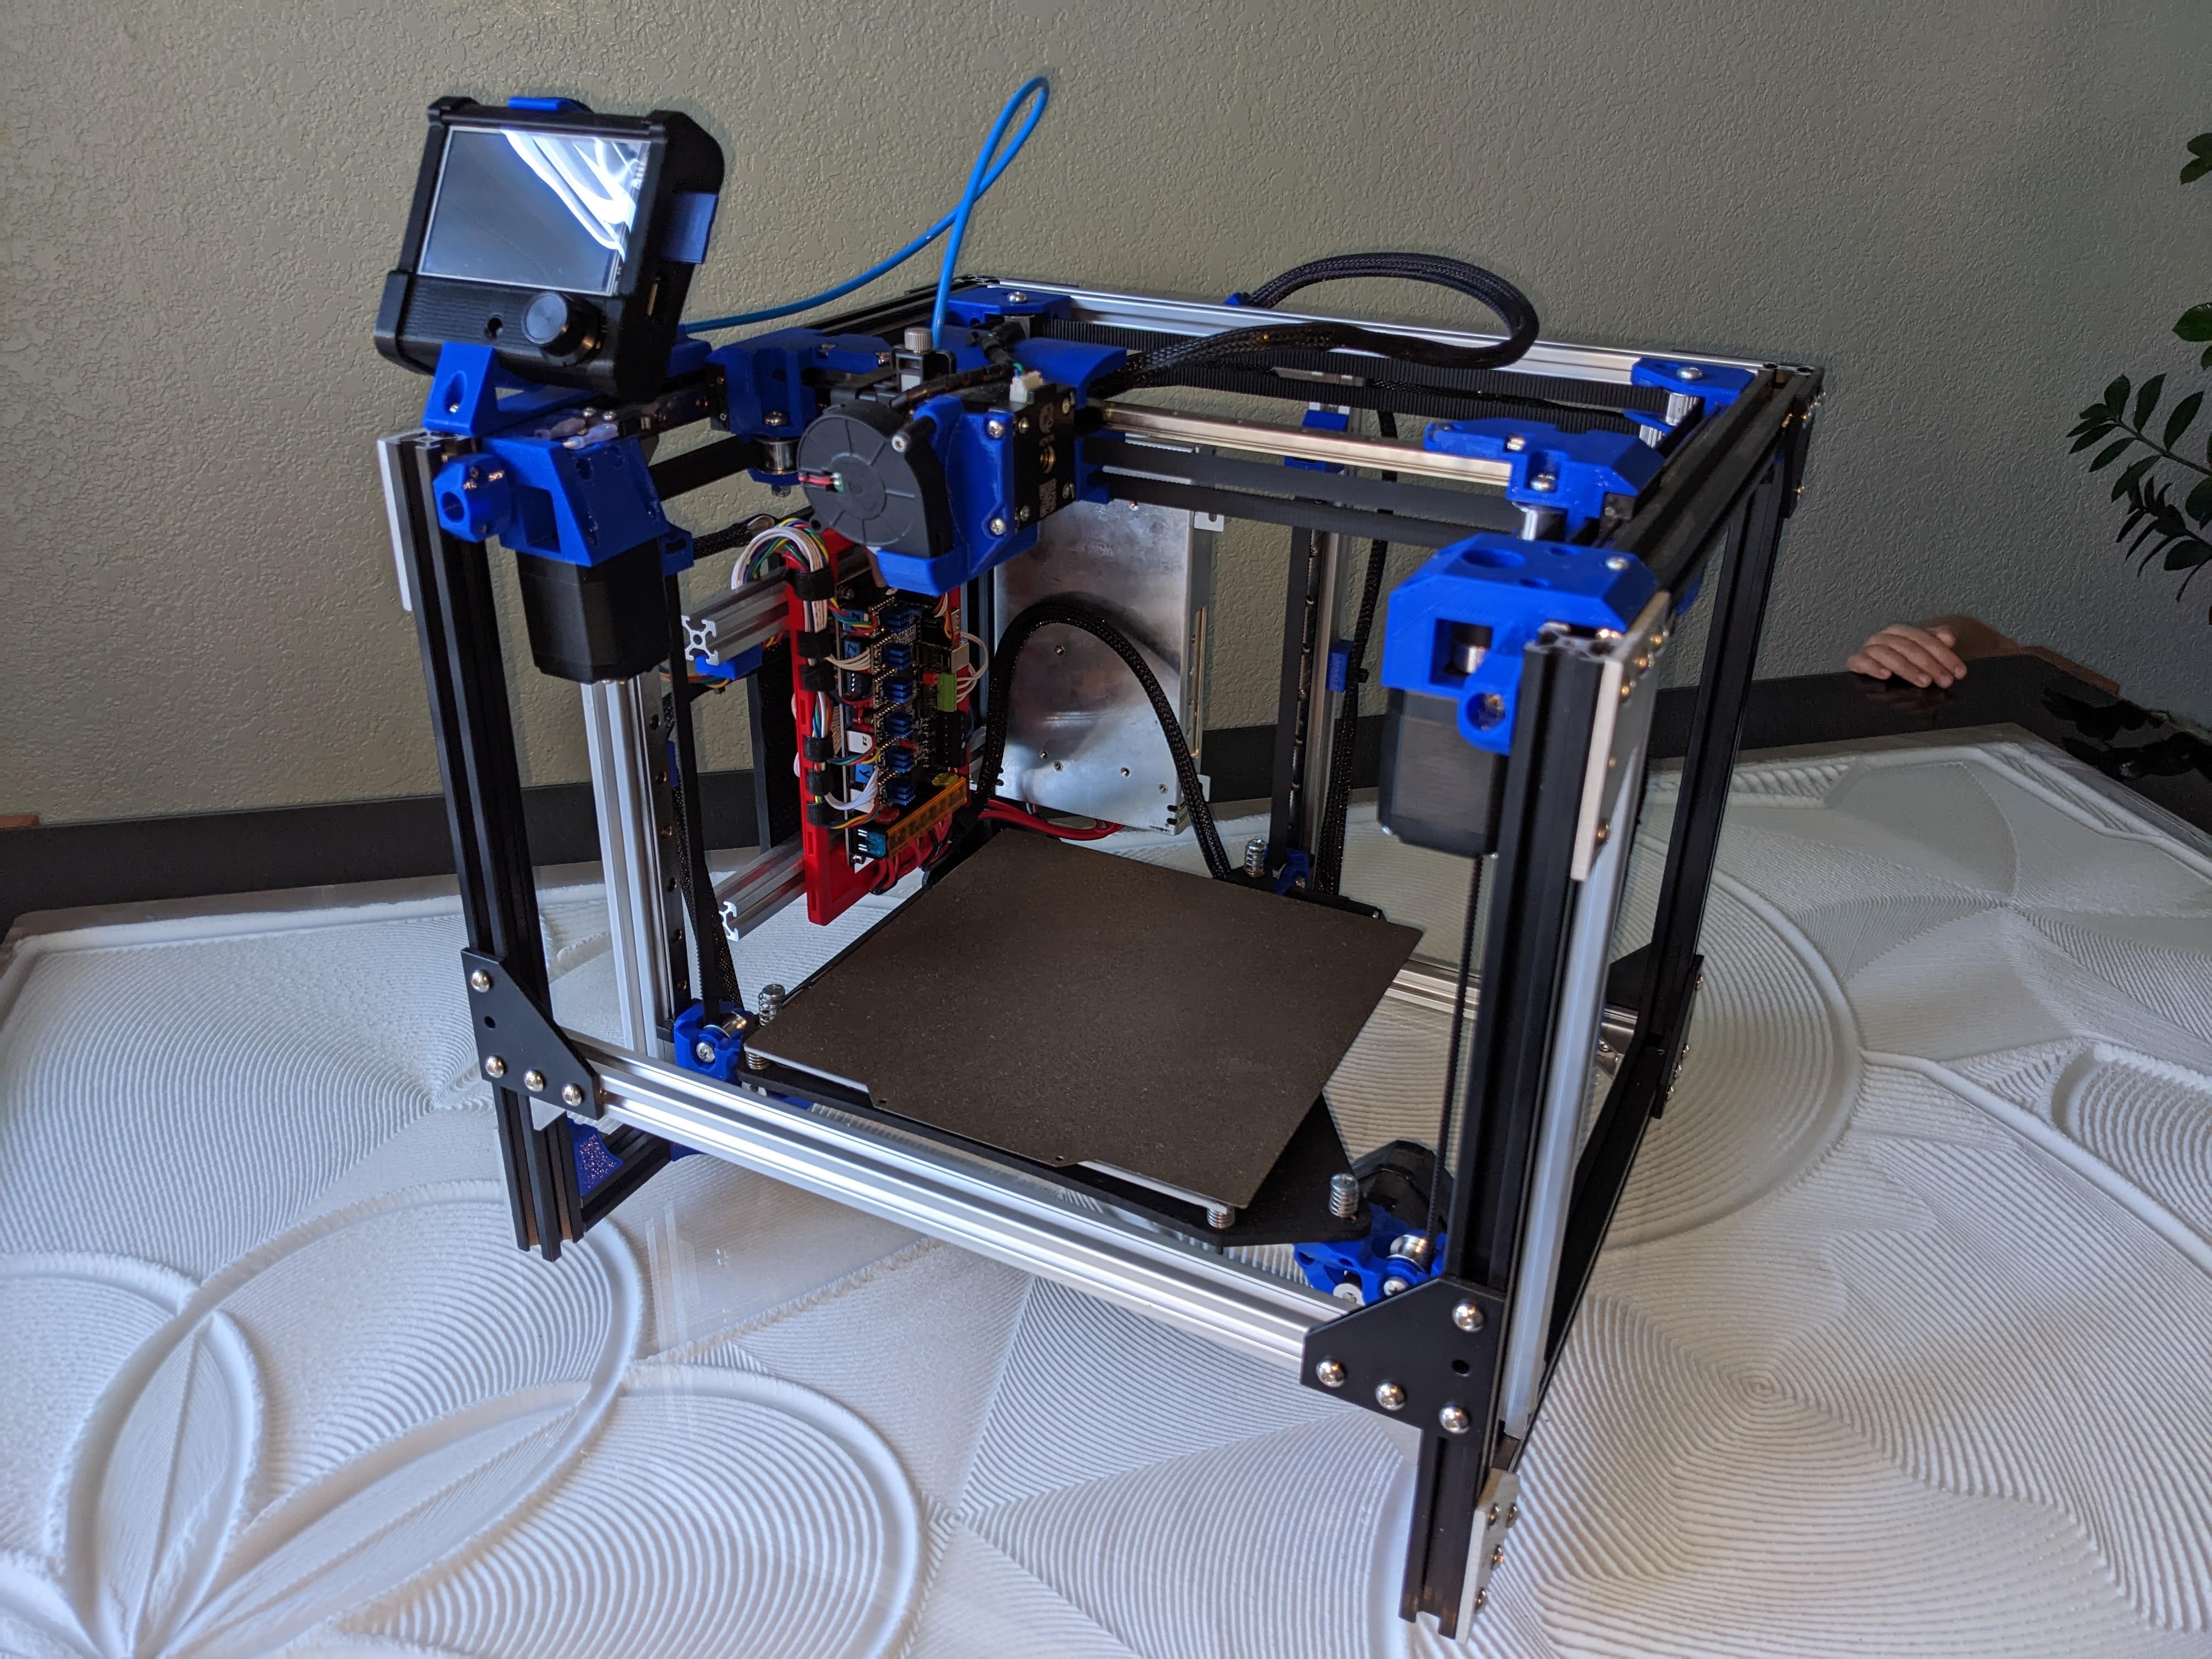
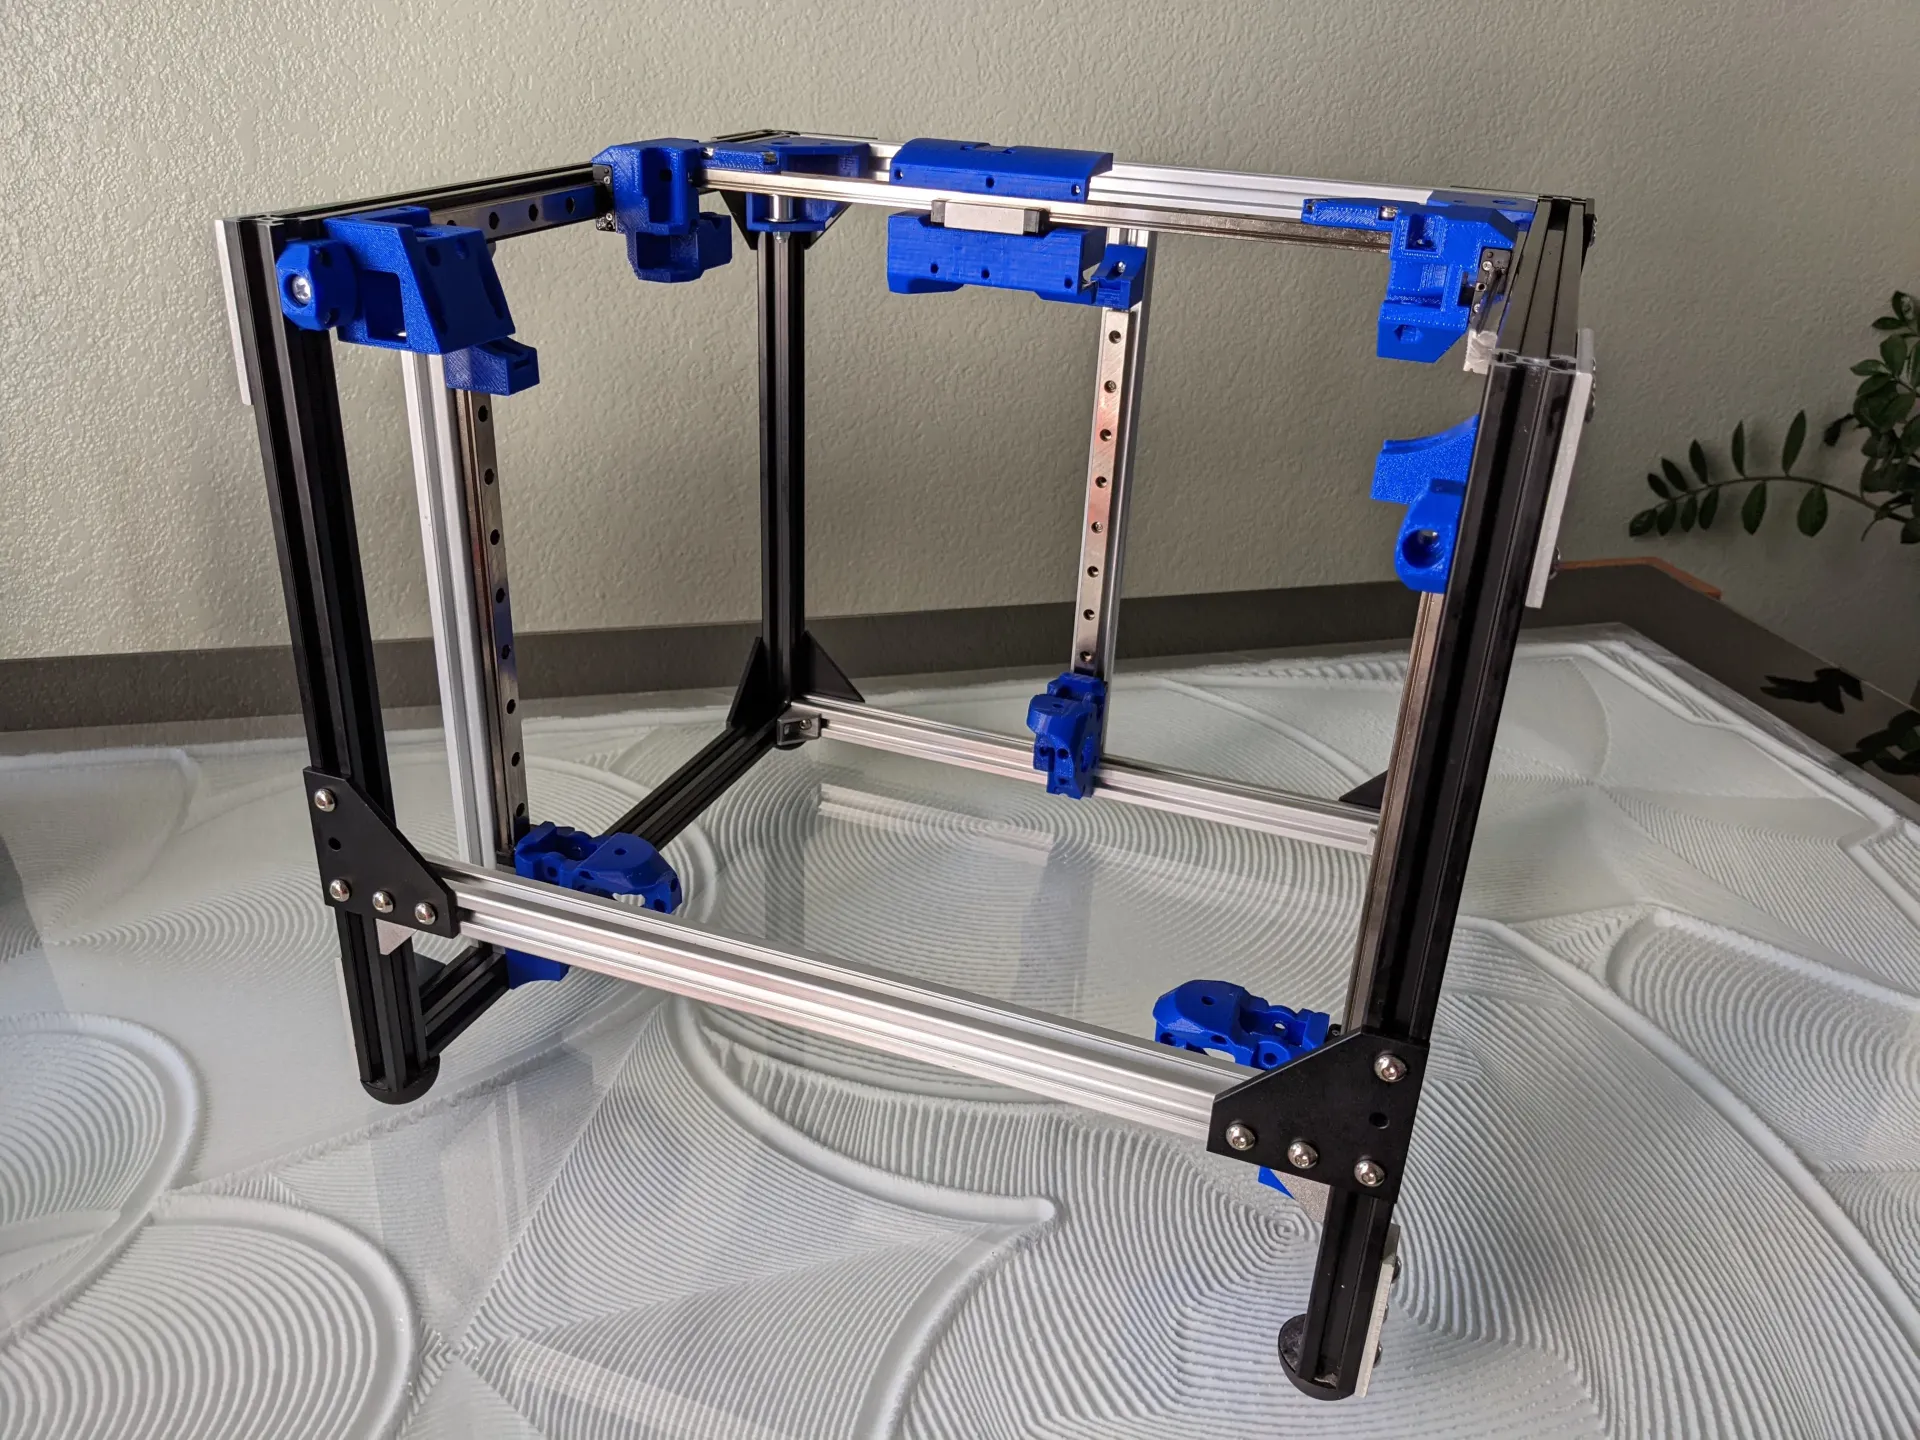
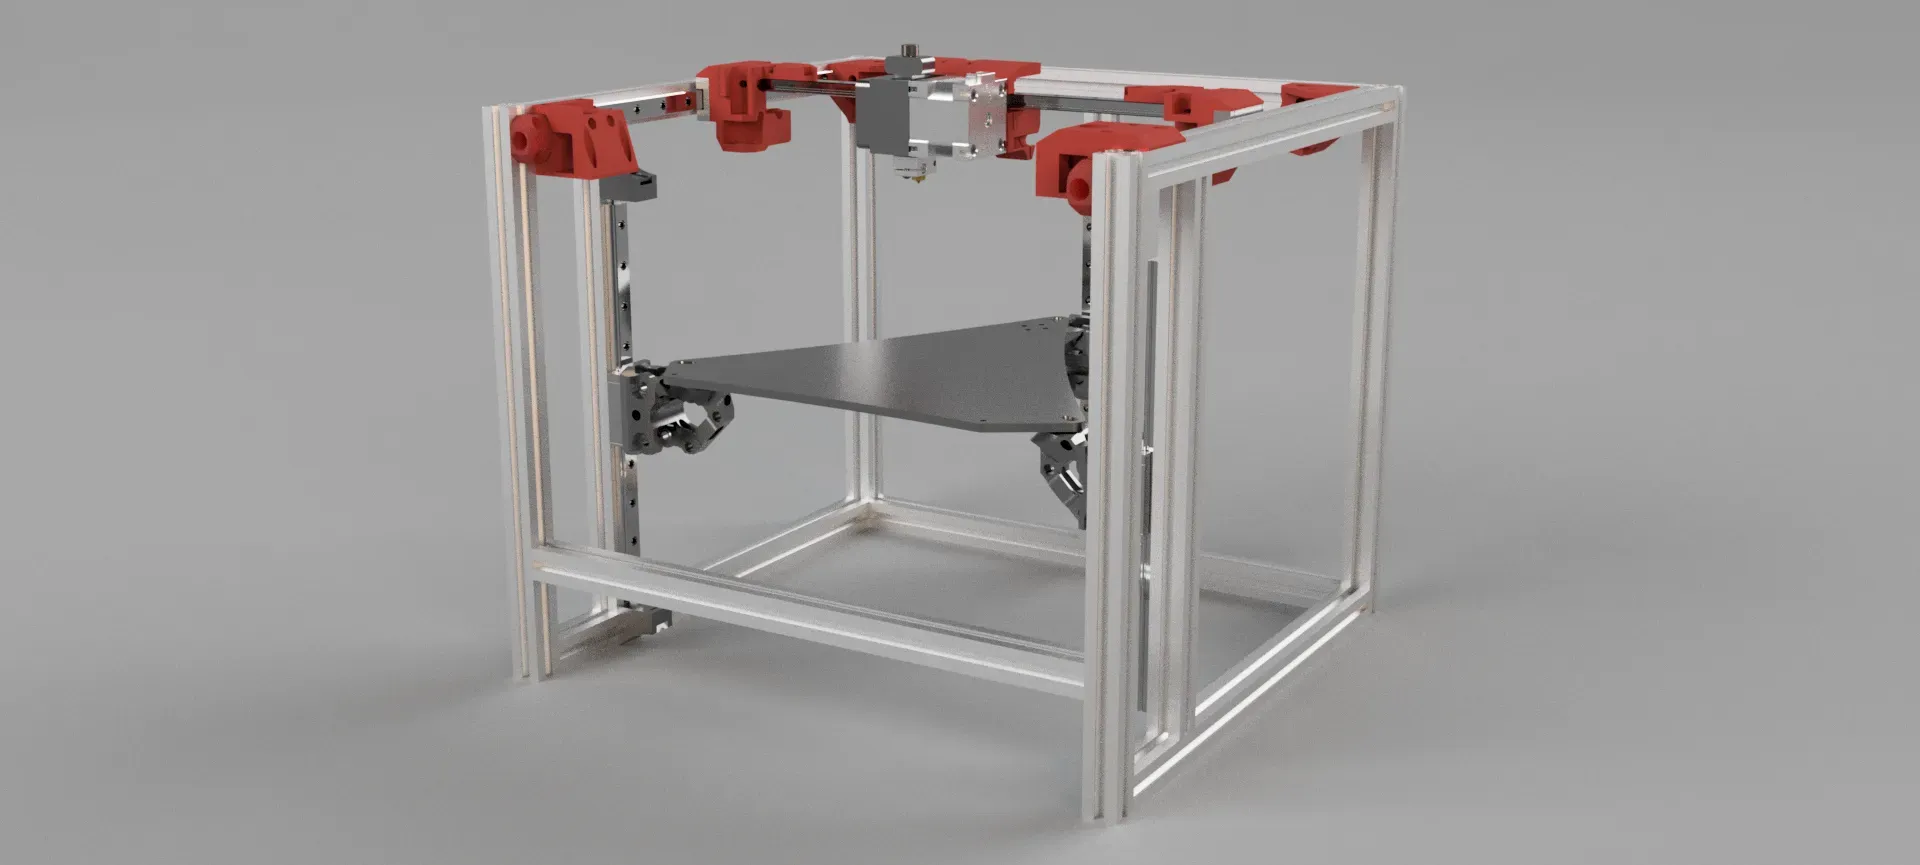
Pics / Gallery
- 23-01-30 Ryan’s pics Mp3dp v4 bom - #40 by vicious1
WHY BUILD ONE?
Mostly Fun, and, maybe profit. Have an Ender 3 Max, great machine but has limited speed/quality/temps. Want something faster and capable of other printing other materials, not just higher temp ASA/ABS/PC, but TPU will be easier with direct drive instead of bowden. CoreXY frame/motion has misc benefits over my Cartesian Ender 3 design.
Super secret goal, arguably the most important one… is to inspire and lure the kids into 3D printing, a gateway to becoming a Maker…
Why others built one…
- Dan/SupraGuy perspective @ Mp3dp v2 - #7 by SupraGuy
- Misc perspectives, great Q’s from @ orob and others
Low Cost (Parts, not labor…)
TBD…
Quality / Speed / Reliablity
Ryan/V1E relies on these to run his business, so that says a lot.
Related:
- Kirk’s speed testing MP3DP Repeat V2 (aka V4) z steppers - #7 by kgleason
Alternatives considered :
- https://vorondesign.com/ too $$$, $1800-$2000
- https://us.ratrig.com/3d-printers/v-core.html too $$, $1100
- https://bambulab.com/en/x1 easy to use $$ + closed bambu x1 carbon
- Specs
- Build Volume (W×D×H)
256 × 256 × 256 mm³ - Physical Dimensions
389 × 389 × 457mm - Frame overhead 133 x 133 x 201
- https://www.pantheondesign.com
- RailCore too $$$
All that said, am biased toward building MP3DP v4 largely because of the V1E community support. To me, the V1E mindset is focused on getting great quality results for great value. This resonates with me more than paying a significant premium for something that pushes the limits, and may involve lots of maintenance. Creating, experimenting and extending is more fun than maintaining.
SIZING
-
Default design is for 200mm x 200mm x200mm (not common).
- Smaller builds like this are more rigid, so better-quality/faster.
-
Sizing related thoughts/considerations:
- Dan… 200mm^3 is good all-purpose, but linear rails may be easier to source for 250mm^3
-
Calculate dimensions for your build using A) Math and/or B) Fusion 360 parameters:
-
A) MP3DP v4 dimensions math…
TODO: Clarify
Linear Rail X = Usable X + 100mm
Linear Rail Y = Usable Y + 50mm
Linear Rail Z = Usable Z + ~50mm (**)

Extrusion Frame Length X = Usable X + 170mm
Extrusion Frame Length Y = Usable Y + 145mm
Extrusion Frame Length Z = Usable Z + ~145mm

Linear Rail Cut list...

Extrusion Cut list...

3 x Extrusion Frame Length X
8 x Extrusion Frame Length Y
3 x Extrusion Frame Length Z

Belt Cut List...

e.g. Buy 5m for Usable 300mm^3

3 x (Usable Z + 150mm ) +
1 x (4 x (Usable X + 200mm)) + (4 x (Usable X + 50))
(**) Z dimension is approximate, can vary depending on bed mounting thickness.
References: Dan
-
B) Change dimensions Use Change model parameters
-
BOM / PARTS
Read: Mp3dp v4 bom - #79 by azab2c
Related:
- MP3DP v4 BOM forum topic
PARTS
Related:
- Ryan’s BOM Repeat V2? - #85 by vicious1
- Voron part sourcing guide VORON Design - Sourcing Guide. Sections below are inspired by Voron generated BOM.
Solved the MP3DP v4 BOM Puzzle thanks to folks in this Topic. Using the following info:
- MP3DP v4 Forum Topic | Fusion 360 model
- MP3DP v4 Pics of Ryan’s builds
- V1E Shop 3D Printer Parts
- MP3DP v4 community builds have stumbled across.
- MP3DP v3 Forum Topic | Fusion 360 model | Docs / Parts
V1E Shop Parts
Parts listed for purchase from V1E Shop. Alternative links provided incase parts out of stock, and/or you’re purchasing from other place(s).
| QTY | Description | Comment | Link |
|---|---|---|---|
| 1 | ** SKR Pro 1.2 Control Board | 6 driver minimum (for 5 motion steppers + 1 direct drive extruder) | Shop – Amazon |
| 6 | TMC 2209 | Buy 6 drivers if not supplied with Controller board | Shop |
| 5 | Steppers, Nema17 | 76OZ/in, e.g. KL17H248-15-4A | Shop – Amazon |
| 5 | *** Pulleys 16T 10mm | 10mm GT2 16 Tooth | Shop – Amazon |
| 6 | *** Idlers w/Teeth 20T | 20T w/Teeth 5mm Bore | Shop – Amazon |
| 8 | *** Idlers Smooth 20T | 20T Smooth 5mm Bore | Shop – Amazon |
| 5m for 300m^3 | **** Belt GT2 10mm | No steel belt | Shop – Amazon |
| 2 | Omron Limit switch, endstop | Use Omron or red rollers | Shop – Amazon |
| 3 | Springs | For bed, silicon tube will work | Shop – Amazon |
| * | Thread locker | Optional for grubs screws | Shop – Amazon |
| * | Lube | Optional for idlers | Shop – Amazon |
| * | PTFE Tube | Optional Extruder to filament | Shop – Amazon |
| * | Print Fan | Optional fits hemera mount | Shop – Amazon |
| 6 | Stick on Stepper temp gauge | Optional | Shop |
| 1 | ESP-01s ESP3D headless | Optional Wifi dongle for SKR Pro 1.2 | Shop |
| 6 | 3/8" wire sleeve | Optional | Shop |
| 1 | 50mm PTFE liner | Optional, need more if building bowden setup | Shop |
As an Amazon Associate Ryan earns from qualifying purchases.
** Personally, am using Octopus 1.1 instead of SKR 1.2 for my build, will have more Mod options, but will be more work to setup. SKR 1.2 and Rambo have better Community support.
*** Pulley/Idler break down :
- 6 Pulleys 16T 10mm.
- 6 = 6 x 1 per Stepper.
- 6 Idlers w/Teeth 20T
- 4 = 2 x 2 per Left/Right rear corner
- 2 = 2 x 1 per XY Left/Right
- 8 Idlers Smooth 20T
- 6 = 3 x 2 per Z post
- 2 = 2 x 1 per XY Left/Right
**** Belt Calculations, cut list :
- 3 x (Usable Z + 150mm )
- 1 x ( (4 x (Usable X + 200mm) ) + (4 x (Usable X + 50) ) )
Parts not listed on V1E Shop
Fasteners
Related
- Dan’s Frame Assembly describes bolts/nuts/corners used
| QTY | Description | Comment | Link |
|---|---|---|---|
| ??? | M3x8 | - Linear rails all use M3x8 - (x+100+(2 * (y+ 50) + 3 * (z + 50)) / 25 - Excel… =(A1+100+2*(B1+50)+3*(C1+50))/25 - e.g. 62 for 200mm^3 - One stepper mount marked with an “8” |
|
| ??? | M2.5x12 | - Endstops | |
| ??? | M3x10mm | ||
| ~113 | M3 or M5 Button head by 8+ mm | - 4 x 25 Side/Back/Bottom Panels - 13 Front lower Panel - (M5’s will have less wiggle room) - 8mm for 1/8" panels, 10mm for 5.5mm+ (e.g. 1/4") - Measure/check length needed for panel thickness |
Panel bolts |
| ??? | M5x30mm | ||
| ??? | M5 Slide in Nuts | - Use slide-in nuts, rotating T-Nuts are horrible | amzn |
Motion
Related
- Ryan/ @ Barry99705 reco filastruder
- @ Barry99705 reco LDO Linear Rails
- MP3DP v3 reco Amazon
- Ryan reco CHUANGNENG MGN12H
- Dimensions:
- Dimensions:
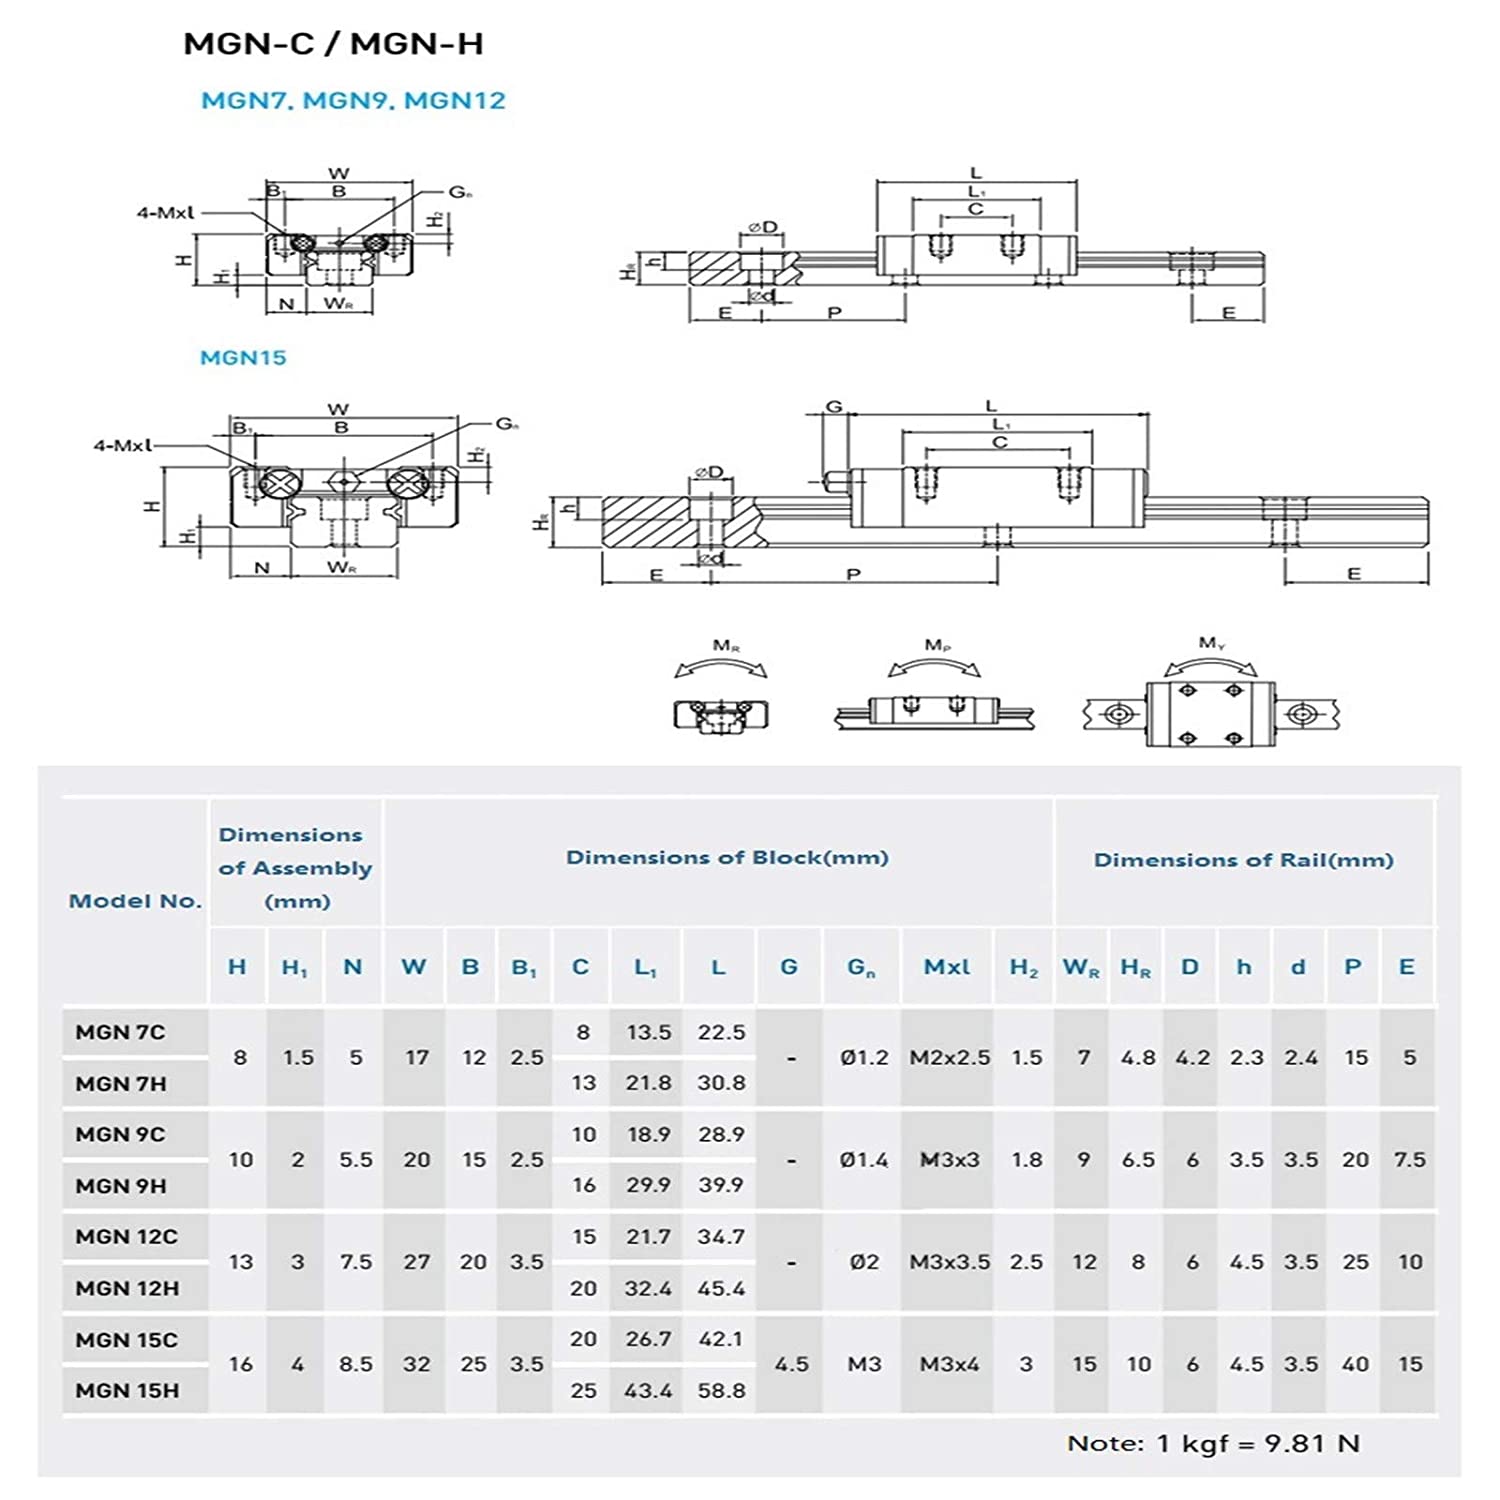
| QTY | Description | Comment | Link |
|---|---|---|---|
| 1 | X Linear rail MGN | Usable X + 100mm MGN12H | Fila – Amazon (select correct dimensions) |
| 2 | Y Linear rails MGN | Usable Y + 50mm MGN12H | Fila – Amazon (select correct dimensions) |
| 3 | Z Linear rails MGN | Usable Z + ~50mm MGN12H | Fila – Amazon (select correct dimensions) |
Electronics
| QTY | Description | Comment | Link |
|---|---|---|---|
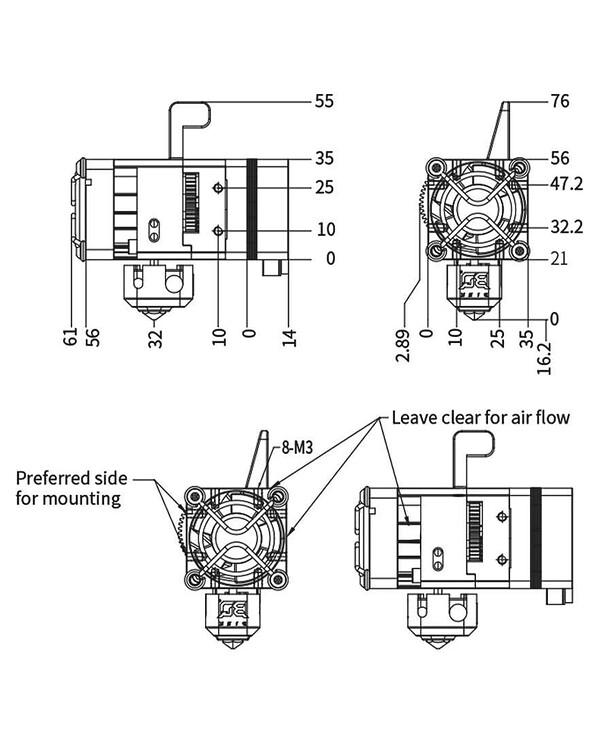
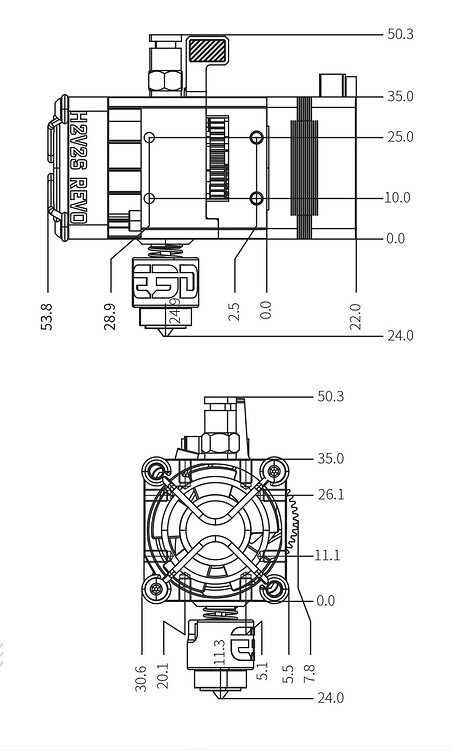
| 1 | Extruder or other tool | Hemera,example, match voltage, 24V is good. BIQU H2 or BIQU H2S REVO |
Fila – Amazon |
| 1 | Power Supply | Match voltage to your setup e.g. MEANWELL LRS-350-24 |
Fila – Amazon |
| 1 | Heated Bed | Style and Size will vary | Shop – Amazon |
| 1 | BL Touch Probe | ||
| 1 | Pi 4 or at least 3+ | Klipper/OctoPi controller | Good luck! |
| 1 | Micro SD | ||
| 1 | Display | BIGTREETECH TFT35 E3 V3.0.1 | BIQU – Amzn |
| 1 | Adaptor Board | BigTreeTech EBB 36/42 Can Bus - CAN Bus overview by Teaching Tech (YT) |
BIQU – |
BuildPlate
- Triangle’sh Bed Support Plate is supported by each Z Post,
- 1/4" MDF Mp3dp v4 bom - #116 by azab2c
Alu?
Mp3dp v4 bom - #116 by azab2c
- 1/4" MDF Mp3dp v4 bom - #116 by azab2c
Frame
-
Consider Zyltech, Ryan(and others?) had bad experience with Amzn extrusion.
-
Corner Brackets Forum reco Jeffeb
Panels
Related
-
Material options
- 6mm /1/4" Plywood
- Acrylic/Polycarbonate
- ACM (aluminium-plastic-aluminium sandwich) great stable material, but $$$.
- Sheet Metal?
- IPA degrades Acrylic, so consider Polycarbonate.
Cables
???
Vibration Management
???
Misc
???
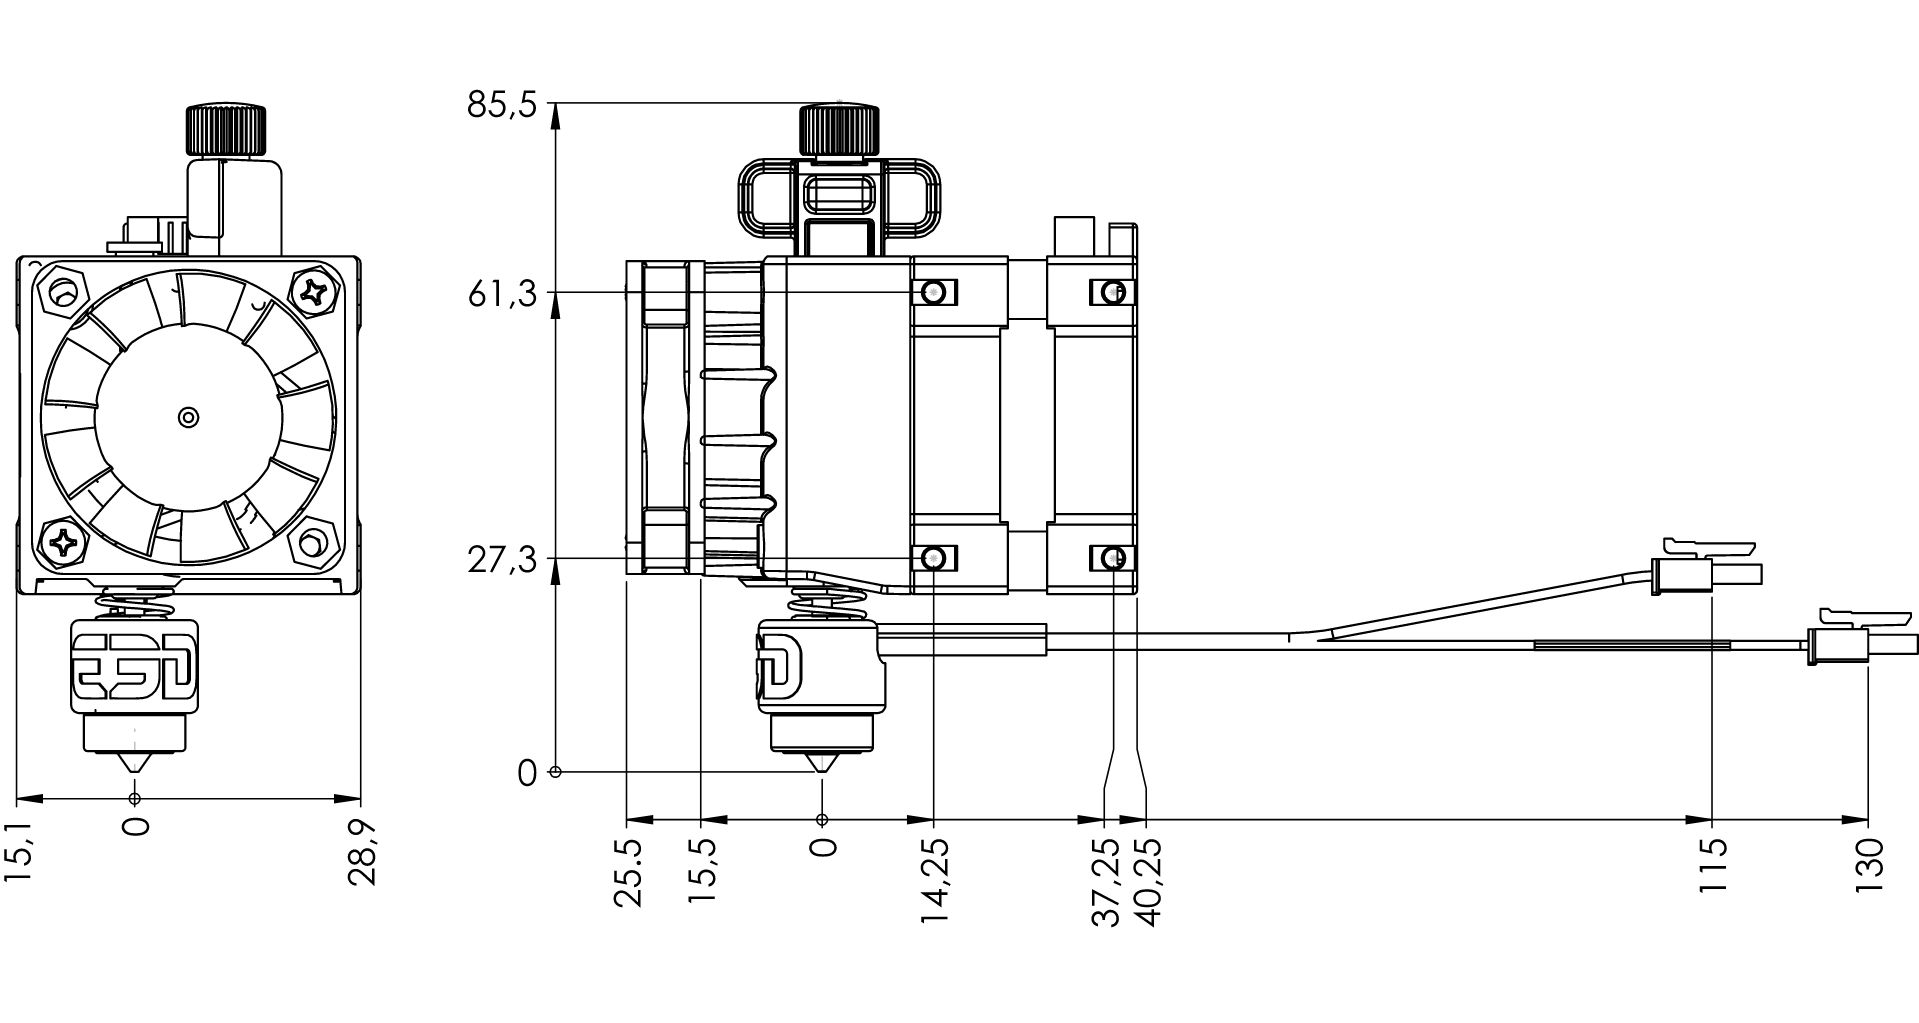
Extruder Options
-
Hemera amzn or BiQU H2 V2 (170g lighter)
-
Octopus
- MP3DP needs 6 drivers/steppers, Octopus is oversized with 8 drivers, am using because 1) am familiar with the board already, 2) will have 2 more slots for mods.
BIQU H2
https://www.youtube.com/watch?v=zyKH05bBs4QBIQU H2S Revo
https://www.youtube.com/watch?v=4X1F-dLVT3g-
Fan Duct https://youtu.be/4X1F-dLVT3g?t=214 by eight_heads
-
@probrwr has BiQU H2S Revo and @gpagnozzi has BIQU H2 V2.0?
E3D Hemera
BIQU H2 V2.0
BIQU H2 V2S REVO Manual
$120 https://www.aliexpress.us/item/3256804514365855.html
Octopus
https://www.aliexpress.us/item/3256802425039425.html
TMC2209
https://www.aliexpress.us/item/2251832860926249.html
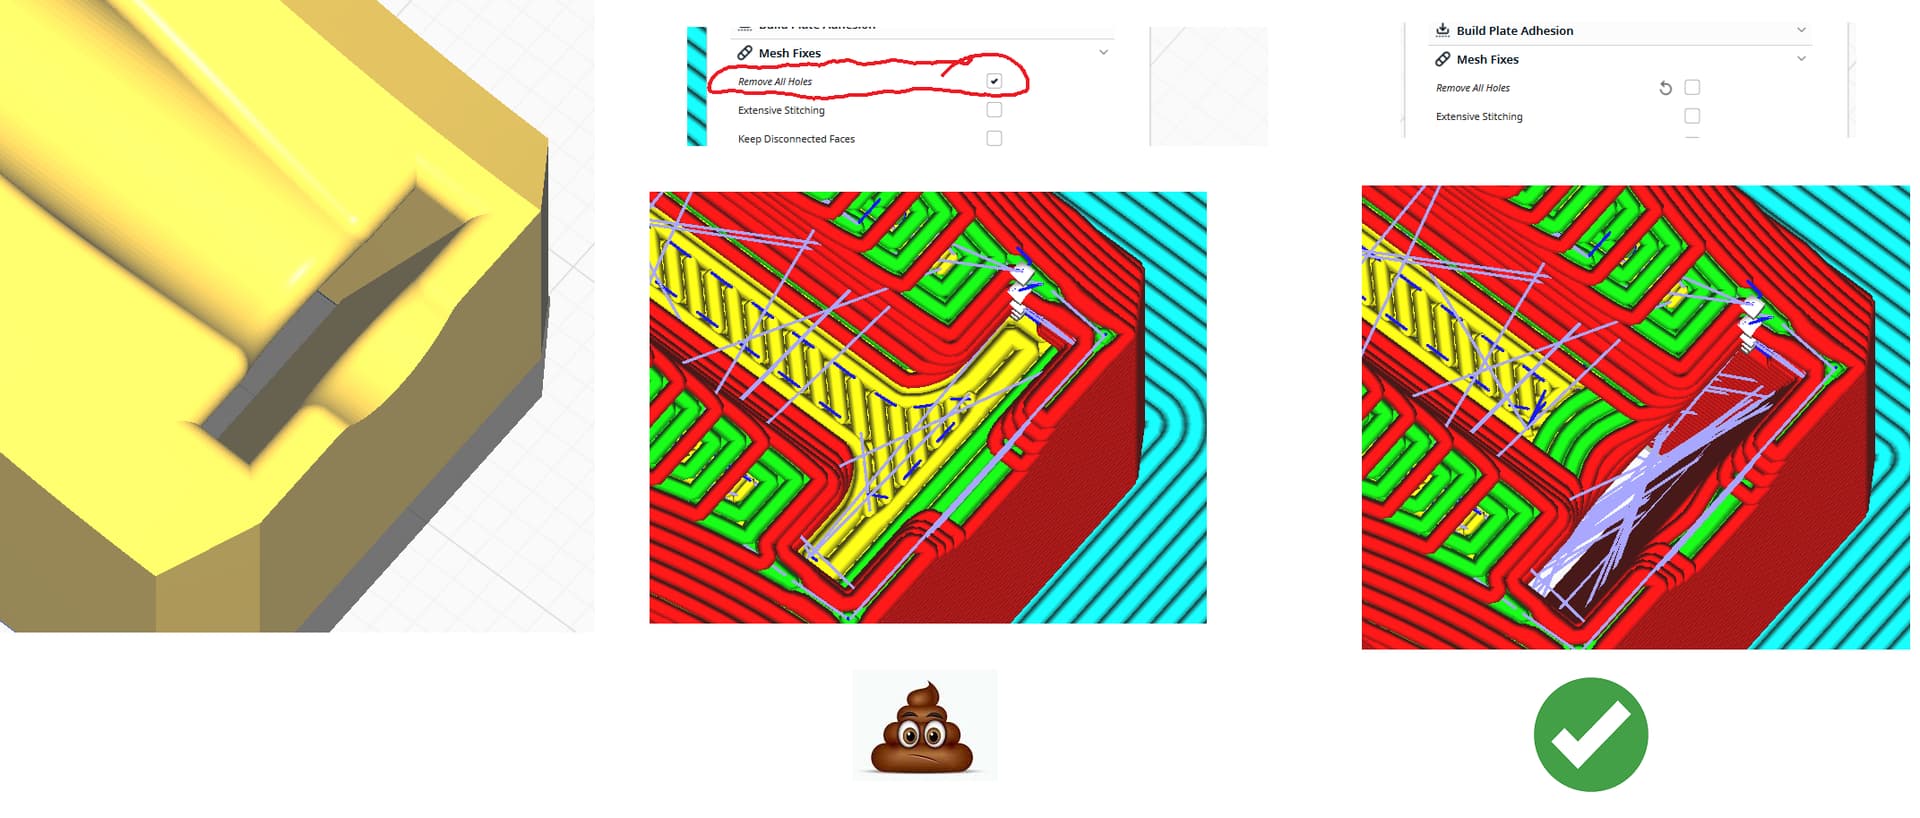
3D PRINTED PARTS
- Used PETG (like Dan), may reprint with ASA using MP3DP v4. Ryan prints with PLA.
- Using Overture Transparent Red PETG](Amazon.com
- My Cura Settings: 0.6noz, 3 wall, 35% gyroid infill.
- Ryan says 40% is probably really good.
- Dan’s used 0.5mm Noz, 2 walls, 30% adaptive cubic infill
Assembly
TODO:
Related
- Until v4 docs available, reading through v3 Assembly doc will help.
- Ryan “Backplate is the reference”
Frame Assembly
- Dan’s Frame Assembly describes bolts/nuts/corners used
Z Post Assembly
Squaring/Aligning rails
- See Matt’s build @ Matt's MP3DP Repeat Build - #153 by MattMed
Wiring
- Dan recos routing wiring to Z Post M Steppers along the Bed Support Plate, use misc holes in the plate to secure wiring, including providing strain relief for heater bed wiring.
Software
GCODE configuration
Power down and/or resets will cause bed to crash down. So, “gcode needs to park the z axis at zmax”
MP3DP v4 V1E Community builds / builders
Some of the Community MP3DP Build Logs that helped me.
v4 builds
-
@SupraGuy 200/235mm^3 ??? MP3DP V4 build PLOG
- Extrusion Cut List :
- 4x 345mm frame upright pieces
- 4x 345mm frame Y axis pieces
- 3x 370mm frame X axis pieces
- 3x 305mm Z axis upright rails
- E3D Hemera hotend
- Dan’s parts
- Dan’s rails, Y = Z = 300mm, X = 350mm
- 5mm plywood Bed Support Plate, 1/2" foam
- 24V
- Extrusion Cut List :
-
@ MattMed 200mm^3 ??? Matt's MP3DP Repeat Build - #142 by MattMed
- E3D Hemera Direct Kit
- Nice Prusa slicer settings from Ryan
- Camera mount setup
-
@ Jonathjon 300x300x400mm MP3DP V4 Build
-
@ Kgleason’s 235mm^3 MP3DP Repeat V2 (aka V4) z steppers
- Glass on Alu Bed
- E3D Hemera
- MP3DP Mod - Z Moto Brake, prevent free fall
-
@ aali0101’s 250mm^3 Repeat V2? - #251 by aali0101
-
@ probrwr’s 235mm x 235mm x ??? MP3DP V4 Build - SW Virginia
-
@ OBI’s Time to start
-
@ Heath_H 300mm^3 Heath's MP3DP Repeat - Akron, OH
- 3 in 1 (multicolor, 1 nozzle/hot-end, 3 extruders)
- Octopus
-
@ gpagnozzi
-
@ niget2002 300mm^3 Not another MP3DP V4
-
@ orob V3 vs v4 3DP build part list
v3 builds
- @ RootsMedia’s 310x310x280mm MP3DP Repeat, Take Two
- Repeat v1 with sweet ACM/PolyCarb enclosure, complete with logo engraved panels.
- 24v Mean Well
- Textured PEI magnetic build plate
- Repeat v1 with sweet ACM/PolyCarb enclosure, complete with logo engraved panels.
v2 builds
- Dan’s costs Mp3dp v2 - #3 by SupraGuy
STATUS
// PRINT PARTS...
  // DONE - sort by print order
│     2 x Z Post.3mf    2.3hrs
      Z Post M.3mf      2.3hrs
      XY Left.3mf       2.3hrs
      XY Right.3mf      2.3hrs
      Left Stepper.3mf  2hrs
      Right Stepper.3mf 2hrs
      X Carrier.3mf 4.25
      Back Corner Left.3mf  1.75hr
      Back Corner Right.3mf 1.75hrs
      2 x Tension Block XY.3mf   1hr
      6 x Z Belt Holder.3mf  6 x 0.5hr, 3hrs

  // INPROGRESS


  // TODO
  ───Hemera
      Hemera Fan Shroud.3mf

  ├───Misc 2020 clips and parts
      2020 Corner Bracket.3mf
      cable tie Wire Hanger.3mf
      Power supply bracket.3mf
      Wire Clip 90 degree.3mf
      Wire Hanger TapeTrick.3mf

  ├───MP3DP V4.1
      Bed Washer.3mf
      filament Rev Bowden Holder.3mf
      Rail Aligner.3mf

  ├───SKR Pro
      SKR Pro Cover.3mf
      SKR Pro Wire tie.3mf

  └───TFT E3 V3
      TFT CASE V3.STL
      TFT Holder.3mf
PARTS - Decisions and purchases
HAVE / BOUGHT:
- Probe : Have unused BL Touch
- Frame: Have Black/Silver extrusion leftovers
- Wifi: Have Pi (will Klipper/OctoPi)
- Controller: Octopus v1.1
- Drivers: 5+ TMC2209 (EBB 36 has TMC2209 onboard that can drive Nema 14 in BIQU H2S V2 REVO)
- Display: Bigtreetech TFT E3 V3.0.1
- Linear motion: Iverntech, chose because deliver fastest and best seller… Wasn’t reco’d by forum, so could be mistake, will find out…
- Fasteners: Rummaged, purchased, delivery pending. Guaranteed to need more parts.
- Power Supply: MEAN WELL LRS-
350-24, enough/too-many Watts? - Extruder: BIQU H2S V2 REVO - Paying premium for REVO to reduce effort for kids/me to change nozzle.
- Nozzle: REVO 0.6mm (for now)
- CAN Bus controller: EBB 36
- DIN Rail, bought wago 210-504 from local electrical supplier (Platt Electric Supply), cheaper/faster than online.
NEED TO BUY:
NEED TO DECIDE, THEN BUY:
- Heater Bed with Thermistor :
- My current Ender 3 Max has 24v 310mm x 320mm, 4mm thick Carborundum Glass, 3mm Alu, 3mm Foam.
- Wiring: Same as above.
- Solid State Relay (SSR) if using 120vac bed heater.
Fastener BOM break down:
Related:
- Dan reco fasteners
Fastener and mount parts:
-
4 M2.5 x 12mm Bolts
- 4 = 2 x 2 Endstops
-
40 ??? M3 x 8mm Bolts (8mm for extrusion, maybe 10mm for wood/plastic panels with inserts)
- 6 = 6 x 1 per Z Belt Holder
- 20 = 5 x 4 per Y and Z Linear Rails (~100mm spacing)
- 4 = 2 x 2 per Tension Block
- 10 = 5 x 2 per Motor Block
-
44 M5 x 10mm Bolts
- 12 = 6 x 2 per Right Angle Corners (Z Mid extrusion)
- 32 = 4 x 4 corner brackets x 2 nuts per Z Corner extrusion
-
??? M5 x 30mm Bolts Pan Head (reco Philips)
- v3 required 29
-
??? M5 x Nylock Nuts
- v3 required 29
-
30 M3 Sliding T Nuts amzn
- 6 = 6 x 1 per Z Belt Holder
- 20 = 5 x 4 per Y and Z Linear Rails (~100mm spacing)
- ?? = X Linear Rails?
- 4 = 2 x 2 per Tension Block
-
44 M5 Slide in Nuts amzn
- 12 = 3 x 2 corner brackets x 2 nuts per Z Mid extrusion
- 32 = 4 x 4 corner brackets x 2 nuts per Z Corner extrusion
-
20 ??? Corner Bracket Right Angle
- 6 = 3 x 2 per Z Mid extrusion
14 = 7 x 2 per Z Corner extrusion
- 6 = 3 x 2 per Z Mid extrusion
-
Order M5 slide in nuts
-
??? M3 12mm Button Flange for 1/4" (6.35mm) external panels.
-
TODO:
- Stepper?
- Board Mount?
- Fans?
- Hot end?
- Cable mounts/brackets?
- PSU?
- Panel design
- For builds without bottom panel helping square X and Y extrusion, consider adding slotted holes (dimensioned for 2020 Corner brackets) for where bottom Y Axis extrusion meets back X extrusion.
- Review all panels, ensure sufficient number of perimeter holes to securely fasten panel. Perimeter bolts should be no more than 100mm apart, ideally much closer.
- Ensure side panel perimeter holes line up with sheet metal slotted holes.
- Doc M5 x 10mm if 2mm panel
- Doc M3 x 10mm if 2mm panel
- Doors?
- LID?
-
Model changes
- Added top|bottom Z Belt Holders to rear, so holes can be projected onto sketch for interior rear panel.
USER PARAMETERS:
- Usable_Depth = 250mm
- Usable_Height = 250mm
- Usable_Width = 250mm
PARTS:
-
4x Frame Z corner uprights, Front|Rear Left|Right 395mm
- Actually cut 500mm and 600mm for uprights, added 100mm below for all uprights to accomodate wiring, also added 100mm for rear upright to accomodate lid.
-
4x Frame Y Top|Bottom Left|Right 395mm
-
3x Frame Z Mid Left|Rear|Right 355mm
-
3x Frame X Front|Rear Top|Bottom 420mm
-
1x MGN12 X Rail 350mm
-
2x MGN12 Y Rail 300mm
-
3x MGN12 Z Rail 300mm
Mods
Assimilated Voron Parts
Voron Trident GNU License
Voron Trident Manual
- DIN Rails assembly, see “DIN RAILS” in manual.
- Voron-Trident > STLs > ElectronicsBay
- DIN_frame_mount_x4.stl
- 8 total, M5 x 16mm x 2 per mount
- 4 total, M3 x 8mm x 1 per mount