New printer time?

I can’t stop thinking about updating my print farm. I have a few projects in the works but I keep gravitating to the printer ideas.

  • 10/1 PrusaPrinters release
    *Update 9/20/21 - Just about there, rough renders.

CAD and 3MF FIles - https://a360.co/381SaiQ As of V107…please know this is not done yet but it is very close. Please consider these files under this license for now [Creative Commons License] This work is licensed under a Creative Commons Attribution-ShareAlike 4.0 International License.

**I learned fusion360 for this project so you can have the actual CAD to edit. Please be nice, I know I made a lot of mistakes early on but it does work. As I progress and edit files I am fixing any early mistakes I made.

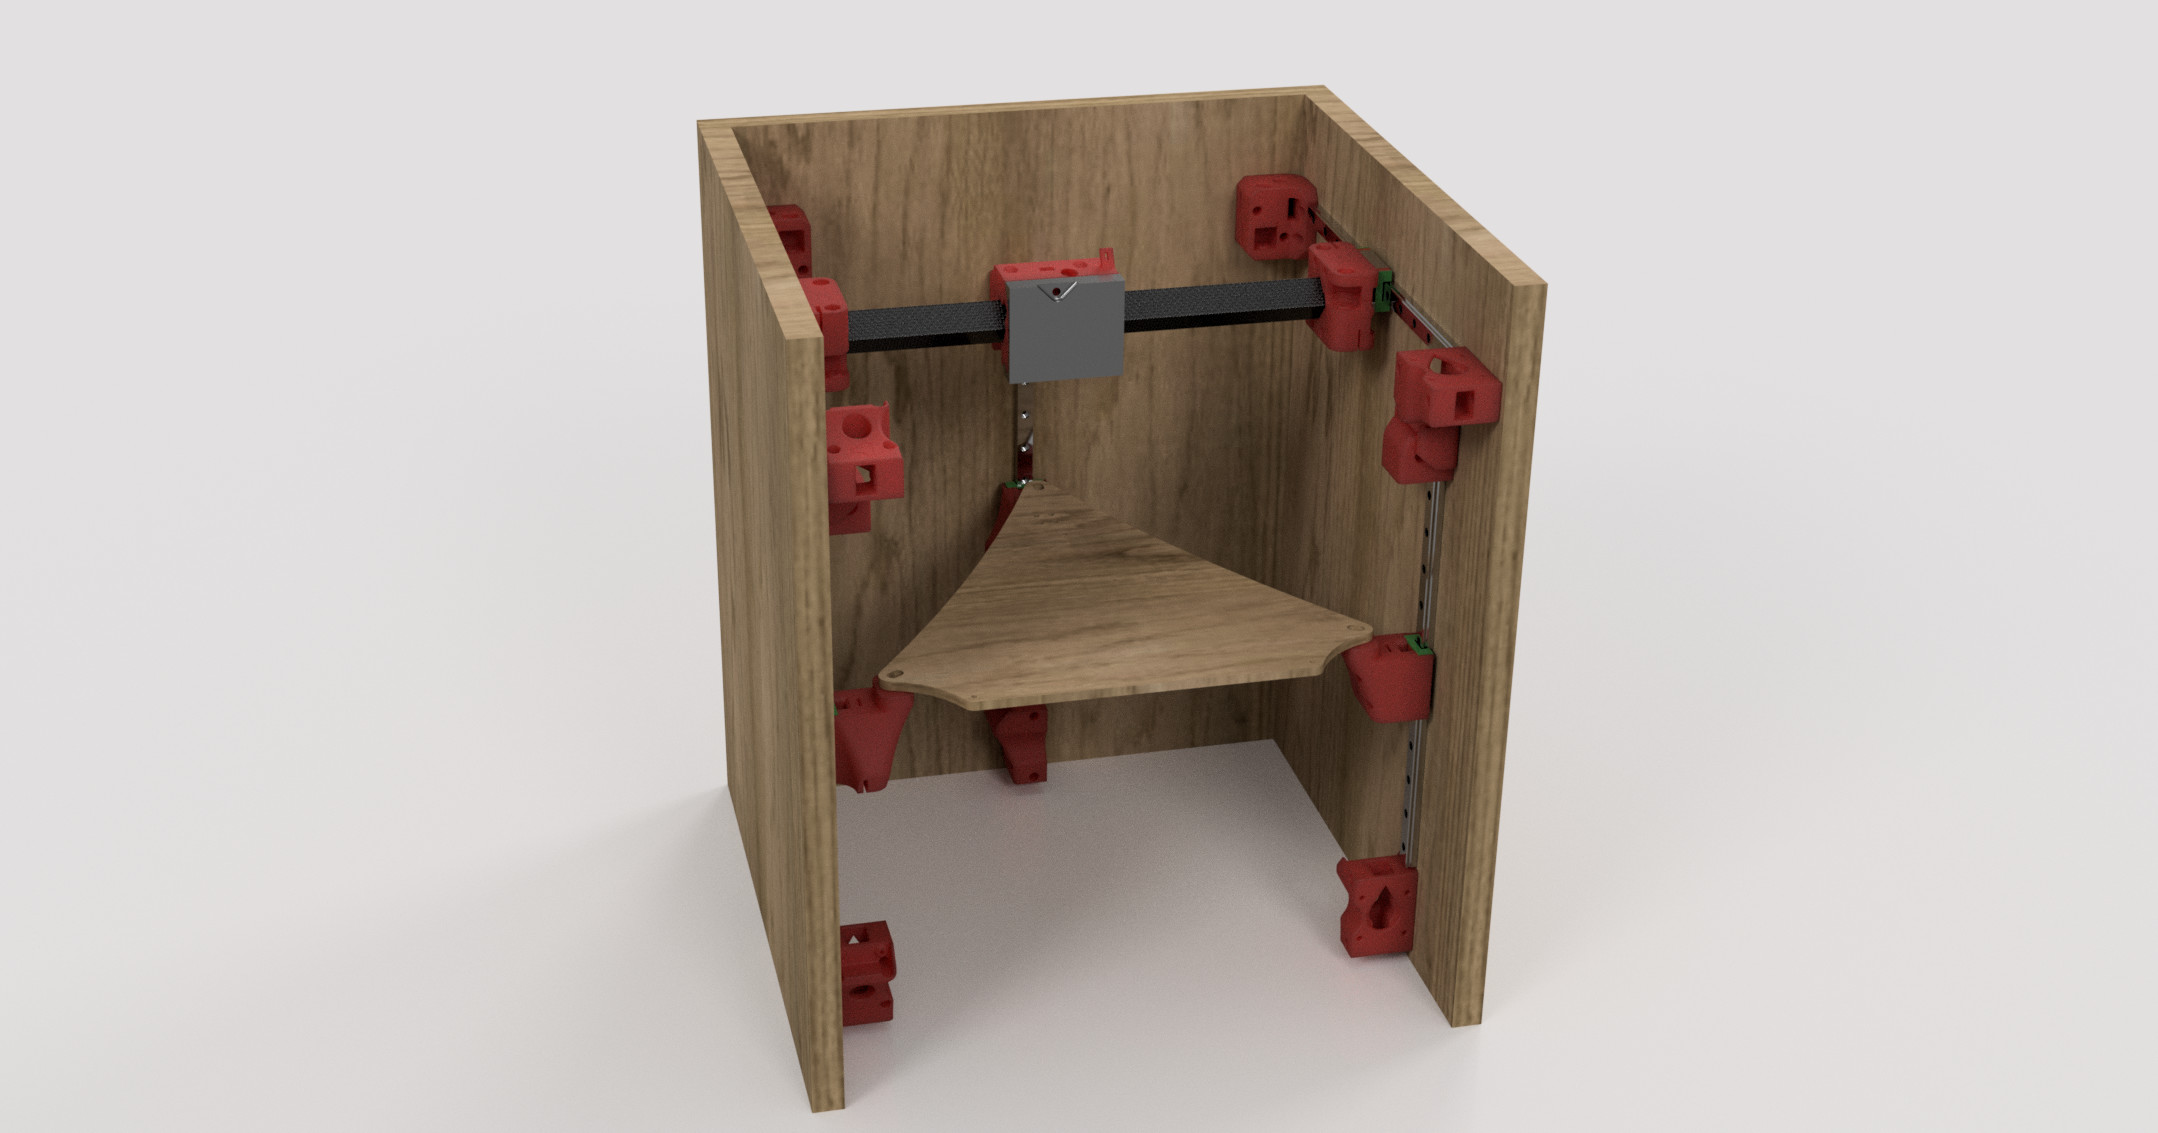
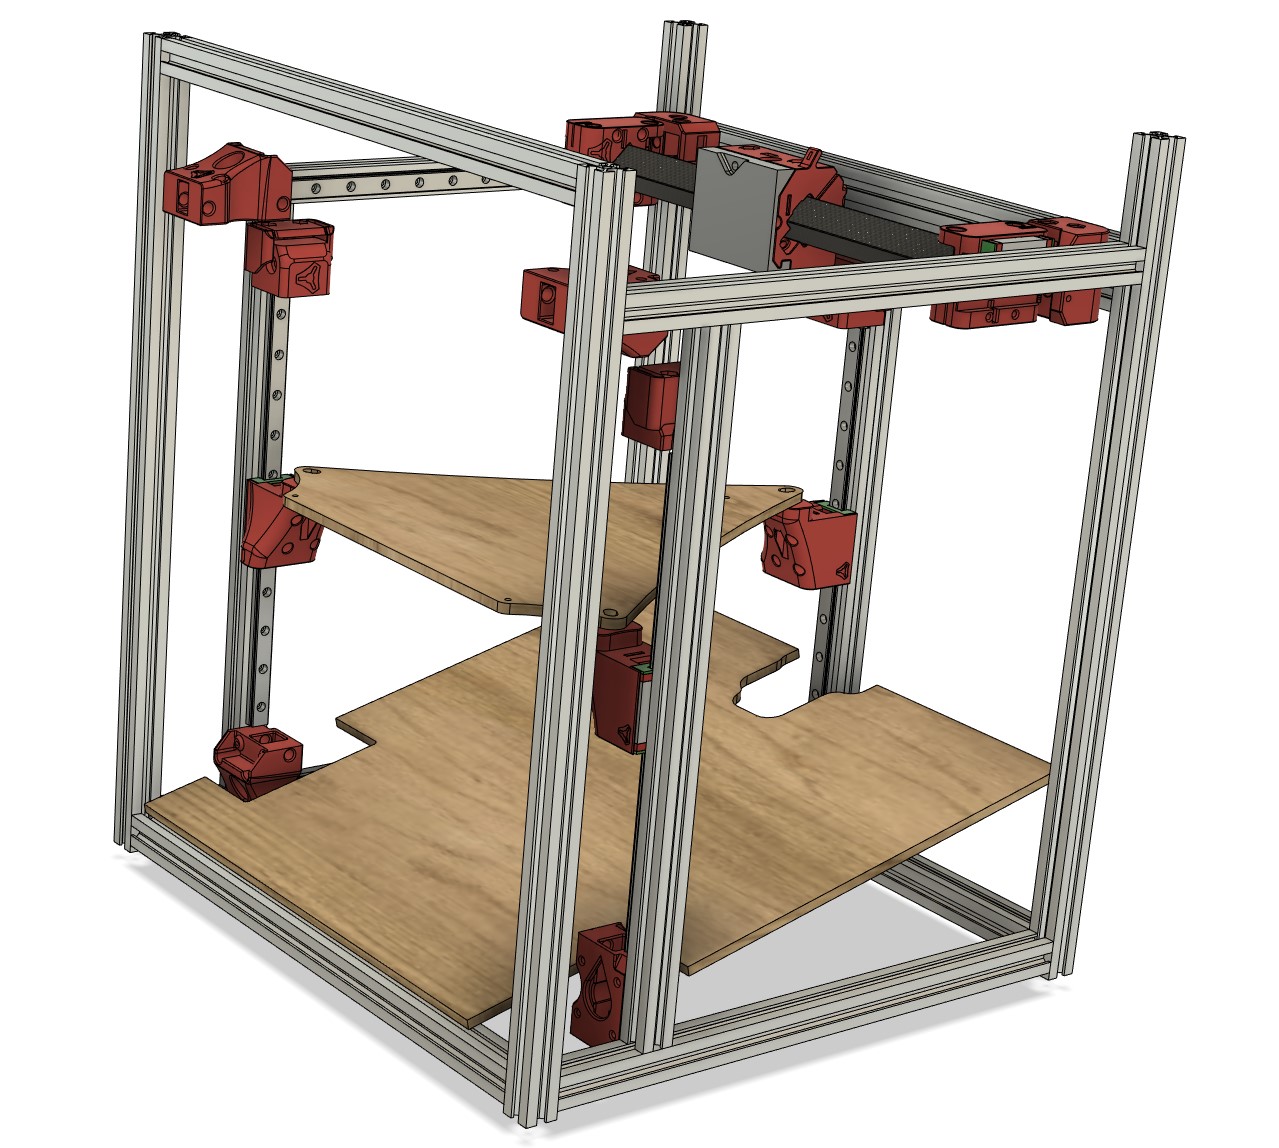
  1. Aluminum extrusions or panel frame?
    I love the way extrusions look, but I am just not a fan of working with them. I have no real interest in being a 3d printer company…and most of us have CNC machines. So DIY wood frames (basically a box with holes), or extrusions? Extrusions are easy and cheap to ship so I would surely go that way if that was my goal but why not make a box with holes for mounting parts instead. That even solves the issue of semi enclosing it as well.

    A)Accommodated both.

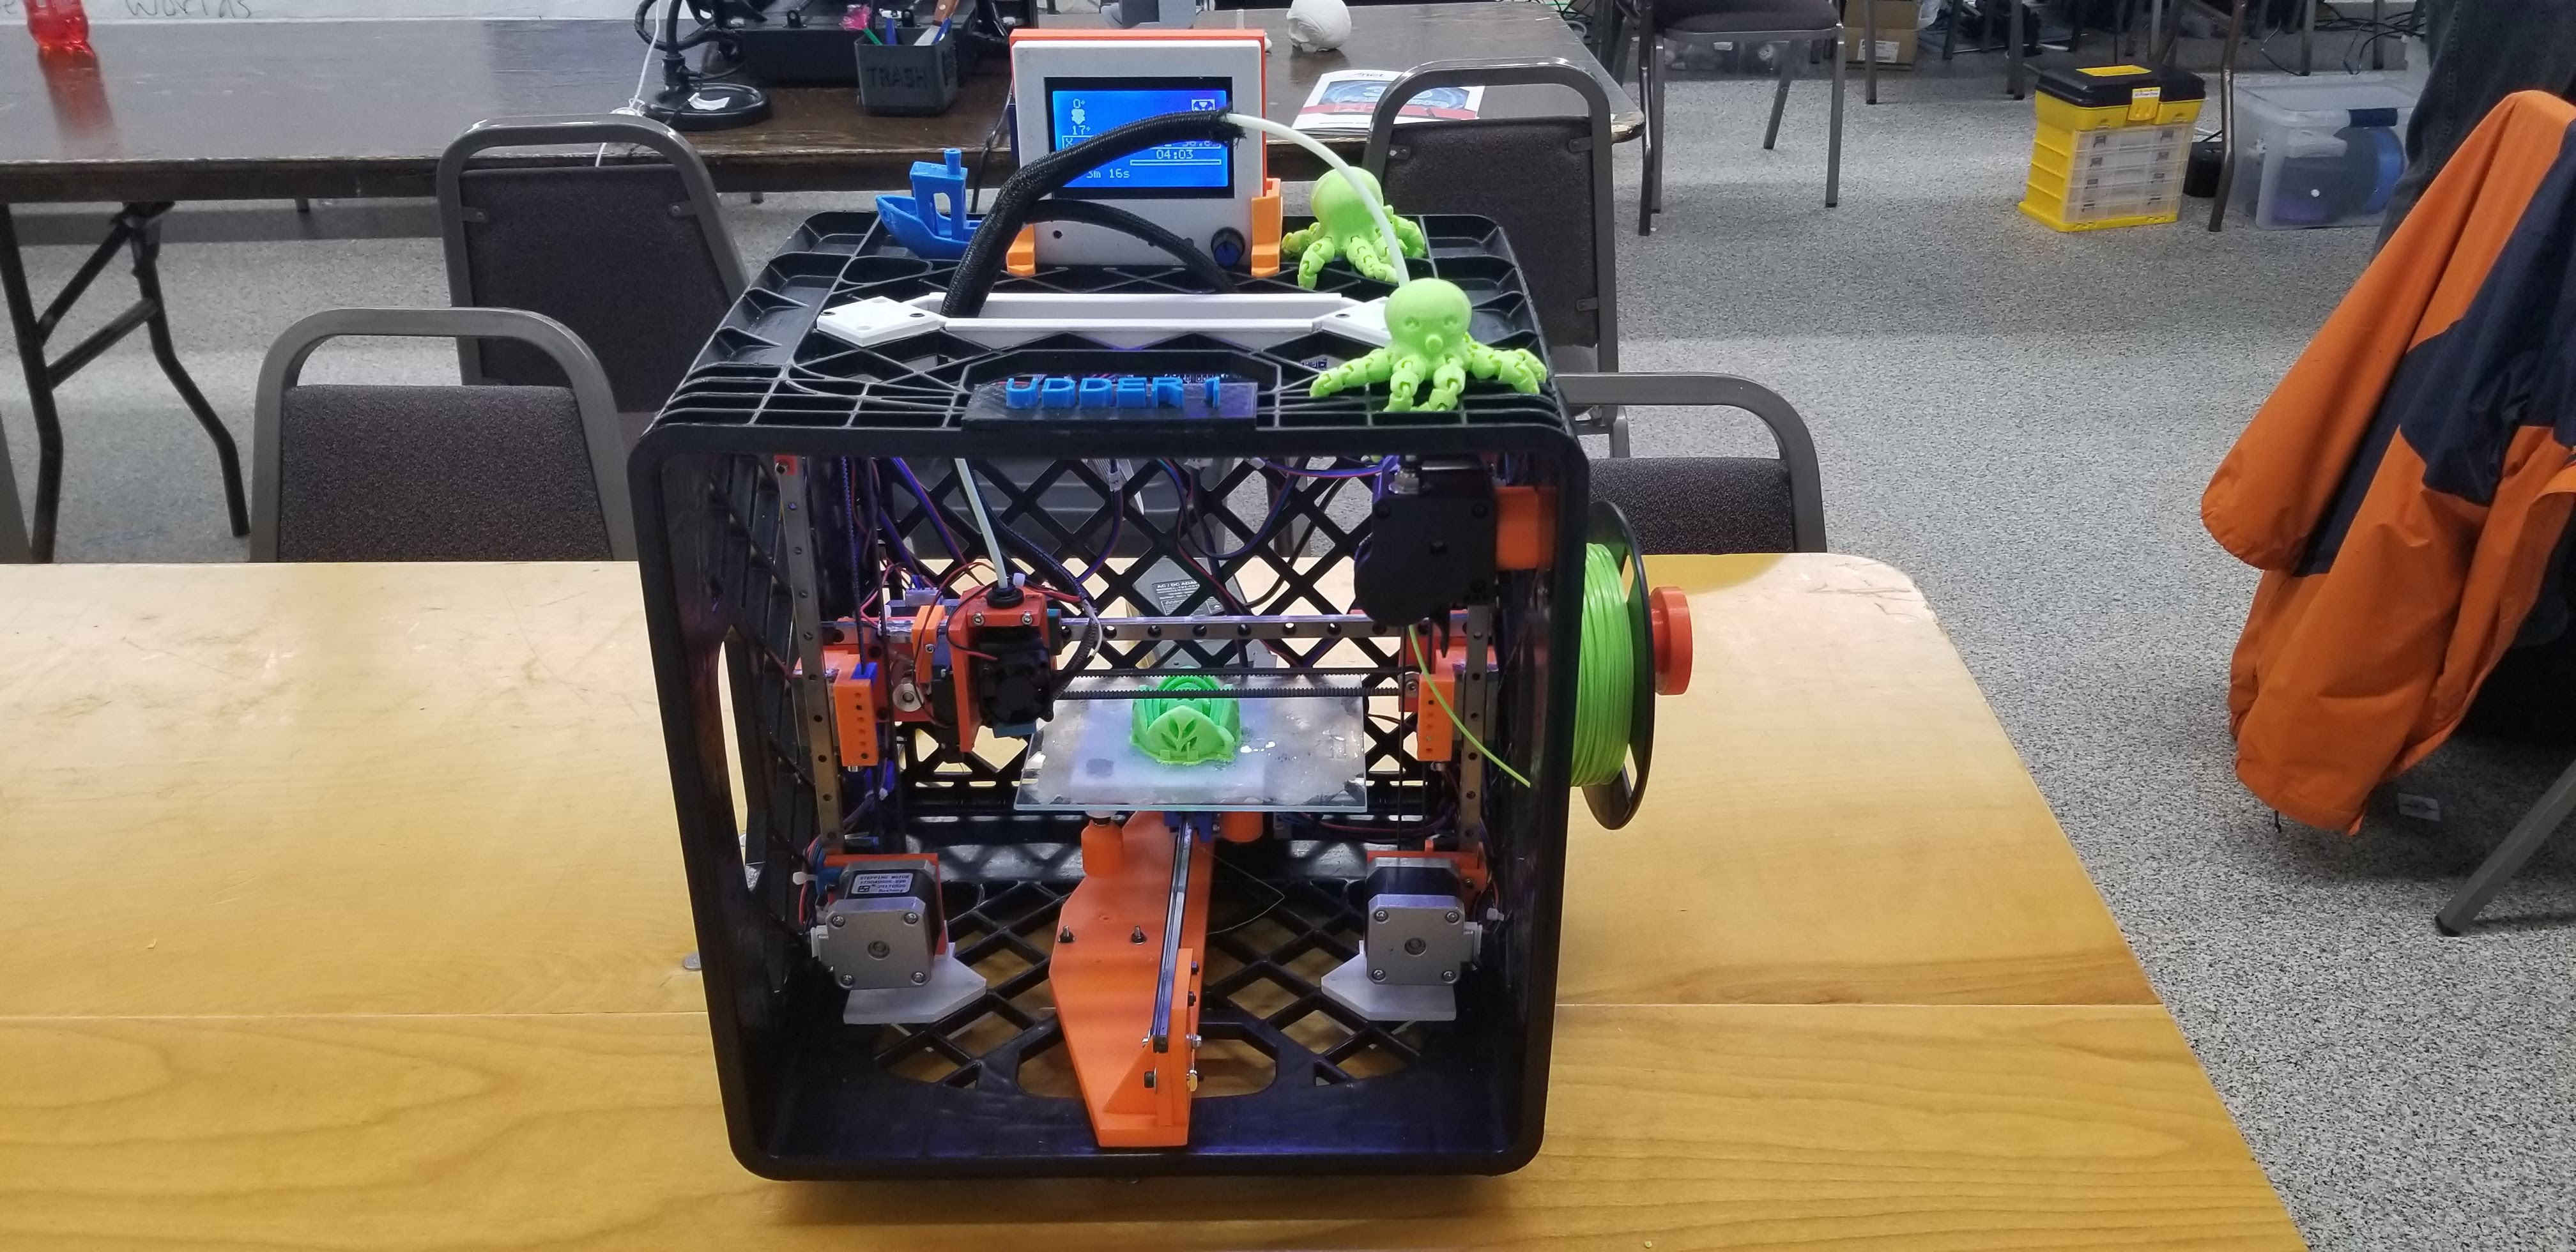
  2. Direct Belt Drive Z axis.

    A) Looks to be precise enough to max out the BLTouch’s capabilities, the marlin accuracy test shows this, and prints looks fantastic. Downside, bed does not typically hold itself up after a print so ending GCode includes G0 Z220 F1000 to end every print at the bottom…plus that is easier for part removal.
    B) Belts do not over constrain the axis or induce wobble to the plate.

  3. CF Rail and wheels

    A) Works fantastic.
    B) Lighter than a linear rail, and only gets better with size.

  4. Low unique part count.

    A)Easier to source, easier to keep track of printing parts.
    B)Easier to kit up…
    C)11 unique main parts, nothing is used only once. Proud of this one.

  5. True Autolevel

    A) Future possible power recovery (homes to Z max), and non-planar printing.

  6. Tool plate simple to modify and edit

    A)Tool plate as in lasers, direct drive or bowden extruder, or even a drag knife.

**Bed plate is currently a CNC’d part but does not have to be, a simple printed part and some extrusions would work as well.

Hemera mount with Bl Touch and Fan - https://a360.co/3AAP0yA
SKR Pro Board wire management - https://a360.co/3BwUxXZ, PrusaPrinters SKR Pro Wire bracket by Allted - Thingiverse

6 Likes

I personally like all metal printers. I put mine in an enclosure to help kill noise and I know it causes any pla parts to soften.

1 Like

There is something about black aluminum extrusion. It just looks neat, and it isn’t intimidating and it makes it seem like you can customize it a million ways. You can drill a hole anywhere in wood, but then you’ve made a permanent hole. It is similar to lego or erector sets that way. The open design of an extrusion box means it also seems easy to reach parts and work on it.

I am not sure any of that is actually a benefit or just a perceived benefit. But there’s no point in arguing with impressions customers have.

But, this is your printer. It is your project and you are going to end up building and, if you feel like it, defending it. So you’d better love it. The mp3dp started as a fun project to build after you made an MPCNC. Then you converted your farm and made v2 to fix some issues. If your goals are the same, then it should be wood. If you are hoping for something with as many people building it as possible (with your kits or not), then the al. ex. might be better.

I also like the seckit components that are aluminum extrusion and some flat cnced parts.

1 Like

Extrusion does look good…

That said, I personally would have little interest in yet another aluminum extrusion based printer builds. It’s been done. Wood with holes seems like the way that I personally want to go.

I have been looking at the RailCore, the HyperCube, Hevort, and a bunch of other CoreXY based printers, but want something that I can do without relying on about the only thing still more expensive than lumber, which is Al extrusion. (It’s not necessarily the extrusion that’s expensive, it’s the T nuts, and the corner castings, and the little fiddly bits that go WITH the extrusion that I end up looking at my Ali shopping cart and then… Delete all.

I quickly become convinced that I can probably just buy a kit based on the extrusion frame for less than the individual pieces, and then… It’s not my build anymore, it’s a kit with all someone else’s design choices and compromises. I can retrofit it all later, of course.

When I built my MP3DP, I did not feel that way at all. Even if I built it cutting all of the pieces exactly as per the drawings, I know that I could (for example) lengthen the X or Y axis to accommodate my oversized print bed very easily, or change any parameters to match materials that I have, or can easily and cheaply get, which I don’t think that I could with a kit.

So, here’s a small wish list. What I’d want to see from the MP3DPCore:

  • CoreXY kinematics supporting either Bowden or direct drive extruders. Ones that are commonly available are of course what I’d think are the best choices. The Mk8 extruder from the current crop of MP3DP seems like a good direct drive, and the E3DV6 is super easy to get, or one of a million clones of it.

  • MGN12 rails are getting cheap, and are way better than they were not long ago. They’re available in a hurry from Amazon, or a little cheaper and slower from Ali. This is maybe a little more specific to me, because I already bought some, but I also bought some MGN15, and a few other types, but the MGN12 seemed like the horse to back as it has a lot going for it in terms of price, weight, and seems to be getting the economy of scale working behind it. I see that many of the linear rail based designs coming up are going this direction for that reason.

  • Flexibility with things like fans, but again commonly and cheaply available options would be best. 40mm hotend fans are readily available. 5015 centrifugal fans are also cheap and easy to find, and make very good part cooling fans.

  • Scalability for different sized print beds. 220X220mm beds are still the most common, but 300X300mm heated beds are also cheap and easily acquired. The options for print bed become almost limitless for plate aluminum and silicone mains-powered heaters.

  • Options for Z axis. A 1 motor Z axis with (for example) 3 screws belt driven in synch for Z height, which could instead be 3 independent Z motors for automatic levelling, or even wire them in series to use a single stepper driver. (This is about the only design choice that I seem to be able to consistently make for myself, I get too lost in this way or that way for the CoreXY kinematics. Sometimes, I like the auto-leveling, but mostly, I’d rather be sure that I can make sure that the build plate remains level.

I really do like the idea of a CNC friendly (to build) 3D printer, which works as a learning project for a new CNC owner. Bonus would be if it also makes a 3D printer which most of us can consider to be an upgrade.

1 Like

You guys are rad! Real thoughtful answers.

I trust the three of your opinions very much…and I got different votes. I think I can make them all work with minimal compromises. I asked here because this was the road I was going down, and then I realized it would be a bit faster to just pick one. Looks like I need to keep going down this road.

To make extrusion or wood work, I have to work on single surfaces. Extrusion based versions will use one screw length and wood a longer screw, seems okay. In wood you can put a hole where ever you want it you can easily mimic extrusions provided the design is planar and does not make use of more than one side of an extrusion at a time. Like the mp3dp being able to accommodate a variable width flat parts, but I also need to keep things in line to fit 2020 or 4020.

As for you David. I would love to make it possible to also have both, but it is much trickier to do here. I mean any part you can easily machine can even more easily be 3D printed so why not offer the option? Well to make them easily machinable that means you typically sacrifice depth. When you do that you bring in a huge increase in unique parts, thinks lots of spacers and screw lengths. Maybe as a solution is try to keep the some parts machinable, others perhaps able to have some machined parts and some printed inserts. As an example, I am thinking of a metal printed part metal sandwich. I will keep this in mind, I would love to go here, but you know I am a big advocate for how strong printed parts can be.

This is the part I love the most. I have been doing some basic prototyping with 2020 and to use it as an erector set and put something together quickly is cool.

The part I don’t like is, as Dan says, the parts add up stupid fast. The other part is building it accurately is very very hard. Think squaring the feet of an MPCNC build, times six. You have to square each face. I bet if people checked the inner diagonals of their extrusion cubes they would not be very close. Every printer reviewer out there is focused on both, speed or looks. I don’t say print quality as they all do because they never check axis tram.

All that said, I think getting something good enough is easy and extrusion looks better with the least amount of work.

Exactly. I freaking love all the new gen printers. I do feel like some of them are just a buzzword mashup though. Some even advertise themselves as overkill. I like to be efficient, and overkill is typically a cringy word for me. Efficient is cost-effective, overkill is not fun for your wallet. In terms of my small farm, 8x’s anything is expensive. So if I am buying 8 of anything I am only doing so if I think it is worth it.

I think a very good example of this is the new build plates. Mic6 is freaking awesome…but there is significant cost there. Any aluminum bed more than 3mm thick with a bltouch and ‘bed level compensation fade’ prints the same after a few mm of printing. You need a bltouch anyway, so why spend so much on a mic6 plate. Don’t forget you then slap an adhesive magnet on it than a flexible steel PEI impregnated build surface on top. Just a buzzword to me. I have two different thick aluminum plates here, just standard 6061, 12"x12"x0.25" from amazon. They are stupid flat out of the box.

I will say I think the cast part of those fancy plates is the key, not the surface.

It kinda depends on who exactly you’re trying to appeal to. If you would like to appeal to the mass market and hook as many people as possible for this project, I believe extruded aluminum would have a much larger market base. That would simply be due to the fact that a person would need some sort of CNC machine to cut out the wooden parts. I believe there is a much larger number of people out there that would be willing to make their own 3D printer than a CNC mill, even if it is completely from a full kit. Of course that is just speculation on my part.
You did say you don’t want to be a 3D printer company, so I can understand wanting to keep this at more of a DIY level. I would also keep in mind the level of precision you’ll need to cut the parts out with a CNC machine. I have no doubt that MPCNC users could cut out the parts correctly, but for some such as myself, I wouldn’t be ready to take on a project like that for a while, even after getting my MPCNC up and running. Its one thing to clamp down a piece of wood and mill out some words, but its another thing to cut out parts good enough to build a 3D printer with.
Of course I have very little CNC experience, so take my opinions with a grain of salt.

1 Like

My goal is easy to source and inexpensive. Which for me means, mostly what I already carry in the shop. I do like to make stuff and experiment, but I really do not want to take time away from the CNC’s or the Zen…for a 3D printer.

I do want to make it a good project for people, not just myself. Meaning, I am trying to make it expandable. Easy to try out different things. For the MP3DP, at the time, meant not being built for one specific extruder. These days, I have other things I want to try out!

If I can make it work with flat parts or extrusions, the tolerances are going to be really easy to hit. Super easy to check diagonals before you start and if they are close all the holes will be in the right place…or close enough.
( I am the guy telling people they do not need 0.1mm tolerances for 99.99% of things designed for others to make)

2 Likes

The one downside is fusion is very slow going for me, and my trial ran out. I think I am going to do this in SolidWorks still. I am fine modeling with fusion for the most part, but assemblies are different and I didn’t see any videos that made it click. I need to find a fusion guide to assemblies for SolidWorks converts.

I know me doing it in fusion or onshape would be ideal for everyone but everything takes me soooo much longer. Maybe I can export it and redefine the dimensions or something.

Or maybe I will prototype in Solidworks and finalize in Fusion…sounds complicated.

1 Like

You’ve got me thinking of a conduit constructed corexy

1 Like

I was thinking about it…but I think the linear rails are so cheap these days why bother.

1 Like

Yeah, I was thinking the basic structure of conduit, probably too much friction for a speedy corexy to act as rails, and then cheap rails. Not sure if that saves much $

The Piper printers are doing that it would be on brand for sure but I think he has that covered pretty well.

The printer I built into a box is still running well. Definitely did it because a) I had a cnc - or two - and b) much cheaper (mdf).
I’m sure you would make a better use of space than I did, and use better parts as well (mine was all anet kit until I upgraded the board because I decided not to fix my ender).

My next printer is going to be a box with the extrusion from my ender for the motion. I think I have the idea worked out for x, y, and z to use just the crap I have.

Basically, I think it’s gonna be tough to go wrong either way.

1 Like

It seems to me that many of the extrusion based builds use it because there’s no need to be careful to build it square, the extrusion will just make it so.

To be fair, the vast majority of the time, it is. It’s that one time where you tightened a bolt with the corner brace about 1mm out of place, and now nothing on God’s earth is ever going to make that angle 90° ever again short of replacing that length of extrusion and the corner casting, and maybe the other extrusion that it was bolting to. There is (Or was, it might have been junked now) a printer at the local makerspace that’s like that. It’s fine for making vase mode prints, or little knick-knack ornaments, but anyone trying to make (for example) a Primo on that is going to have a bad day putting it together.

So, while I don’t have a problem with Al extrusion, I never want to count on it to make stuff square.

When it comes to tools, (And I count a 3D printer as a tool) I like functional aesthetics. I’m not too concerned about things like colours (though I do pay attention to them) as I am about how they function.

One thing that I’d like to say, is that I’ve had three 3D printers from kits. One used threaded rod, one used laser-cut plywood, and one was extrusion based. I have my self-designed one, and an extrusion based 3018 CNC, and I’ve now built an MP3DP. The MP3DP was far smoother for assembly than ANY of the kits. I remember assembling the base and wondering how I was going to square it up. (I’d cut one of the base floor pieces, which I assumed would do it.) It was perfect. Right from first assembly. Diagonals were right on to within a quarter of a millimeter. None of my kits did that. My self-designed one did, but that was cheating since I made it so that it absolutely had to be, or else it couldn’t bolt together. But I designed it that way because the kits didn’t. Unfortunately I also designed it using cut acrylic which gets a little wobbly, but it’s reinforced with 3/4" aluminum square tube. (I suppose that I could have used 2020 extrusion, but the tube is much cheaper, and worked more than well enough with cheap hardware.)

Ryan’s designs have been a cut above for building all the way through. To build my design 3D printer, I think that I did a pretty good job. I have no real complaints about its performance. I’d absolutely hate trying to make it into a kit. 3mm screws, 4mm screws, 6mm here, 10mm there, 18mm in places, 20mm other places, square nuts here, regular hex nuts there, One-of parts all over the place. Hey, it worked, because I designed for what I had. The kits I’ve bought seem like they were designed that way, too. For what someone had. “Use the 10mm spacers and 18mm screws here, use the 6mm spacers and 12mm screws there. Use 3mm screws for this, 4mm screws for that…” and so on. Often with no discernable reason for or advantage to the unique parts.

So @vicious1 can say that I’m really looking forward to seeing what you come up with here.

3 Likes

No pressure…

:grinning_face_with_smiling_eyes:

I do agree with you, not to toot my own horn but my printers have all been extremely square and perpendicular, I have never actually adjusted one. The kit I did assemble was absolute garbage (a long time ago) and I am not having the luck you have with extrusions. I cut them very accurately and tried two different types of corner brackets. I can move the frame significantly and it will stay deformed.

I had fun making a part. Assembled it, immediately wanted to make some massive changes. So far it looks like it will work making it for either style but I have not gotten far.

I have looked at a lot of designs and asked for some advice and I have a feeling this might take a while. There are an absolute mind-boggling amount of options and decisions to make. My desk is now a pile of printer bits (again).

1 Like

If you make them from wood, you can make them in a box and stackable. If you make them from MDO, it should be fairly stable and not warp over time. Having it be a box would make it more stable, and being mostly an enclosure, wouldn’t be too hard to keep the parts being printer warm and out of drafts.

That’s why the railcore and most other large core x/y printers have side panels. They panels add most of the structure and stiffness. Somewhere there’s a photo of Tony standing on his railcore to demonstrate this. These guys are built from 15mm extrusion and hdpe panels.

1 Like

That makes more sense.

You could go the milk crate route like we saw at mrrf.

7 Likes

Exactly my problem… I get wrapped up in decision paralysis.

1 Like