Help develop the next MP3DP!?!

I have been asked constantly to let people behind the curtain of a development cycle. Let’s give it a shot here.

“Rules”
This thread will be different. I will delete off topic posts. I think this is going to get very long so I will trim it up as I see fit. Normally I do not do this. So tangents will be deleted, if we are talking about fans all sorts of fan stuff and flow is fine but let’s not get into BBQ or anything.

I am going to hyper focus on one aspect at a time. Each topic will get linked in this first post. When we move on we should have a resolution and an easy to reference marker on why we chose what we did.

“The Goal”
Lastly, this is not going to work for everything, but I will try to accommodate everything we can. If something need a unique part size, I will do what I can to make that an easy to edit CAD part. This is going to be a “best bang for the buck” type of build. If you want a gold plated extruder that is fine, we will try to accommodate that but it will be set up for something more ideal.

In the end this will probably look an awful lot like the current MP3DP. Hopefully not though!

“The Topics”

1- Print volume. Starts here
Decision - X-300xY-300xZ-300(± depending on rail length to simplify BOM). Make it as space efficient as possible, so add-ons do not make for an overly oversized build (parametric build volume).

2- Z Axis drive system starts here
Decision - Belt is fine, E-Z-Brake works (relay). 3-Z steppers (max out skr)

3- Moving or stationary bed, starts here
Decision - Moving bed.

4- Frame material / construction Starts here
Decision - extrusion / hybrid just like it currently is unless (three planes) something comes up to do it otherwise. It lets people have options.

5- Belt - starts here
Decision - 9mm

6- AB stepper position - starts here
Decision - Slightly favoring back of the printer.

7- Top plate or Top rail, side mounted rail - starts here
Decision - Side Mounted.

8- Concept XY starts here
Notes - Twisted planar belt, is the current direction being pursued. With the help of Mark R’s ptfe tube splitter.

9- Hot End / Extruder Width before size needs to be added to the default frame… Starts here
Decision - 78mm (hemera) as the “largest”, biqu H2 a great option.

10- X linear rail orientation- starts here.
Decision - Horizontal linear bearing surface, favorable Truck mounting plate.

11- “plate” thickness - starts here
Decision - 5mm plates fit M3x10, M5x35-40 screws and the pulley as shown. Slightly thicker should still be fine (M5x40). Thinner plates will need shorter M3 screws and the pulley flipped.

12- Z axis, linear or V-wheel - starts here
Decision - Linear rails - JRS made a wheeled option.

“Upcoming topics” (not answered yet but came up in the discussion).

  • Heated beds, zone heating.
    Notes- SSR Gcode triggering for zones reasonable? Any way to trigger other zones to get held lower, is it needed?

Notes

-Klipper 3B and better should be used, the zero 2W also seems to be a budget option.

-Optional Hemera and Biqu H2 mounts built in.

-Optional EBB36/42 CAN Bus mounts designed in.

-Optional V1 Terminal block mount.

-Heated chamber, what limit? Limited by the temp the electronics/stepper/bearings can handle, make sure to print any parts out of a suitable material.

-Gantry linear rail or rail and added “support”? No “support” as designed, room for support under the rail if you prefer.

-Linear rails come in ~50mm lengths inexpensively (obviously you can spend a lot more), chances are you will need to cut one to *75mm to save a ton of money. Abrasive cutting blades work well, cover to keep things clean while cutting.

“Cad” - Source

If you want to get a look at a previous example, here is the 4.1 MP3DP we will be using as a reference. Fusion

New CAD V5, here - Fusion
10 Likes

Print Volume

Obviously, this will be as parametric as possible but we need a “standard”

I propose 300^3

I figure you can cheaply buy all smaller printers so the goal should be a more Intermediate build.

Core XY start to have belt limitations around 500mmx500mm. So we we have a 300-500 parametric XY goal (smaller is also easy) and Z can easily be any length within reason (assuming a belted Z). Anyone have any ideas about this?

3 Likes

For my everyday printer, I am looking for 300x300x300 minimum. I have also been considering 3503

I think 3003 is probably a good “standard build”

4 Likes

is there a heated bed for that volume? Or is there a way to do zoned heating like prusa is?

1 Like

Keenovo makes a wide range of sizes Here. I have not researched this extensively, but 300x300 up to 500x500 are sizes I see often in some of the other printers like Voron/Ratrig/HevORT/etc.

Keenovo sells pads from 80x80 up to 500x500 in both 120V and 220V

1 Like

I think these are both good second topics. I will add an “upcoming” section to the first post.

1 Like

I agree with the 300mm^3 size. I used a standard 12" cut of aluminum for my bed and it works great. Also the bed heaters are already produced in these sizes for the next topic. If you want to get seriously real, the CR10 is already that size so options abound to save money or go whole hog (sorry… no BBQ…).

Size wise the only issue I have is the sheer overwhelming mass of my MP3DP V4. It is a BIG machine.

4 Likes

I think the 300 cube is the only size I’d be likely to build. I have a 250 cube now and rarely fine anything in my 3d print list that would benefit from more that 300.

An for those very few instances, I have friends that print BIG, :grin:

Mike

2 Likes

Nice! Thanks for inviting us to look/participate in the Design/Dev process. Considering break-out topics for specific areas/parts? This is going to get long…

Like that you’re designing a parametric Printer Platform, with bang for buck, and modding in mind. Making a reference example Build 300mm³, that’s easy for some community members to follow/make as-is. But the Printer design/platform is open/structured for other community members to riff off, and explore different features for their needs-wants, hopefully feeding their successes, and fails learnings, back into the community.

Nice! Seems like a popular choice. Wish I built this size, retrospectively knowing the time/material that went into my build. Already have projects that won’t fit on my 250x250… Checking, is popular/common a goal, or are you explicitly looking to do something special. e.g. because you’ll showcase at RMRRF 2024?

Saving my heat zoning thoughts… Separate topics?

Been wondering how to reduce the weight and overall size too, while keeping the cost down.

I completely agree with this. The 200x200 that it is now is just too small for every day use. I have 4 printers now, 1 200x200, 2 300x300 and 1 350x350. My 300’s get the most use and fit 95% of everything I ever want to print. There is the rare occasion that what I want will only fit on the 350 but that’s why I have one here LOL. I can always print smaller things on a larger printer, I cant print something larger on a smaller printer

300 Z is a good spot too. Its even more rare that I print something over 300mm high than is is in XY

Some real good bed options in that size too but ill wait till that part comes up

Another future topic??? Z gearing (similar to voron maybe) to mitigate the bed crashing, Or even something like the 2.4 that keeps the bed in one spot and moves the CoreXY gantry up and down. After killing 2 SKRs this week with bed crashes this is defiantly on my mind LOL

I’m going to go against the grain a little here and say I would like to see a little extra space around the bed. Not a ton. But I want to be able to have things like Klicky, sexbolt and a nozzle scrubber that I’m not sure I could get to work without using servos on my current MP3DP

Above everything Thank You for including us in your thought process on this!!! I know it probably makes it 10 times harder on you in the end but it will make for a much more user friendly printer in the end for all.

1 Like

slow and steady baby steps forward. I am in no rush, having a new build for RMRRF would be cool though (would need to be done early April for shipping unless someone brings one).

Trying to account for more things than I normally would (can bus boards, ect). I also want a printer that is well thought out why does the standard have or not have something. So if a beginner really did want to build their own, lets provide a clear path with a reason behind each choice (with the freedom to stray easily).

No just later discussions. Please take some notes and we can get to everything systematically when the time is right.
Size is an easy topic to feel out this format to see if it will work before we get into the nitty gritty.

Mike had a idea that sparked this whole thing. I will be testing something in the next couple days…later discussion.

The bed did that? I would think the drivers would pop first…maybe we need a new topic for this. If my experiment works we can do that topic next to let you try it out.

This is on topic for sure.
For this If we build the build as efficient as possible you can always easily include space anywhere with a parametric build (best to keep it off the +x or +y side). So we shoot for the smallest 300x300 and that lets you go 350x 300 in the most efficient space possible.

Nice, I like this so far.
So we are getting a lot of agreement, a good standard is 300^3 I feel that might be a lot of extra Z but we can revisit the Z length in trying to get all the linear rails the same length for a more simple BOM. This has some wiggle room without bothering anyone I would suppose.

So far we are at X-300xY-300xZ-300(± depending on rail length to simplify BOM)

3 Likes

Yes sir. Its around in my printer build and This one talking about trying to fix the SKRs

I’m all for a separate topic talking about it more in depth, I don’t believe I’m the only one this has happened to.

1 Like

300^3 sounds pretty good. If you went 500 would that switch the rail gantry to an extrusion and rail gantry? I like the idea of keeping the single rail gantry. Lighter so the speed demons can pair a lightweight extruder with it!

If we make a added extrusion possible it could be used at any size…or maybe we add one to decrease the linear rails size.

The current version is built so an extrusion could be added if needed. The core has dimension to change the height above the rail Turns out I do not think they are needed. The only reason…maybe we hit this topic later. Adding it to the list.

1 Like

Something that might affect dimensions… Room for rear tool changer setup. Linear-Rail/Extrusion in front of the Extruder. You know, like a Prusa XL, but not so $$$. Would like multi material setup that doesn’t waste tons of filament, so space for multiple extruders.

1 Like

I think that fall into make it as space efficient as possible, for the extra super advanced users trying that they just add room to the Y+

2 Likes

The 300^3 has worked really well for me. It’s been more useful than the 180^3 build I used previously. I have not had a need for a larger printer, yet.

2 Likes

This is also a good note. Definitely not for the average user but we can make plans for user to try things like multiple extruders or Clicky’s, wipe bins, lasers, chocolate extruders, pellet extruder room…Seems easy enough in this case. Make it as space efficient as possible so add ons take up minimal space, definitely not a Average user thing. Adding it to the resolution (build notes to keep in mind).

2 Likes

wrt Goals… Is/should one goal be to maximize/leverage, and flex even, what’s possible for CNC owners? Enticing more to join the crew.

Are there things only a CNC owner could do easily (unfair advantage)?

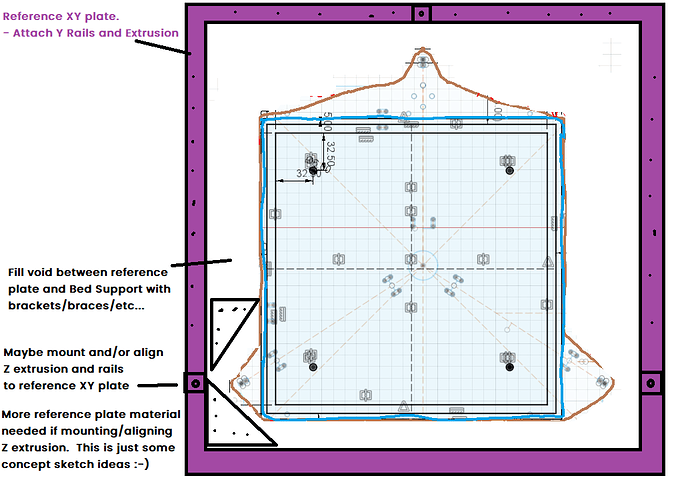
For example, CNC a reference plate to build the printer off. For example, could create a design that helps getting square XY trivial. Could design flat parts that includes nested Bed or Bed Support and some number of brackets and braces that help to efficiently cut parts used to assemble/secure the final assembly. See Pantheon and similar, their Z mounts to the reference plate, so it doesn’t matter how out of square the surrounding enclosure/frame is.

Maybe end up with design with some number of nested CNC’d flat parts…

Success looks like you cutting supporting Alu extrusion without giving a crap about it being a mm off because your reference plate(s) maintains your square and plane(s). Or, maybe not even using extrusion for the frame at all…

Curious what else CNC owners could do that benefit MP3DP v.next?

EDIT: With CNC’d reference plate, maybe cheaper angle L bracket material becomes an option for a bulk of the frame and enclosure (reducing weight and cost). Only using extrusion for Z rails. Get rigidity from MacGyver approved plywood exterior panels that don’t affect printer quality because they mount to the reference plate. The reference plate decouple enclosure structure from the inner precision cut/assembled XYZ rails. Haven’t thought about this deeply, hopefully there’s something useful here.

Bonus points for making reference plate based assembly with a width that fits a standard server rack…

2 Likes

The 300mm cube sounds good to me. This would then replace my 300×300×250 Repeat for capacity.

In the bang-for-the-buck category, the OpenBuilds style gantry assemblies that I am using for my laser engraver seems to be way cheaper than the MGN12H rails, and are reasonably lightweight. The big ones I’m using are heavier, but the mini wheel versions are lighter and still smooth and rigid. I would recommend this for the Z axis at least for low-cost linear motion. The gantry parts are about $15 apiece, as opposed to the cost of the rails, it’s quite attractive, though it does demand V slot extrusion. I wonder what I could do with a 90° V bit with 3/4" material…

Reinforcing extrusion with panels seems a no-brainer, considering how solid my MP3DPv4 is. That’s 5.5mm subfloor plywood I’m using but I could stand on that printer and it wouldn’t move.

I like the Hemera hotends, but the Biqu H2 looks like a strong budget option.

For a 300mm X transit, an unsupported rail might have some vibration for the gantry. Might not, but it would take some exploration.

I’d like better part cooling. Maybe put a pair of the 5015s in parallel. I’ve been playing with part cooling design…

2 Likes