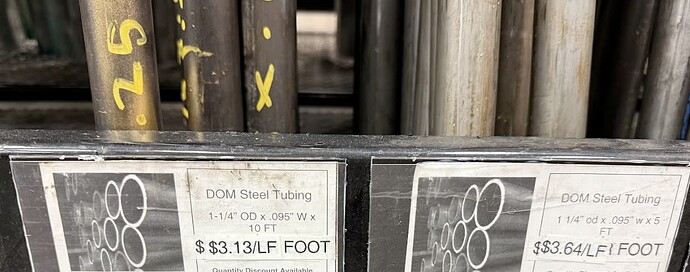
I want to use 4x4
If we have our choice of tubing (29.5mm, 30mm, 32mm) which size should we do?
I think I found what I am going to use, but don’t want to assume bigger is better. This will cost me roughly $20 more than EMT conduit in my area, and they will cut it within a 1/16" for me.
Is 0.95" the wall thickness? Because if so, that’s 2.413 mm, which is really thick compared to the 1.5mm wall thickness of my 1" EMT! It will be heavy, but I have no doubt it will be very strong! I’m not an engineer, so take as FWIW, but I’d say go for it!
Yes, and that’s roughy what it measured with my calipers.
They also have a .065" and .120". Maybe I go even lighter, which is still more than conduit.
It is all basically the same price, I just don’t know which is best.
Nope, 32 max, sorry
Larger diameter is more rigid is all else is the same. Thicker walls is more heavier than it is adding strength. Once you get past strong enough there is very little rigidity gained by internal metal, the skin does all the rigidity work the thickness resists the bearings crushing it.
Weight takes away accelerations. So it depends on the work you do. Lots of carving, you might want lighter. Lots of full long cuts, no issue.
Always a tradeoff.
I’ve been seeing that model around this past week. I’ve been away from the scene for a couple years and I’m a bit unsure what all the skew stuff that model is referring to. Originally I assumed it had something to do with klipper and bed mesh tuning. Would this model still be beneficial for someone whom has a basic corexy setup?
If you apply the calculations, it can help assess the machine for skew, and may help with the proper calculations for skew correction if your printer firmware supports it. I think its helpful to ensure the parts fit together, but for something like a LR4, its also important so that you end up with the router straight in the mount. ![]()
Very much so! This is how you make sure you are printing straight and accurate parts. Just about all the firmwares have the ability to do this now. Not just Klipper.
I think I’m still running the original D-Bot firmware from 2018. I’ll probably download it and run it anyways to see how good I had it tuned.![]()
Just verifying for the Makita Tool Mount:
Use 2 walls or less so the overhangs print right.
I thought one wall was tough for overhangs? Is the “or less” correct? Again - just verifying, I’d use 2 anyway.
Slice the skirt part and take a look at your bridging for the gap, how does it look with 1 wall vs 2 or 3. The statement depends on wall thickness (nozzle diameter and line width), but 1-2 walls should work as good as it can. Cura hates bridging, but a repetier/prusa based slicer does it flawlessly.
Before i place my order. Is there a fusion360 post process for the jackpot controller?
Just in case you missed Ryan saying “Slice the skirt part” — the bridging concern is not the tool mount part but the skirt part that gets the TPU bristles inserted.
The Jackpot’s firmware is FluidNC, which is GRBL compatible, so you’d be looking for a post processor compatible with GRBL in general, and hopefully FluidNC in particular.
This one says it supports “GRBL 1.1”:
That would be GRBL, I am sure there are several of them nothing we made special. Not many use Fusion CAM compared to Estlcam or others.
My understanding is that for the router clamp, use the 3 wall 30% setting. For the TPU flexible bristles, use the one wall. if you are asking about the bristle holder dust shoe… not sure, but I printed it and it work just fine at 3 wall 30%
Thanks!
This bridging issue came up on two parts, basically: the YZ plates (on the internal pathways for the wiring) and the dust shoe’s skirt part that holds the bristles. Most all slicers alternated the direction for bridging to minimize bridging distance, but Cura actually tried to bridge the entire length of the channels, requiring ridiculously long bridge attempts. Ryan built in model edits to create bridging hints to break up the roofs into smaller chunks, but still Cura needed some steps (re. wall count) to help, which I think Ryan mentions in docs re. YZ plate. Same steps should work for skirt part too.
My approach was: I don’t use Cura anymore, and Orca Slicer did it great, so I did not have to worry! LOL
where is everyone’s videos of the LR4 running? I’ve seen dougs so far and HAWi on youtube!
