On the few prints I’ve done so far I haven’t noticed any issues with falling bed temps. If it becomes a problem then perhaps I will add insulation. I would think the insulation wouldn’t keep it steady “better” but just it keeps it steady “easier”. It probably requires slightly less power to maintain its heat when insulated.
I used the CNC to cut a piece of purple 1/2" foam for that space.
I haven’t tried that particular bed without, but I found that it gets up to temperature quicker, and seems to need lower duty cycle to maintain it. Makes sense, I suppose. I have no idea if it actually helps printing to have it insulated or not, but lower power requirements are a good thing, in my book.
Honestly, why not. I think i’ll go ahead and add that foam under mine. Shouldn’t need any tape, as it can just sandwich/clamp it down between the heated bed and the wooden bed plate.
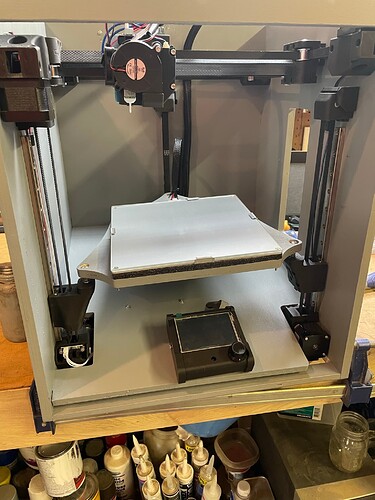
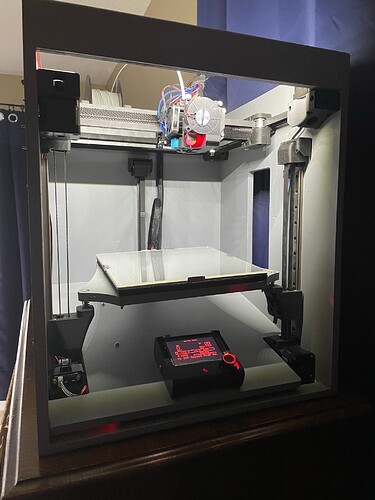
Worked on it a bit over the weekend. I added some foam insulation under the bed, added some LEDs, and also installed a rasp pi so I can control this via octoprint. All that is working well.
One thing I still need help on. My G34, true bed leveling, is not working too well. I am getting decreasing accuracy each iteration after about the 3rd or 4th iteration. I had a final accuracy of .27mm yesterday… I am not sure what’s causing it. I have tightened all of the belts so they all have a nice and firm tension. Is there any other factors that contribute to the accuracy of this that I can play with/tune?
Make sure your bl touch is in the correct range.
The tension on the hub is good, not too tight, not loose enough to have obvious play.
Your wire loom could be too stiff an push harder than you think.
Your filament is not fully constrained.
Try the g34 without any filament, if that fixes it you just need to constrain it with the reverse Bowden to at least the frame.
Just remember the g34 is trying to make 0.001mm adjustments, sneezing can change that it is extremely sensitive. You can also plot the results of the g34 and see some patterns. My wire bundle was too rigid on one build.
Oh yeah, i still need to do that. I will see if no filament attached produces a better G34.
I didn’t know I could plot G34 results. I thought I could only plot G29, mesh bed leveling.
What do you mean by in the correct range?
Shoot you are right, see what g29 shows you though.
If you look up the bl specs there is a range. Your offset should be within 2.3-4.3mm, https://www.antclabs.com/bltouch-v3
Still doing a bit of testing. However, now instead of plugging in and using repetier, I am just using the octoprint terminal to send commands and monitor. I am still testing G34 and trying to better my results.
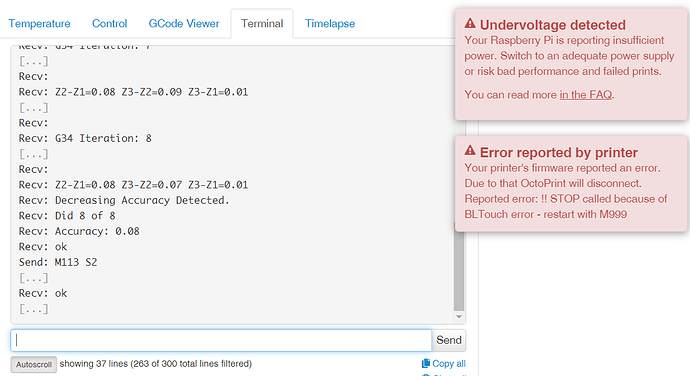
Using Octoprint, I am getting random ERRORs at random times throughout the G34. It notes the error is due to the BLTouch. Not sure why. And yes I know there is low voltage to the Pi, I am using a 5V output from the SKR Pro to power the Pi, is this not enough?
Pi’s are hungry for power. The recommendation is pretty high, 1A, IIRC. I wouldn’t run it off of the skr. The skrs 5V power is just for the cpu and some small accessories.
I am trying to remember the bltouch error. I think it means it didn’t have room to extend, or it is so extended that it won’t retract. There is a bltouch self test you can run where it just opens and closes until you reset it. If it fails there, then it should be replaced. If it doesn’t fail there, then it might be something like you are turning in the printer with the bed so close it can’t extend. That’s what I remember, I may be thinking of a different error.
It depends on which Pi you’re using. Lightning bolt usually means amps are lower than they should be. I finally bought a 3 amp supply for my Retropie Pi 3B+, and it no longer shows the lightning bolt. I’ve also run a dc-dc converter off the 12v supply for my Prusa clone to power my V1Pi host that manages both my Primo and the 3D printer.
Ill probably just go the buck converter route. Ill step the 12V main power supply down to 5V and go with that. Thanks for the input!
Recv: Z2-Z1=0.39 Z3-Z2=0.11 Z3-Z1=0.28
Recv: G34 Iteration: 3
Recv: Z2-Z1=0.22 Z3-Z2=0.17 Z3-Z1=0.05
Recv: G34 Iteration: 4
Recv: Z2-Z1=0.08 Z3-Z2=0.07 Z3-Z1=0.01
Recv: G34 Iteration: 5
Recv: Z2-Z1=0.07 Z3-Z2=0.09 Z3-Z1=0.02
Recv: G34 Iteration: 6
Recv: Z2-Z1=0.14 Z3-Z2=0.10 Z3-Z1=0.04
Recv: Decreasing Accuracy Detected.
Recv: Decreasing Accuracy Detected.
Recv: G34 Iteration: 7
Recv: Z2-Z1=0.21 Z3-Z2=0.09 Z3-Z1=0.30
Recv: Decreasing Accuracy Detected.
Recv: G34 Iteration: 8
Recv: Z2-Z1=0.47 Z3-Z2=0.12 Z3-Z1=0.59
Recv: Decreasing Accuracy Detected.
Recv: Did 8 of 8
Recv: Accuracy: 0.59
Recv: ok
I still haven’t quite figured out why my bed leveling is doing this. I wasn’t able to copy far enough to see iteration 1 and 2, but you can clearly see the accuracy is getting better up until iteration 5 where it starts going the other way. Very strange behavior. I have all 3 Z Axis belts tensioned snug but not over tightened. I have the PTFE tube running all the way out and mounted to the wall of the machine so the filament isn’t pulling on the extruder at all. Regardless, you can see the accuracy is getting better and then it decides to start getting worse. This happens consistently every time. Would it be worth replacing the BL Touch and ruling that out?
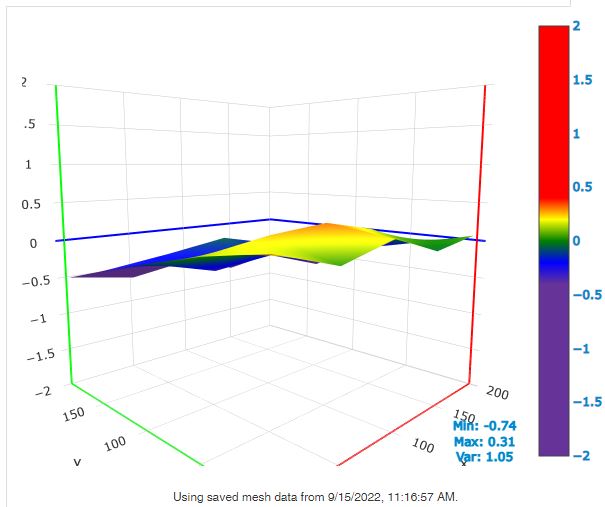
I should note that the bed itself is quite out of plane (i.e not flat). See the results of the mesh leveling below. I ran it twice 24hrs apart. It appears to be much higher in the front than it is in the back.
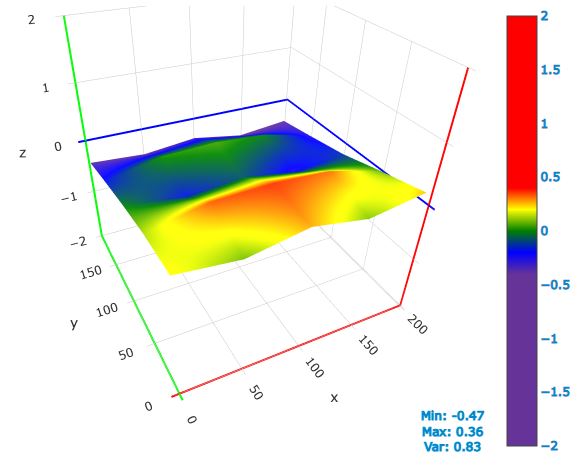
Now, I know this is not ideal by any means. BUT, the Auto Z Leveling I am having problems with should not be effected by this, right? Auto Z Leveling finds a level plane between ONLY 3 points and should not matter what the rest of the bed looks like. It will still level 3 points of the bed.
That mesh level grid looks like the wire bundle on the extruder is pulling on the head. Check the carrier tension. This is the number one reason I swapped to the v4. That CF tube starts to break down and this gets worse. To the point my prints started to show artifacts.
Oh no… there is a new version?? I have been inactive for a while and didn’t even notice. I am excited and overwhelmed all at the same time!
So Ryan, tell me straight up. Should I keep the existing V1 Repeat and start a new V4 Repeat from scratch or should I tear it down and reuse all the components (control board, Hemera, bed, steppers, etc.)? I like the idea of having ANOTHER printer in my arsenal, BUT new components make the number in my bank account decrease a bit so there’s that. Really the question is, is the V1 worth keeping around?
Obviously I’m not Ryan, but I’m about to start printing parts for the new one.
I think the biggest thing he addressed was the CF tube fatigue. If yours is still going strong, great. If not, you can replace it with an aluminum tube, as that has shown some promise in a couple builds.
It’s also easier to to tweak dimensions to square up, so if you’re satisfied with the accuracy you have, again, great.
I think all the other improvements are significant, but minor, like moving the steppers to the z post so they move up and down with the bed: uses less belt, but i wouldn’t rebuild a printer for it.
Hopefully i hit the major points.
Thanks Tony. Right now my printer seems to be running just fine, other than the umbilical pulling on the gantry when at Y=0, which causes bed leveling issues. But once that initial print layer is down I don’t seem to have any issues. I haven’t put a lot of print time on this machine yet though, so maybe I will just keep using this until I find issues. The new V4 version with aluminum extrusions just looks so enticing.
Tony hit it perfectly. Keep going, if the problems get worse V4 just takes another linear rail. The rest is reusable.
If you were careful you could even reuse your current frame, minus one part, which I could help make an alternative part or adjust your current frame.
V3 proved a lot of things, one of which is I got to wrapped up in challenging myself to make as few unique parts as possible. V4 is easier to build and easy to adjust and repair. initial leveling is rock solid this time around.
I’m sure that the answer comes back to the old stand-by. “It depends.™”
One of the “big problems” with the Repeat is that the CF tube becomes inconsistent with use. The laminate starts to flex on the faces which lets the hot end move in inconsistent ways. This leads to more artefacts with stuff like G29 bed leveling where the wire harness tugging on the carriage starts to alter the trigger height of the BLTouch.
Honestly, I think that’s the only real issue, and it takes a while for that to really show up. Ryan’s printers are in a print farm and run pretty much continuously, so he’s going to see this worse than most of us ever will. I have more printers than I could possibly need, so mine doesn’t run nearly so much, and the only problem that the CF tube really gave me was that I could see some of the CF texture on the surface of otherwise very smooth prints.
That said, I’ve switched to 20mm aluminum tube. The aluminum is really smooth, of course, only a few grams heavier than the CF, and probably won’t develop the same flex on the faces as the CF tube did. I’m very happy with my V3 Repeat, and am looking to build another. I’ve paused a bit to think it over for if this should be another V3 or if I should go ahead with the V4, for which I’d need to buy another MGN12H rail. I have all of the hardware to go ahead with the V3 in hand already not to mention a complete set of printed parts.
My factors for building the V3 are:
-
I am perfectly happy with my current V3. It works well, and I can’t see a reason why another wouldn’t also work well.
-
At this point, the cost is the frame material. 12mm plywood still costs more than I’d ideally like, but the cost is likely to be the same no matter what I choose. (I have the wood, just haven’t cut it yet.) So the V3 is definitely cheaper for me to build.
On the other hand…
-
“Gotta build 'em all” there’s a bit of that mentality to me.
-
I do plan on having the printer around for a long time, and there might eventually be an issue that the linear rail would have made better.
-
The Z axis on the V3 is sometimes annoying to adjust, I get some incidents where the belt touches the Z blocks on the opposite side, even when the belts are properly tensioned. This only ever seems to be a problem during rapid Z moves, like after homing starting the G34 leveling, or sometimes when homing after a print completes, but I’ve got one print that has a curve where the Z axis didn’t move evenly. The new Z shuttles look like they’d solve that problem. (This might result in a hybrid build, too, just take the new Z axis.)
If I had any kind of time crunch, I’d go with the V3. Full speed ahead and damn the torpedoes. Like I said, I’m happy with the performance of my current V3. Most of the current pause is really that I have 300mm rails, and I’ve hesitated on the decision to cut them down to 275mm.
If I didn’t have any of the hardware, I’d probably collect with the intention of building a V4.
So… It depends.™ I can tell you that I have no intention whatsoever of tearing down my V3. The 20mm aluminum rail goes a long way towards helping. I also have 3 CF rails that could be substituted in on relatively short notice.
Thanks for the replies guys. I think I am definitely going to upgrade my machine to the V4 at some point. Maybe not right now, even though I just went ahead and purchased the aluminum extrusions… But I just wanted to have them when I am ready. As long as I can reuse all of the electronics/components then cost shouldn’t be too much more than the aluminum extrusions and another linear rail.
Matt,
I did remix Ryan’s Repeat, to accommodate a linear rail for the X axis, and that made a huge improvement to the printer. The modified parts are not pretty (V1 standard) but they work, 4 parts to print plus a linear rail, and you are done.
I can post the files here if you want, or get them to Printables or thingiverse
The printer still going strong and very reliable.
I order parts to build the version V3-V4 what ever the number is  , all coming on a slow boat, but I’m keeping the original Repeat, as it has been the best printer I have ever owed.
