Inexpensive LinuxCNC interface revisited... deja vu, or just another rabbit hole?

Recently I posted regarding the fun I’ve been having playing around with Rasperry Pi’s and Python. And, related, I discovered a rather meaty Python project called PyCNC and started playing with it. Rather than a real-time kernel it uses a clever DMA scheme to provide more accurately timed signals for driving the stepper motors of a small CNC machine. I couldn’t get it to work completely. It started throwing OS errors… and I then quickly realized I was in over my head so I put that project to the side for the time being.

Sadly [sic], I’d also heard rumors of more and more folks now running LinuxCNC on RPi’s. While I thought I had already checked off the LinuxCNC check box on my resume (I started using it in 2010 or thereabouts)… I decided to see what’s transpired over the past couple of years, while I wasn’t looking.

When last I left off, I had gifted all of you with my Inexpensive LinuxCNC interface for MPCNC… and a few of you brave souls weathered the storm. But I persevered and recreated a Ubuntu/LinuxCNC desktop PC setup that mimicked my original BuildYourCNC machine… using the PC’s parallel port and my little two-board interface consisting of an inexpensive Mach3 breakout board and CNC shield.

So now, several years removed, here I am staring at my RPi4 (4G ram) and, with only slightly renewed interest in CNC stuff, I thought I should be able to gift you once again… with Inexpensive LinuxCNC interface #2. Should be a snap since I’ve done it before… right?

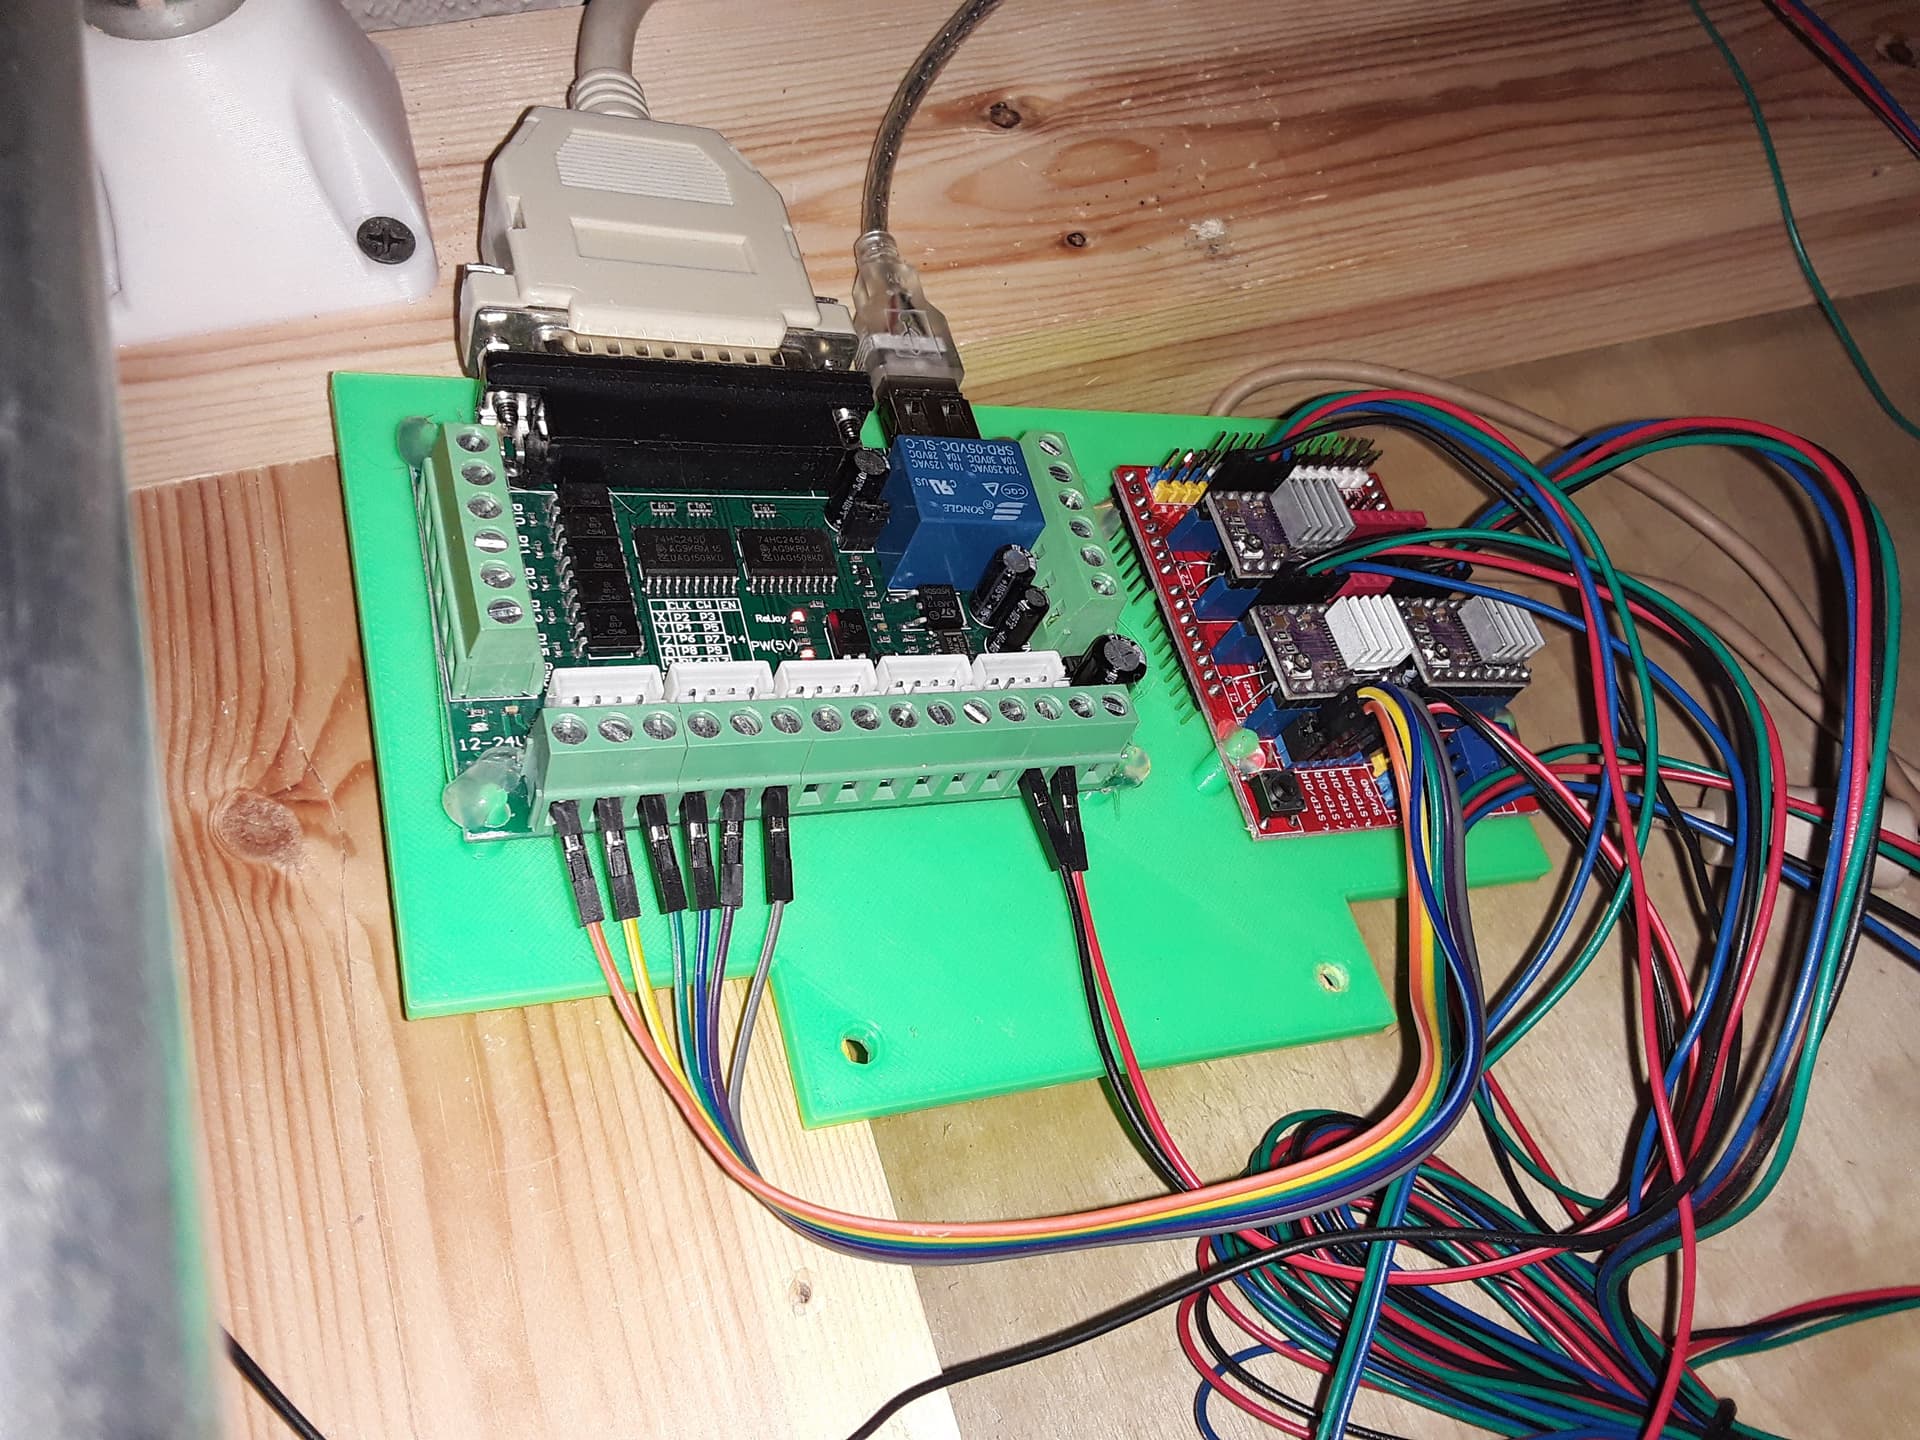
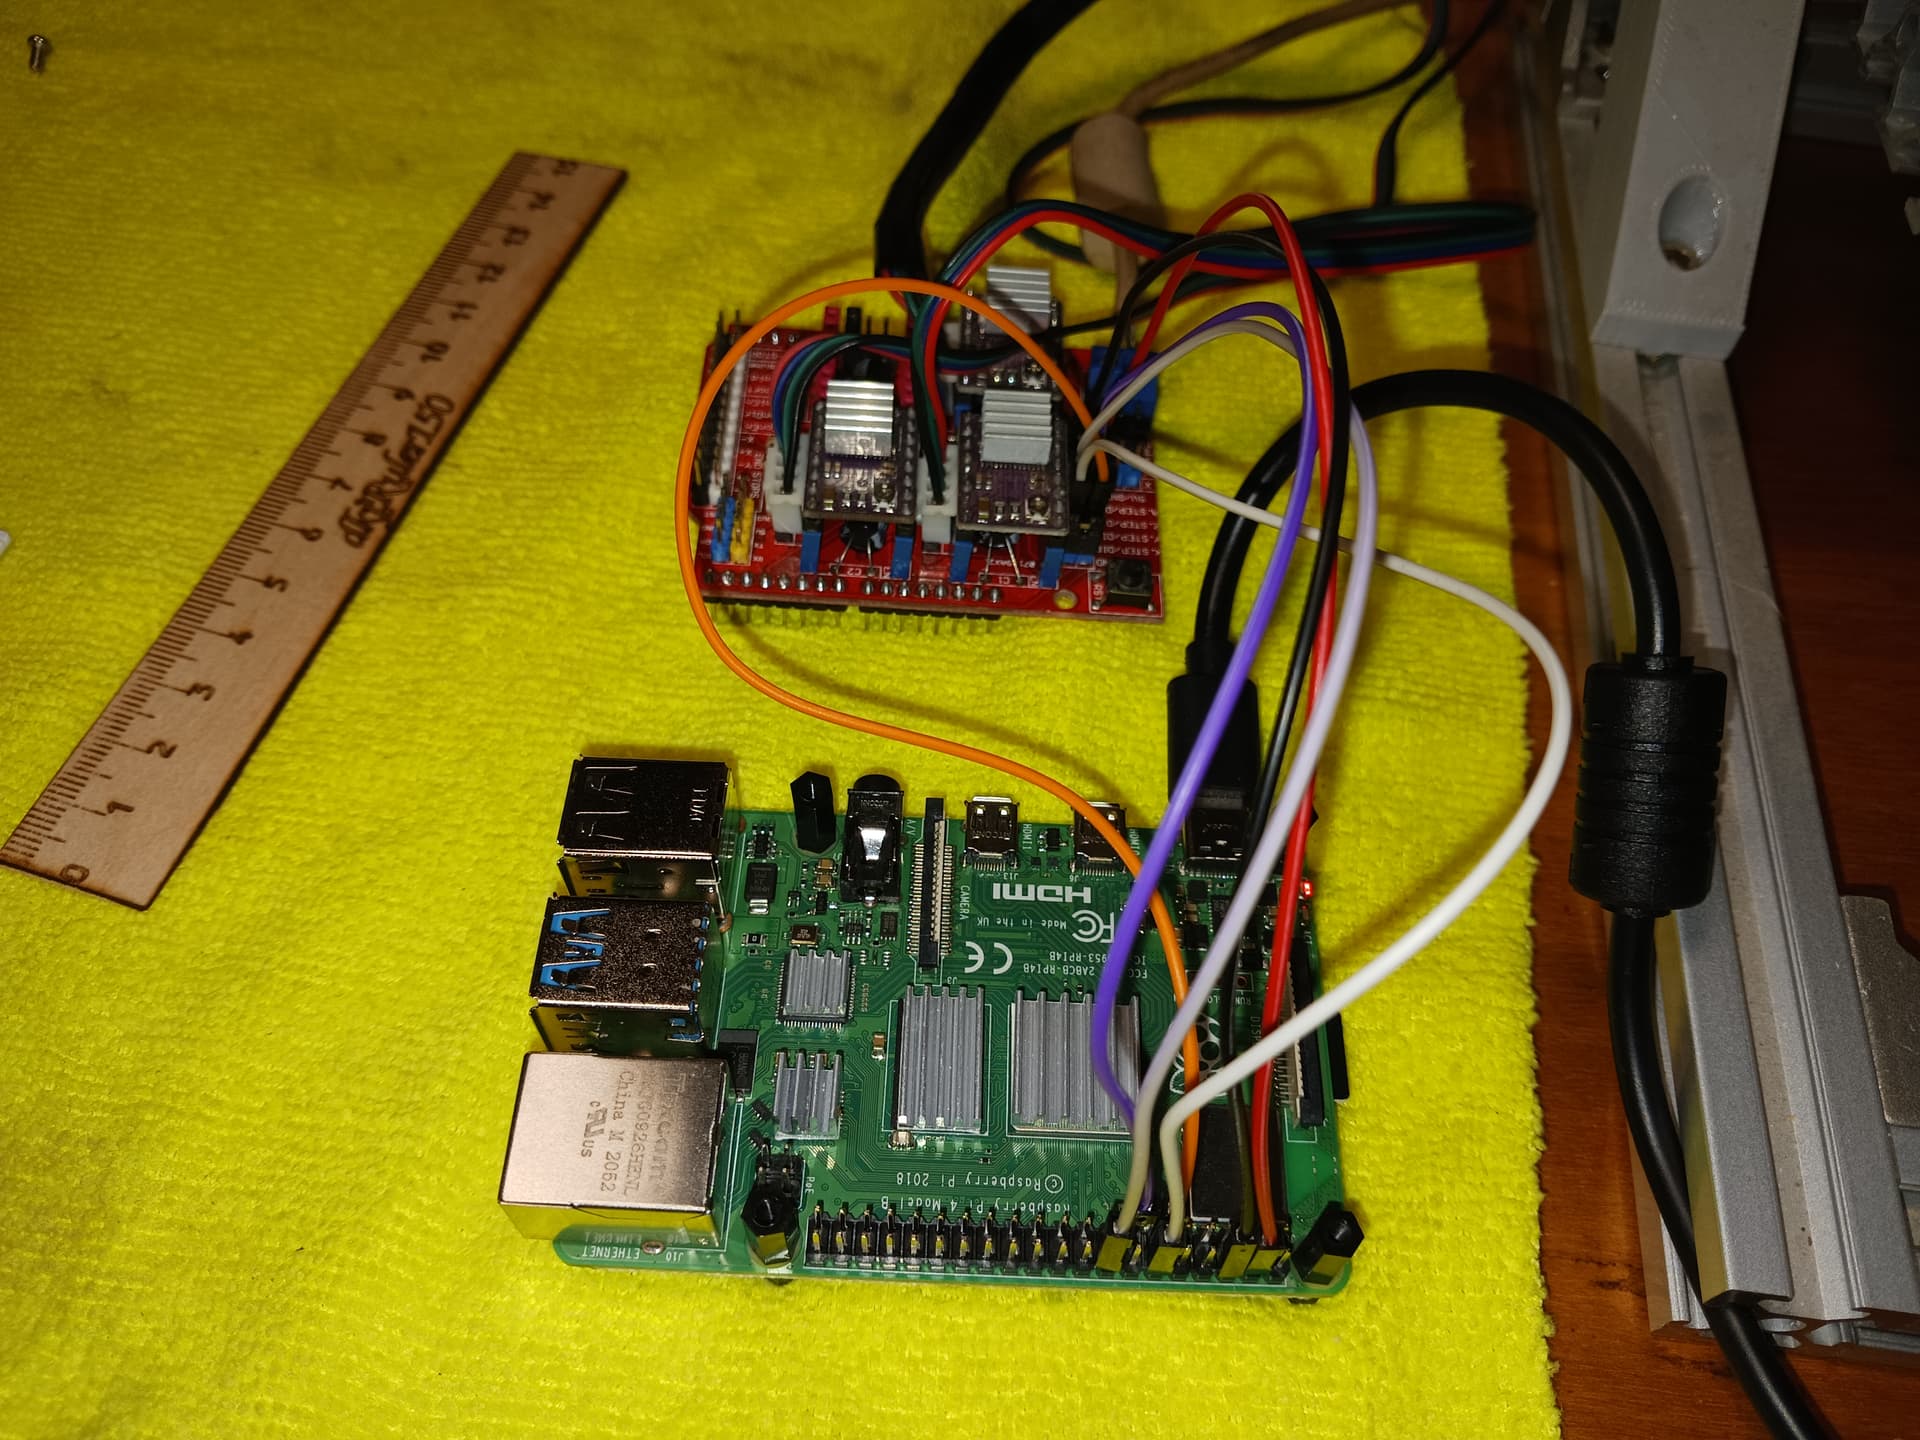
Boy… was I ever wrong! Half a dozen (or more) tries to find a proper (i.e. working) RPi LinuxCNC image and then struggling with HAL for a week or so to direct step and direction signals to the RPi GPIO pins… and I’ve finally come up with a modestly successful – i.e. it moves! – setup using only an RPi4 and the same little CNC shield as before.

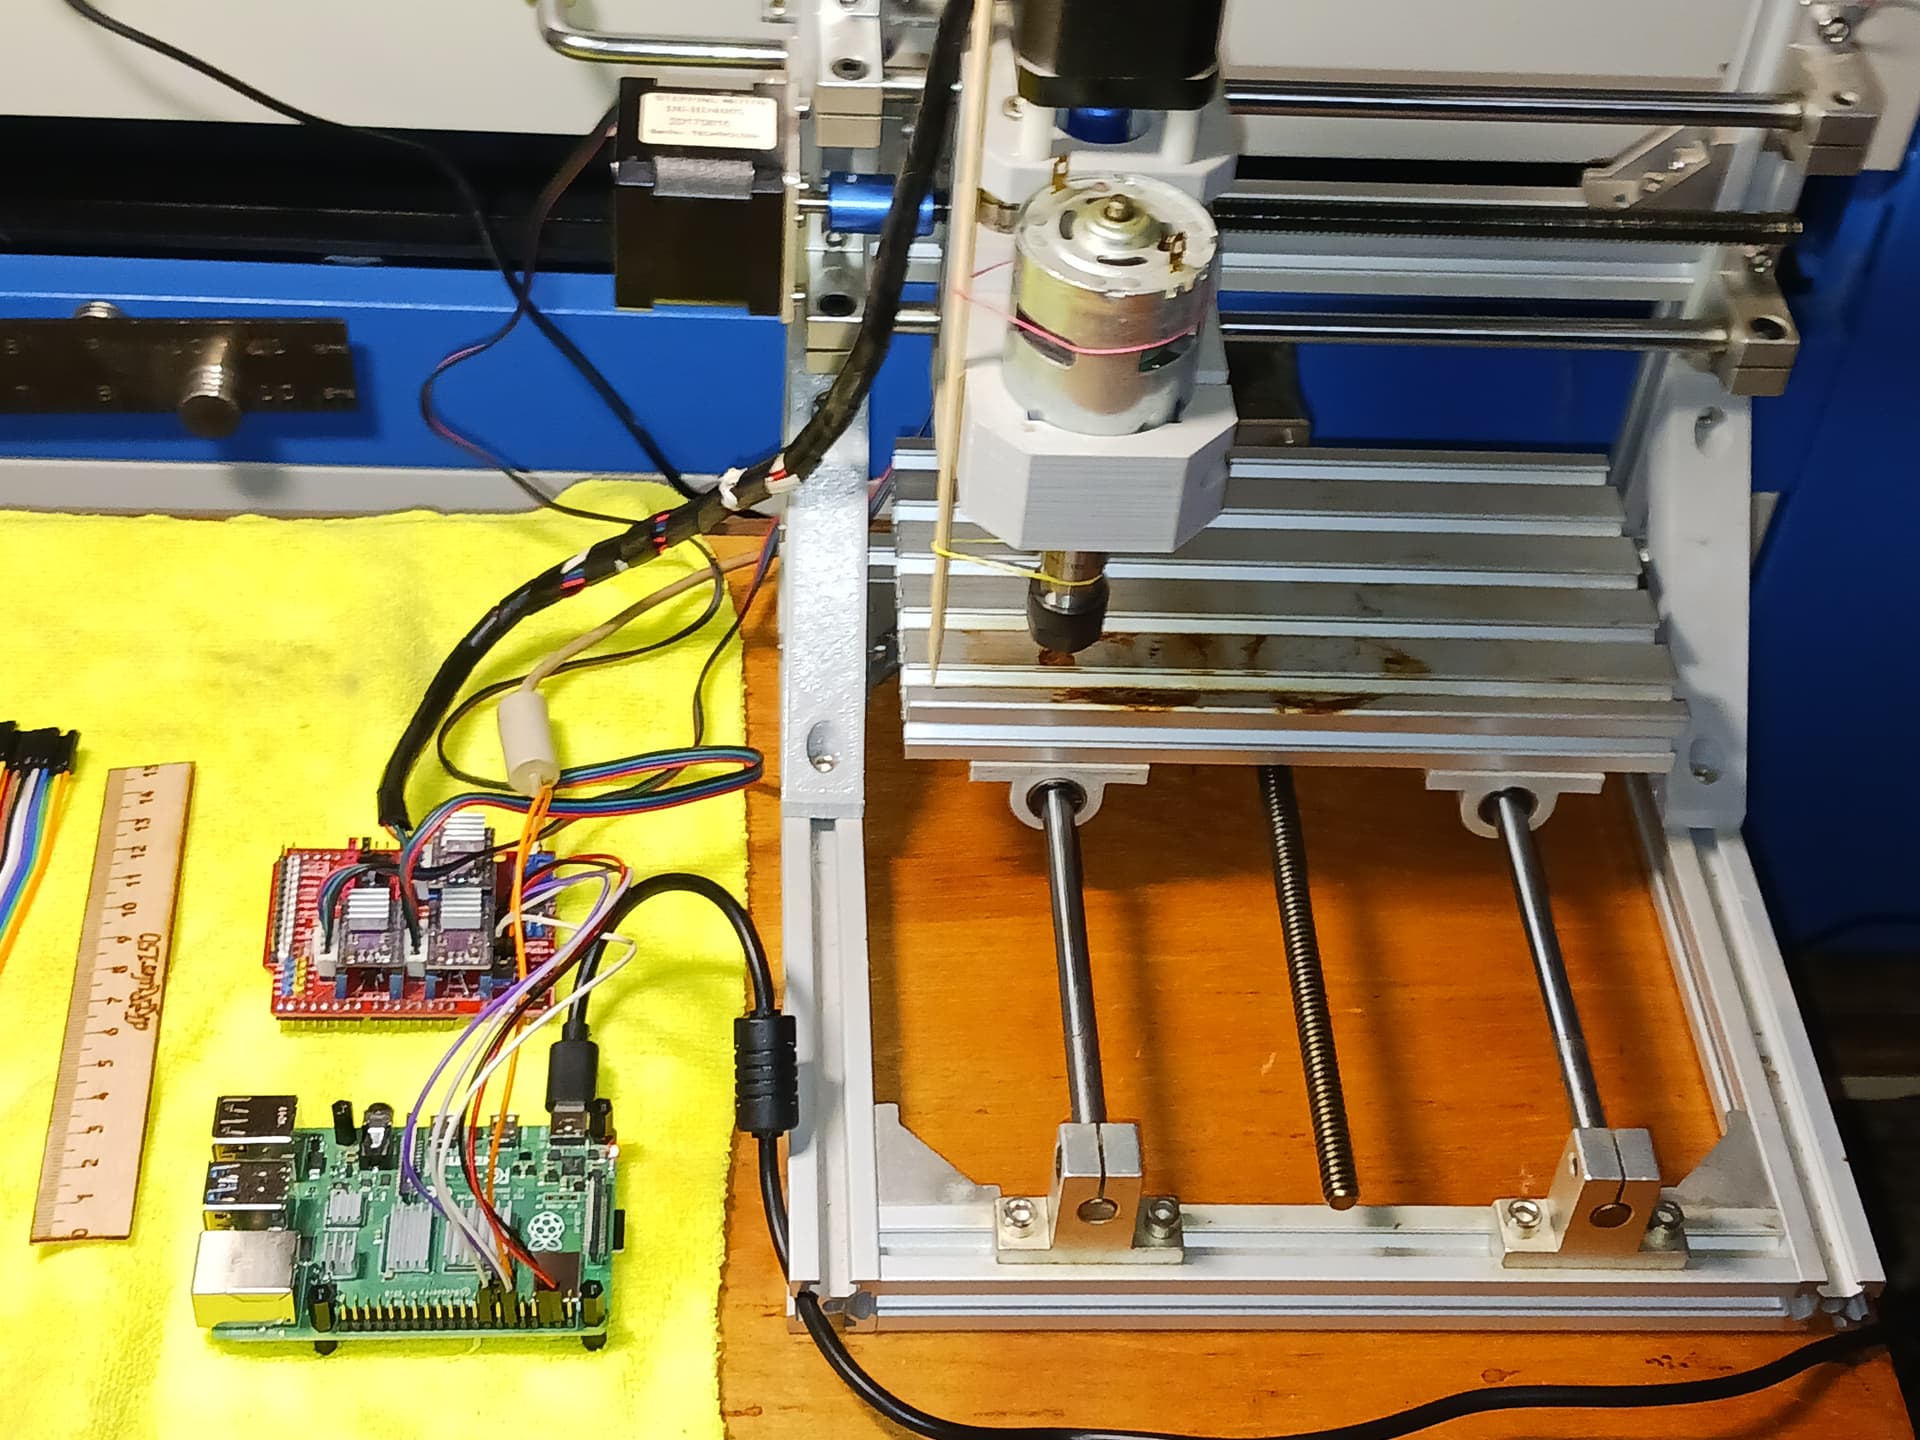
Gone are the desktop PC and the little Mach3 breakout board. RPi4, GPIO pins, and the little CNC shield carrying the DRV8825 drivers we all know and love… are all we need.

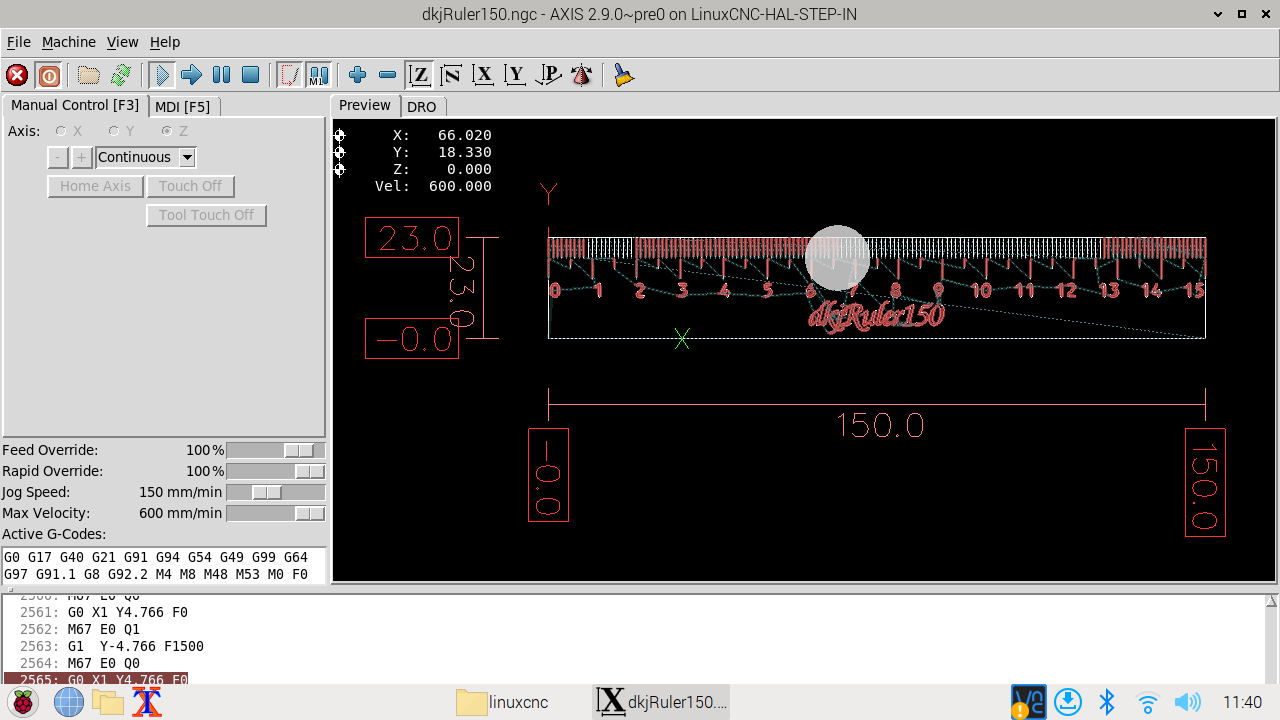
Here it is in action… just X and Y, for now. Oh, and Lightburn-generated gcode for my favorite little rulers…

There’s, of course, still a ton I don’t understand and probably never will… but it’s been interesting and has kept me off the streets at night. I’ve already got the Z-axis implemented… just not hooked up, for demo purposes. I probably should get the spindle going… since it’s there and of more interest to most folks, here. A laser might be trickier… as there seems to be less information out there about LinuxCNC and lasers.

But I’ll keep piddling along… who knows what lies ahead?

– David

9 Likes

Linuxcnc on raspbian? Or something with realtime extensions?

The gang’s missed you… :wink:
streetpimps

1 Like

Thank you. I’m just getting slow… common old age stuff setting in. I’m really enjoying this RPi /Python/LinuxCNC stuff though. Thankfully, I can do most of it from my recliner… most is over my head and I forget it by morning. Maybe my dreams have something to do with that… :stuck_out_tongue_winking_eye:

7a6h

1 Like

Do you know if LinuxCNC for RPi uses the “clever DMA scheme” for accurate and fast step/dir signals, or if it uses more conventional imperative code to set the state of the pins?

My impression of pigpio (a bit stale perhaps and imperfect memory) was that you could program a waveform ahead of time and rip through it with very tight deterministic timing and high speed. Keep the buffer from emptying and you can get some crazy fast signals. I am assuming this is one and the same with the clever DMA scheme. But it might not fit well behind a HAL such that LinuxCNC can utilize it. But then I know nothing of the architecture of LinuxCNC.

I had to go looking again for that one post, among the many that I had carelessly closed down, and provided the link to an SD image that worked for me. From @elovalvo out on the LinuxCNC forum…

It uses a Raspberry Pi realtime Kernel (5.15.65-rt49) with Debian 11 (bullseye) running on my headless RPi4… and controlled through VNC, from my recliner.

For reference, I’m not a LinuxCNC “power user”… just a tired/retired EE trying to keep piddling for as long as I can. Using LinuxCNC on a desktop PC with a parallel port was a snap since the “stepconf” utility walked you through all the configuration. You’re not so lucky if you wanna use the RPi’s GPIO pins, however… it was a sort of “HAL-hell” that took me about a week to come up with something that works, i.e. moves. I’ll be happy with simple XYZ basic operation… maybe just a pen plotter :wink:

So, to answer the question posed in the thread title… for me, this is just another big ol’ rabbit hole . But it’s been fun so far, now that I’ve got movement…so maybe I’ll surprise myself.

:stuck_out_tongue_winking_eye:

– David

3 Likes

Hey, Jamie!

The RPi4 is using a real-time kernel running Debian 11 (bullseye).

But I think I did read somewhere along the way that PyCNC’s “clever DMA scheme” was also how Pigpio works. I pictured it at the time as some sort of stored waveforms accessed using DMA (hardware) rather than the slower program access (software). I also vaguely remember studying DMA in college and using ROM lookup of waveforms for a system we were building at some point… but that was 50+ years ago. Sounds like they’ve married the two schemes?

– David

2 Likes

They use DMA to send data to neopixels/ws2812b too. There regular gpio isn’t fast enough.

You should probably spend a little time on the streets. The next generation of tinkerers need your mentorship.

7 Likes

Alright! For completeness sake, I hooked up the Z-axis and cobbled together a pen-holder. I used some Spongebob clipart from the LB art library and used a simple online svg2gcode converter to get the Z-axis involved. I could have used Inkscape or F-Engrave as well.

I’m using the RPi4/LinuxCNC headlessly and VNC to wirelessly control it from my Linux-enabled Chromebook (developer mode). I sftp’d the gcode file to LinuxCNC, which then squawked about two G0 codes on the same line. Fired up the RPi text editor and inserted a newline (\n) for 98 occurrences and LinuxCNC was then happy.

I suspect this is the last update for this 2nd version of the Inexpensive LinuxCNC Interface. Don’t care to get a noisy, messy, spindle going (just replace pen with free-running spindle) and controlling a laser is beyond the scope of my abilities with LinuxCNC. But it’s been interesting and fun… I’m just lazy and slow.

:grin:

– David

6 Likes

Congratulations, you have made what i am trying to do.
I am fighting with linuxcnc.ini et .hal
Could you share those files with us.
Thank’s

1 Like

I’m sorry… everything has been dismantled and all I have to share is documented in this thread. Being several months removed and now engaged in other projects I remember very little of the details. Follow and study the links provided and you’ll quickly know as much or more as I could glean for my effort. This was just a fun project to satisfy my curiosity and never intended to become a serious endeavor.

2 Likes

Thank’s four your answer.
The simpliest way i found to solve this problem was to use :
linuxcnc → by_interface→parport →stepper →stepper_mm
modify the file standard_pinout.hal

standard pinout config file for 3-axis steppers

using a parport for I/O

first load the parport driver

#loadrt hal_parport cfg=“0x0378”

Pour les GPIO

#loadrt hal_pi_gpio dir=67108751 exclude=0
loadrt hal_pi_gpio dir=35390224 exclude=31718639

next connect the parport functions to threads

read inputs first

#addf parport.0.read base-thread 1

Je fais la même chose pour les GPIO

addf hal_pi_gpio.read base-thread

write outputs last

#addf parport.0.write base-thread -1
addf hal_pi_gpio.write base-thread

finally connect physical pins to the signals

#net Xstep => parport.0.pin-03-out
#net Xdir => parport.0.pin-02-out
#net Ystep => parport.0.pin-05-out
#net Ydir => parport.0.pin-04-out
#net Zstep => parport.0.pin-07-out
#net Zdir => parport.0.pin-06-out

net Xstep => hal_pi_gpio.pin-23-out
net Xdir => hal_pi_gpio.pin-19-out
net Ystep => hal_pi_gpio.pin-13-out
net Ydir => hal_pi_gpio.pin-15-out
net Zstep => hal_pi_gpio.pin-38-out
net Zdir => hal_pi_gpio.pin-40-out

create a signal for the estop loopback

ça ne change pas

net estop-loop iocontrol.0.user-enable-out iocontrol.0.emc-enable-in

You find easily the pins i used.
You can use rpi-gpio_1.0_arm64.deb
After installation, rpi-gpio well give you the line
loadrt hal_pi_gpio dir=xxxxxx exclude=yyyyyyy

Your Spongebob is still alive in France !

1 Like