CNC-cut table for LowRider v3 (parameterized, for cutting full sheets+)

I think it depends on what the purpose of the table is.

If the idea is a low-entry cost table for LR3 builds, then the material costs should be minimized. At today’s lumber prices, a couple of 32X80 inch hollow core doors starts to have a fair amount of appeal.

So assuming that this is supposed to be a step up from a couple of doors on sawhorses, but less than a complete cabinetry workbench set, maybe some parameters for the height would be a good thing.

For my Primo table, I used a 3.5" interior height, and I can’t get inside the table at all, but I hung an 8" deep drawer underneath the table. The drawer closes, and keeps the chips/sawdust off, which an opening doesn’t do as well.

2 Likes

I’m fine paying to have a solid base made. i’ve got 3k earmarked for this project.

I’ve been following this for about 2 years, and am finally ready to clear some space out of the warehouse and start building

5 Likes

When I said “personally” I was referring to a private fork I’ve done of this design.

To minimize material costs for main version, the crucial break point would be going from a single sheet of plywood to a second sheet. I can experiment with whether tightening the height can get to only one. It’s worth checking.

1 Like

Amount of sheets can defiantly effect cost. I stopped counting the $ on my table. I believe im at 7 sheets of 3/4 plywood. 4 sheets of 1/2 plywood and 6 sheets of MDF. and I still need at least 5 more 1/2" and probably 4 more 3/4" to call it done and complete LOL. Drawers get expensive and eat up a ton of wood. But man do they give you a ton of space to store stuff.

1 Like

So assume your ribs must be cut lengthwise on a 4x8 sheet. You have 4’ to work with.

Make them under about 11-7/8" tall and you get 4. Maybe enough, but…

Make them under about 9-3/8" and you get 5

Make them under 7-7/8" and you get 6

Make them 6-1/2" and you get 7. For me this is a pretty good place if the table has to be 8’ long, because the ribs will be a little under 16" apart, which should be plenty rigid. Of course you don’t get any spars from that sheet, you will have about 3’ of offcut from the end, which should give you some material for other fixtures.

Now let’s play devil’s advocate and say 5-1/4", which gives you 9. Use 7 of those as ribs, and 2 as interior spars. Now you’re getting too short to have much useful space inside the table but you have a torsion grid inside that is 6x4, ~16" x ~12" – lots of rigidity. You still need the edge platforms to mount the LR3 rails and the side panels for the box, but this seems to be not a bad compromise. 5" doesn’t leave room for much more than a 3" tall opening though, so not sure if it’s much for your needs. Let’s say it isnt, and you want to conserve…

At about 4-1/4" you get 11 strips. Which gets your entire grid. 7 ribs, 4 spars. You still need the rails for the machine, but these might be strut or other material. These rails need to be about 9’ anyway so they have to come from another source (assuming full sheet capacity) if I were designing this as a budget /default table, this is probably where I would go. This lets you cut a full grid for a 4x8 sheet (or 49"x97" for MDF).

If you just want the whole thing 8’ long, about 3-1/2" gets you 13 strips. I don’t know if you would want to go much thinner than that.

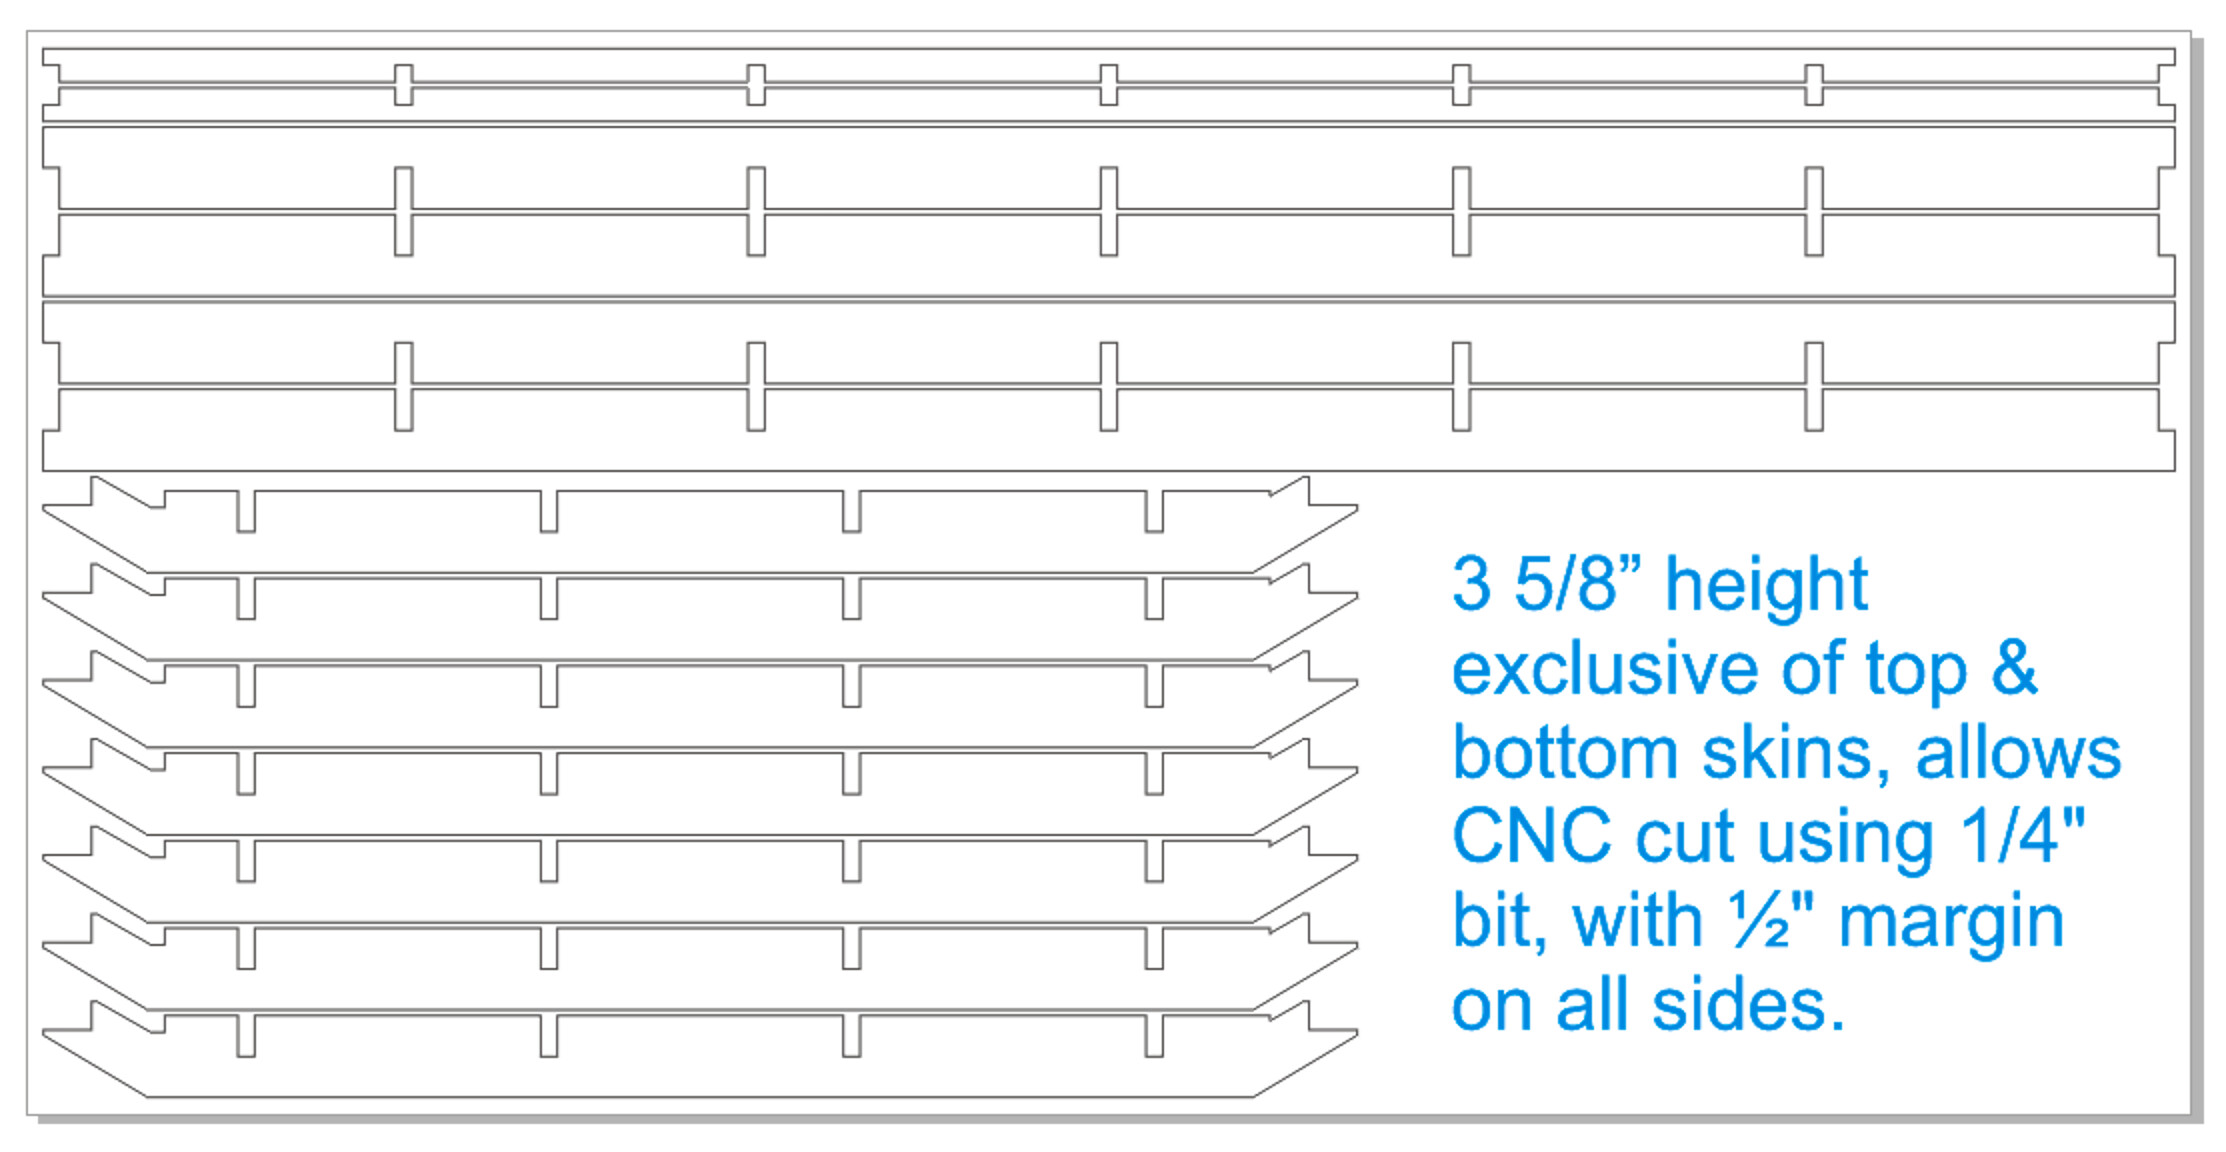
I’ve rounded the sizes a bit to account for about a 1/8" kerf from the saw or router bit. If you are using a 1/4" router bit to cut these out, you’d need to go a bit smaller. I’m personally thinking about a tablesaw, actually.

Of these choices, the 9-3/8" option gives you 4 chambers, which is probably good. 4 struts gives you about a 16" depth and leaves you a couple of 4-1/2" strips from the second sheet which can either be your rails or table supports. This actually seems like a pretty good setup to me. The openings could be 6-1/2" high which is more than enough space to reach in.

1 Like

@SupraGuy: Thanks for the calcs. For a prospective main design, I’m going to be sharpening the pencil so to speak, to target using only one 4x8 sheet of plywood while getting the best rigidity and greatest reasonable quantity of ribs and spars out of it. I am not aiming for usable storage space inside the torsion box in that instance.

The screen shot below is based on 2D vector manipulation of the design, but I am fairly confident that reworking the 3D model will support this. This potential cut plan shows using only one 4x8 sheet and yet getting four (4) main Y spars and seven (7) main X ribs, plus two minor Y spars on the extensions for a place to attach metal struts. The lower right corner of the sheet has some free room for cutting additional pieces that could be “laminated” or “scabbed” onto the minor Y spars for a version of this that has wooden side rails for the LR3 to ride on. These drawings are based on a 3 5/8” height for the torsion box body, exclusive of top & bottom skins, and it would allow a CNC cut using a 1/4" bit, with ½" margin on all sides.

2 Likes

That’s looking good, thanks for all the work you’re putting into this.

1 Like

Anyone see this CNC torsion box? Beginner Workbench Challenge - YouTube

1 Like

Yea, that was a horrible design.

Man you should make this available for the ones dont use fusion…

1 Like

It will be offered as DXF’s for cutting … want to actually cut, assemble, and test first.

2 Likes

Awesome. Im planning 2 builds. A 4x8 stock one and a 1700mm x 3000mm build (but first i need to sort out the space issue on my shop, maybe move or get the shop bigger i still have space to grow)

1 Like

Hi Doug - very good work on the parametrics. But the holes in the spars and ribs defeat two of the aims of the part. 1) Holes cost money and unless you cut a hole then use it as a part then this is a conflict and you pay more for the function of the part then needed to 2) The hole means the local bending stiffness is reduced hugely and the local shear path has been removed. A “torsion box” depends on local shear stiffness and the holes have removed all of the local stiffness. If the holes are to reduce weight, then they need to be triangular like a truss. This improves the local stiffness over a large hole and reduces weight. Peter

1 Like

@peteeng
Thanks. There are no holes in either the ribs or spars in the version I’m working on now. There were holes in earlier versions (above) based loosely on a Ron Paulk-inspired approach, but the shallower version I’m working on does not have room for the holes or any need of them. You can see a rough 2-D sketch of the current work in this post here:

Hi Doug - Well done. Peter

1 Like

Update Apr 10, 2023: re. wooden sides version — older pics still shown, but newer pics shown beneath them — streamlined version that is doable from a single sheet of plywood (all except the wooden side extension rails), and the Fusion file is updated both for online viewing and the download link I’m sharing.

@DougJoseph Not having any luck downloading the F360 file (either of them) - I click the link and nothing happens…

@tippmar

There are two links for each. Several thoughts:

  1. I’m actively working on this even now, so a delay is advisable.
  2. The reworking for shallower cut plan so that a torsion box can be cut from a single sheet of plywood has not yet been done on the version for metal struts.
  3. The shallower plan for the version with wooden side rails is closer to completion, but the F360 archive currently available for download is not the latest — pending update happening soon.
  4. There are two links for each — because I am not on the paid version of F360, I can only offer a live preview via their cloud, and I then can offer download of a Zip file containing a Fusion360 archive file that I manually upload to my own website. Which link are you clicking? Which table version, and of that one, which of the two links for it?
  5. I’m prepping DXF files for a variety of cut plans
  6. I’m prepping to do test cuts to check tolerances on real life assembly based on actual measurements of thickness of real plywood.

Bottom line, waiting is advisable, but I’m still unable to advise more unless I know which link you’re clicking, and what you see versus what you expect to see.

No problem, Doug. I can wait a bit.

I was trying to download the .zip files for both designs. Finally got it to work by copying the link URL and pasting it to a new window, not sure what the problem was.

OK, I was able to reproduce that, and I think it was a “browser security” issue. I edited the links to change http:// to https:// and now the download happens on the first click, no pasting needed.