So, can you hook a brother up? LOL
Sure, if you are in Alberta or Ontario, or at least don’t mind a drive to the warehouse…
I was considering 2 different options. The side of the table would have a vertical piece of plywood. Then I’d either drill holes on the inboard side of the 2x2 and install rivnuts, or drill a small hole on the inboard side and a large hole big enough for a socket on the outboard side. Then use lag bolts through the small hole.
EDIT: If I go the rivnut route, then I can cut groves in the plywood and have vertical adjustment on the 2x2 steel.
One of those videos finally explained fusions parameters the way I needed to hear it. Now I have no problems with them. I think it is a combo of know sometimes you can not edit a dimension you have to start over (like the mp3dp side panel hole locations), and sometimes I was just trying to do it like Solidworks.
Just to test this I made the Lr3 strut plate single input fully parametric. Fusion Now If I could just figure out a better way to do parametric assemblies.
@vicious1 Cool! It was almost all new learning for me, cool stuff. I’ve made a lot of progress, but I still have a ways to go in implementing what I’ve learned. The order matters and so planning is important.
I actually do remember that. I think I had commented if I was in CA, I’d totally apply! Gah that was when I was building my LR2, seems like a lifetime ago.
I don’t believe a 3-legged table would be a good idea. While it’s true that since 3 points define a plane and will never rock, the corners on the end with the single leg are not supported and weight on one corner could cause the table to tip. However one could argue that the weight across the x-axis will normally be balanced. But if you were to lean on one of those corners that could tip your table over giving you a bad day.
You make good points.
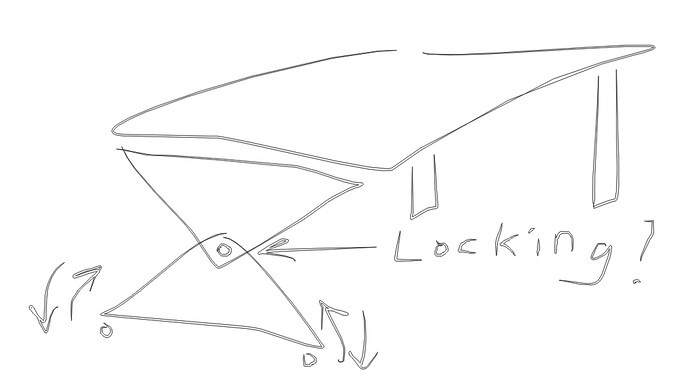
My vague thoughts on 3 point approach included a pivot, something like this:
However, it may be just as you say: perhaps not a good idea.
If it pivots then it is a 3-point support. So the question is do you try to make the table stiff enough to hold its own weight (including the LR and what you are cutting) or do you go through some kind of process to create a flat plane perpendicular to the router shaft?
It’s interesting that we always talk about leveling the table when really we need to do tramming. If the table is a little out of level that doesn’t matter as long as it is properly trammed.
The concept I think most viable is levelers. (I have no vested interest in a three leg setup.)
In the world of welding tables, one of the tests is does the table bend any when a corner is lifted.
While one would hope the torsion box is so strong as to not bend if one of the support legs is not touching the floor, I think no one wants their table “rocking” … ![]()
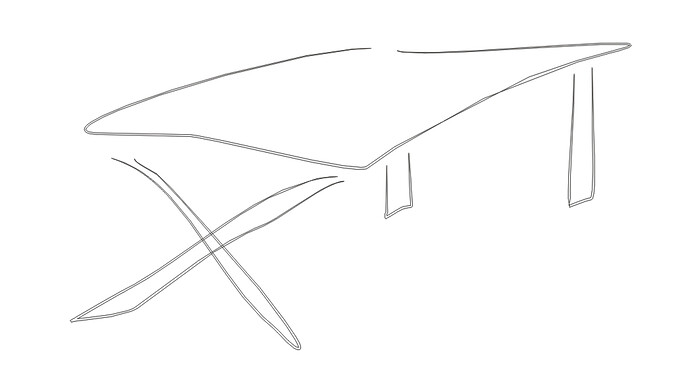
If it pivots only until locked down, it’s a leveling system. Once locked down, it becomes something like this:
I’m not an engineer, and don’t even play one on TV. ![]() That concept may be considerably not as good as four straight legs. I’m not pushing for it. It’s just me thinking out loud.
That concept may be considerably not as good as four straight legs. I’m not pushing for it. It’s just me thinking out loud.
You could have a temp leg in the middle of one end. Then use leveling screw feet in the legs in the corners to just hit the floor.
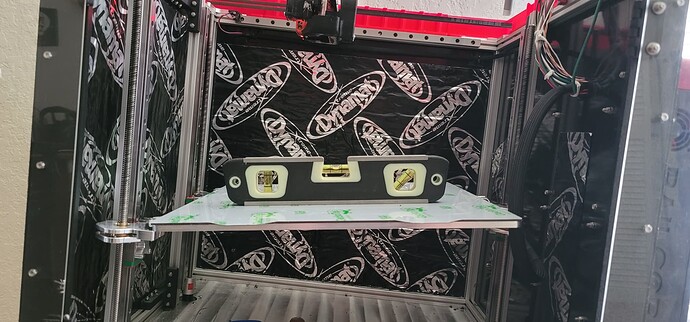
At least your bed is level! lmao
I just measured the hole openings (versus structure) on the spars/ribs of the Ron Paulk-inspired torsion boxes (of which I made two and bolted them together for my current table). They are 2" tall of support (above and below the holes), with 6" tall holes, making 10" total height of the rib/strut, exclusive of the thickness of top skin and bottom skin.
I point this out for a couple of reasons:
-
The 6" openings on my current table allow ample access for placing/storing/retrieving items inside the torsion box. I use this space very often.
-
The plans shown here (above) thus far call for 8" tall exclusive of the thickness of top skin and bottom skin (instead of 10") and call for 2.667" openings (instead of 6"). This would be less space in between the skins, and drastically less usable / less accessible.
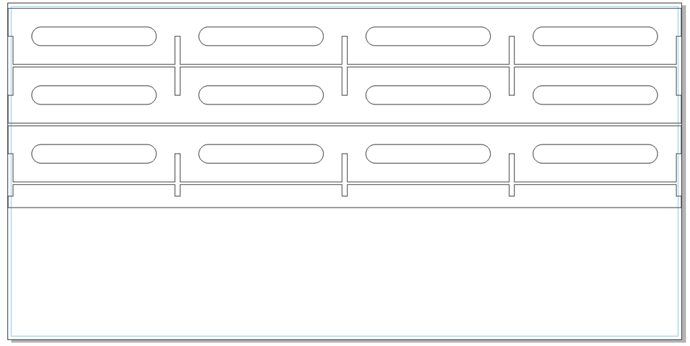
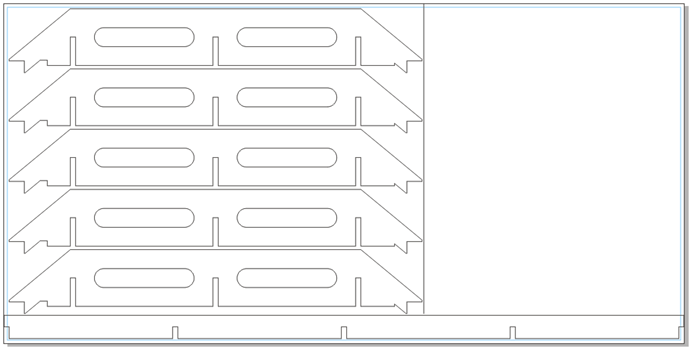
In personally considering whether to make the torsion box of this table (for me) 10" instead 8" and make the opening 6" instead of 2.667", one consideration is the additional material needed for the build. Below are: cut plans based on the current plan, and then a modified cut plan for the added storage.
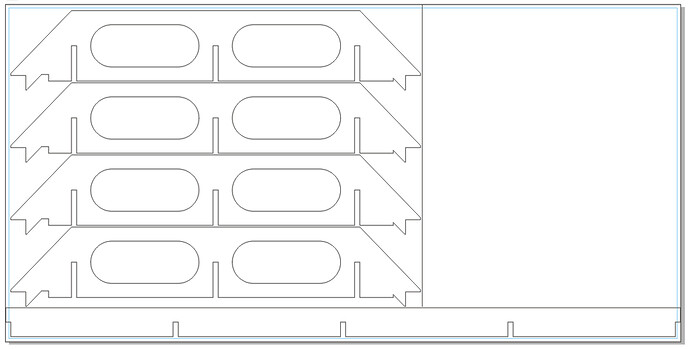
The current cut plan requires two (2) 4x8 sheets of 3/4" plywood, and leaves an unused remnant of about 39% of the first sheet and 38% of the second sheet (could be used on some other project).
8" high (current plan shown as of Apr 8, 2023)
Cut plan, 4x8 sheet #1
Cut plan, 4x8 sheet #2
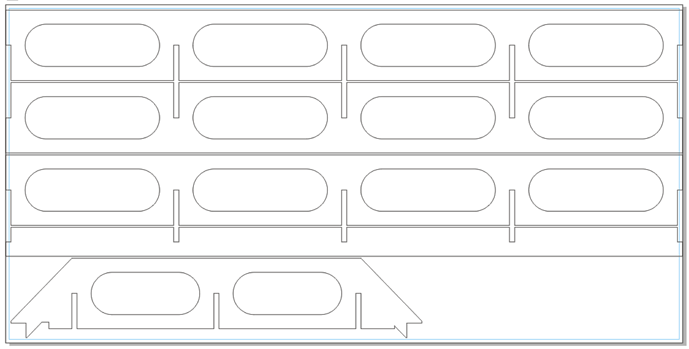
By contrast …
…the latter proposed 10" tall approach also requires two 4x8 sheets of 3/4" plywood, yet it leaves an unused remnant of only about 10% of the first sheet and only about 25% of the second sheet (less that could be used on some other project).
10" high (potential plan not yet created)
Cut plan, 4x8 sheet #1
Cut plan, 4x8 sheet #2
I’m also seriously considering a dual setup with a torsion box on top (either shallower and not intended for storage, or taller), and added storage underneath, with a bottom skin on the torsion box serving as the top of the storage area. The storage area could house either cabinet shelves or drawers or both. Deep in thought.
if this design is finalized, I could have these pieces cut on a cnc water jet.
I think it depends on what the purpose of the table is.
If the idea is a low-entry cost table for LR3 builds, then the material costs should be minimized. At today’s lumber prices, a couple of 32X80 inch hollow core doors starts to have a fair amount of appeal.
So assuming that this is supposed to be a step up from a couple of doors on sawhorses, but less than a complete cabinetry workbench set, maybe some parameters for the height would be a good thing.
For my Primo table, I used a 3.5" interior height, and I can’t get inside the table at all, but I hung an 8" deep drawer underneath the table. The drawer closes, and keeps the chips/sawdust off, which an opening doesn’t do as well.
I’m fine paying to have a solid base made. i’ve got 3k earmarked for this project.
I’ve been following this for about 2 years, and am finally ready to clear some space out of the warehouse and start building
When I said “personally” I was referring to a private fork I’ve done of this design.
To minimize material costs for main version, the crucial break point would be going from a single sheet of plywood to a second sheet. I can experiment with whether tightening the height can get to only one. It’s worth checking.
Amount of sheets can defiantly effect cost. I stopped counting the $ on my table. I believe im at 7 sheets of 3/4 plywood. 4 sheets of 1/2 plywood and 6 sheets of MDF. and I still need at least 5 more 1/2" and probably 4 more 3/4" to call it done and complete LOL. Drawers get expensive and eat up a ton of wood. But man do they give you a ton of space to store stuff.
So assume your ribs must be cut lengthwise on a 4x8 sheet. You have 4’ to work with.
Make them under about 11-7/8" tall and you get 4. Maybe enough, but…
Make them under about 9-3/8" and you get 5
Make them under 7-7/8" and you get 6
Make them 6-1/2" and you get 7. For me this is a pretty good place if the table has to be 8’ long, because the ribs will be a little under 16" apart, which should be plenty rigid. Of course you don’t get any spars from that sheet, you will have about 3’ of offcut from the end, which should give you some material for other fixtures.
Now let’s play devil’s advocate and say 5-1/4", which gives you 9. Use 7 of those as ribs, and 2 as interior spars. Now you’re getting too short to have much useful space inside the table but you have a torsion grid inside that is 6x4, ~16" x ~12" – lots of rigidity. You still need the edge platforms to mount the LR3 rails and the side panels for the box, but this seems to be not a bad compromise. 5" doesn’t leave room for much more than a 3" tall opening though, so not sure if it’s much for your needs. Let’s say it isnt, and you want to conserve…
At about 4-1/4" you get 11 strips. Which gets your entire grid. 7 ribs, 4 spars. You still need the rails for the machine, but these might be strut or other material. These rails need to be about 9’ anyway so they have to come from another source (assuming full sheet capacity) if I were designing this as a budget /default table, this is probably where I would go. This lets you cut a full grid for a 4x8 sheet (or 49"x97" for MDF).
If you just want the whole thing 8’ long, about 3-1/2" gets you 13 strips. I don’t know if you would want to go much thinner than that.
I’ve rounded the sizes a bit to account for about a 1/8" kerf from the saw or router bit. If you are using a 1/4" router bit to cut these out, you’d need to go a bit smaller. I’m personally thinking about a tablesaw, actually.
Of these choices, the 9-3/8" option gives you 4 chambers, which is probably good. 4 struts gives you about a 16" depth and leaves you a couple of 4-1/2" strips from the second sheet which can either be your rails or table supports. This actually seems like a pretty good setup to me. The openings could be 6-1/2" high which is more than enough space to reach in.
