Welcome, Daniel! I’ve only recently begun on my LR3, though I’m well along the way printing my parts. That’s just to say that I’m not coming from the perspective of one who’s gotten all the way through this process yet.
That being the case, reading the assembly instructions, there are comments along the way about the merits of all of those plates being metal, and some comments on the length of screws that you’d need. Check that out for starters.
We all look forward to following your progress! Post often!
I’m on the tail end of my build. Can’t speak to metal though I imagine you wouldn’t need a full 1/2” for the YZ plates like you said. Looks like they also suggest metal for the XZ plates since it’ll be more rigid: LowRider CNC V3 - V1 Engineering Documentation
I first printed the YZ plates in PLA on my ender 3. Problem is the bed is too small to print them flat so I had to print them vertically. Prints were fine but I had serious problems with layers delaminating when I installed components. Hole predrilling helped but didn’t solve the problem. I’m sure they’d be fine if I could print them flat.
I switched to mdf. I was too impatient to plane down my 3/4” → 1/2” so I just went for it with the jigsaw and one of the printed parts as a template.
I pulled out my Dremel a few times to grind clearance for the shaft couplers and the wiring connectors for the stepper motors. Dremel also came in handy for widening my imperfect cuts for components. Besides the Dremel I also countersunk a few of the screw holes with a forstner bit where needed.
I’m pleasantly surprised how tolerant these parts are to imperfect cuts but I guess I’ll see when I actually go to use the thing
Thanks guys,
I found all the info about the XZ being metal in the docs but no mention of metal YZ plates.
I’ve decided I’ll get them done in metal as well, may as well since I can get get them done locally for a very reasonable cost. Its hard to wrap my head around it all without one actually sitting in front of me to look at. It looks like the only difference will not be using wood screws to hold the linear rails on, instead I plan to tap the holes to M3 and use cap screws.
Does anyone know if the current DXF at LowRider CNC V3 - V1 Engineering Documentation is the V1 updated version mentioned here: Minor LowRider v3 update ? (so you don’t have to pre-fit the 3 screws in the XZ plate before attaching the rails to the YZ plate).
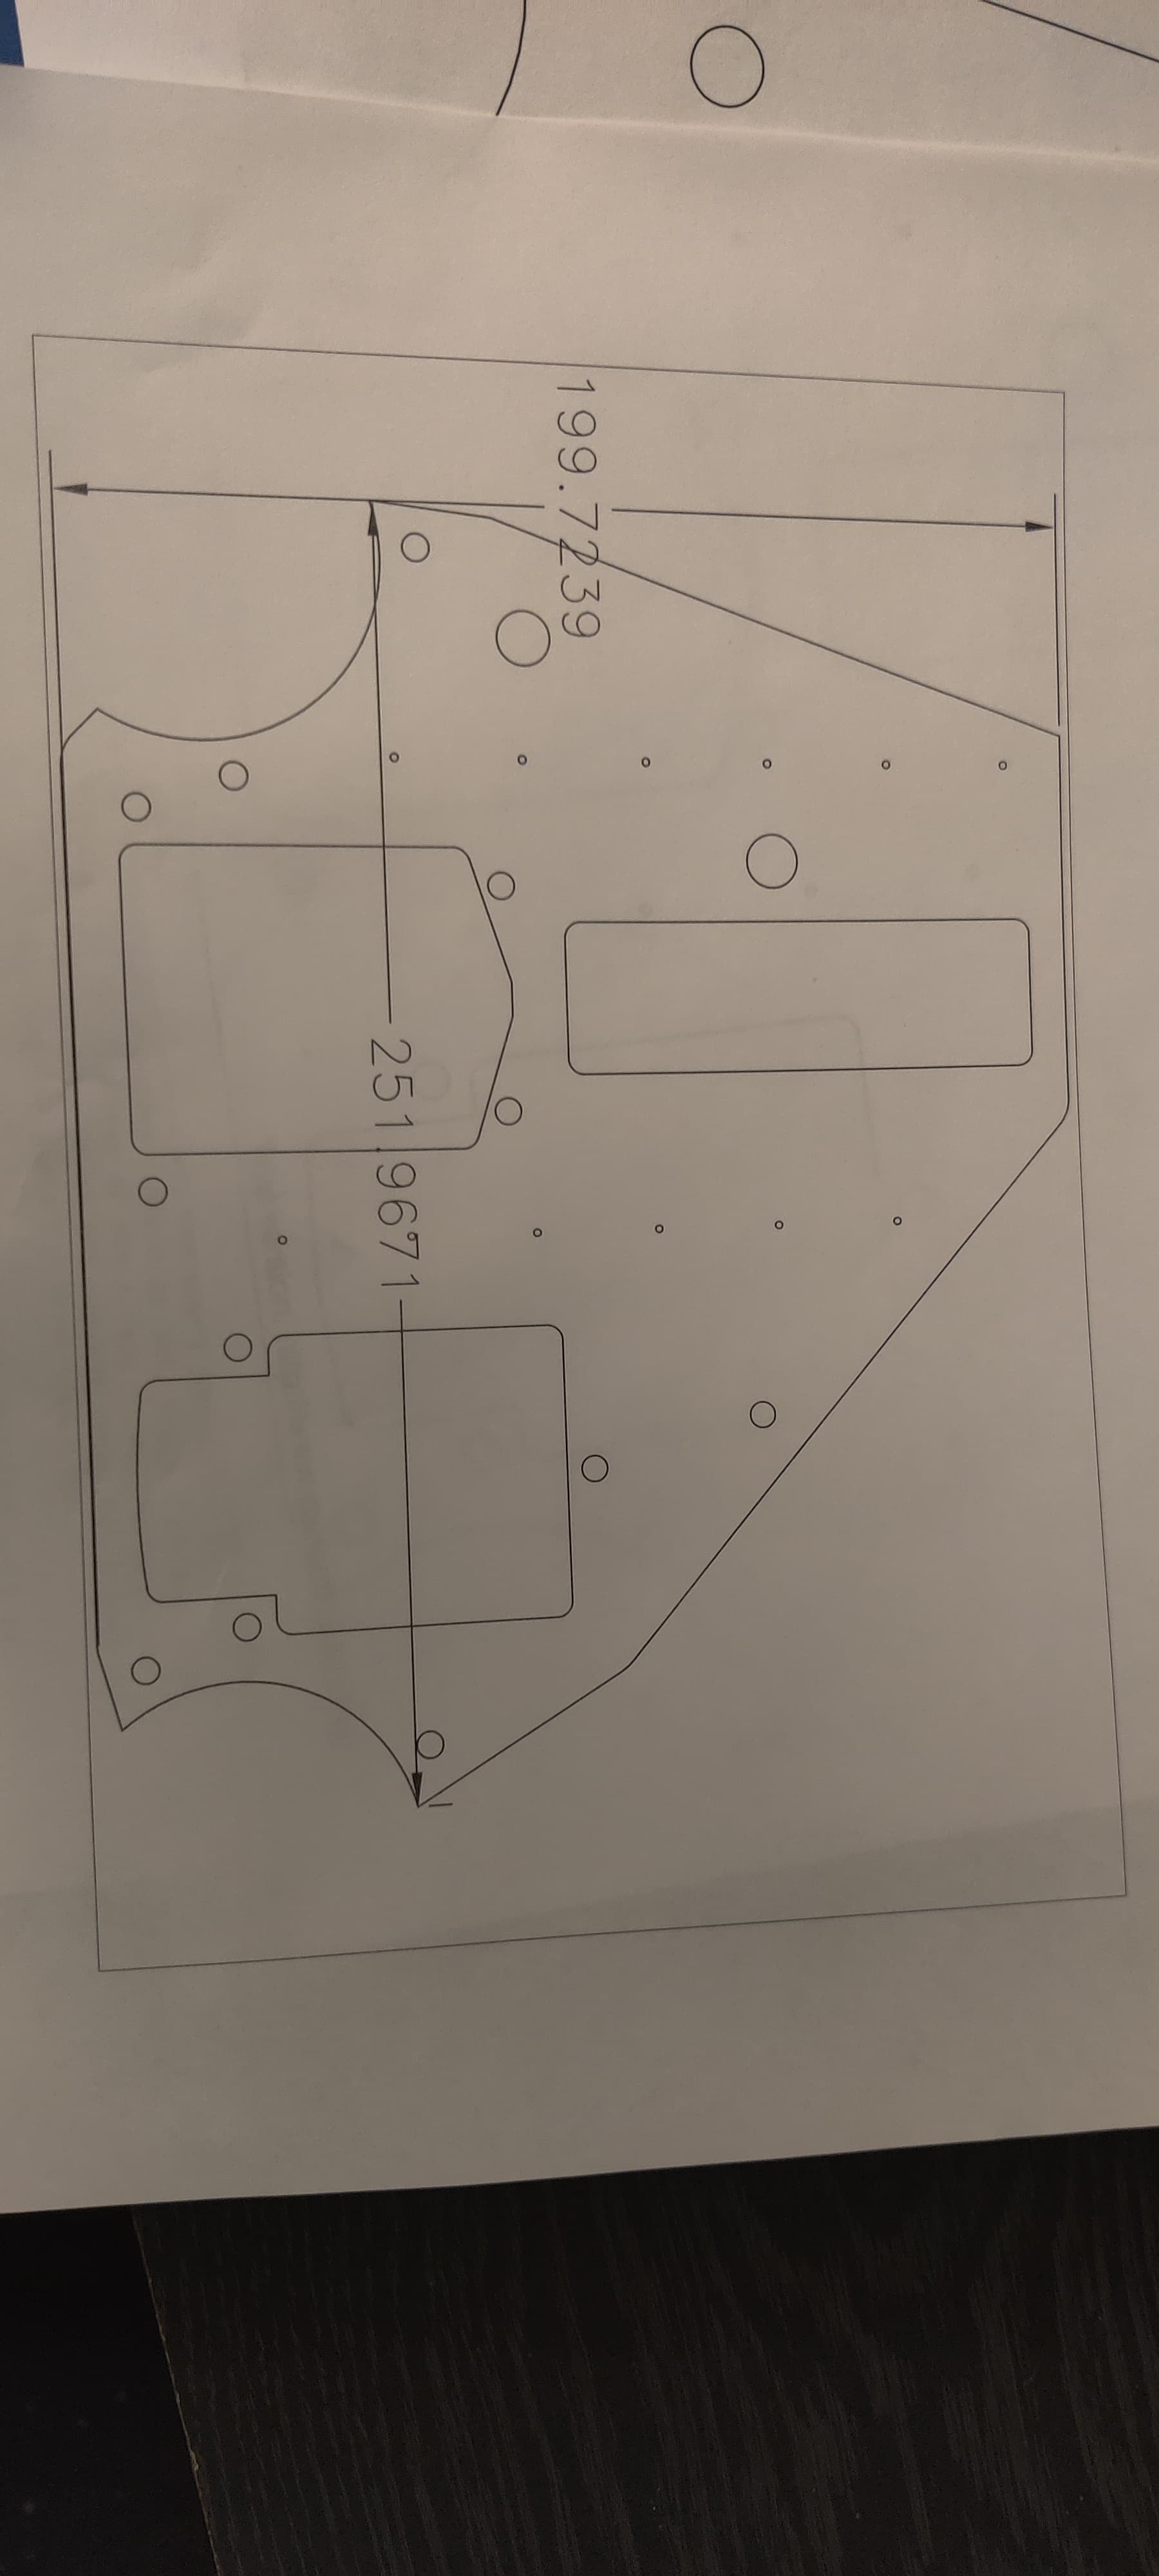
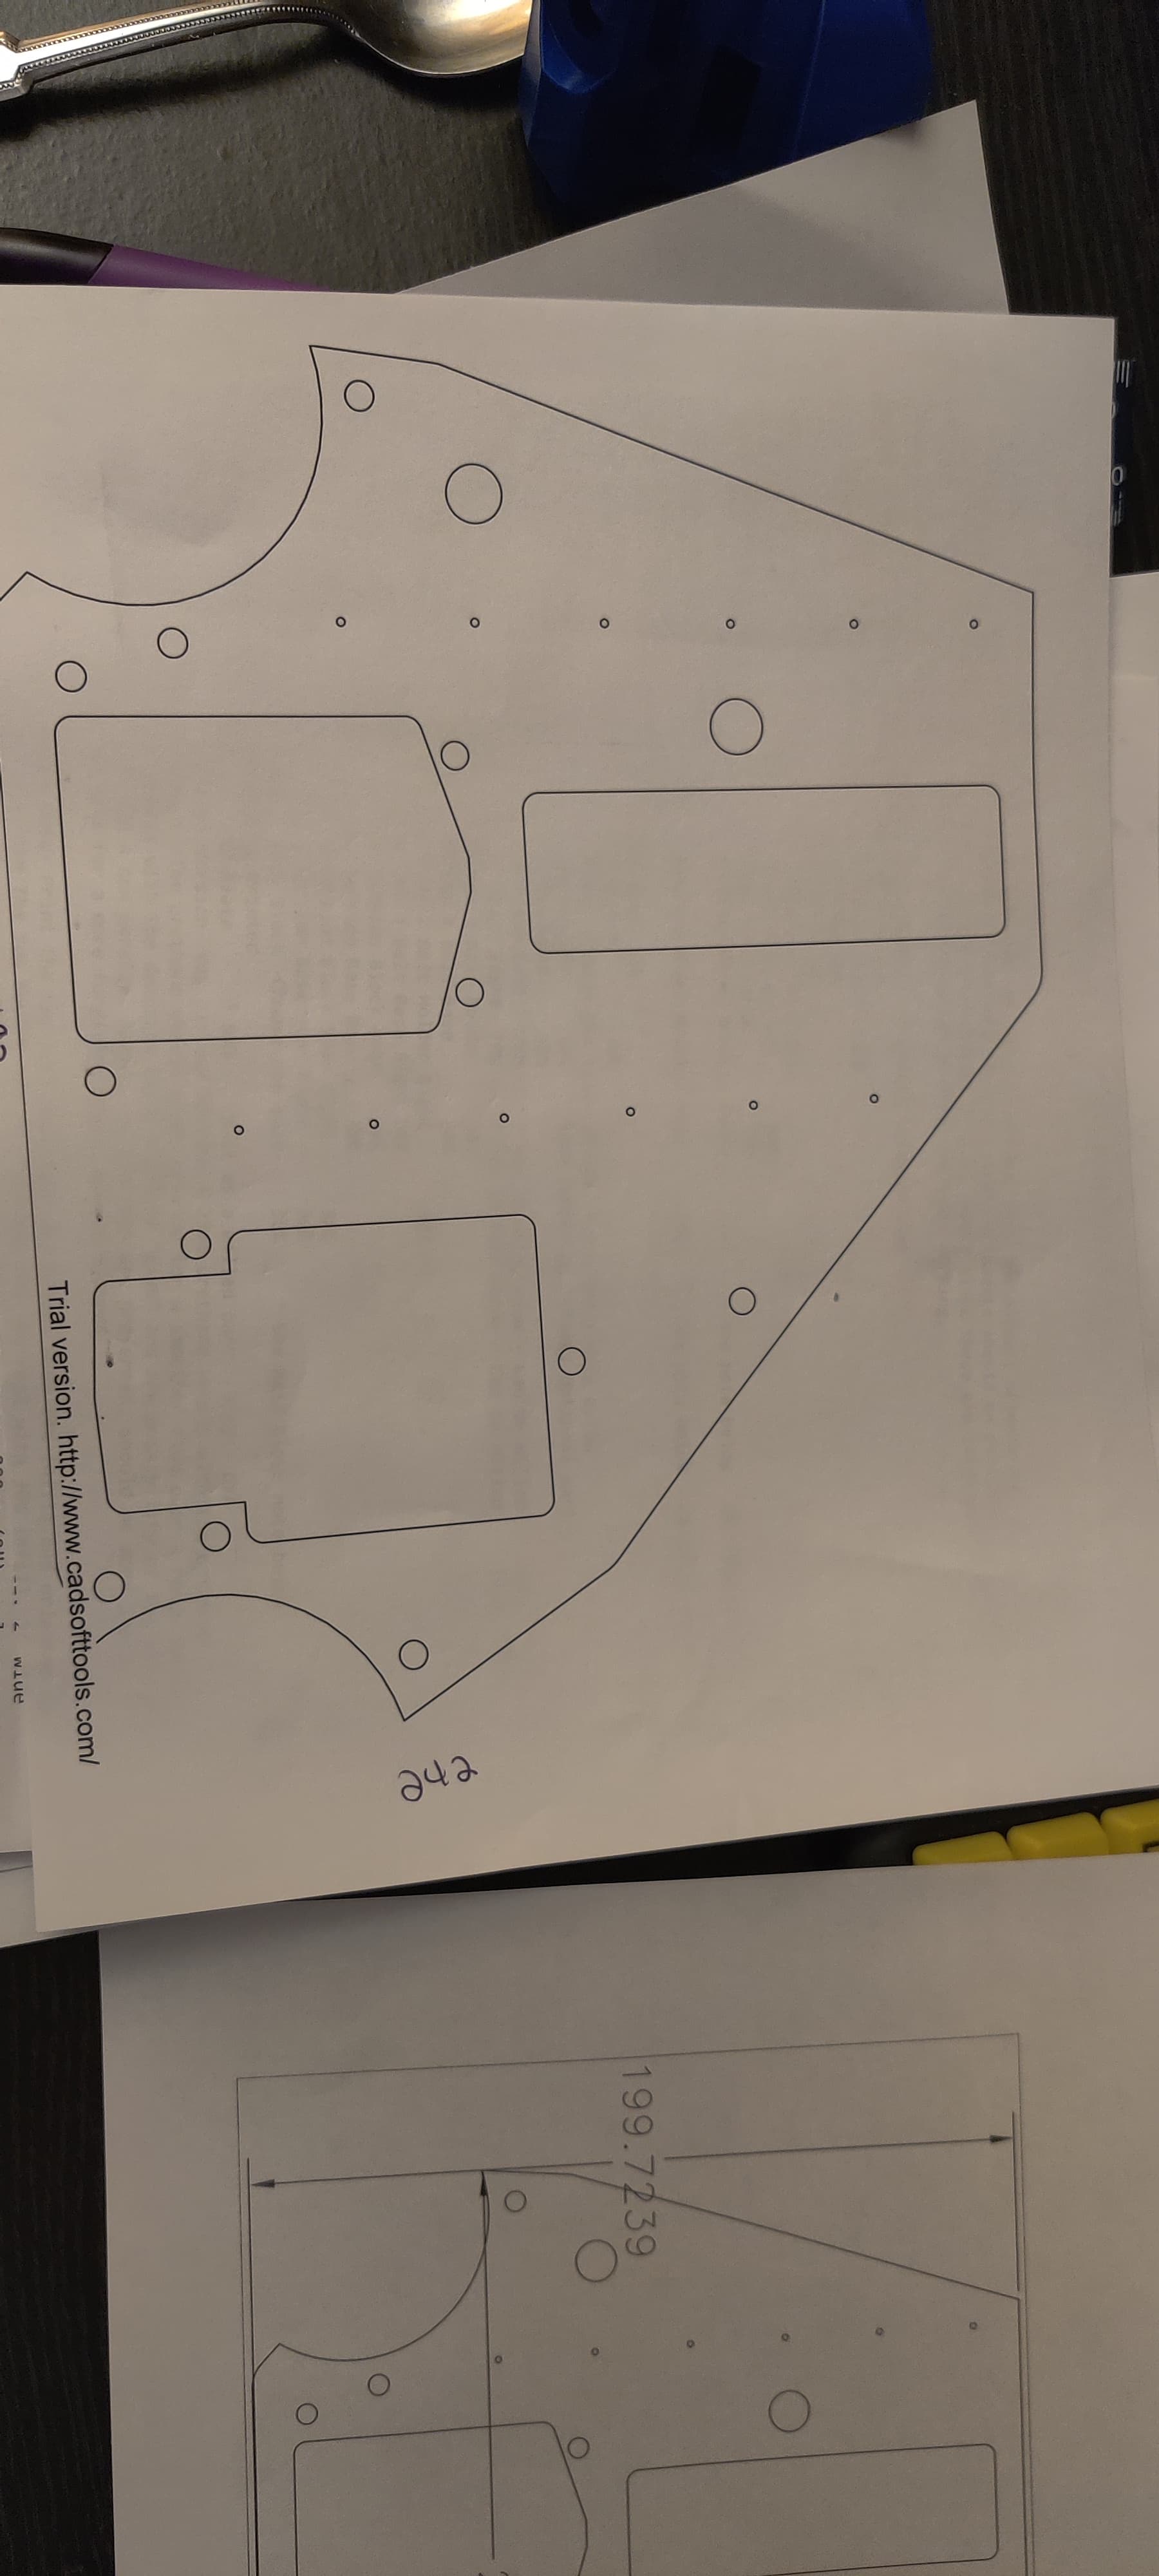
The downloaded DXF and images in the above update link show the holes in different locations and different sizes. I want to make sure I get the updated version.
i need to verify the dimensions of the plate in x by y to check scale are correct not all printers have same scale as i printed to paper for transfer to plywood for marking and center punching holes
thanks
I’m also looking at alternatives for plates, and I’m wondering what thickness I’d need in different materials. Is 6mm Aluminum good enough? Could you go thinner? SendCutSend will make a 3mm aluminum YZ plate for $15, but that seems too thin?
I saw someone make YZ plates out of 12mm acrylic - is that overkill? How thin could an acrylic YZ plate be?
I’m planning on just printing my plates, or printing a template and making them out of 1/2" MDF, but I’m curious about options like the OP
Ryan will know best but my personal opinion I wouldn’t go less than 12mm unless doing aluminum, then maybe 6 but even then idk. I have 2 LR3s and run 12mm acrylic on both. But I push them hard often. What size machine are you planning and what are you wanting to do with it… like what kind of materials. really you can do any thickness you want but there will be tradeoffs depending on what you choose.
Using a commercial cut service is against the license.
Ryan sells these parts and makes a living from that. He allows us to make our own as a courtesy and to encourage the maker spirit. It’s a cool thing to provide the part files.
I don’t want to get into a great debate, and I’ve always felt awkward because I had my aluminium plates cut at a time @vicious1 Ryan was. only supplying steel- against the license technically, but not without approval.
I would stick with 6mm for aluminum myself. 3mm is strong enough, I think, but the YZ plates also have a lot lf M5 hardware that may need to be kept square, and the thickness adds to that. It may be OK with 3mm (everything has a flat flange for the M5 hardware, and most have 2 or more screws.) I’d still go 6 myself, the aesthetic of 3mm is weird. (The XZ plates need 1/4" / 6.35mm, IIRC for screw clearance and the YZ plates just seem like they ought to be at least as thick.) If cost saving is the motivation, MDF is probably cheapest.
12mm acrylic is nice. I wouldn’t go less than 10mm acrylic. Even at 5.5mm acrylic is Jell-o. Wiggly. My first 3D printer was an I3 clone with a 10mm acrylic frame, and I never did get rid of print artifacts from the frame flexing. (And a bunch of other issues that made the printer junky. It was NOT a very good printer.) It was longer and thinner than the LR3 plates though. You have to do stuff to make thinner acrylic stiffer, but the 12mm works nicely at that size.
12mm or 1/2" is pretty standard for plywood or MDF, and works great.
I’ll add, I printed mine in PLA 12mm thick, I think I did 5 walls, 7 tops and bottoms and I think 70% infill and they are rock solid. If you do end up going that route, I’ll find my exact slicer settings to share but it was about that. Easily the most dense rock solid parts that have ever came off my printer. Very satisfying.
Not saying it’s the best way, but inexpensive and convenient
For the most part I am not really bothered by this, especially if you are not selling them. I think most reasonable people see it as such. I do not offer metal or plastic versions, so buying a set for yourself is not a big deal. Even a group buy so the prices are better I am fine.
Statements about the license and the spirit of it that have to be said because a few people have quickly gotten out of control with it.