Is it possible to use the V bit for clearing the pockets in the male inlay? If you’re leaving a gap between the top of the female part and the bottom of the pockets in the inlay, the bottom of the pockets is going to be cut off, so it doesn’t matter if it ends up with a ridged texture.
I actually appreciate the videos! I’m looking forward to the one where you finish off the project so i can see the whole process.
The great advantage of F-Engrave is it figures all that out for you. I have not tried putting the V-bit in as the clearing tool. I don’t mind the tool change, it’s pretty simple.
You could give it a go.
I will do that this week. I am planning to show the roughing part where you basically size the male part with the band saw then the glue-up and then finally the clean up of the male part.
Thanks for watching the videos.
1 Like
Part 3 of the video series is available now on YouTube F-Engrave and MODfef inlay technique
Please feel free to take a look and leave a comment if you have any suggestions or if you just like it 
I am planning to do a review of the finished article once I clean it up and stain it.
I will admit that this particular one did not come out perfectly but it’s not terrible. :- 
2 Likes
Anyone happen to know if a planer works ok for exposing the inlay?
it might if you have a helical cutter. The normal straight blades would probably rip part of the inlay out.
A thickness sander would be better.
I guess I’ll make do with my belt sander.
Anyone tried flat bottom v-groove bits?
Seems like maybe you could avoid the tool changes?
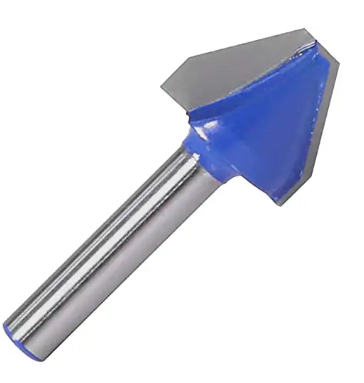
I don’t think that will work.
F-engrave doesn’t have a provision for the flat nose, and it generates the g-code on the expectation that the bit comes to a point. I’m pretty sure the male and female parts won’t mate with this bit.
I’d love to see you prove me wrong, though! 8^)
I have a friend who wants to give me a 16" open end thickness drum sander! I’m stoked. Apparently it’s been sitting in storage for years and he just wants to see it in use. There may be a requirement to make some stuff on the Lowrider for him, but I would have done that anyway.
I’ll be trying the V1 logo inlay shortly, too.
I’m cutting the female part now with a 30 degree 1/8” v bit. The rough outline went pretty fast but now it’s going back and clearing with the v bit by doing one swipe at the material, raising the z, lowering the z, doing the next pass. Looks like it will take hours. It’s spending most of the time just going up and down. Did I do something wrong ?
Well the first half finished… it took 5 hours for a two inch high carving of a name though.
I was poking around the gcode trying to speed things up and figured out why the first pass was so much faster… the F127 line is not valid I think… changing it to G1 F127 should fix it up. I might also try setting a faster travel feedrate with G0 F500 etc in the start script. Still not sure why so much up and down motion but I’ll try setting the safe height lower to speed things up.
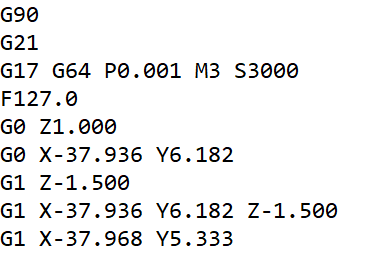
Edit: Also, feedrates seem to not get applied at all to the carving file but they do get applied to the cleanup files. Which means the plunge feedrate doesn’t seem to have any effect.
I think the main carve file is expected to be a 3d carve, moving simultaneously in X, Y and Z, so it doesn’t set aseparate plunge speed.
I’ve done about a dozen v-carves with F-Engrave, and it sets a feedrate like your F127.0, but mine show F540.0 which matches what I have set in the G-code properties. I have a plunge rate of 180, but it doesn’t use that in the main V-carve, just the clean-up code, where it’s doing all that up and down motion.
Are you sure you didn’t get you’re plunge rate entered in the feedrate box? That might explain the F127.0 I agree that would be frustratingly slow.
Most of the text V-carves I’ve done didn’t produce any clean up code at all.
I made one sign where I neglected to fill in the multi-pass settings. It carved the ~12mm deep cut in one go. I was a bit concerned when I saw it diving into the stock, but the Lowrider plowed right through, and the sign turned out great.
It’s not setting any feedrate at all as far as I can tell F127 isn’t valid gcode it just seemed to ignore it and plow ahead with the feedrate I had last used before running the gcode which was quite fast for the carving. Maybe all the Z retractions were some weird edge case from the particular font and bit size I’m using.
I agree with @niget2002 the planer is likely to pull the inlay out of the groove. I did something similar trying to be too aggressive on one of the Watford inlays that I did 
I agree with @Paradox_Pete I don’t think F-engrave has an option for a flat ended angled cutter like that.
That’s what I call the “hunt and pecking” that it does. Its much worse if you have a bitmap file that has lots of small lines in it. If you can get a drawing that has clean solid lines it goes much faster. I did an engraving of a submariner emblem and it literally took forever hunting and pecking its way around. It did finish but having a clean drawing would have been much better.
If you use the F-Engrave text fonts I think the engraving is pretty clean. If you import text from a picture its a different story. Again, I think it comes down to how clean the image is. It will get there in the end but can take a long time.
If you look at my videos you will see I did the same thing, turning off the multipass and it plunged to 6mm in one go. The MPCNC cut it with no issues but I think the final part came out a bit smaller than it should of. If I had done multipass I think the fit would have been better.
Thanks… at least I know it’s not just me!
I’m using a text carve of LLCALLIG.TTF from the windows fonts folder… not a bitmap.
Hopefully the tweaks I made will make the hunting and pecking a little faster on the female part.
I think it depends on the font. If you do some testing with different fonts you may find similar ones that are faster to cut. - I know when I first started using F-engrave it drove me bonkers trying to figure out why it was doing that. Especially when the first cut is so quick and clean. The problem is, if you don’t let it do its thing with cleaning up you will have to do a lot of tweaking manually, and that doesn’t go well in my experience. I have watched it do the main file part then walked away while it did the Vclean part. Because I have MPCNC using Octoprint, I can look at the progress from another computer and go back when its ready for the tool change.
Wouldn’t that make it impossible to do sharp corners on the letters?
1 Like