Sudden speed changes on curved sections only

I did start down the route of your suggestions… SD etc

Then by some amazing fluke, I got version 515 to compile in PlatformIO. NO idea how or whether I will ever be able to repeat that process.

But, it loaded and appears to have cured the stuttering on the curves.

I then managed to edit the required lines in the code to add my wireless tablet and Joystick back in.

Now I need to figure out the Laser connections. I am using pin 45 for the PWM, but the laser is just flickering at a low level. M106 / M107 doesn’t work.

But… progress

3 Likes

The progress is biblically slow… but it’s progress.

Flickering was I forgot to link the grounds of the Rambo and the 12v PSU for the Laser… duh.

What commands should operate the laser? Pin 45 is set in the Marlin code.

M3 s### or M4 s### makes it flash on for about a second at the requested level.
M106 s### does nothing.

M42 P45 S### Works the best. M42 is set the pin state and P45 is the laser PWM pin… but why do I have to state all this info?

Pretty sure M106 and M107 are supposed to work.

I am sure my PlatformIO isn’t correctly setup. I seem to have to send each file separately (instead on just Marlin.ino).
I ended up sending the config files individually which can’t be correct…

Any ideas on the laser command issue?

First off, Steve,

You and your machine are legends. I am glad to see you making a return and making progress. Sorry the software is a pain.

The root issue was (I don’t think we gave tried recently) that arduino tries to build every single file in the project (including HALs for boards you aren’t using). The command line to do that ends up way too long. Linux and Mac have no effective limit on command line length, but windows does. Pio has a build configuration file (platform.ini) that describes which files to build for each board.

We talked to Marlin about it and they are so smitten with pio, they don’t care to fix it.

I tried deleting the HALs we don’t need as a band aid, but it was still broken. Since then arduino IDE has moved to be more vscode like. But I have no idea if that improves things.

It looks like you are past this already. The source code in MarlinBuilder releases is built in pio before creating the .zip. My advice would be to start with those, unchanged. And follow the instructions linked whenever someone writes platformio.

  • If that isn’t working, the instructions need updating.
  • If it does, then bring in your config changes one at a time, or a few at a time.
  • Only pay attention to the compiler errors (not the squiggles in the editor).
  • Only fix the first one (the rest could be cascaded errors).

That should be a good path to success.

Since you were here last time, a few things have changed. It may not be quite as easy to edit Marlin with the newer versions, but we adopted this MarlinBuilder to make it easier for the more standard user to find their way through an intimidating process. If you didn’t need to change Marlin, it would have been 100x easier for you.

Another thing that has changed is that @robertbu has been a regular here. He probably helps the most with laser issues. So I think he can help you with the gcode issue.

@SupraGuy also is a big time regular now. He helps as much as any of us.

They don’t know that you were once a big contributor, sharing an amazing joystick project, a beautiful build, and some really cool projects (please share more!). It will take a little time to get familiar with everyone’s technical knowledge levels. We all want the same thing.

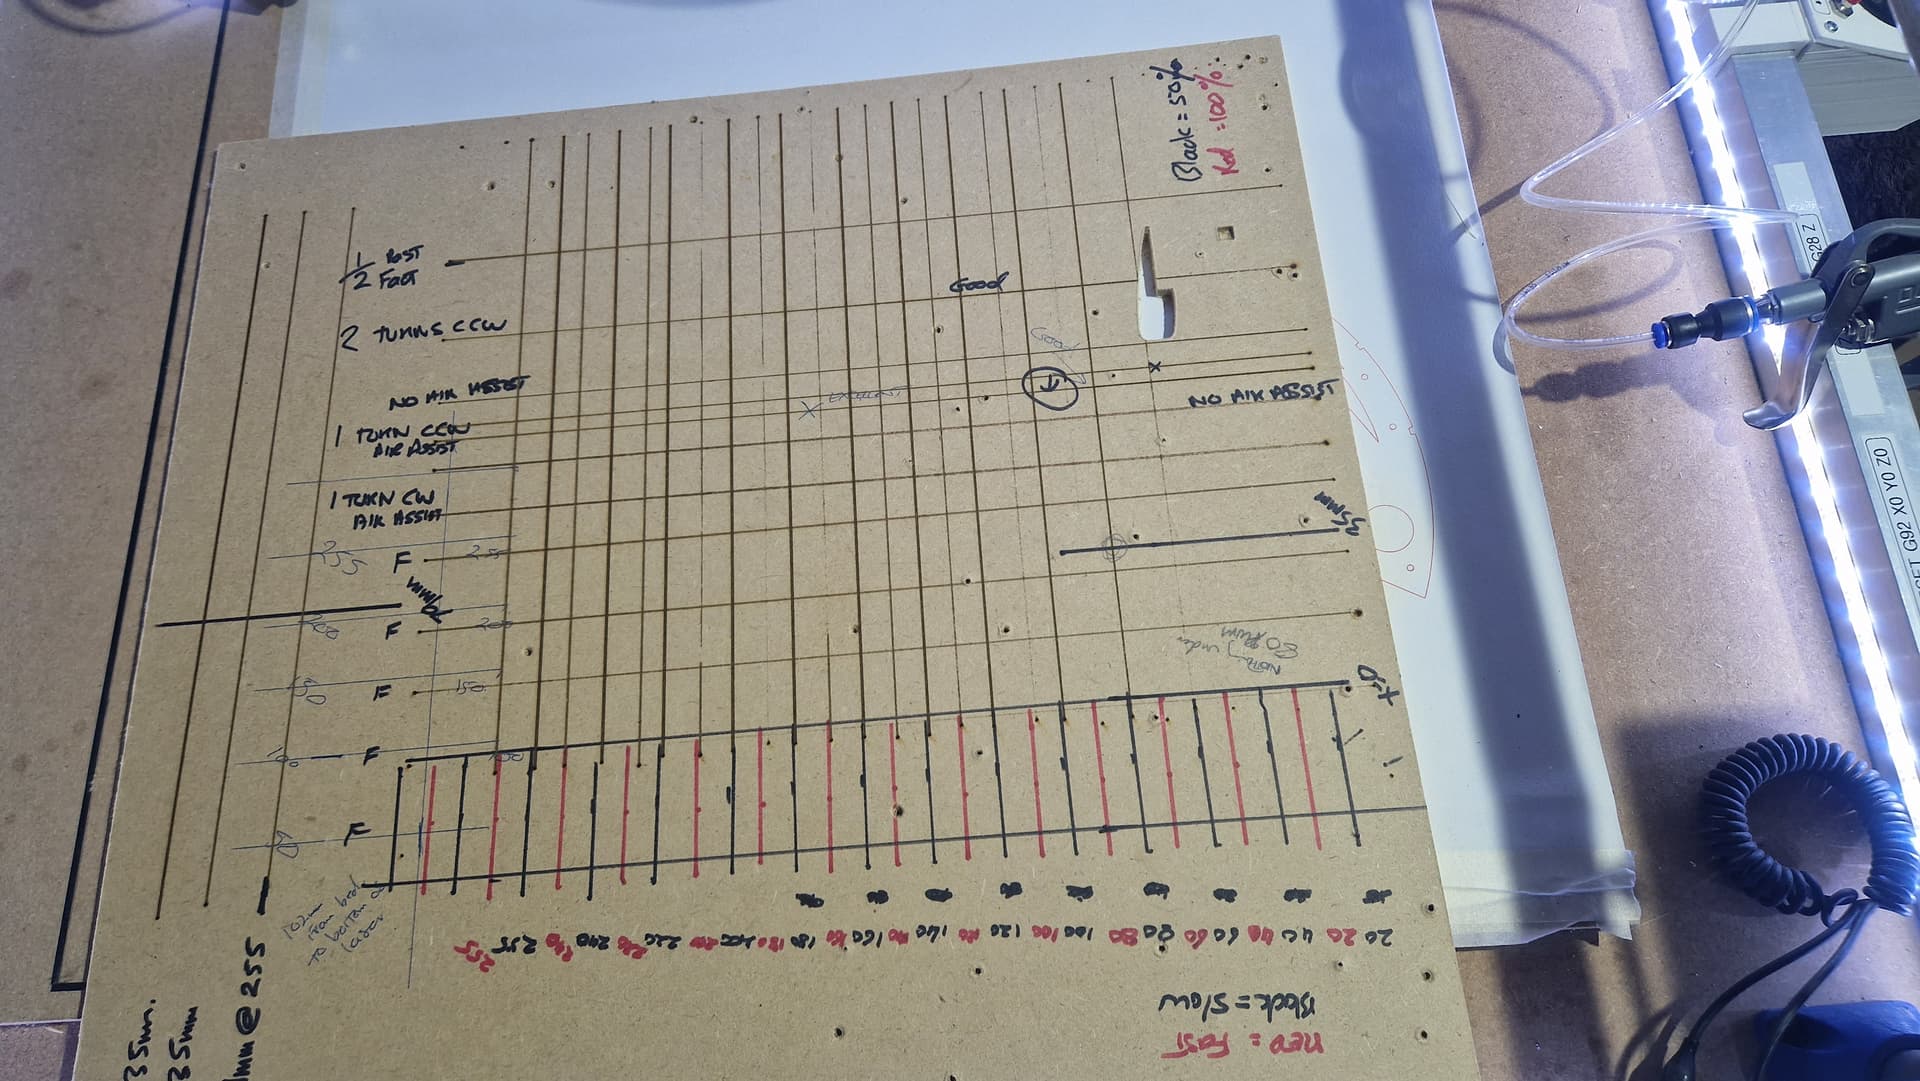
I haven’t really used my laser with this version. I think it may have to do with the new features that scale the intensity with speed, which greatly improves grayscale performance. But if you aren’t moving, it doesn’t turn on. But I would wait to see what Robert offers.

It is hard to troubleshoot your laser without understanding how you have it setup and how are generating the g-code. A couple of points.

There is an issue with using the laser menu. It has been fixed in Marlin but the release V1 builds do not yet have this fix. If you want to test your laser, it is best to manipulate the pin directly using a M42 g-code. You can turn your laser on at 10% power by sending:

M42 P45 S25

If you are trying to use inline commands, you must put the following at the top of your g-code file.

M3 I

Marlin’s rewritten laser support does a great job using inline g-code commands. The results are much better than using M3/M5 or using M106/M107. I use Lightburn to generate the inline g-code for my laser. Lightburn is not free, but I find it well worth the money, and it is not a subscription (though you only get a year of updates with a single purchase).

1 Like

Hi all

OK… Better afternoon all around :grin: Would like to say its a good thing, but only here because I lost my job. Hey ho.

I don’t dare turn off PlatformIO in case I can’t get back here!

Laser up and working. Been running it down an angled timber board on various powers to see if I can dial in a focus point (It’s a Neje 50w A40630 laser… nothing posh + Yes, I have sexy goggles).

After some twiddling and using my compressor as air assist, I seem to have a focus distance of 79mm from the bottom of the laser housing. That seems very long to me and does air assist work that well if its that far off the work?), but the tests showed that to be the best distance for a neat, solid line.

Pic here of a quick test… it’s not turning off between moves, but it was the first go. Using Repetier to draw it. Those lines are about 1-1.5mm deep in the MDF. Won’t be burning MDF #Bad4you, but it’s all that was around.

My questions on this laser front are:

Air assist. I assume a pump/blower is easier than my huge compressor. I can use pin 42 I believe to control an electric air valve. Have to play with that.

Smoke extraction. Definitely need that.

My trials showed that it left no real burn mark (in timber) even at close range until my PWM signal was at least 95 out of the 255. Is that normal?

Thanks for everyone’s assistance.

1 Like

Very sorry to hear about the job. Hope you get another real soon! Lasers, I am not much help with.

1 Like

I seem to have a focus distance of 79mm

That is a huge distance and probably an indication of a problem of some sort. The lens on my A40640 is adjustable, but the max is around 20mm. I don’t know if the lens is adjustable on the A40630.

Air assist. I assume a pump/blower is easier than my huge compressor.

I get good results with a larger (1200 GPH) aquarium pump. I watched a YouTube video comparing air assist methods, and an air compressor slightly outperformed a large aquarium pump, but even a small aquarium makes a major difference over not having air assist.

My trials showed that it left no real burn mark (in timber) even at close range until my PWM signal was at least 95 out of the 255. Is that normal?

Feedrate is a major factor for when wood burns, so I cannot say if this is reasonable or not. You need to set up a speed/power burn test for your laser. What/how you set up a burn test will depend on your tools, but typically I do something like this. If you post your burn test, I can make an educated guess about whether your results make sense.

1 Like

I do now! You kept mentioning the Joystick. As I said, I’m not using Marlin, so I can’t really use it, but it is an interesting concept. I should clarify that I did not mean to imply that you don’t need the joystick. Obviously you like it, and it works for you. I feel that I get the same functionality from my touch screen is all.

I definitely hear you with the hate for the Arduino IDE, I do most of my coding using vi (about as primitive a text editor as exists) with the ocasional foray into Notepad if it’s on Windows. My workststion seems to want to open Python programs in Notepad++ which has just enough extra features that I like without the other features that I loathe. VScode/platformio tries to be too helpful and gets in my way, and the IDE is the same, but if I’m only editing config files, it’s acceptable.

Porting changes from an old version to a new one is always … annoying. Sometimes the provisions you used for your changes get used for something new in the main branch. Things conflict that didn’t before.

Hmm… the focus is adjustable on the laser itself (mine is the A40630 - not the more powerful A40640).

I tried adjusting the focus on the laser as well to see if that made much difference. It does, but the best ‘line’ was still at 79mm.

The instructions that came with the laser say 33mm from the mid point on the laser housing, so 79mm is way out of spec. But… what would cause such an issue?

Maybe I need to drop way down to 0 - 50mm and do the tests again.

Saying that… at 79mm, it did work reasonably well.

As for the joystick… it’s so easy. Just whizz the gantry to where you want it and then press the centre button (hold for 3 seconds) to set 0, 0 ,0.

1 Like

Ever use ed? Or just cat > filename? Although I suppose for editing, sed would be the alternative, but that makes things less primitive, not more…

Note that I have done all three, mostly thanks to jobs during university for the Comp Sci dept, and there were plenty of hours with not much to do (when I wasn’t trying to break my hand using a hole saw to cut through raised flooring amidst installed racks, or trying to figure out how to define a new cross-compiler for gcc).

1 Like

The instructions that came with the laser say 33mm from the mid point on the laser housing

Most lasers use a spacer and measure from the bottom of the housing. My aprox. 20mm focus distance is from the bottom of the housing. If measuring from the mid-point of the metal housing, then my focus distance would be about 55mm.

Well. An afternoon of burning stuff.

Tried running it through Repetier (I plan to buy lightburn… got the free demo just now).

I ran the laser from basically touching the angled board to about 60mm above the board.

Nothing much shows <80 PWM.

If you ran Repetier at 100% speed (what mm/s is that for the MPCNC?.. Must work that out), then the results were OK but not amazing.
Running it 50% speed, the results were far better.

At the recommended 35mm from the top of the laser adjustment (according to the instructions), the line is pretty nice, but also fairly wide at probably 1.1mm? Would have thought it would be thinner than that, but I suppose that is full power and this is crappy old MDF.

Of course, the 35mm from the top of the laser adjustment is assuming it’s factory correct… which I doubt.

Air assist… can you have too much air? I basically fired my big Stanley air compressor down it and assumed the narrow tubing supplied with the laser would act as a regulator.

Suggestions?


A laser line of 1.1mm is way wider than I would expect. My laser has a kerf of about 0.2 mm for cutting, and I would expect your laser (since it only has one diode) to be tighter than that.

Air assist… can you have too much air?

For engraving, you don’t need much air. You are only trying to keep the smoke away from your stock and your lens. Air assist provides additional benefits when cutting by blowing out the charred material so the laser can get to fresh wood. For cutting, too much air means that pieces cut out can be blown out of their “socket,” potentially getting in the way of the laser or even stopping the laser. I’ve had both happen to me.

I really struggled with figuring out the focus distance for my laser module. The best method I found (for me) was:

  • Tape a piece of black poster board to a horizontal on/near my machine

  • Remove the laser from the mount and set it on the spoilboard pointing at the poster board.

  • Turn the laser on to a low setting.

  • Move the laser forward and backward looking for the smallest spot and when I saw a bit of burning.

  • Measure the distance. I repeated this a few times, and the measurements were within .5mm of each other.

I hesitate to own up, but with the laser set low (1 or 2 out of 255), and pointing at a black surface, I made the determination without my glasses on. Normally, I’m obsessive about wearing my laser glasses, but I just could not tell the size or the charring with them on. To get just a bit of charring, you will likely have to go to a higher setting than 1 or 2, given your laser is half the power of mine.

Since you now have Lightburn, you can run some engraving tests. There are multiple YouTube videos on how to set them up in Lightburn. These are going to tell you a lot about your laser. Note you want to set up Lightburn to use inline commands, and you will need an M3 I at the top of your g-code files. You can have that g-code command added automatically to every script by placing it in the start g-code section.

Hmm… It seems odd that basically there appears to be little output below around 70/80 PWM.
There is output… as in you can see a dot, but it doesn’t do anything to the surface you are pointing at.

More investigation required, but I have yet to get a ‘thin’ line to speak of. Maybe the MDF isn’t the best target to be using as a gauge.

Update…. just had another tinker (basically undoing my days work!).
The Wiki page for this laser says 55mm for cutting and 33mm for Etching, taken from the bottom of the lens?. The manual that came with it said 35mm from the top :roll_eyes:

So, I lifted the laser up on it’s highest Z, set the power to 1 and lowered it slowly while pointing it at a piece of darkened acrylic (gave the best visual). You can see the dot go from square, to rectangle to a small dot. There is however a range where the dot is indistinguishably small and you cannot really see a difference.

The Wiki laughably says it can cut 18-20mm at 55mm. Yea, I seriously doubt that.
I have yet to make it leave more than a 0.5mm deep line in some fairly soft timber.

I am assuming for cutting, the speed must either be madly slow (but wouldn’t it burn?), or multiple passes.
The spec says 100mm/s at full power cuts 6mm ply. I don’t believe that for a minute.

Keep tinkering I suppose. Shame there is no easier way to find the focal point. And why make the goddam lens adjustment so hard to access! Make it a larger diameter so it is outside the housing.

1 Like

I adjust the focus of my 5W laser for each job. I have pnly done etching with it so far, so I adjust the pinpoint focus to the top of the material. For cutting, I would arrempt to center the focus in the material, or at least where I expect the center of the cut pass to be.

I am looking at doing some foam cutting, which I think I can do with the 5W laser. If not, I will do it with the NEJE 40(10W) laser.

Just noticed my Z Max endstop doesn’t work or even show up in the status report when I send M119?

I get the status of the Z min, but nothing for Z max (doesn’t even report there is a Z max).
Where did/does that get turned off?

OK. Another morning+ on the MPCNC… and I have decided enough is probably enough :face_with_diagonal_mouth:

It’s just hogging far too much of my workshop time. The laser is ‘kinda’ dialed in, but still not perfect and a lot of other things need to be put in place for it to work. Definitely days more need to go into it yet.

The Z max has stopped working and I can’t see why. Now the touchscreen isn’t working either, and that is because of the horrible PlatformIO I am sure (something somewhere has got messed up).

Spent days on this now, so been looking around for a second hand commercial laser I can grab.

Thanks for the assistance. I 'll hang around to watch what others get up to.

There is no ZMax support in the firmware for the Primo. There also isn’t a proscribed mounting solution for a ZMax limit switch. If you have figured out or can figure out a switch mounting solution, you can wire that switch in parallel with your touch plate (which uses ZMin). You then need to enable probing (G38.2) in the firmware. There are a couple of topics that explore different settings to turn this functionality on. I explore one way in this topic, but my solution uses the Z_SAFE_HOMING firmware setting, which may not be what you want.

After going to all the work of setting up the bitsetter and later Z probing up, I’ve barely used the bitsetter.

Note that limit switches are only used during homing or probing. They are not active when you are running your jobs. Ther is a potential for soft switches (to limit router movement to the working area) to be active, but the way most people set up their jobs, soft switches are disabled.

On focusing your laser: If you use black cardstock and the right laser setting, you can watch the glow of the paper starting to burn increase and decrease as you change the focus distance. I also found the spot size is the same over a larger range, though selecting the middle position of when the spot appears smallest should be very close.

Thanks Robert. I am burned out on this. Haven’t got near the laser today because of the MPCNC issues.

I had a Z max limit switch in place since I built it, connected to the Z Max pins on the Rambo 1.4. Now, it doesn’t do anything.
Z min works fine. It was never wired in series with Z min.

The switch works (NC at the Rambo board), but clearly something in the config is now disabled.
Z max doesn’t even report a state with M119… only Z min.

I can’t see what is disabled for Z max. It used to stop the Z carriage from rising too far and hitting the bearings. Now it does zip.

Can’t see anything in config, adv_config, Rambo.pins etc. The Z Max input must be turned off somewhere, but I can’t see it and Google hasn’t helped.

Off to do something more time efficient :frowning_face:

If you still have the configuration.h and configuration_adv.h from the previous version you were running, post them to the forum, and someone here can take a look. There are a variety of compariance/difference tools available on the net, and comparing the old files and new files will identify how the old one was set up. Personally, I use Meld for comparing code files.

All I know about Marlin is from this forum and reading comments in the files. A look leads me to two setting, that when enabled, might give you what you want. The first is enabling this flag/define in configuration_adv.h:

// If you want endstops to stay on (by default) even when not homing
// enable this option. Override at any time with M120, M121.
//#define ENDSTOPS_ALWAYS_ON_DEFAULT

Then you have to turn on the ZMAX endstop plug in configuration.h:

//#define USE_ZMAX_PLUG