Was a typo. ![]()
I went to a pretty big festival every year. One year they decided a shower pass was 5€ additionally. I was mad and told the owner that this was stupid… Just raise the prices by 5€ and don’t give the customer the feeling that he has to pay extra for something that did already cost a lot of money.
That’s also the same thing when I ranted about shipping and especially taxes to the EU and the post’s 6€ fee. And here I actually know they are going to be added, it still bums me out (and no, it’s not Ryan’s fault).
Long story short: if Ryan included the taxes in the prices for the different states of the US, that would probably help (and generate more revenue in the states that don’t have that tax). Win win. ![]()
Yeah, I think you are right.
Interesting, That very well could be the case. Seeing fees tacked on later is a bummer.
Yup, good idea
Maybe something like
choose enclosure
- 3D printed case (jackpot)
- 3D printed case (SKR Pro)
Hello my fellow V1 E’ers…
Happy Friday!
I did that 4-letter word thing, READ and answered my own Q’s…sorry!
I did that 4-letter word thing, READ and answered my own Q’s…sorry!
That’s kind of cheating. We like helping out. ![]()
Glad you got it solved though. ![]()
That’s kind of cheating. We like helping out.
Glad you got it solved though.
Ok Philipp…
so, is the Min YZ plate assembled exactly the same as the max?
Also, why are there mounting places on the back wheels too? we are only placing on both fronts, correct?
Thanks! You guys will always be needed… for instance, i don’t see instructions for the rails/braces, and how to mount them to the XZ plates…
![]()
Yeeeh, help is needed:
- The plate is basically the same except of using the other wheels.
- Those are for those people who want to home the machine to the back instead of the front. Like the second spot for an endstop on the core.
- Just put the rails into the braces. There are three holes in the alu plates and the YZ plate where you can stick the screws through after that. It makes sense once you line it all up.

Thank you, Thank you!! Have an amazing day, and weekend …
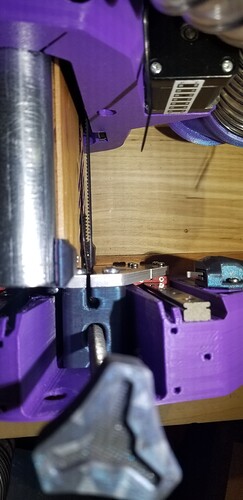
Maybe I messed something up, does the x belt go into the slot and just hide behind the xz plate on the X min side? I’m getting bound up on x moving left and right on cuts, it moves fine when it’s not under load. From what I can tell it’s level across the entirety of X
Personally just had inch of excess belt on X min side. Excess is between belt and front strut, so core rides over.
ok that was genius and fixed my issue!
Anyone know why my Z would be sticking only sometimes when it gets low? I can run it fine 80% of the time then it will get stuck low
Usually stuck Z is a misalignment Z motor to Z nut. The LR4 design lets that float a little, if it does so easily, should be fine, but if not, it could bind.
Also, a little bit of freedom of movement in that Z nut is still a good thing, so maybe 1 turn of slack in the M3 screws holding it in place might help…
Do you have permanent Struts mounted, or, are you in Bootstrap mode using the small temporary printed Strut parts and possibly have a wonky/racked setup that adds to Z friction/resistance? Go slow until you have permanent Struts installed , they help provide correct alignment (reducing binding risk) as well as providing rigidity.
Did you lube the leadscrews really well? Make sure temp stickers are adhered first.
With the YZ plates as vertical as possible, and Beam as low as possible…
Try loosening bolt between Z Nut and Z Stub. Play with the leadscrew angle, find out how far the leadscrew can slide withing the Stub’s slotted hole, then position in the center (or wherever the least bend force on coupler is)… Thank/blame Jamie for this technique.
Then, loosely snug the bolt connecting Nut and Stub. Snug just enough to engage the Nylock, don’t tighten to the point that pressure gets applied between the parts that would add friction/resistance to Z travel.
I think that was the key, I had those z nuts tightened, and it was binding as soon as I loosened them it goes up and down no issue!
That bind is easy to adjust in and out, I have yet to put that in the docs. I really hope this was your issue.
There is also twist, if the Z stub is twisted, it can cause issues. Twist is pretty hard to get. you can loosen the two M5’s and pull the Stub up against the holes and that should be pretty level.
Even hard to get is too far out of range front and back.
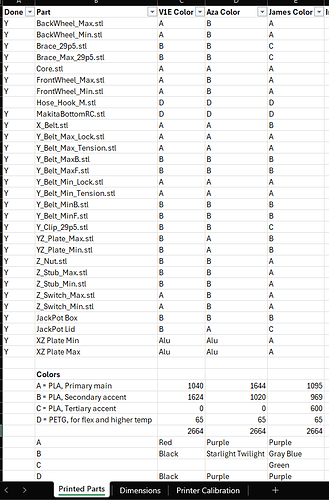
Hey guys, sorry if this has already been discussed and I’ve missed it. What pieces do you normally accent print?
The tool mounts. Wheel holders. Endstops., braces
I think my next print will be solid colors for each major part and attachments, but have min x, core, and max x all be different colors
What pieces do you normally accent print?
Observed folks try out various color combinations, myself included. Here’s my notes for V1E’s combo, my LR4 and James’…
Awesome. That’s pretty much what I’ve done so far, but it’s my first build so I’m not 100% which bits go where yet. So that guide is perfect for me ![]()

