I’ve got a 12v 15A psu from an old 3d printer i no longer use, it’s like the ones you get for LED lighting or 3d Printers. it has output “channels” (mutliple output pins for DC power)…
there aren’t many photos of the back of people’s gantries and those that have, don’t seem to show how everyone’s mounted thier power supplies.
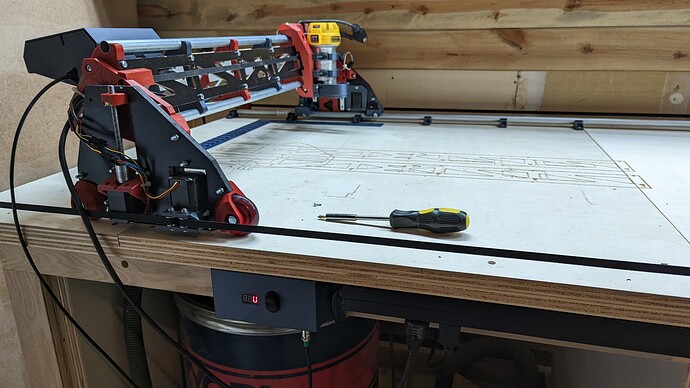
i wondered what others have done to mount their PSUs and generally to keep incoming power wires out the way of gantry Y travel and hose movement for x travel… would love to see ideas / what others have done for inspiration.
I have a power outlet up quite high above the LR3, I was thinking of mounting it there, but I ended up mounting it under the table, right in the middle…my LR3 rides on unistrut/steel channel, so I need to figure out a system to keep the wires inside the channel…Maybe a lanyard?
The original intention was to keep it within the strut of the LR3 itself, but once I rearranged the braces to screw the strut into, I realised there wasn’t enough space.
@jeffeb3 i must be going mad mate because i looked at your profile, chose activity and all, but still couldnt see your build log. Dont suppose youd mind pasting a link please?
You’re welcome @josh1e. Cheers for asking about power, I hadn’t even thought about that. Still trying to make a decent surface. Now I’m reading Jeff’s LR3 and starting to wonder about power, vac, emergency stop and other stuff… Meanwhile my 2x4’s lay neglected on the floor.
tell me about it. so much to think about… i didn’t even have a workbench, then realised no workshop / room big enough for it (after building it) then down to the “little” things, like i have never been able to cut a straight line when working with wood (long story pmsl)… but… v1 seems to have a really nice & very helpful bunch on board (including yourself - thanks ) so is making things waaaay easier… good to hear your build is progressing though… don’t leave the 2x4s too long, they have a habit of retailiating and bending / warping on ya when your not looking!!!
thanks to @azab2c and @jeffeb3 for the links / advice on @jeffeb3 build log. lots of really interesting stuff…
@jeffeb3 - really nice build and build log mate, ty for pointing me towards it. The wires that trail from your gantry to the PSU / switch box, you don’t worry about them rubbing on the Y axis belt or have you done something to prevent that? (here)
also, curiosity more than anything… Your build shows rubber or nylon wheels on your LR3 on the non pole mount side, but… the most recent docs (and my order) have bearings like this)
is there any advantage / disadvantage between them? was it a choice i missed or an older (beta?) version of the LR3? (just making sure i haven’t missed something important )
Hope you don’t mind a bit of friendly plaguerism i might have nicked your idea @jeffeb3. It didn’t even occur to me to mount the PSU under the bench like you’ve done. After seeing it and thinking how do i get the wiring from there to the gantry, i had a moment of err madness and… have epoxied the threaded connectors for EMT conduit into the bench top. Countersunk a little so not in the way of the bench top being flat and useable for other things. Then i am going to fabricate some spare conduit so it spans the narrow width of the table & the hose / wires can all go up to that from the gantry and then down the poles to the bench where i’ve done similar to you and installed a small board under the front 0,0 corner with a sockets and a bench on/off master switch. i’ll put quick release connectors or something on the cables for when i don’t want to use the CNC and pack the pole assembly away. i’ll add photo’s and update the build log once i’ve edited them / finished it… appreciate the ideas / help, has been a very productive day!


