See above. ![]()
3 Likes
I haven’t looked through the API in detail, but have seen some posts saying that there might be some support to do something through the API like you did with Fusion?
2 Likes
Yep, there is, I went down a rabbit hole…
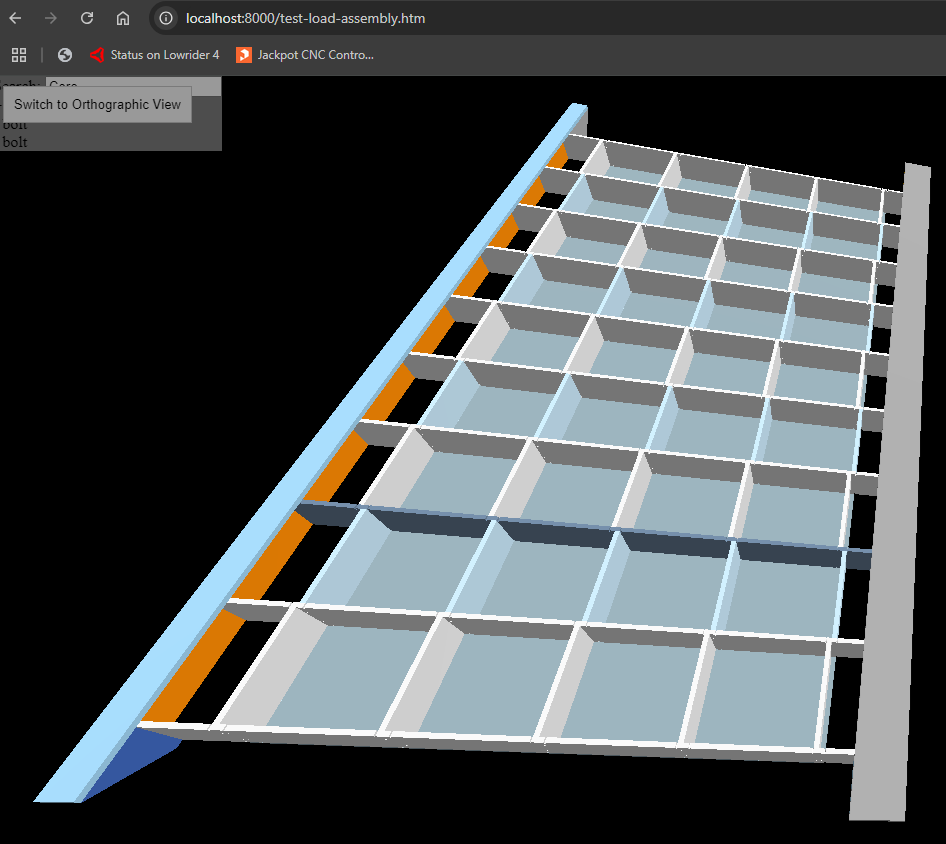
Python script to call OnShape APIs → assembly JSON + bulk exported .STLs → web page to load, place and render .STLs with model’s material color/opacity info.
Contemplating implementing auto layout for exporting .DXF set(s) for CAM tool (e.g. EstlCam)… But, guessing this has been done a bunch already, so, wondering what folks who’ve used OnShape for more than a few days do?
7 Likes
Export one by one, lay it all out one by one, then get aggravated later when I realize I missed one ![]()
Everything you are doing with this script is so far above my pay grade its not even in sight ![]()
4 Likes
Silly question but I really want to make this table for the LR4 as it looks great. But I have not finished building the LR4. What do I need as a min to be able to use a newlely build LR4 to cut the parts for this table? Do I need to make another table 1st???
2 Likes
You can just lay a sheet of plywood or MDF down on a floor somewhere and use it as a makeshift table.
Mount your clips, belt and rail as you would on the table. Just make sure it’s relatively flat
6 Likes
I did my struts for the lr4 in thirds. You could do the same!.. as long as you can pass parts all the way though your machine. Just need something to position off of.
1 Like
For a full size build of 4’X8’, wouldn’t the MDF sheet for the initial table need to be larger than that? The site calculator for the LR4 table with a 4’X8’ work area is 59.375" X 108.5".
1 Like
For a 4’ x 8’ build, the spoil board is a full sheet.
Underneath, for this design, the X ribs are easily cut within the 4’x8’ temporary floor table. The Y Ribs are small pieces that get glued and screwed together, also easily cut within the space.
The only pieces that are outside of a 4’x8’, are the runners and supports for the sides.
So you have to piece meal those runners together for a full sheet, unless you can get your hands on a 10’ sheet of MDF (I’ve never seen one).
You could try to see if they fit on the diagonal (I’m not doing the math), but otherwise, split pieces are going to be necessary for anything over 8’.
I didn’t look closely at the design, but my guess is a table saw is more than sufficient to cut the runners, and the torsion box area is the only thing where the CNC precision really matters.
I thought I saw a mod for the LR3 where they used a length of C channel like Unistrut for the side runner, something like this. It would be good as you can get 20 & 40’ lengths of that stuff, but of course I cannot find that mod now.
Edit: That might actually have been only for the left side of the machine & not the side with the tube on it.
Is there an example of the temporary floor table with an LR4 build or is it that you simply lay the full 4’ x 8’ spoil board sheet flat on the floor with only the side runners assembled?
Also, by piecing the runners together, what’s the best way to do this with 3/4" MDF? Do you just glue it together or attach the two pieces with metal plates and screws or bolted together?
I just realized they sell these at my local store. https://www.lowes.com/pd/Radius-Edge-MDF-Actual-0-6875-in-x-5-5-in-x-12-ft/1000801814
Would cutting to size in one piece this 12’ X 5.5" X 0.6875" MDF board work better instead of cutting multiple pieces?
It would be slightly thicker though as the specifications in the onshape document are for 0.472" thickness for the sides. Would that difference in thickness even matter?
“better”… not necessarily.
You can get equal quality by joining 2 pieces of MDF with a lap joint or < insert your favorite joinery here >, and fill the crack between, and end up with just as smooth of a surface.
Both “better” and “easier” in this case will be relative to your own skill, will, and patience ![]()
It just changes the height relationship between the runner and spoilboard a little, so I guess it won’t be able to cut quite as deep below your workpiece, but it still should be able to go more than deep enough to cut through material.
I have 3/4" MDF runners with a 3/4" spoilboard and I have no problem with a LR3 going more than deep enough into the table. LR4 should be no different.
With a LR4 build? probably not yet, but @azab2c has it in his LR3 build thread I think, and maybe one or two others.
Here’s an example boostrap of a LR3…
But it doesn’t have to be that fancy.
Don’t overthink it. It’s literally just putting down a sheet of plywood or MDF on a flat surface, and attaching the belt holders and rails to in the same way you are going to do it on your table.
All the Lowrider needs is a large flat-ish surface.
The fact that you can lay a piece of plywood on the floor and get enough precision to cut a super-fancy table, should demonstrate to you that a super-fancy is not strictly necessary.
Don’t stress over whether or not you are off by a mm here or there.
2 Likes
I am starting a full sized build now so I can get new pictures. I will have to make some sort of frame to show a bare minimum type of thing. I think the sheet and two 10’ pieces is probably easiest. Maybe a 2x3 frame.
2 Likes
Using your quarter sheet LR4 to mill Paulk inspired torsion box, but with design more like your Parametric table with the out riggers?
Or, just doing bare bones minimally viable bootstrap full sheet build that doesn’t depend on owning a CNC already?
A minimal table on sawhorses or the floor.
I do not believe torsion boxes are worth the effort. If you want a fun project, it is a great project, but I see no difference to any of my janky tables in terms of getting things done.
3 Likes
Sure, for quarter sheet sized table. Curious if/how your perspective changes after making the full sheet table, especially if using for Carve jobs. Ideally, you have a flat enough garage slab, or unused bedroom floor to work with for a no table solution.
Making a big one for the build instructions.
How many 4’x8’ carves have you seen?
My stance on carves if you want sharp corners the right way to do that is surface your material, do not move the material, start the carve. This works for 4’x8’ carves as well.
The table is not as important as people keep making it out to be.
Anyone that plans on rolling, folding, or moving their table in any way, they would need to surface the table top every time to be of any effectiveness. For them their only hope is to surface the material to be carved first.
This 100% goes along with the yellow brick road issue. A perfectly perfect table can make things easier, and the need for less material removal when surfacing, but no wood is flat enough not to need to get surfaced first. Think of all the jointers and planers pros use to make a decent table. Flat tables just make things a tiny bit easier, 100% not required.
4 Likes
![]()
![]()
![]()
About time you build a full sheet machine!!!
My lr1 was full sheet.
I will be doing this just to take it back apart after pictures. I do not want to mess my newly freed up space with a 4th CNC build.
6 Likes