Full video of first print.

Full video of first print.
That looks great. You made good time on it too.
Congrats David! Great to see these machines moving.
Appreciate the video and all the info you’ve been sharing. Baby chicks?
What are these things? Mosfet relays for fans or something else low current?

Exactly. One is for the exhaust fan. The other is for the chamber heater.
Both will be controlled by my octoprint plugin.
Yikes! I am pretty sure you just have not gotten to it yet with the excitement of a first print, I use an ending gcode of G0 Z195 F3000. That parks my bed at the bottom. My little bed does not thunk like that, big bed, big thunk.
Whoa! On a first print. That is awesome.
Pretty interested in your long term opinion. I am very happy with it but I also kinda have blinders on, it works way better than anything I have ever used before so I see no major flaws yet. So far just change the belt holding (I till want to do that with no hardware). I am all set to mess with klipper when I have a bit of time, and who knows what I will see at RMRRF. I also have a super light BTT H2, but I am easily maxing out my flowrate so I might also try a higher flow CNC Kitchen Hack.
Yup. Completely forgot to put the ending gcode in. I added it this morning. Sadly, if you cancel a print in Octoprint, it still thunks. I need to see if there’s a setting in octoprint to NOT turn off the steppers when you cancel a print.
So far my only complaint is the parts cooling fan. I have a few more of those fans that I found in a drawer. I’ll try replacing it to see if it’s just the bearings on this particular fan.
That was the loud one I was hearing? Mine are quiet but thay also don’t move enough air, I might need two if I speed up at all.
Yup. That was the loud one. And I only run it at 60%
I might try oiling this one first.
I’m running a 5 hour print later today.
I like the video!
And it looks solid! What was the hardest part of your build?
There is. I bet it has an M84. There are sections in the settings for cancel, pause, start and finish, IIRC.
Can you put some tennis balls under it or something to it at least bounces?
I’m going to print some large springs out of TPU and mount them to the base panel under the bed.
Yes.
Seriously, though. None of it was really hard per se. I would probably have to say the ‘scope creep’. Maybe? I kept wanting to add stuff to the build instead of just doing a basic build. So that makes everything more difficult. More electronics. More hardware. More. More. More.
And deciding what size/hardware to use. Part of me wanted to use an octopus board with klipper. Another part of me considered a different extruder. Then trying to decide what print size to build for. I knew I wanted 300x300, but didn’t know how tall.
Found it!
Still have one corner that’s a bit high. I tightened the bed screw on that corner, but I guess it needs just a tad bit more.
I also figured out why the printer was printing the xyz cube so slow.
I have s3d setup to run the printer slower if the layer is going to take <X number of minutes to print. The XYZ cube layers take less than that amount of time.
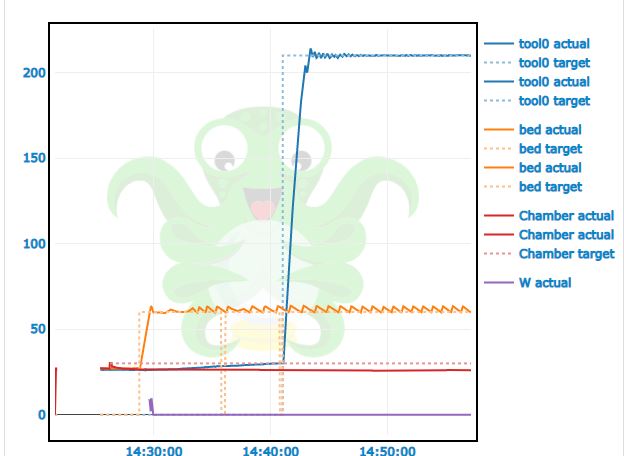
I really think I need to enable PID on the heated bed.
Ignore the fact I have duplicate temps on everything. I think my i2ctemp plugin is causing this.
That’s one way to get the parts from the build plate. ![]()
A friend of mine set his up to use the gantry to push parts off the front of the print bed. He’d back the gantry to the back of the bed, lower it to just above the bed, wait for 10 minutes for the bed to cool, and then rapid to the front of the bed. It worked pretty good as long as the bed was cool and the party was big/solid.
I haven’t noticed any problems with Bed PID. I think it is just off by default because of really old hardware.
I made a couple hundred window retainer clips for a friend of mine with a glazing business. Couldn’t get the clips anymore.
Designed one, added the wait and move at the end, then copy/paste a bunch. Got the idea from a guy on YouTube.
I like that bowden holder, and just printed one. Hopefully you’ll see it soon.
