Holy cow, I absolutely love this. Bolts, printed bearings, moving 16lbs with ease!
I think you are fully onto something here. I do not want to sway any design decisions, you are a genius! I love this design so far.
Holy cow, I absolutely love this. Bolts, printed bearings, moving 16lbs with ease!
I think you are fully onto something here. I do not want to sway any design decisions, you are a genius! I love this design so far.
So true. This thing is great.
I started clearing off the MPR&P version 1 table in my garage to work on an upgrade when ready.
I wish there could avoid every horizontal surface in my garage getting buried in stuff.
I resemble this…
@dkj4linux your progress on this is amazing. Truly a work of affordable art!
One thing I found interesting when I was making threaded parts before my printer was tuned and it was overextruding a bit: PETG fit really tight, but once I ran the plastic threads a bit, it really became smooth. The part was a belt tensioner on an ender. I wonder if that might be useful for this threaded rod you print in place, notwithstanding the tradeoff with PETG vs PLA.
![]() Me too unfortunately.
Me too unfortunately.
Goodness! You guys are my heroes and you’re making me blush… ![]()
I must admit, it was the Z-axis on the original MPR&P that I was never really happy with. And seeing how the LR4 has such a great reputation for rigidity and power and a low COG with the Z-lift function split out to the ends of the gantry… that’s what set the direction for this project. IIRC it was something @MakerJim and I mused about during the first build… what if we stacked a LR4 beam on a couple of MPR&P linear stages?
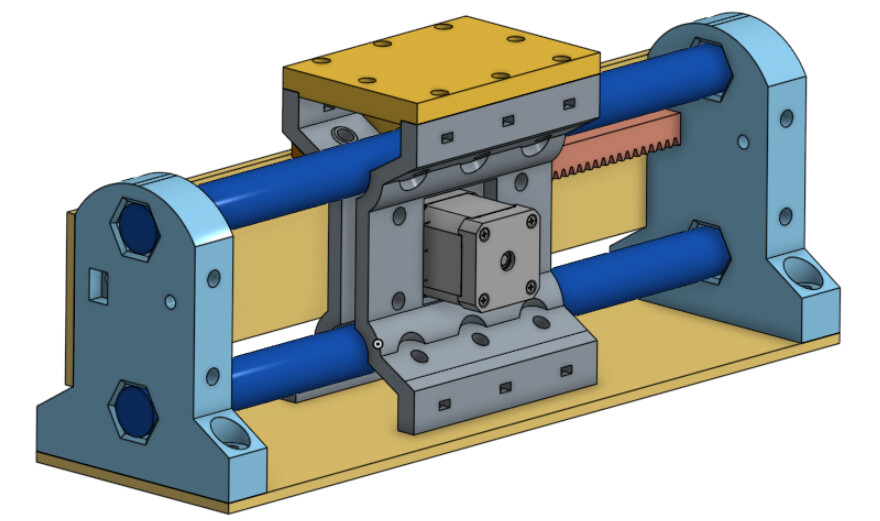
So, take 3 of these…
and add 2 of these…
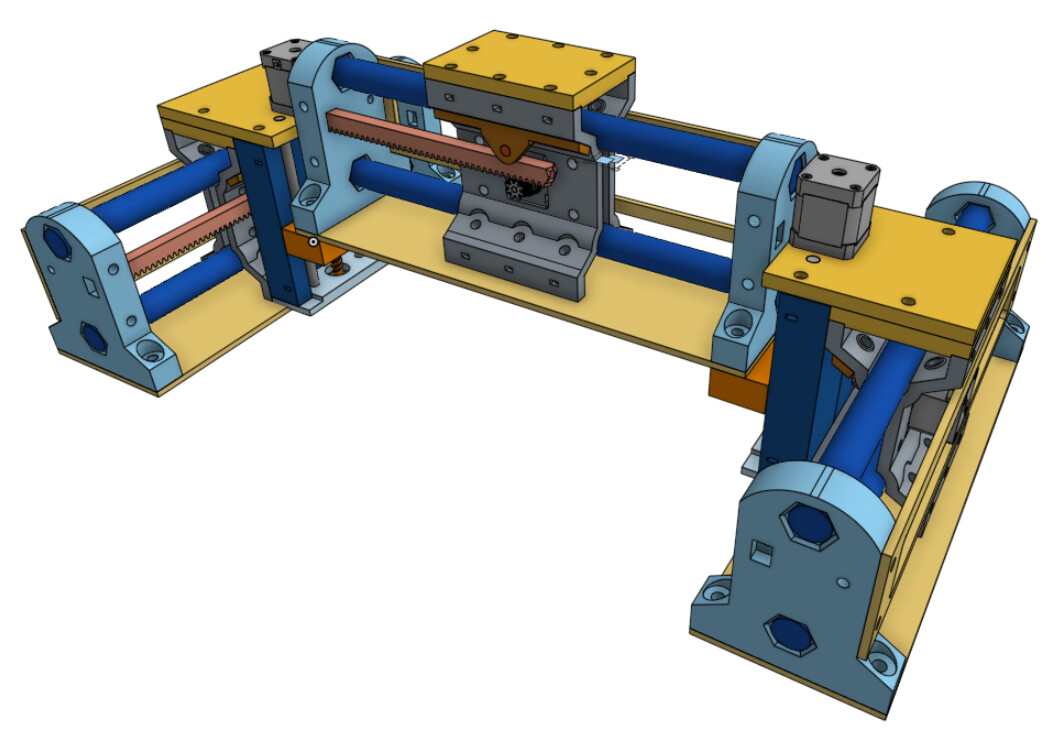
and stack it up to look something like this…
I’m having fun with it…
![]()
Yeah, we kicked that around a fair bit.
Using three identical stage mechanisms makes the machine so modular.
I’m loving seeing you iterate on the design.
The stages could do other things, also. For example, one would make a great camera slider base.
You are getting into the territory where a couple cheap injection molds could build this thing. The first MPCNC was only a couple parts I planned on injection molding (because 3D printing was still not all that great at the time).
I can’t keep my mouth shut. If that printed leadscrew and nut is working that smooth, think you can make the rails and rack one modular printed part? ?Take out the bearings and bolts and just have some sliding surfaces?
At this point you are at rails, steppers, controller, power supply, couple bolts and bearings.
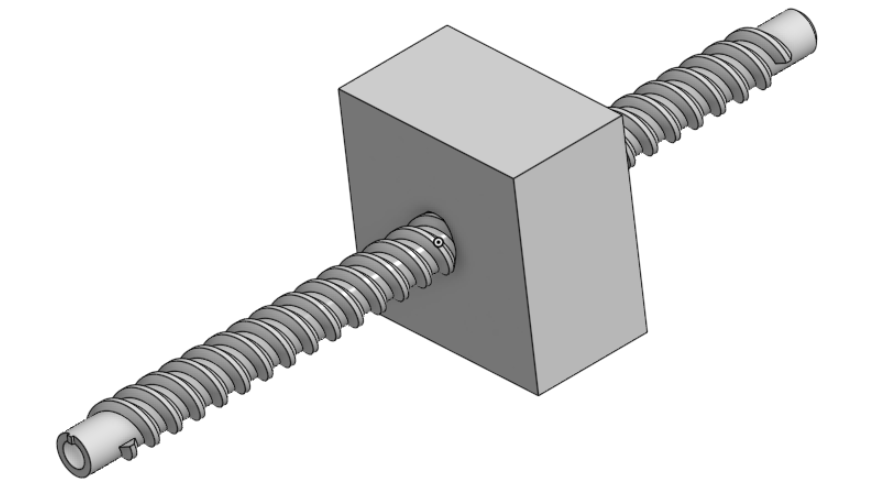
Are you talking about something like this… only scaled up for MPR&P?
Maybe, that leadscrew seems smoother than I thought. Just wondering if a slide of some sort is feasible or best to just stick with the cheap emt and bearings
The leadscrew is easily made in Onshape… and the one for MPR&P is a 2-start, 10mm per revolution, trapezoidal thread. It’s easy to change starts and pitch with helix and sweep ops… with any thread profile.
I thought maybe the dovetail slides replacing the guide rods was what you were asking.
I can send you a link to the Onshape document for this if you’d like…
Are you talking about just the lift assembly? Or the linear stages?
Yeah that might just work.
But then, RapRap has a long love for it’s vitamins (mis)using bolts and printed bearings.
A print-in-place stage would be so rad, though… Even if you print it in place and then crank it up and shove in some dowels or bolts.
I’m not sure if you guys are just looking at the Z-lift assembly or, somehow, the whole machine. I been going on the assumption that the MPR&P linear stages are in pretty good shape, needing only minor tweaks… and that the Z-lift setup is what I’m focusing on now. Where are all the “bearings and bolts” that could potentially be sliding surfaces… other than in the Z-lift; i.e. like a scaled-up version of the little laser engraver Z-axis design from a few posts back?
That’s how I see it.
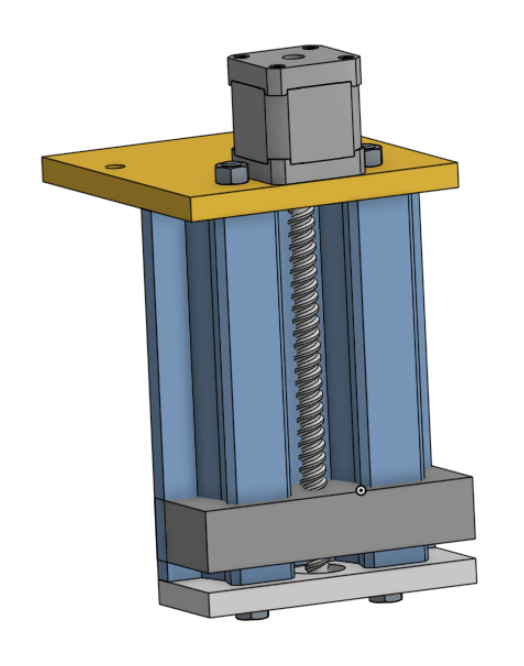
Pretty sure this would be easily printable and last for at least a while…
The previous guide rods now become simple fasteners to strengthen and hold the whole assembly together. The sliding carriage and leadscrew can be printed in place as before. The slider rails easily printed with no supports.
Still no idea of lube requirements. I really don’t think in this application they should be running dry. I’ve thought of petroleum jelly and white lithium grease… others?
Chime in if you have thoughts or ideas.
Print in Nylon.
The bolts sound like a better idea to me. Sorry, Ryan ![]()
agreed
C’mon guys… I’m already printing some test parts for the all-printed version.
Wussies! ![]()
You’re a machine prototyping machine!!!
Can’t wait to see how it plays out.
I had good luck with PLA-on-metal bearings, but never PLA-on-PLA.
Stiction or something.
Thanks for the kind words.
I’ve done a number of plastic-on-plastic slides but always for slow and/or intermittent movement and light loads… as with laser engravers, where you most often set focus and then leave it there. Here is a note I wrote from one of those engraver Z-axis models…
An observation about printed sliding surfaces… it helps if the mating surfaces are NOT printed at the same resolution and with layer lines running in the same direction.
To test I printed two sliding mechanisms…printed vertically-oriented, the set hardly slides at all without considerable force applied, printed horizontally-oriented, that set slides better but feels a bit “sticky”… but mismatch either set and it is “just right”.
For the “threaded” parts – the leadscrew and carriage – I felt both needed to be printed oriented vertically to insure their cross-section is as round as possible. In this case, I found that if I printed one at 0.3mm layer height and the other at 0.2mm to “mismatch” the layers… I got smoother operating threads than if both were printed at the same resolution.
I’ll go ahead an build a all-plastic lift unit just to see what I can get away with. I still think a light layer of petroleum jelly or lithium grease might be is order as well. I always try to put that off until I’m done assembling/disassembling during testing…
![]()