That is really amazing results.
1 Like
Thanks Jeffe!
Now my goal it to tune it so it could print lattice structures. None of my printers were ever good at doing that, I always sucked at tuning them for this kind of task. My goal is to print a giant Eiffel tower, it would be awesome if it was precise and reliable enough to do it, I think this would be the ultimate test to pass since it would be both super difficult and also a really long print (I estimate it to take around 40 hours)
I’m thinking this one, but I would at least double its size to make it 500mm heigh at least.
Any tips of good practices when printing this kind of structures would be very much appreciated, that’s something I never quite managed to get right so far.
2 Likes
Wow! Impressive print results for such a big beast!
I’m finalizing the cabling on my CoreXY and then need to install the bed and stuff. Hopefully it will print fine as well soon. 
1 Like
That will be awesome. I just had some nasty failures on a similar problem. This was vent holes for an electronics case but they had very spiney plastic pieces that were nearly vertical. They ended up being garbage. I didn’t try to print it again because it worked fine without those pieces.
I suspect the trick is to cool down the hotend temp and slow down. Dial in the linear advance, maybe. Maybe @mordiev would have some good advice.
A model like that would be really interesting printed non planar. I really wish that was possible. I don’t know how it would get the support it needed. But it would be neat to keep those parts strong.
You can always cheat and print so much larger that it is solid enough to not be a lattice. 
1 Like
That looks really great man! 300mm part in that machine is bigger than anything I can print in mine, but looks so TINY sitting there on the bed!
2 Likes
Haha, yeah I also thought it was looking ridiculously small in the machine after I printed it 
4 Likes
That BOx looks great! Seriously! it looks clean enough to belong in a hospital. Somehow everything I build end up looking like it came out of a redneck’s garage. (I consider myself to be a bit of a redneck so that makes sense.)
Very impressive benchy as well. Very impressive to get that clean of a print from such a large printer. I assume those are 10 mm Smooth rods. My TAZ 5 is close to the same size print volume (a little smaller) and it can’t get results like that. Well done.
I agree to cool down the nozzle if you can but be careful with slowing down the print speed. Only do that near the top where the layers don’t have enough time to cool. You may want to test print the top 50 mm first to get the heat and speeds tuned before printing the full 40 hours.
As for the lattice work. The nozzle will radiate heat that can cause over hang on previous layers to deform. With that tower you will probably have a lot of that kind of lattice work overhang. So rather than printing the whole thing slower it will probably be better to print with thicker layers (At least 0.2 mm in my opinion). Here is a link to a video where he explains it better than I ever could. At the 2:05 mark. The entire video has some great tips but this is probably the most helpful.

3 Likes
Slic3r has an option where it will slow the printer down if the layer won’t take a minimum amount of time. I don’t know what slicer you’re using, but there may be a similar setting.
LOL. Just looked back to some of your earlier posts. 25mm Steele tube. NICE!!! That would help keep it rigid and stable.
And I like the part cooling fans and shroud. I am curious to know how that works out for you. Is it loud?
2 Likes
Thanks for the kind words mate!
Oh, that’s a really good suggestion. I’ll try that, thanks!
Not really, that’s one of the reasons I chose to go with blower fans, they are usually a bit quieter. You can definitely hear them, but not to the point that it’s extremely bothering. So far they seem to work quite well, I was a bit concerned about this part of the printhead melting or being damaged during the print, but so far so good!
I’m using Kisslicer and it has this option, I activated it for any layer taking less than 5 seconds, since apparently my fans are able to cool down things during that time. I might go for a bit more just for good measure.
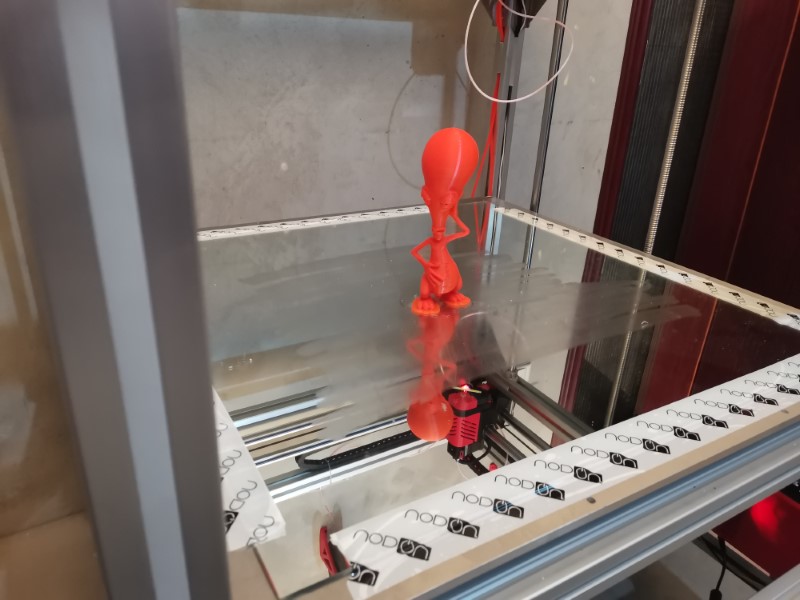
A sexy Alien visited my shop last evening:
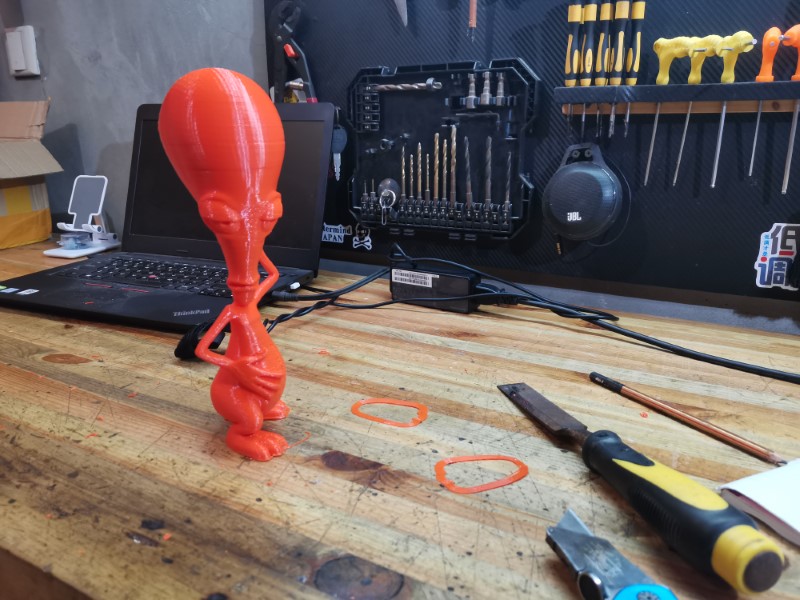
It took a while to print (bit less than 4 hours) because it was quite big (250mm height) and the result wasn’t great at all, but that’s mostly due to the original 3D file being really bad. The mesh was completely out of whack, which apparently confused the slicer, making some weird useless paths all around which both took longer to print and gave really bad results.
The other reason is that my extrusion isn’t really well tuned, those holes shouldn’t exist if the extrusion was perfectly set up.
Also had a bit of layer shifting on the head (happened two times). Not sure yet why this happened, might be the machine skipped step, but might be also that the print head bumped in Roger’s head, moving it sightly, since the neck is thin so it was not a very solid model. I hope that’s the reason.
Weirdly enough, the part I was most concerned about on the model turned out to be the cleanest by far: the arms turned out amazing despite their small sections and long overhangs. That’s great!
It did print entirely, so that’s nice, but this print quality was real bad as you can see better here some spots turned out horrible (but those wouldn’t exist if the 3D model wasn’t that bad in the first place):
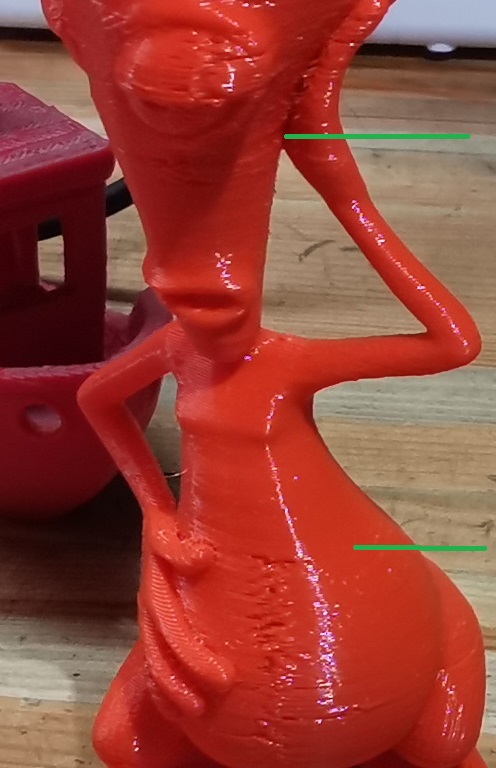
It printed almost perfectly between the two green lines, because those were the only part of the model which didn’t have mesh issues…
So next step will be to take my time to tune the extrusion properly. Kisslicer has a really neat feature which is the tuning wizard. It helps you tune the temperature, extrusion flow, linear advance and retraction with a simple process. I never actually tried it, always been lazy, but this time I will. Pretty sure it will make a nice difference, usually the guy who codes Kisslicer makes really great stuff.
For anyone who doesn’t know this slicer already, I really, really recommend you to try it. I tried all the other well known slicers (cura, S3D, slic3r, etc) and they never really matched the print quality and efficiency I got with Kisslicer. Plus I find it easier to use once you get used to the interface.
Here it is if you want to give it a try: http://www.kisslicer.com/
3 Likes
Lol! Love the sexy alien.
Yeah the mesh problems seem like a real problem. I am curious if your slicer has a “resolution” setting. That might help clean up some of the mesh issues and some of the “zits”. Don’t use to high of a number or it could make the problem worse. Again a video that explains what I mean better than I can.
 I finally got rid of these blobs!")
2 Likes
Ah yeay I saw this video a few months back (great 3d printing channel BTW). Actually that wasn’t this problem here, it was a very weird issue that I never had before. the model had some external geometries that were crossing themselves, going from the inside to the outside of the model. The slicer followed those and so it was making some perimeters inside the model instead of infill, and some of the external perimeters were basically becoming some tiny islands instead of continuous paths. It was a real mess.
I don’t know if there is any resolution setting to kisslicer, but in this particular case it wouldnt have solved it 
Usually it does a great job at repairing the mesh automatically, but this time, for some reason, it didn’t work either.
1 Like
What size belts are you running?
About one meter, almost same lenght as each axis
1 Like
Look like GT2 6mm?
Yeah, I just recycled the old ones from my mpcnc actually
1 Like
Excelent piece of machine you have done! I-m looking to the big benchy and I can trully say it performs well in many tricky areas of FDM printing. For the rest, you have a lot of outstanding parameters compared to a standard printer so there will be a lot of work for tunning.
Apart from printing settings which is your hard fight, you mentioned you need a rigid print to cope with the rigid printing head. Tree-like supports which software like Flash-print offers are best in taking not only weight of overhanging structures but also side-loads/ push forces. They have also small contact points with the print, which makes them easy to remove and leaves small scarrs on the print (at least in my opinion). You can define them as apropriate; not too much, not too less and with controlled angles.
1 Like
Not much since last time, unfortunately I was extremely busy at work these days, “thanks” to a virus destroying our entire network. Anyway, should be fixed now, finally.
So I haven’t got much time to play with my printer, but I noticed a few problems during my last print attempt (tried to print a SaturnV rocket model):
1-Extruder motor got disconnected two times
2-I had small layer shifts
Problem 1 comes from the HDMI plug on the electronic box side. I’ll secure the cable more firmly and see if it happens again. In which case I’ll forget the HDMI cable solution and move to something more traditional.
Problem 2 is still under investigation. I know that X and Y movement weren’t perfectly smooth due to the belts rubbing sometimes on the roller parts. So I spent my sunday working on the lathe and came with those little aluminum belt guides that I pressed on the bearings:
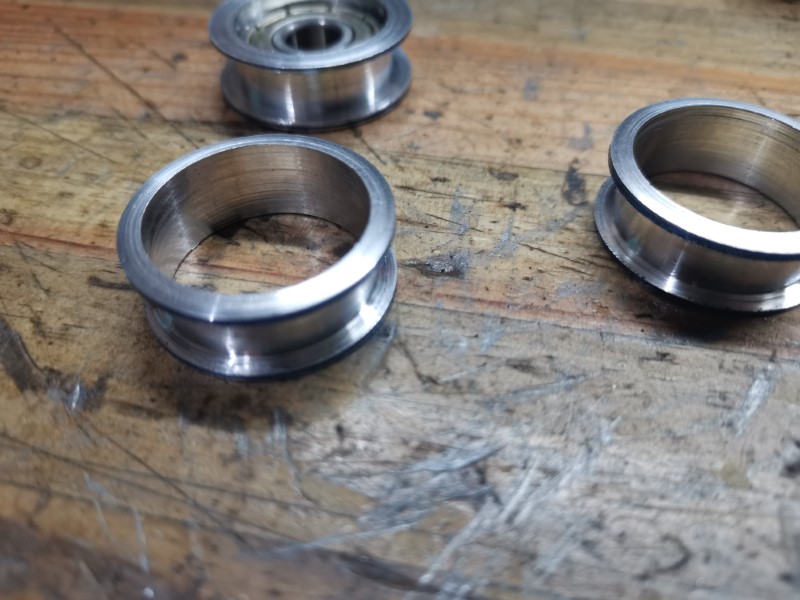
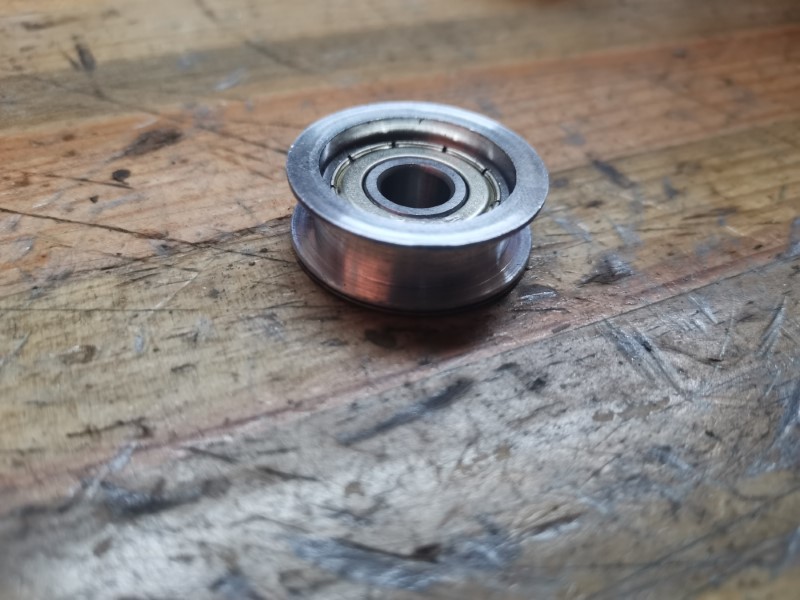
Installed them on the rollers, the movement is now much, much smoother than before.
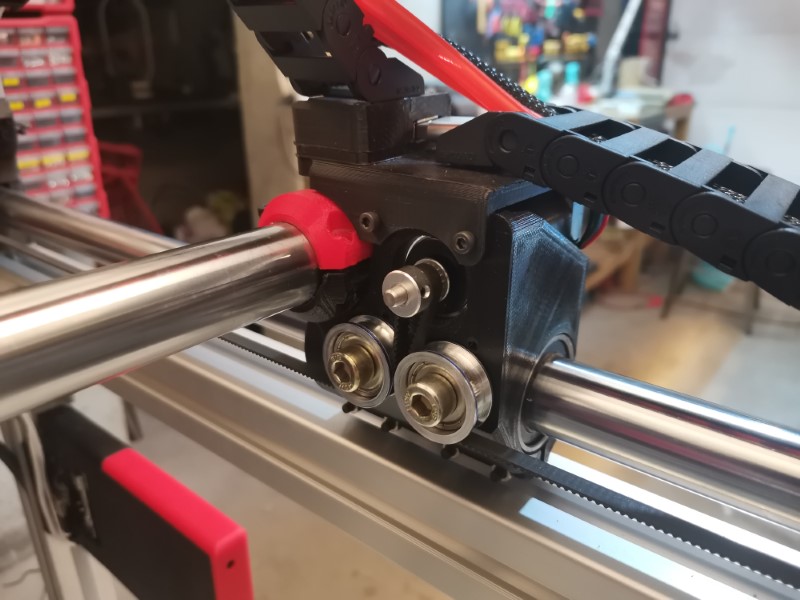

I also came with a new belt tensionning system which is very easy to use:
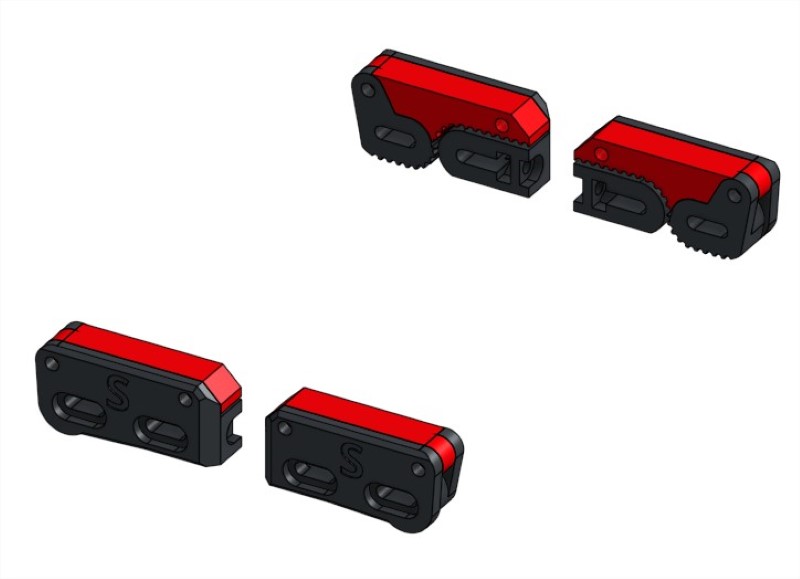
I forgot to take pictures of this system installed on the printer, but basically you open the little red lever, slide the belt in the black part, close the lever and secure it with a screw which locks the belt in place and then finally tighten the screw at the back to tension the belt and trim up the excess. Looks clean, works great.
Hopefully these hardware updates will solve the layer shifts issues. The next possible culprit would be the USB wires not working properly, in which case I’ll replace them with something more reliable. Would be a bummer, but what matters is what works.
8 Likes
Well that’s just great. I’ve been putting off getting a lathe, and now I think I need one.
2 Likes
Then I advise never, ever watching this YouTube channel:
Keeps reminding me of the jewelry class I took in high school some… 35 years ago?!
2 Likes