MPCNC Made In China: New Build!

Well I gave up and re installed my trusty old steppers. I made some slight modifications so I can drop the servo backs later, menawhile I’ll try to send them back to the manufacturer to at least get them flashed back to a working condition, or maybe better, gt them swapped for the v1.0 which works exactly the same but at least does have some support by the community.

So at least my printer now works fine again, but still open loop.

2 Likes

That’s a bummer man! :confused: I hope you it works out in your favor in the end.

2 Likes

I have 2 of these on my Geeetech A10M and they are working great, but they don’t have to synch with two in each axis.

I hear there is supposed to be a V2 coming soon that has a better PC interface. I agree that the OLED interface leaves plenty to be desired.

On the plus side, when testing I grabbed the bed to make it skip, as soon as I let go it snapped right back to position. A10 layer shifts are a thing of the past.

@vicious1 if you want to play with them I’d donate a couple of the conversion kits to you… Let me know.

2 Likes

Thanks, but if there is a V2 coming I better wait. I am really interested to see if the current limiting would do it’s thing, more so than the closed loop. I think I can get what I want out of the TMC’s (coolstep?) without adding cost. Or at least test it since I do believe it is enabled on the SKR pro.

2 Likes

It might be turned off. I wanted to make sure we had the same holding power as the drvs, so I turned off some of the fancy features. Turning off quiet mode at 100mm/s doesn’t make sense if our hardest task happens at 10mm/s. And the noise won’t be important once the router turns on.

There is definitely some room for experimenting there though.

2 Likes

The ones I had were the v2.0
Maybe at some point there will be some documentation as well as a better interface, but clearly I can’t say that it is the case today.
So far the only difference I see between v1.0 and v2.0 is that they changed the main processor for another one that is able to support can bus, which is close to useless since they do not provide any documentation as to how to use it.

To be clear, I’m not saying that these motor are complete garbage, they might work perfectly ell on some printers, but if they don’t work well right out of the box for you, then you’re screwed, because you can’t tweek anything.

Ahh, yes the CAN bus was the only hardware feature. Maybe get some of the 1.1? The 2.0 disappeared from biqu.com, maybe that version is crap?

It seems kind of like they are making hardware and hoping someone in FOSS will fix the software.

I haven’t checked here in awhile, but there’s always something neat going on in this thread!

Perhaps the initial issues were noise induced? I was watching some youtube videos, and a comment came up about it (apparently there’s a big google group for these things? This might be it: https://groups.google.com/g/smart-stepper?pli=1). Someone came up with a power conditioning PCB which could help https://www.estechnical.co.uk/signal-isolation-and-power-conditioning-for-smart-steppers
That’s assuming you get working firmware back on your steppers… maybe that group has a solution. But not saying throw more money at the things if it could be something that might not be solvable such as your dual axis motors inducing feedback on eachother; one correcting itself causes the other to move, which corrects etc. Or maybe it was just a matter of tuning the PID. There was a V1.0 fork with PID settings added to the LCD. I wonder if it’s trivial porting V1.0 firmware to 2.0?

1 Like

That’s a possibility, it’s not impossible that some issues were coming from noise or from over compensation due to steppers fighting each other (haven’t thought of that one before actually, good point). But I got them to work at some point, only thing I needed to do was to tune the PID, which was not possible without some very complicated firmware edits, using the manufacturer firmwares which didn’t work.
I got them replaced with version 1.1 instead of version 2.0, but I had no time and frankly no motivation to give it another test.

Over the past months my machine has printed a lot of stuff, I’ve used more than 20 kilos of plastic printing things for work, many jigs, parts for machines, test or assembly benches parts, etc. Goal was to test the printer’s reliability.

It helped tremendously my career, I’ve now become officially engineer in my company despite not having any engineer degree, and to be honest this forum and the MPCNC have not been strangers to this: I’ve learnt tons of stuff from building my first MPCNC and from you guys on the forum so I really thank all of you for that, and especially Ryan obviously!
Too bad we can’t share a beer to celebrate that, but maybe someday, I hope!

I have to say I’m impressed by how reliable this printer is so far, I don’t even recall when was the last print failure I had, and if I had to guess it was probably not machine but human related.
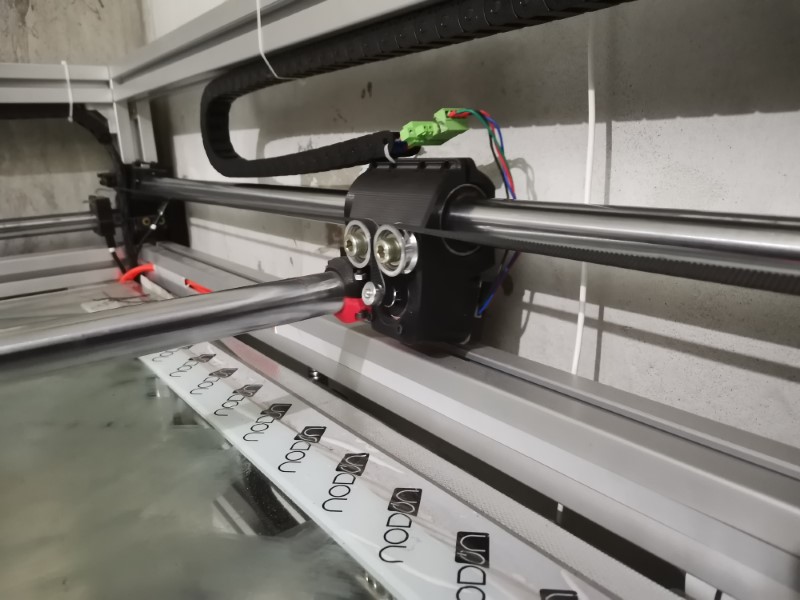
What is even more impressive is that it still works perfectly fine despite lots of broken parts. It was a bit hot in my garage over the past months, and my stepper motors current is set up quite high, so the roller parts did melt, also the print head broke in several places due to some mistakes I made.
But it still carries on and prints just fine, this thing is just great, I think it deserves the name of Big Ox Jeffe gave it, it seems just unstoppable. :yum:

Just look at how deformed the rollers are now, seems like the motors will fall off any second XD


Also a proper repair on the print head, using tape, beautiful work:

Anyway, still works incredible. No problem whatsoever, I love it.

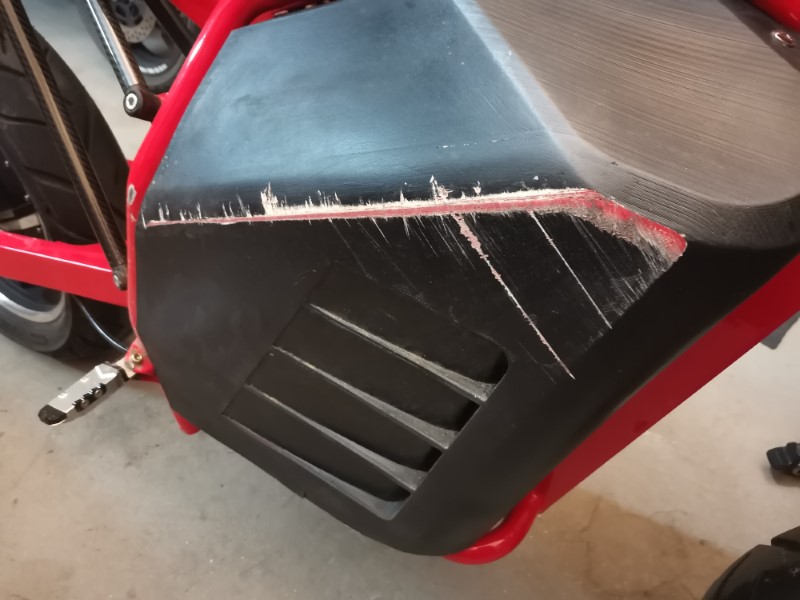
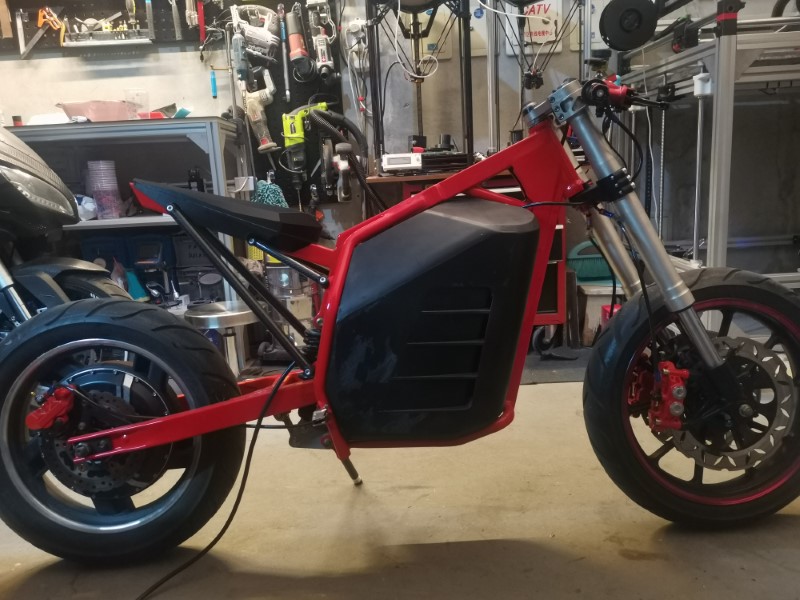
Also, maybe some of you remember I was building a new electric motorbike and printed the battery covers using this machine. Well, on the good news side, the motorbike was almost finished and it is very, very powerful. On the bad news side, I crashed it very hard at 100+kph. Amazingly, both the bike and myself survived with some very minor injuries, just some big scratches and bruises (now I’ve recovered completely so everything’s fine).

And well, those battery covers survived incredibly well. No cracks, they are still in one piece. Remember that this is just PLA. The bike slided on the covers for a bit less than a hundred meters, but as you can see, they are really, really tough, doesn’t look like such a violent crash at all:

So yeah, PLA’s great and you can indeed 3D print some very tough stuff with it!

Sucks because I had just finished the paint of the frame and I think it was looking great, now I’ll have to do it again. That thing is a beast, it has some pretty crazy torque, around 30KW of peak power, and it weights only 110kg, it’s so fun to ride! (well, as long as I don’t crash it obviously):


Anyway, I’ll start by fixing my printer next week with improved rollers and then I’ll work on fixing the bike, luckily the damage is very minimal. Next the plan is to replace the PLA battery covers with carbon fiber ones, I’ll have to print some very big molds for that.
Also I need to make myself a new print head with a 0.4mm nozzle to try and print some large, high definition parts from time to time.

12 Likes

I’m glad you walked away from that crash. Scary stuff. I never laid my street bike down, but I feel like I came close nearly every day. Around here, distracted drivers are the biggest hazard, scared me enough to sell it.

The bike looks insane, so naked! Feels like I am looking at the bike of the future. Any idea how long the batteries might last? I feel like a good 6 hours of standard weekend (pleasure ) riding would be amazing, 3-4 hours is probably plenty though.

2 Likes

Amazing to hear about your builds and your career Dui! Well done in so many ways. I put you in the pool with Wintergatan, the self thaugth geniuses. Ryan definately deserves room in that pool as well, but I wonder if he got a degree or not?

2 Likes

That’s awesome. Congratulations! Very well deserved. I have worked with a lot of people with engineering degrees and I would definitely say if someone deserves the title, it’s you. If I had an honorary degree to give you, I would.

That is incredible. I am glad you are ok. Maybe don’t paint it. It tells a story you just can’t with clean paint. It is a nice reminder too. Great story.

5 Likes

Haha, thanks for the really kind words guys, made my day! I wouldn’t be there without your help that’s for sure!

Oh, not nearly that long, but well that really depends on how you ride. I tend to drive really fast, so in my case the battery will only last an hour tops, so maybe 50 km in the city with all the stops and whatnot. But for any non maniac people/normal rider, I guess the bike could do 100km. It could have a better range with an other kind of battery chemistry, but the one I’m using is a good compromize between high discharge rate -meaning it can deliver lots of power quickly- safety, and long term reliability, meaning I won’t have to replace it before at leat 10 years and it is really hard to have this battery catching fire)

But as you can probably guess, the point of this bike really isn’t to do long distances, it is not designed to be comfortable, but only to be a fun, crazy machine for the weekend, for going to work when it’s sunny or for occasional rides. Kind of the same spirit of the first Dodge Viper, something brutal, lightweiht, with lots of power and very little care for practical aspects or comfort. :smile:

So yeah, you wouldn’t spend 6 hours on it anyway, but I still have my other electric motorbike for longer distances.

Haha, yeah a friend of mine also suggested the same thing. I’ll keep it like that for now, but I’ll need to make them out of carbon fiber soon, PLA is tough but it doesn’t like sun, so I can’t leave it like that for too long.

2 Likes

Your motorcycle accident looks a lot better than mine.

I was only doing 20mph when I broadsided a minivan that changed lanes on top of me. Did $7k worth of damage to my Harley.

I flew over the handlebars and landed 20 ft in front of the bike. Only bruised and scraped, nothing broken.

Congratulations! It’s awesome to work for folks who can recognize talent and appreciate self - starting motivation. Good luck with the new role!

1 Like

Awesome work Dui as usual! Congratulations on the promotion.

Good to hear that you and @niget2002 walked away with minor injuries. My brother-in-law had a similar experience to David’s but the outcome was much worse. He was in a coma for a few weeks and ended up loosing the use of his right arm. Luckily he was left handed but it made it a lot more challenging to play guitar and drive his manual transmission car. But he still does both.

@forcerouge Did you ever think about adding a regenerative breaking system to prolong the runtime? I guess the added weight would be a little counter to your crotch rocket goal but it would be cool for commuting. :rocket::grin:

Thanks mate!
The bike does have regenerative braking, in my case I’ve set it up so the motor will recharche the battery while releasing the throttle, which gives a nice feeling similar to the engine braking you get with gas engines.
The brake levers remain entirely hydraulics, for safety, but I had an idea to be able to get both variable electric regen and hydraulic brakes working together on the same hydraulic rear lever, just haven’t actually build the system just yet.

Regen is nice but it also have some drawbacks: first you won’t get a huge gain in terms of range, in my experience it’s around 5-10% if you’re lucky. But moreover, all this energy has to get back to the battery in a very short amount of time, but batteries don’t really appreciate to be recharged quickly. So it’s usually not really good for their lifespan. In my case I’ve set up the regen pretty low in order to keep the battery happy for many years.

Also, some news while I’m here: I’ve started designing yet another printer: this time it’ll be a corexy!
I haven’t tried this architecture yet and I wanted to replace my delta printers (they work well but they are a bit old, the build plate is a bit small and moreover I have some issues with dimensional accuracy).
I’ve started the design two days ago and it’s mostly done for the general picture, so I’ll now start purchasing the components to build it and already started printing most of the parts.

The frame will be made of 3030 and 3060 aluminum extrusions, the outside dimensions are 1000x500x680mm so it’s a decently sized machine. I don’t know the print volume yet because it will depend on how compact I can build the extruder (I 'd prefer it to be direct drive but I’m still open to use a bowden system). My goal here is to print big stuff, at high speeds, but with smaller nozzle sizes, or print many stuff at once.
This one will have active bed leveling with a BLtouch and 3 Z motors. It will run on a Duet2wifi (because I still have the one I blew up and got repaired, would be a shame not to use it!), and I’ll install the DueX5 extension board to, maybe later, try experimenting with tool changing or multi colors… Something I wanted to try with the BOx but never did…
Anyway, let’s build this thing!

9 Likes

Excellent work.
Interesting project.
I am looking forward to follow the steps that will lead you to the final realization.
Congratulations.

1 Like

Maybe this one will be a good use for the closed loop steppers on XY? I’ve been pretty happy with mine so far. Mine are the 1.1, they must have stopped shipping the 2.0 because I can’t find it anywhere!

1 Like