Here is the gcode for both prints if anyone things they can see anything that may have caused it…
XZ 100mm Squareness Test.gcode (527.9 KB)
YZ 100mm Squareness Test.gcode (522.2 KB)
SuperSlicer_config_bundle.zip (4.0 KB)
Here is the gcode for both prints if anyone things they can see anything that may have caused it…
XZ 100mm Squareness Test.gcode (527.9 KB)
YZ 100mm Squareness Test.gcode (522.2 KB)
SuperSlicer_config_bundle.zip (4.0 KB)
It’s modern art! ![]()
Expensive ugly “Art”
Anyone have any ideas on this skipped steps stuff? Seems so very odd to me that 2 prints did it in exactly the same spot. They were not printed in the same orientation. Why print the entire way up and then when you get to the last 2 layers it skips. If they had skipped steps in different t places I would for sure think mechanical/hardware. But for these both to do it in the exact same spot really is odd to me. Also there was no cool down time in between. As soon as the first one was done I started the second one
That is strange, is there a chance that your umbilical is sagging and snagging?
Just uploaded “aza-ptfe-guide-110mm.v4.stl” for the PTFE Guide, earlier version was 60mm radius, new one being 110mm radius helps suspend Umbilical higher off the rails.
Ideally, the aza-ptfe-guide-mount-v4.stl (that attaches to extrusion and Sensor) should also be updated to have a recess/well for the 90 degree bend to seat inside of.
Recent discussions, and previous ones (e.g. fans-on-stepper-motors and taller-lr3-build/…/81) about keeping steppers cool influenced me into trying out some cheap Alu 40mm x 40mm heatsinks. Hopefully the Temp stickers will reveal IF/What difference those make, am not wanting to put additional fans on the steppers if possible.
I haven’t printed as much on the MP3DP as you, so am looking to you for guidance/ideas from your posts. Appreciate you sharing your experience and observations. Cheers!
Thanks Aaron. I wound up having to ditch the mount/ptfe guide. I just have too many wires coming up though there. That’s what pushed me to look into the CAN bus. These damn wires are a mess. But I do need to come up with something. I don’t have a full enclosure like you do and don’t ever plan to go that route (as of now anyways LOL) so I’m going to try to come up with something similar to yours that mounts to the top of the 2020 extrusion. That should keep it up even more. Actually tomorrow I’m planning to laser cut some shelf brackets to mount a shelf above the row of printers and store my filament in the food safe “dry boxes” and feed filament from above so Ill have to see how that works out and what I need to do so all of that meets up smoothly.
I’m about to start a print and I have turned the speed WAY down. We will see how it looks in the morning. as you can see from the thermal images I posted my motors aren’t getting hot. Its the drivers that are getting hot. Makes no sense to me. The ones on the LR3s in garage at 90° do just fine. But these are in a semi enclosure right next to a 1/4" thick headed bed so that probably doesn’t help anything. I mounted a single 40mm fan on top blowing down. Probably should put that blowing up, or multiple blowing from the side. Actually I can rob the 2 from the old SKR case from the LR3 since those aren’t needed anymore going jackpot, until those get too hot and I have to figure out how to put fans on it LOL.
I will report back in the morning how the print goes. Will either be good or another waste of filament…we shall see. Hoping that slowing it down will help.
It is VERY odd. Looking at your pictures, those were printed in different orientations, and the skipped steps shift the layer in different directions in the printer.
This could be mechanical as @azab2c notes, or I think more likely there is some kind of slicing error going on. How many top layers do you have in your slicer setup? Does it happen to be 2?
I’ll take a look at your config bundle later if I get a chance.
It was set at 2 for this print… That’s what seemed so odd to me. Thanks for taking a look when you have a chance!
I think superslicer is overextruding your two top layers, causing print failure. I thought that looking at your pictures as the layers look significantly overextruded.
I did a bit of searching. You may be running into the issue shown below. Crank down the flow on your top layers.
Finally got a good print off of it! I slowed the acceleration way down. That made a huge difference in the jerky and it’s no longer skipping steps. Well not for this print anyways lol. Hopefully a lot more to come
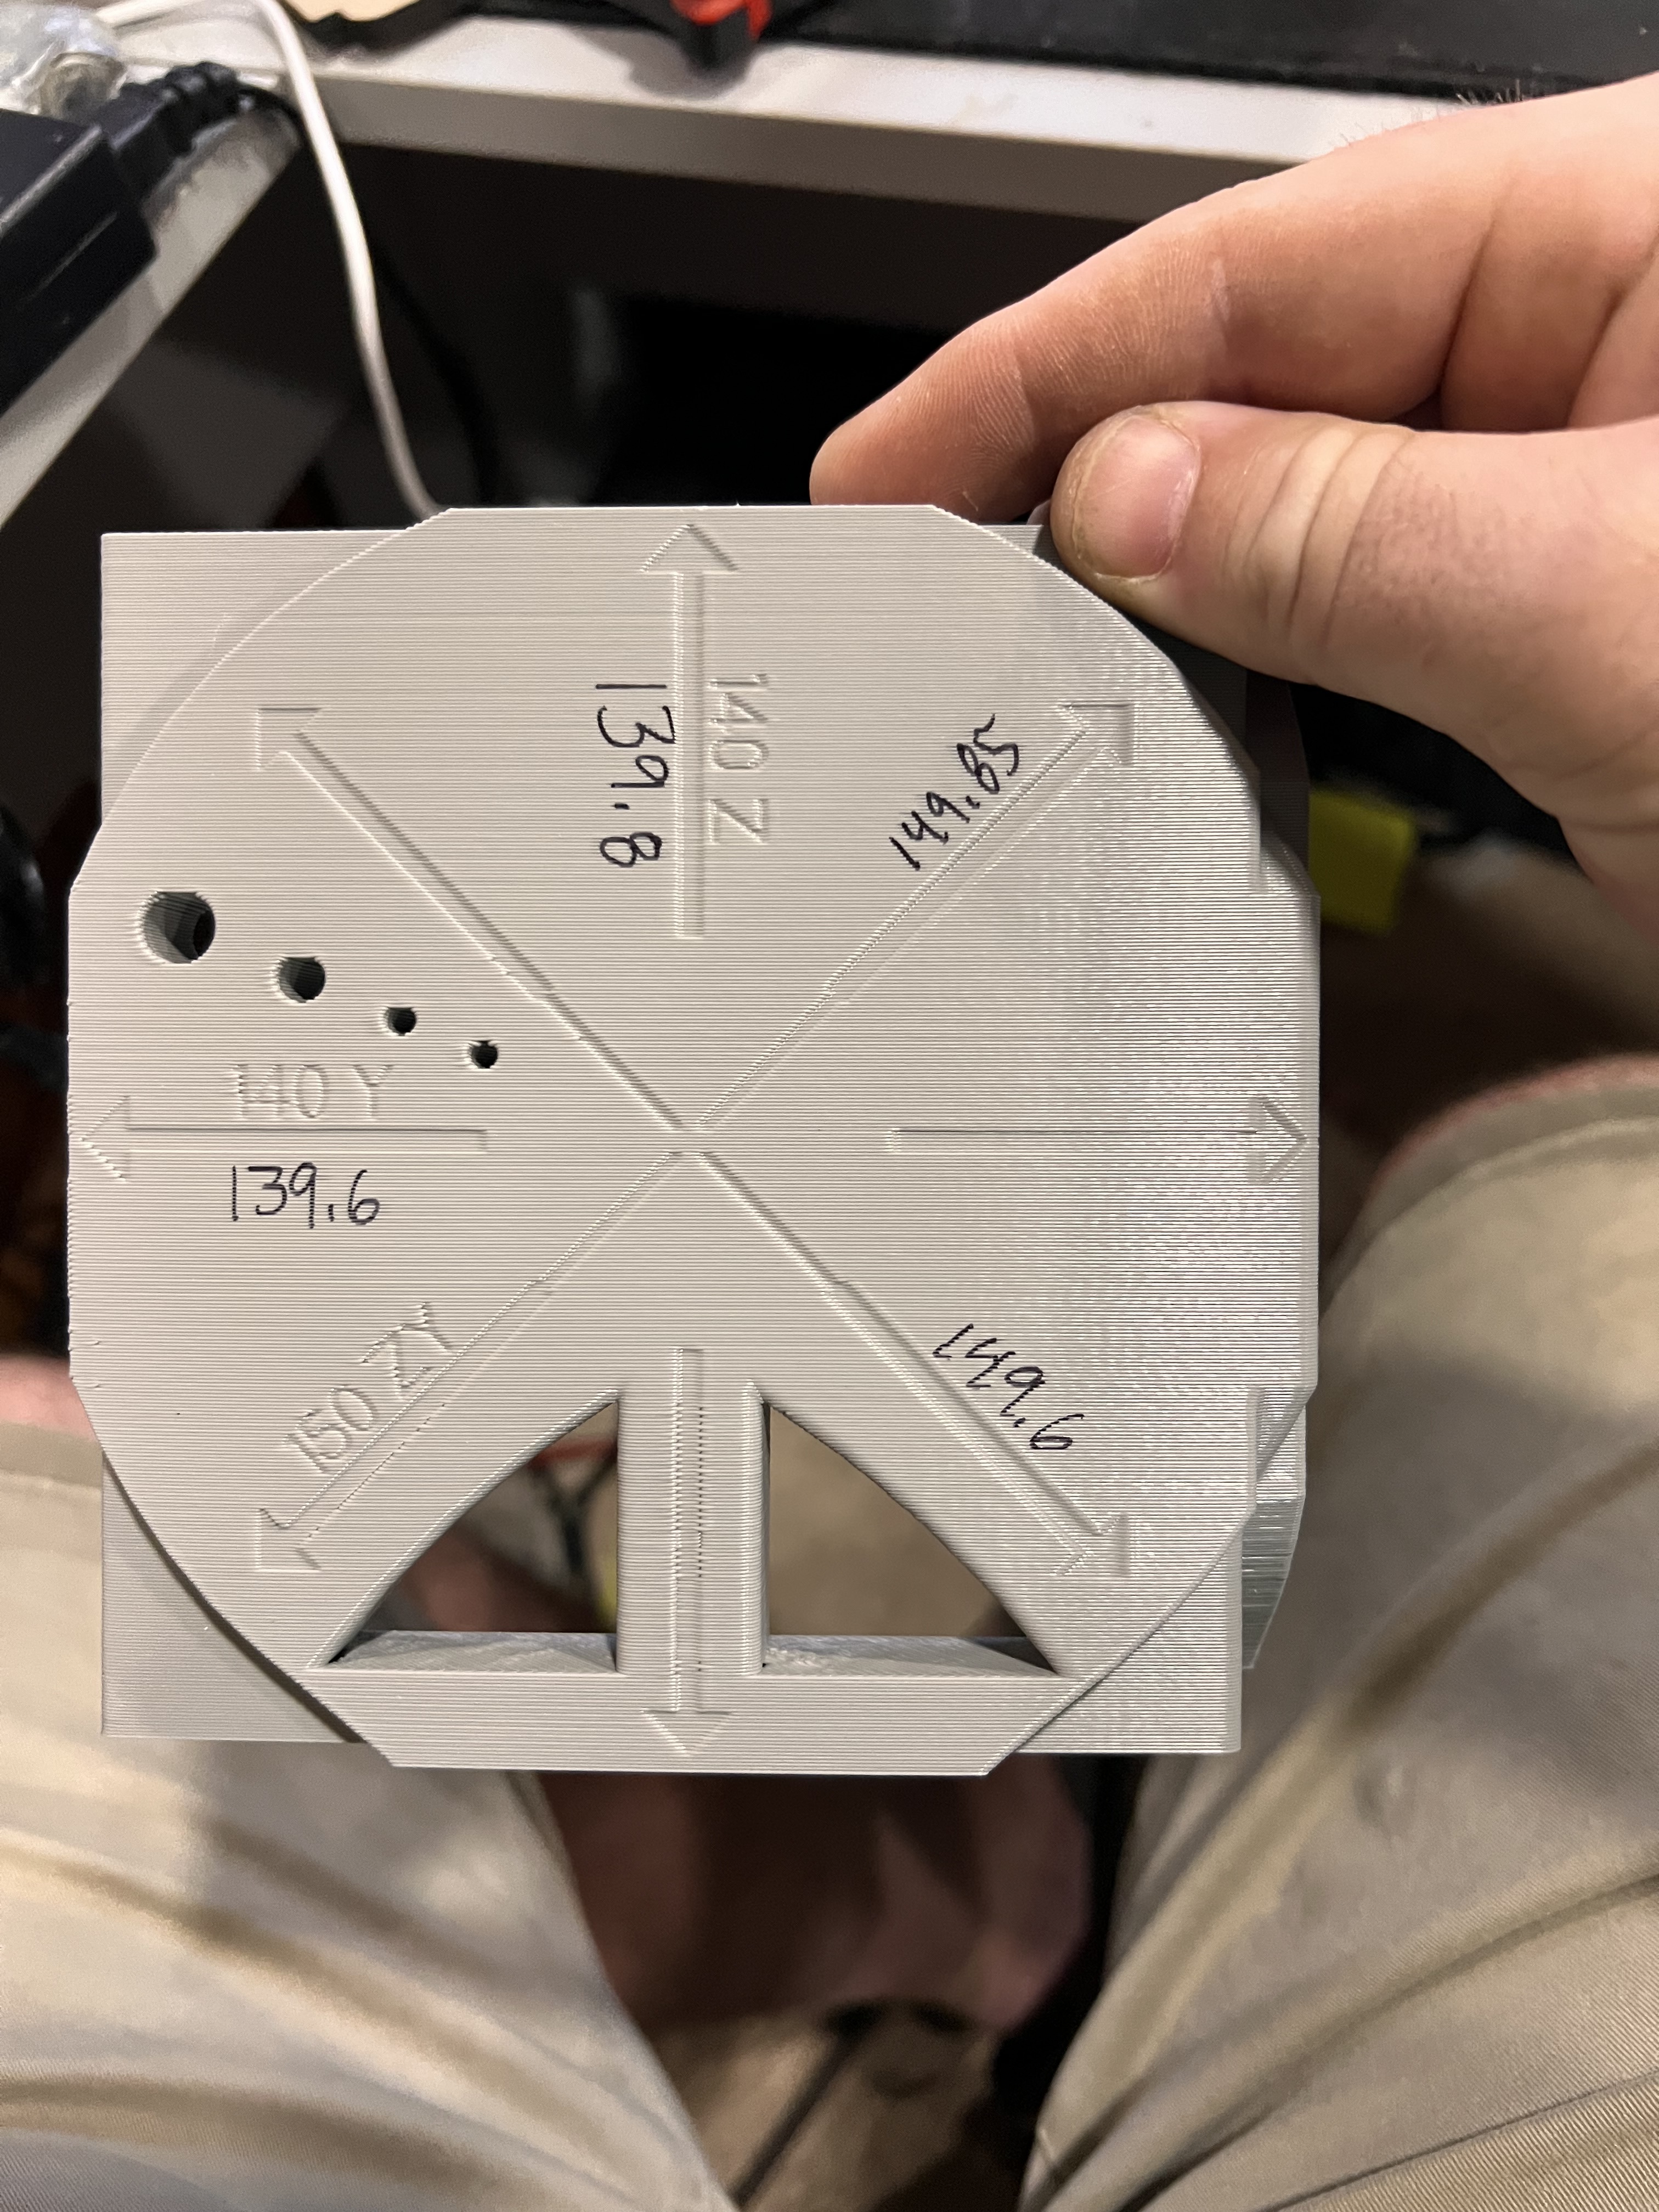
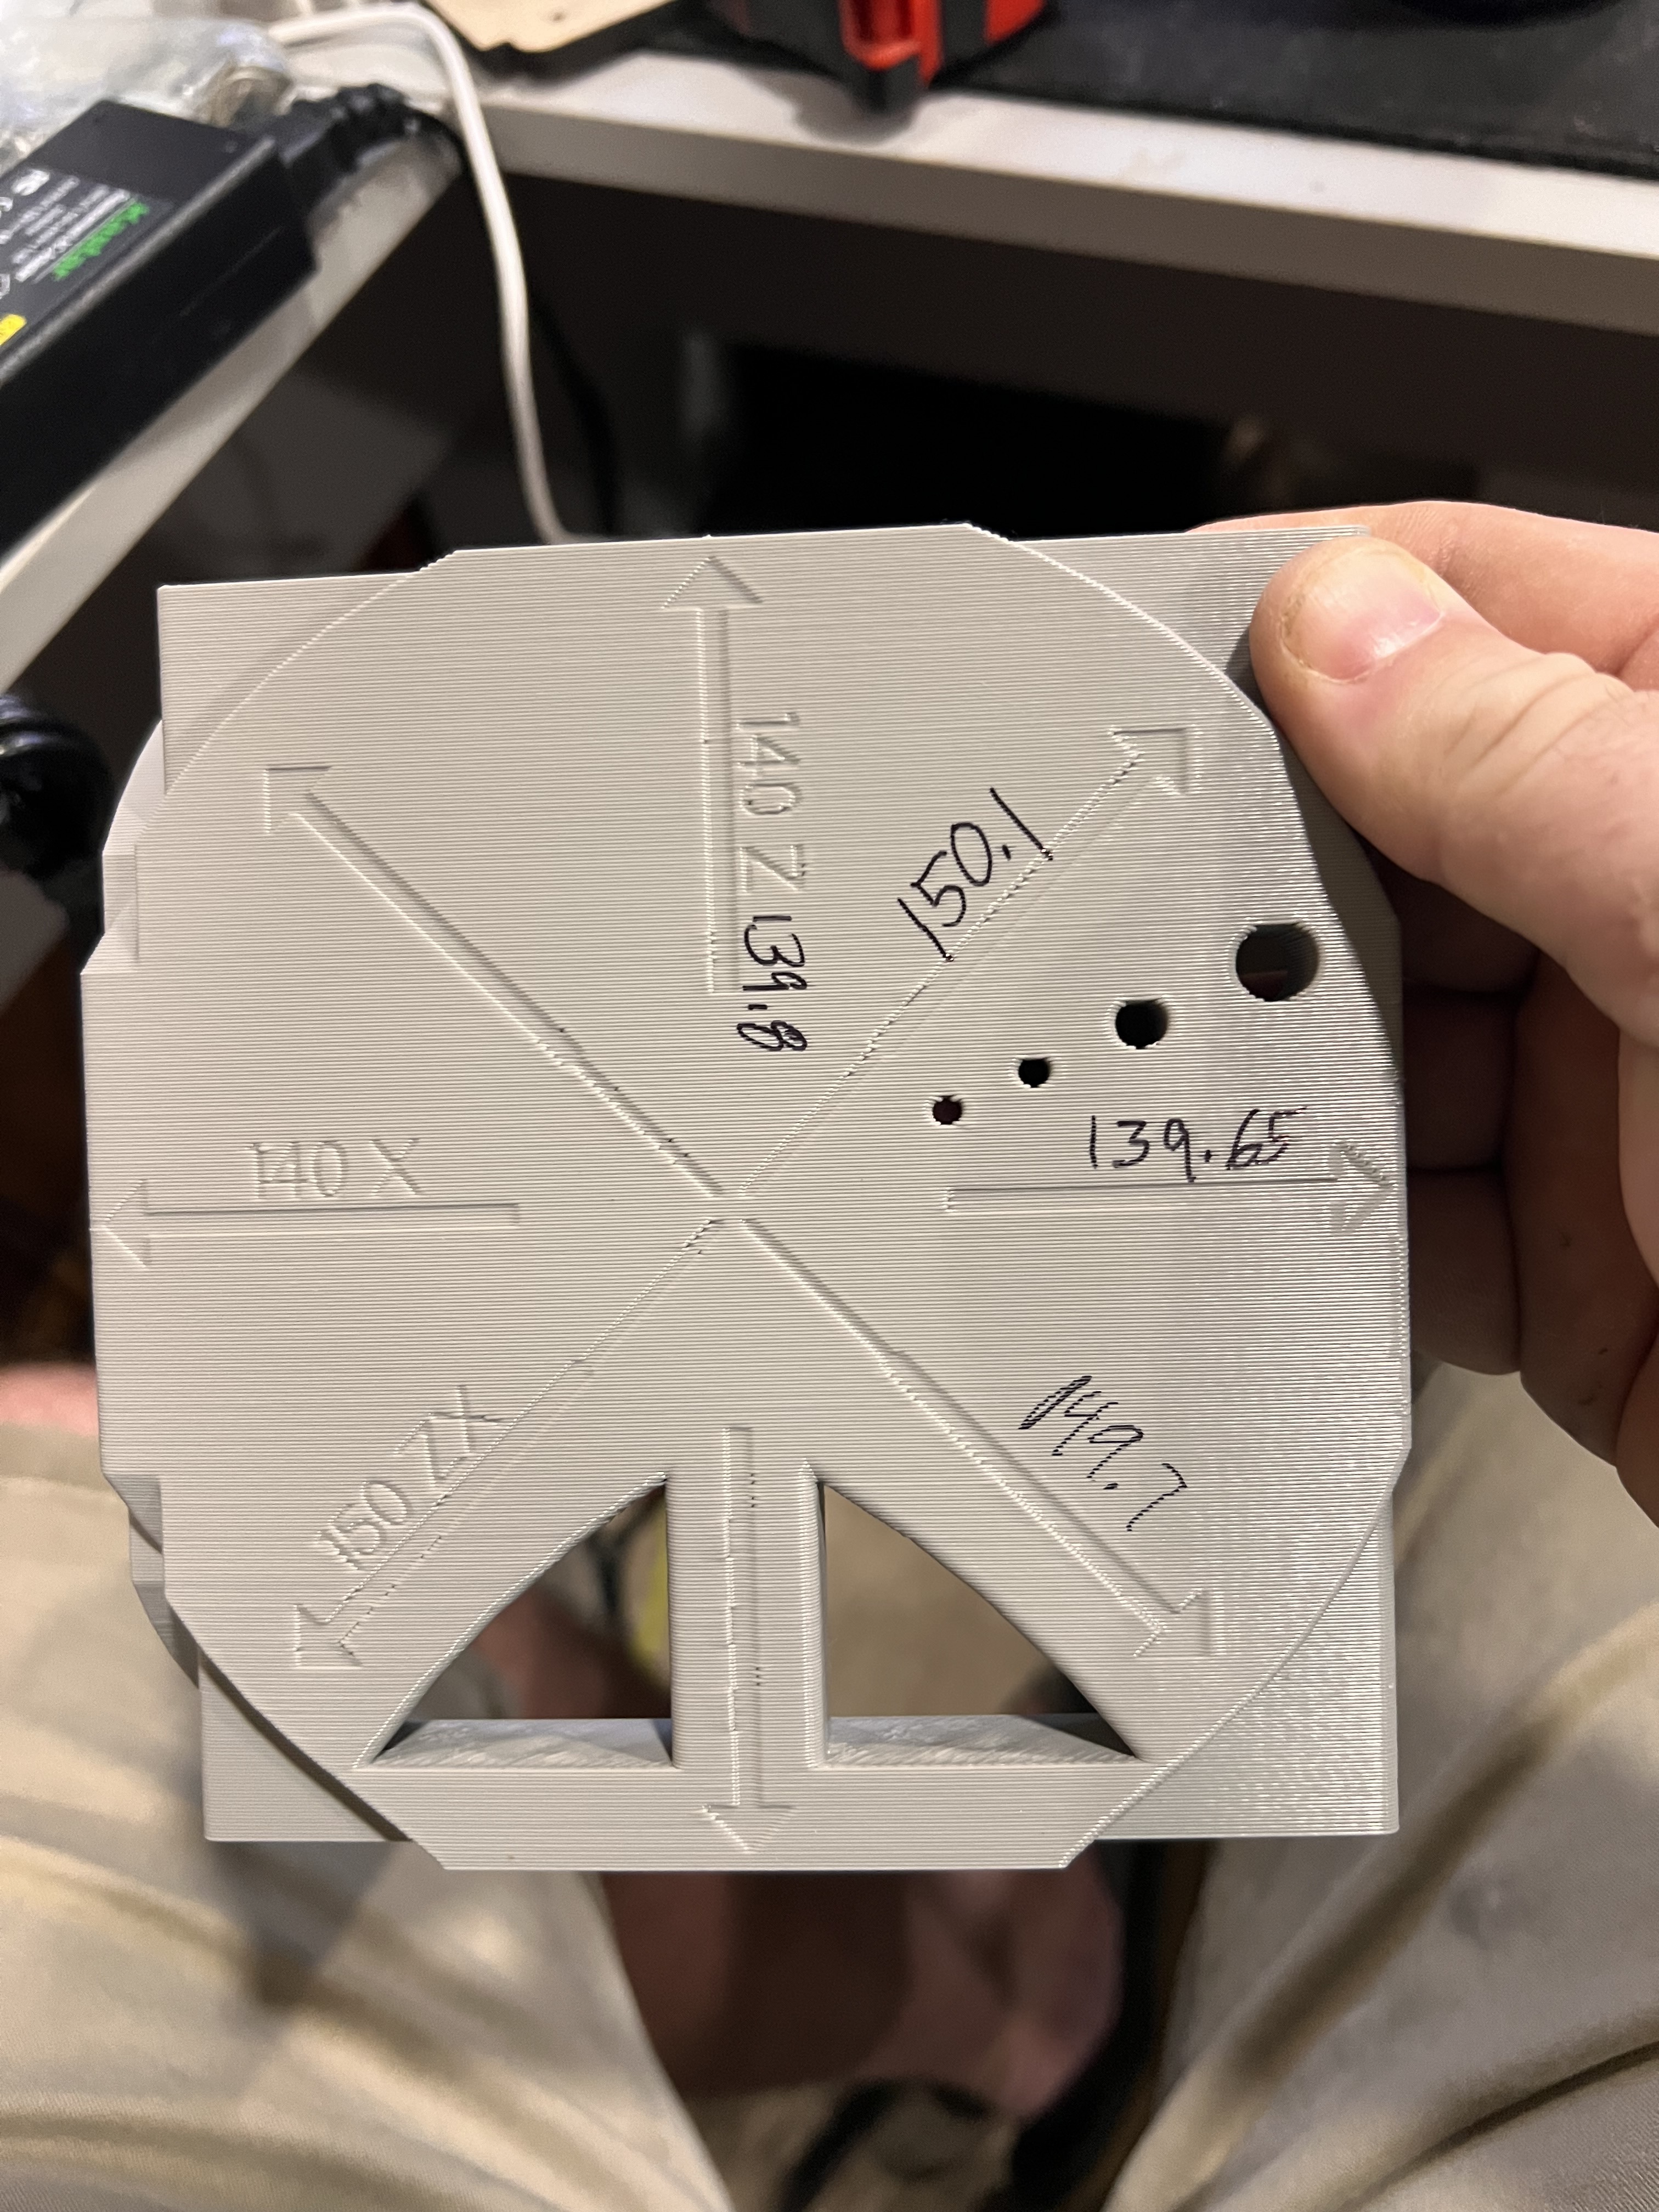
Ok now for the actual print. I printed @vicious1 xzyz test and took measurements with my calipers. Time to invest in a larger pair lol. I was at the max for these. Anyways take a look a the numbers for me and tell me if it’s off enough to worry about and if so what steps should I take to fix it. The frame is as square as I can get it with a metric tape measure. So I’m not 100% sure what to mess with next or if I even need to. Relying on you much more experienced guys to let me know. Thank you!!!
If you can’t get the machine any more square, then maybe check to see if Klipper has Skew Compensation. (I know nothing about Klipper)
Marlin has it. I used that on my Ender 3 to get everything squared up before printing my LR3 parts.
Edit: Google always knows… Skew Correction
I know somewhere Ryan said there was some amount that was “good enough”, but I guess that depends on what you intend to print.
My printer was close enough without the skew correction, but I decided to do it anyway, because why not? Figured I might as well make it as good as I could, whether it was necessary or not
I’m running marlin so I will look into that. I just didn’t know if what I had was enough to worry about
Ah, well if you have Marlin, you may have to recompile the firmware to enable skew correction. I can’t remember if it is enabled by default.
In that case, that’s another variable to consider whether it’s worth the trouble for you or not.
Less than a half mm off is pretty close
Hey @Jonathjon, your post a few days ago made me pay more attention to my belts. Just noticed unexpected flapping rising/falling belt motion on my right side because my idler is wrong way around ![]() , details here, sharing incase you’re having similar issue still. Cheers!
, details here, sharing incase you’re having similar issue still. Cheers!
Thanks @azab2c I took a look at that and mine are orientated correctly. It hasn’t been doing it nearly as much as before since I tensioned them a little better. Still trying to get this thing truly square. Printing the bed skew prints now and going to give that a try like @Michael_Melancon suggest.
Does anyone know how to get super slicer to wait until everything is heated up before it starts homing?? I think that’s been throwing me some weird stuff. Bed isn’t sticking well in spots and I think that’s because its being leveled while its still expanding. But I am slicer dumb and cant find anywhere to change that.
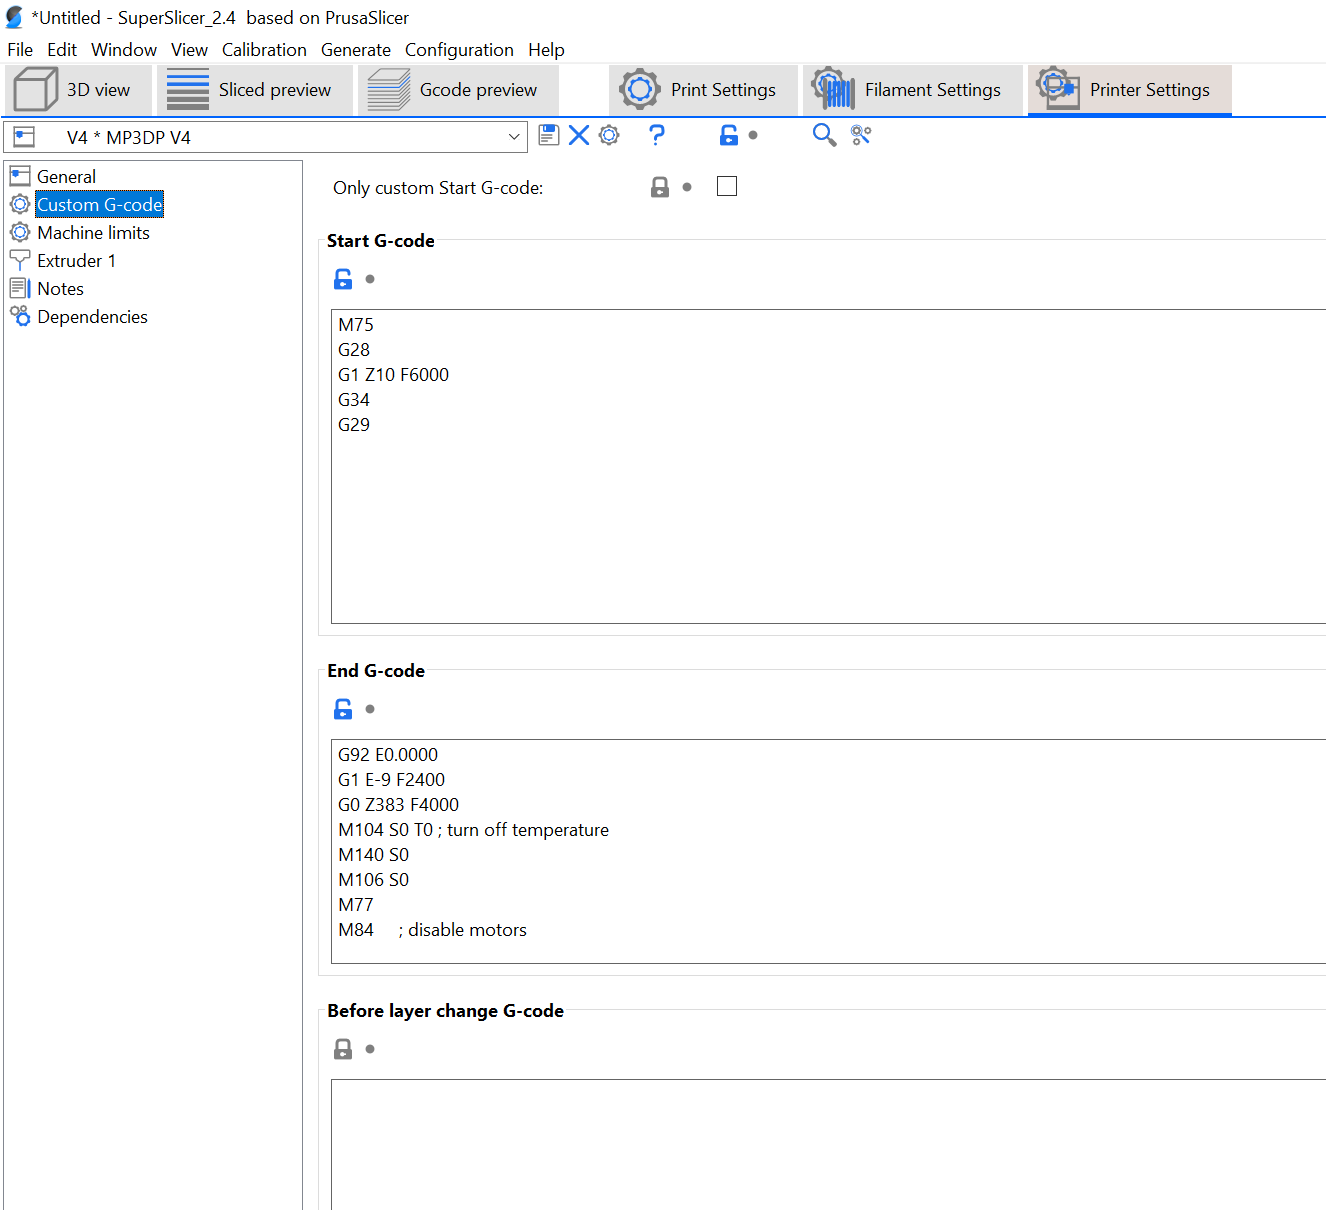
What does your start G-Code look like?
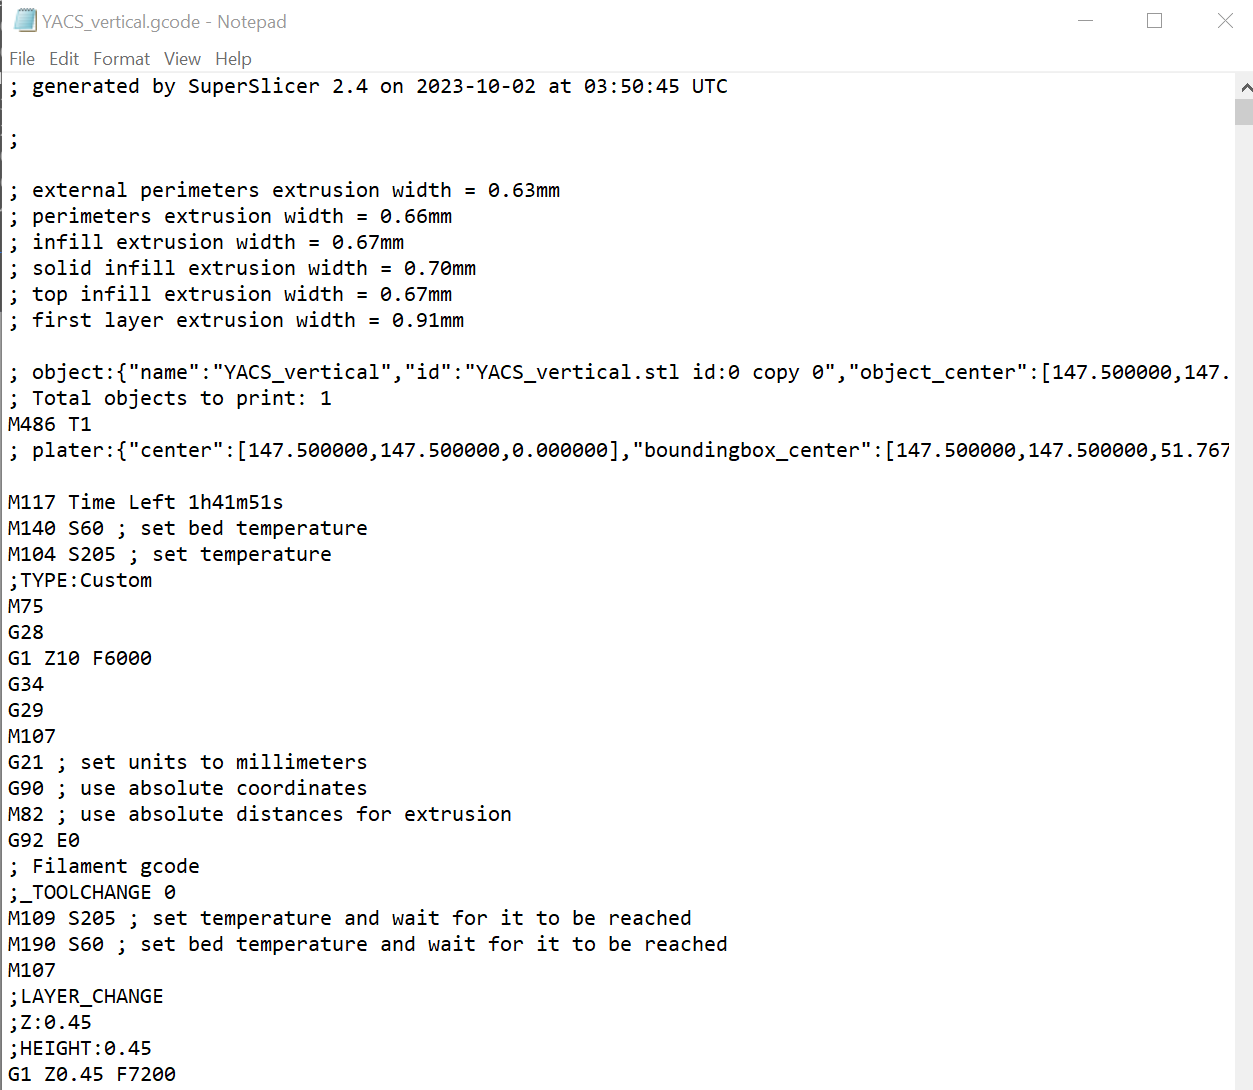
M109 and M190 are probably what you are looking for to wait before your homing GCode
I tried adding that, the heat stuff gets put in before it gets to the custom start gcode and there is no wait. I have tried googling it but keep coming up empty.
Looking at it now, I see why I always get a slight hesitation before it starts printing. I just wish it would heat up before it started homing/leveling
ah, ok. I use PrusaSlicer, so my start GCode has something like:
M190 S{first_layer_bed_temperature[0]} ; wait for bed temp to stabilize
M109 S{first_layer_temperature[0]} ; wait for nozzle temp to stabilize
You can check SuperSlicer macros for custom GCode and still inject it there probably
EDIT:
looks like the above should work for you still too
Yep I didn’t have the { part right when I did it. Going to add that in there now and see what happens on the next print. THANK YOU!
While we are on the subject. Do you run a purge line? or just let your skirt do the purge? Anything else in your start gcode I should add?
I do a purge line even though I also use skirt.
Since I went to the 0.6 nozzle, I find that the ooze out empties more of the filament, and about half of my purge line is blank, so my prints probably wouldn’t work without it.
I used to like the prime line that my old Cura profiles gave me better, but currently the PrusaSlicer default is
G1 Z0.28 F240
G92 E0
G1 X2.0 Y140 E10 F1500 ; prime the nozzle
G1 X2.3 Y140 F5000
G92 E0
G1 X2.3 Y10 E10 F1200 ; prime the nozzle
G92 E0
I still need to tweak my start profile a bit as it kinda annoys me the extra delays that are in there, but this is the PrusaSlicer default
G90 ; use absolute coordinates
M83 ; extruder relative mode
M104 S150 ; set temporary nozzle temp to prevent oozing during homing
M140 S{first_layer_bed_temperature[0]} ; set final bed temp
G4 S30 ; allow partial nozzle warmup
G28 ; home all axis
G1 Z50 F240
G1 X2.0 Y10 F3000
M104 S{first_layer_temperature[0]} ; set final nozzle temp
M190 S{first_layer_bed_temperature[0]} ; wait for bed temp to stabilize
M109 S{first_layer_temperature[0]} ; wait for nozzle temp to stabilize
G1 Z0.28 F240
G92 E0
G1 X2.0 Y140 E10 F1500 ; prime the nozzle
G1 X2.3 Y140 F5000
G92 E0
G1 X2.3 Y10 E10 F1200 ; prime the nozzle
G92 E0
It does a partial warmup only to 150 so it doesn’t start oozing before the Z home.
I don’t really like this G4 S30 dwell command it has, but I also haven’t taken the time to make it better.
I would probably prefer if it looked something like:
G90 ; use absolute coordinates
M83 ; extruder relative mode
M140 S{first_layer_bed_temperature[0]} ; set final bed temp
M104 S150 ; set temporary nozzle temp to prevent oozing during homing
M109 S150 ; set temporary nozzle temp to prevent oozing during homing
M190 S{first_layer_bed_temperature[0]} ; wait for bed temp to stabilize
G28 ; home all axis
G1 Z50 F240
G1 X2.0 Y10 F3000
M104 S{first_layer_temperature[0]} ; set final nozzle temp
M109 S{first_layer_temperature[0]} ; wait for nozzle temp to stabilize
G1 Z0.28 F240
G92 E0
G1 X2.0 Y140 E10 F1500 ; prime the nozzle
G1 X2.3 Y140 F5000
G92 E0
G1 X2.3 Y10 E10 F1200 ; prime the nozzle
G92 E0
just to optimize the waiting a little bit. (I just made those changes in this editor…so careful of any errors lol )