Precision made, all in the wrong size…
2 Likes
Finally back to piddling with this thing. Trying to get it all wired up and running again. Much needed distraction currently.
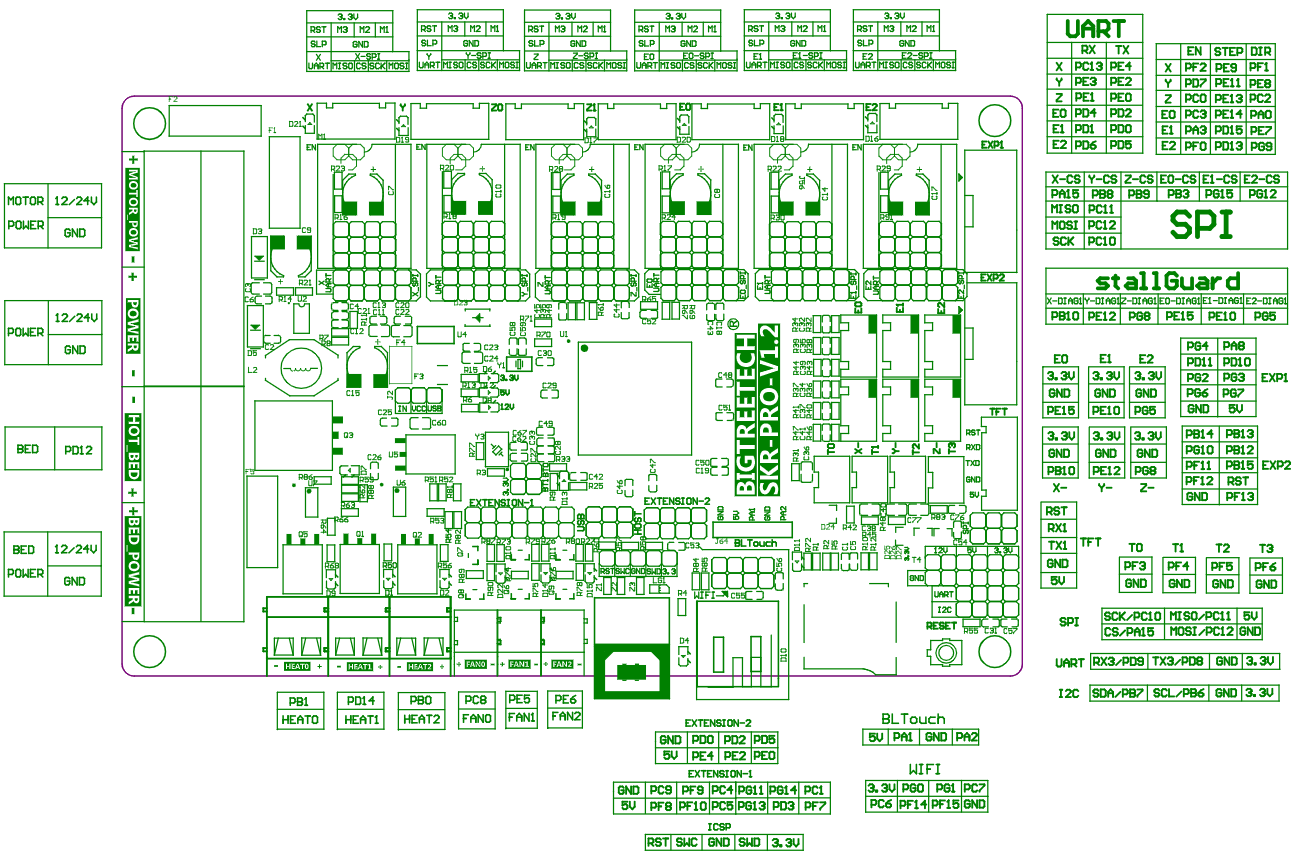
@azab2c where did you hook up your smart filament sensor on the SKR? Shoot now that I think about it I’m not sure you are running the same SKR Pro 1.2 that I am.
From what I can find online I’m guessing it hooks to E0 Stop but I will need to double check that in the firmware.
Edit:
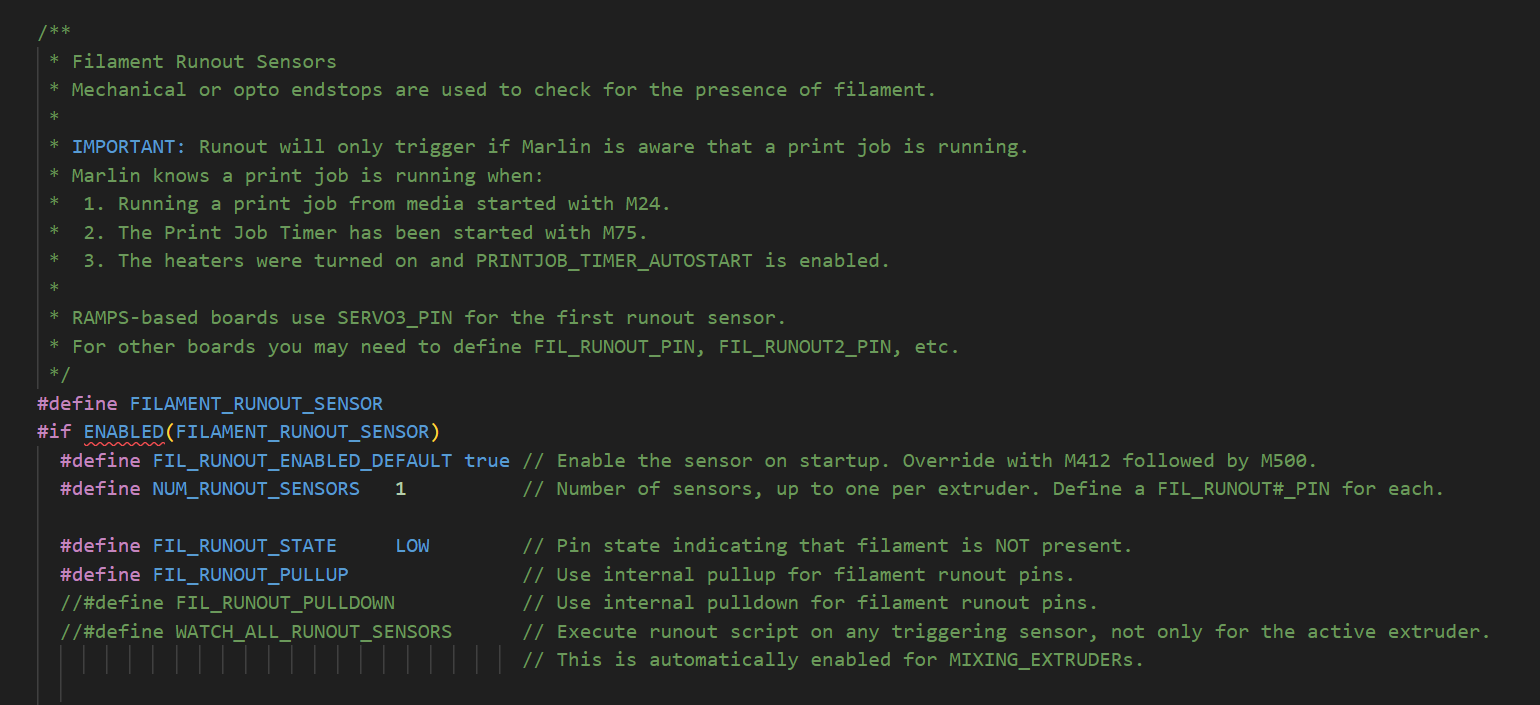
Does this look right? Trying to set it up to use E0 Endstop

This is how it comes in Marlin, But if I’m understanding it right I have to add the line for the pin:
#define FIL_RUNOUT#_PIN PE15
Am I understanding this correctly?
1 Like
Yeah, you’re right my MP3DP uses Octopus v1.1 and I used Klipper as well. So, am not sure what Marlin changes would be needed. However…
ME: What Marlin firmware configuration changes are needed to use BigTreeTech Smart Filament Sensor?
ChatGPT 3.5:
Configuring the Marlin firmware to use the BigTreeTech Smart Filament Sensor involves several steps. Please note that the exact configuration may vary depending on the specific version of Marlin and the features supported by your 3D printer. Always refer to the Marlin documentation and the documentation provided by BigTreeTech for the most up-to-date information. As of my last knowledge update in September 2021, here are the general steps to configure Marlin for the BigTreeTech Smart Filament Sensor:
-
Enable the Filament Sensor Feature:
In your Marlin firmware configuration files (usually
Configuration.handConfiguration_adv.h), locate the section related to filament sensors and uncomment the appropriate lines. Look for lines like:#define FILAMENT_SENSOR // #define FILAMENT_RUNOUT_SENSORUncomment
#define FILAMENT_SENSORto enable the filament sensor feature. If you want to enable filament runout detection as well, uncomment#define FILAMENT_RUNOUT_SENSOR. -
Select the Filament Sensor Type:
BigTreeTech Smart Filament Sensor uses an optical sensor. In your configuration files, find the section that allows you to select the type of filament sensor:
#define FILAMENT_SENSOR_TYPE 1Set
FILAMENT_SENSOR_TYPEto1for optical sensors. -
Set the Pin Configuration:
Specify the pins that the filament sensor is connected to:
#define FILAMENT_SENSOR_PIN 2Replace
2with the actual pin number to which your Smart Filament Sensor is connected. -
Set the Inverted Logic (if needed):
Depending on the sensor and its wiring, you may need to invert the logic. In most cases, the default setting is not inverted (LOW when filament is present). If your sensor behaves differently, you can change it like this:
#define FILAMENT_SENSOR_INVERT falseSet
FILAMENT_SENSOR_INVERTtotrueif your sensor is normally HIGH when filament is present. -
Configure Sensing Parameters:
You can adjust the sensitivity and debounce settings to suit your filament sensor’s behavior:
#define FILAMENT_SENSOR_DEBOUNCE 100 #define FILAMENT_SENSOR_THRESHOLD 10FILAMENT_SENSOR_DEBOUNCEsets the debounce time in milliseconds.FILAMENT_SENSOR_THRESHOLDadjusts the trigger threshold for filament detection. You may need to experiment with this value to get reliable detection.
-
Compile and Upload:
After making these changes, compile the Marlin firmware and upload it to your 3D printer’s control board.
-
Calibrate and Test:
Once the firmware is uploaded, you may need to calibrate the filament sensor by following the manufacturer’s instructions. Test the sensor by manually triggering it with a piece of filament and ensuring it pauses or resumes printing as expected.
Remember that firmware and hardware compatibility can change, so always refer to the documentation provided with your specific hardware and the Marlin documentation for the version you are using. Also, make sure to back up your existing firmware configuration before making any changes to easily revert to your previous settings if needed.
ME: No idea if ChatGPT 3.5 is right. ChatGPT 4.0 is probably better. It’s sure convincing though🤯
1 Like
That’s pretty much everything I found doing a google search. So we will see if I got it right or not lol. Working on finishing up the wiring now. man what a mess. This is really making me want to go CAN bus like you did. I need to do some more research on it and see if I can figure it all out. This mess of wires going to the hot end would be SO MUCH NICER if it was just a single 4 wire and done lol
Am really close to being able to share walk through that covers CAN Bus if that helps. Includes some issues I ran into and overcame as well. Will share when done.
1 Like
One thing that can be noted in ChatGPT answers is it’s absolute confidence in its answer. It can be absolutely wrong, but will still state things with the certainty of fact, even if those answers are self contradictory. (Or prefaced with “consult the documentation first”)
3 Likes
That would be AWESOME!!! Thanks!
1 Like
One thing to be aware of… The marlin changes for the filament sensor only work if you’re printing from an SD card.
If you use octoprint to print like I do, then the filament sensor has to be set up to work through a gpio pin.
Supposidly there’s a way around that, but it looked complicated.
1 Like
Currently SD card is how I’ve been printing with this printer. I will probably be changing to Klipper soon and do a can bus set up so when I do ill get with @azab2c and see how he has his set up. He is working on a write up for that so I’m going to see what all he has documented.
2 Likes
Ok I’m almost done running the wires for the Z/bed heater. One problem. I’m coming up short on the thermistor wire for the bed heater. Can I extend that wire and it still work correctly?
This is the heater I’m using
https://www.amazon.com/Imdinnogo-Silicone-Adhesive-Thermistor-Sidewinde/dp/B09W5SNSXW
Yes, you can extend thermistor wiring and it will be fine.
2 Likes
Well after WAY TOO LONG the ole V4 is finally back printing!!!

Still need to go though and fine tune everything. I really want this to be an extremely accurate printer.
Had to fiddle with the filament sensor some to get it working right. I had set it at 7mm like the instructions say but it kept tripping even though it was printing. Changed the firmware to 10mm and now it prints. Will do some testing later to see if it actually trips when it runs out. I do know it makes loading filament a PITA. I see they have already come out with V2 of this that includes a slider to make it easier to load. Makes sense. I also think I will end up putting a shelf above the printer for my filament holder and re do the mount for the sensor. Time will tell if I will stick with this sensor or upgrade to the V2 for easier loading.
Once this dust shoe completes I’m going to start tuning it. Starting with TT website. After that is there anything else anyone suggest I run to get it completely tuned in? Oh I will also print @vicious1 squareness test and see how it lands. By the tape measure its square to less than 1mm. so now we will see if it prints square lol.
1 Like
Well unfortunately it didn’t complete the print. Started skipping steps somewhere. I found I had forgotten to tighten down the stepper mounts after tensioning the belts so that allowed them to move around a little and probably skipped a tooth on the belt. Time to back up and get it tuned in like I should have from the get go LOL.
Also I had been having problems with G34. It just wouldn’t complete anymore. Turns out I think the Z accelerations were too high for how heavy my bed is. With the 1/4" aluminum brace and 1/4" aluminum bed at 310mmx310mm I think it was all too much and it was skipping steps on the sudden down when its leveling. Dropped the acceleration down from 1500 to 1000 and also bumped up the stepper mA to 650 and it completes the G34 in 2-3 tries now! I keep forgetting to run the bed visualizer in octoprint. As soon as the bed cools off enough to get the print off I’m going to run it and see how it does.
What could be causing this?

And do I need to worry about it?
Is your motor perpendicular to the belts? I do notice that there is a little twist available in the mounts.
It wasn’t earlier but they are tight and straight now. Just happened to notice it while I was printing a TT Test Cube
And now test cube complete. Doesn’t look half bad…


2 Likes
Haven’t fully tuned my MP3DP, but I don’t see any flapping around like this. I do see the right hand side belt drift up and down as the carrier moves between Ymin and Ymax. It’s as though the pulley on the right XY stepper is too low. I can tweak and fix, but it means messing with grub screws…
1 Like
I will take a look at that. Its possible but if so its not by much.
Been fighting with this filament sensor. About ready to chuck it in the trash…
From my Klipper config, but some of the info and value may apply to Marlin too? e.g 10mm can help avoid false triggers.
# Based on :
# - https://docs.vorondesign.com/community/howto/samwiseg0/btt_smart_filament_sensor.html
[filament_motion_sensor SFS_T0]
detection_length: 10.00 # This can be adjusted to your desired level of sensitivity. 10 is a recomended value to prevent flow dropoff false triggers.
extruder: extruder
switch_pin: ^PG12
pause_on_runout: True # This can be set to false to debug false positives putting the sensor in "monitor mode". The printer will not pause but it will run the runout_gcode below.
event_delay: 3.0
pause_delay: 0.5
runout_gcode:
    M117 Filament Runout/Jamb!
insert_gcode:
    M117 Filament Inserted...
Think I need to check my esteps are calibrated correctly. If not, then the Smart Sensor might think there’s a flow issue and false trigger?
Smart Sensor related… Radius for the 90 deg bend on my smart sensor mount is too tight. Flimsy slim CAN bus umbilical ends up snagging during fast motion. Larger bend would be better now I know how large the lid is.
1 Like