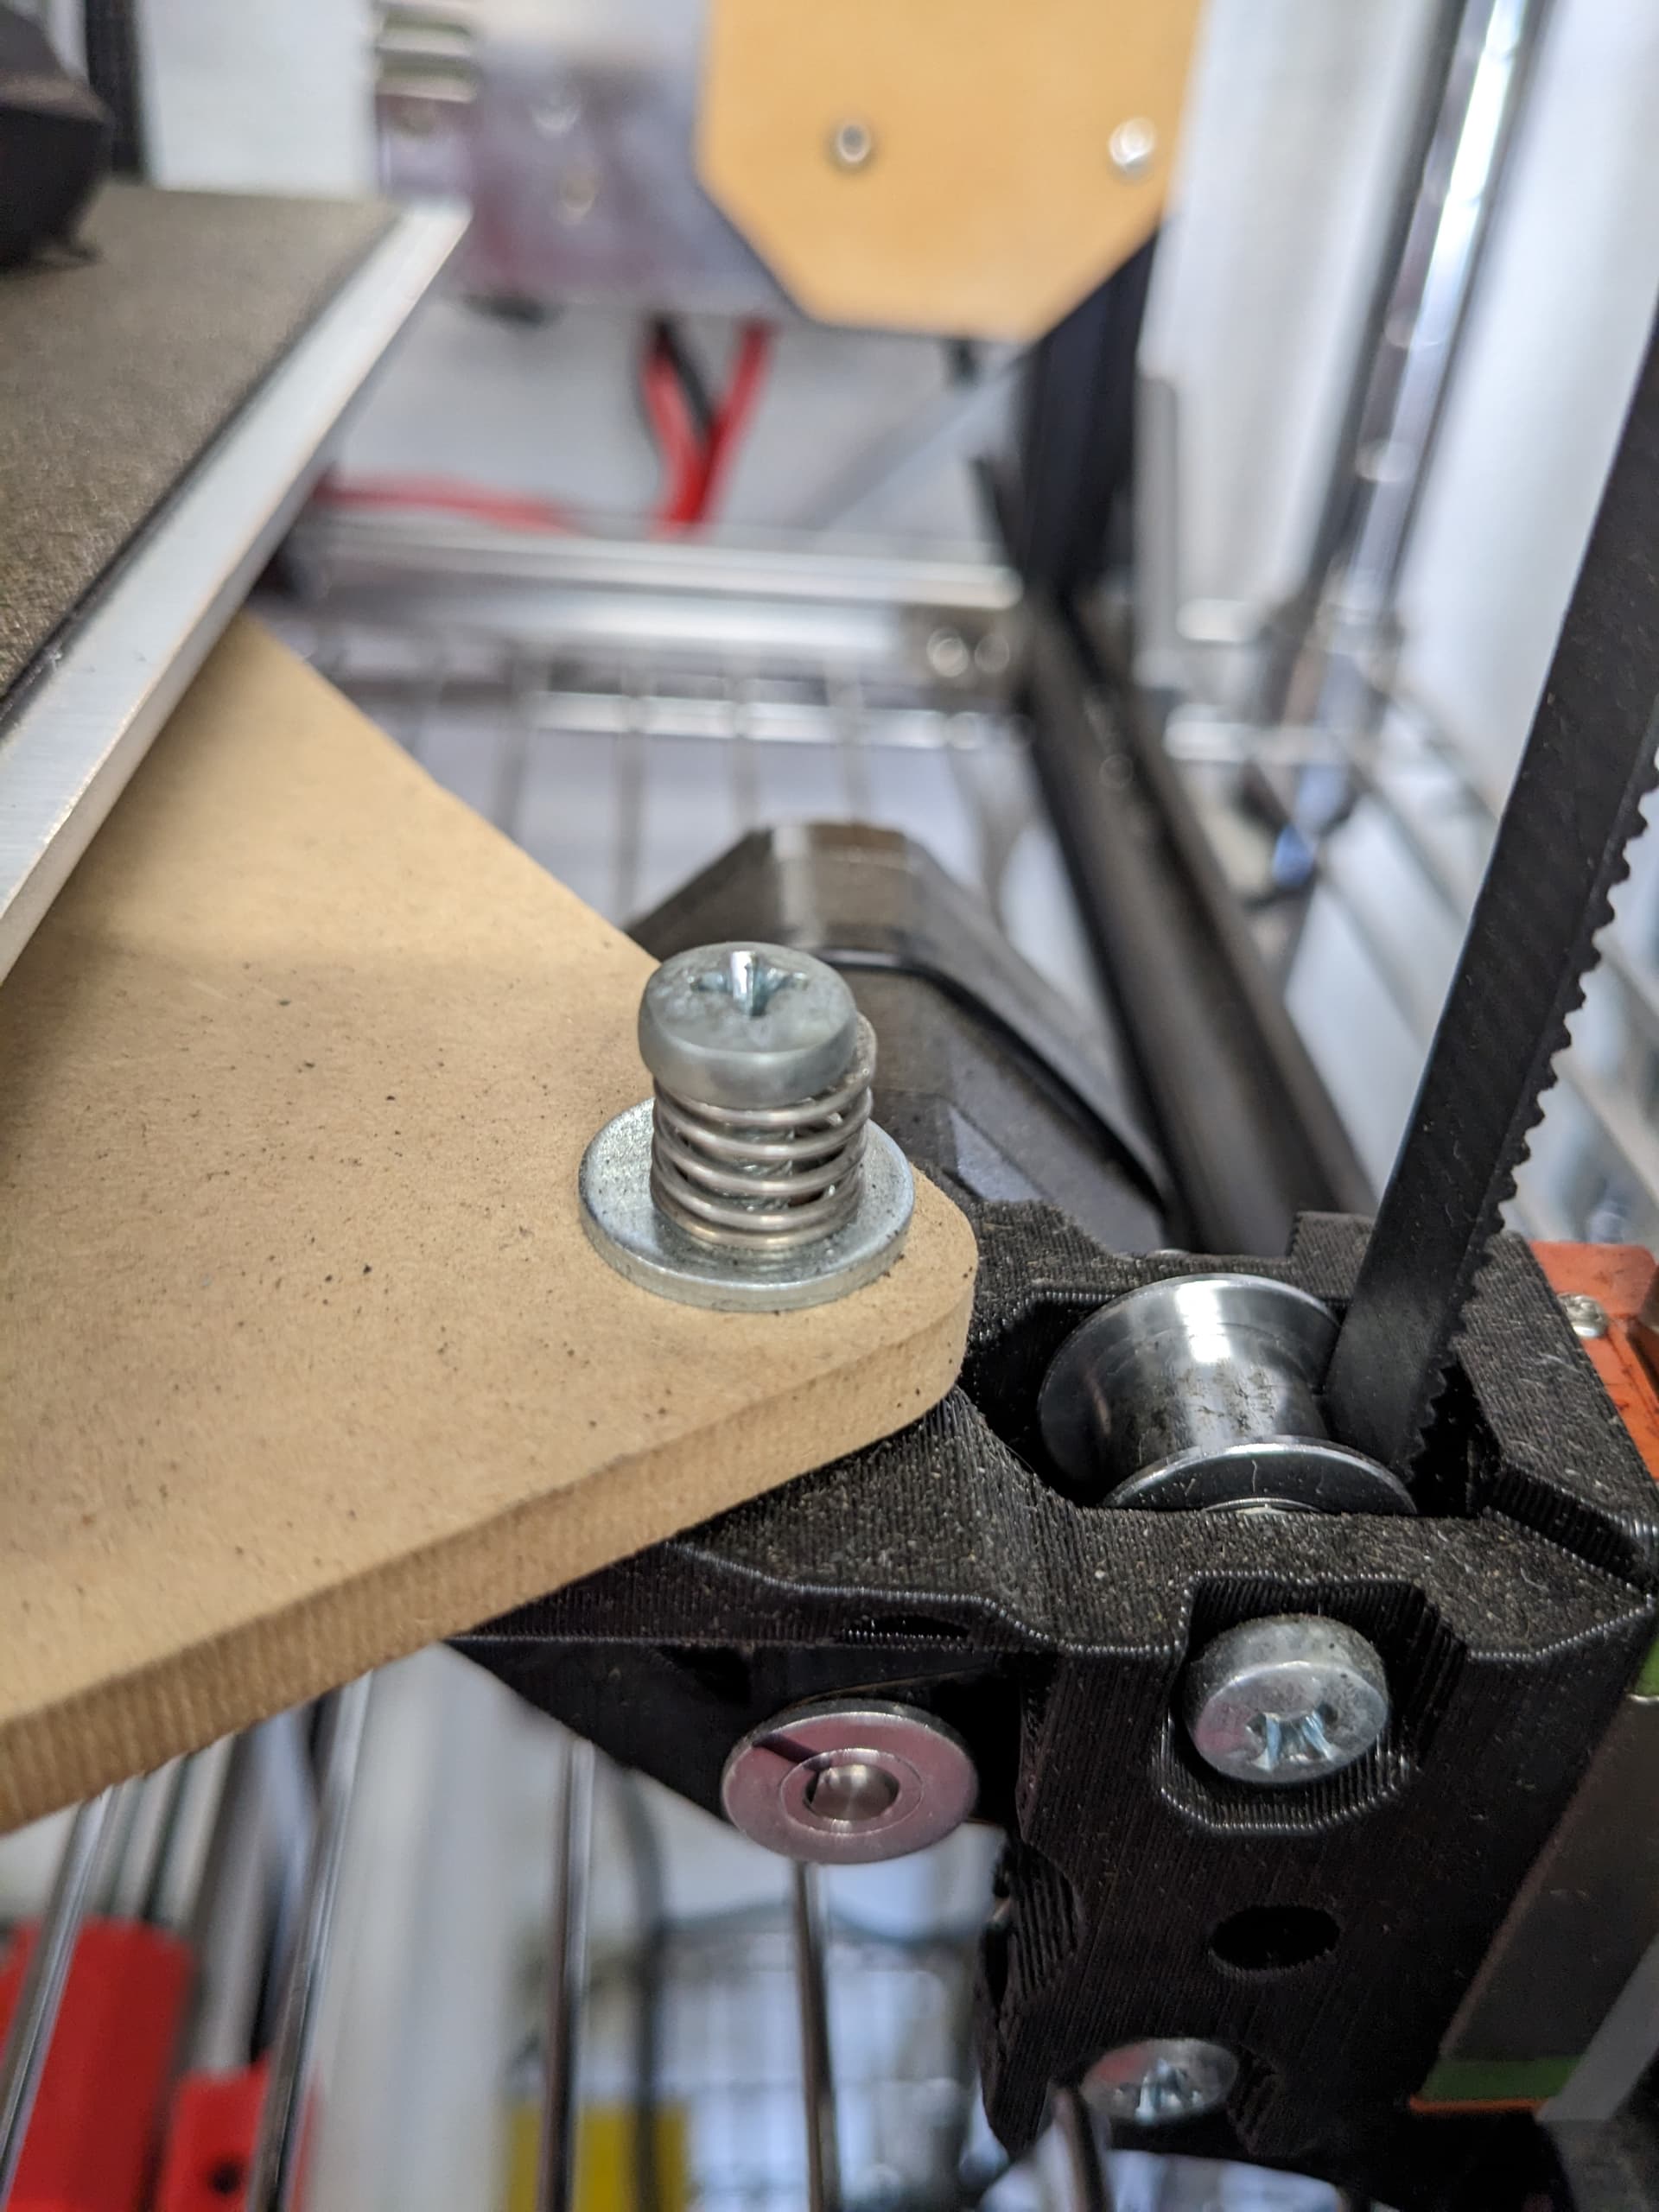
What about stiffer springs? on the springs I got from you its sitting on the insulation before I even put a screw in it
I have a washer in the top and bottom of some and only the bottom in others, top is optional, bottom is mandatory ( I even made a fancy printed version in the CAD).
That reinforces the insulation bulge idea. The insulation is forcing the bed to move.
Not just up and down, does it wiggle front to back, left and right? It needs to be able to. The bed is floating, because it moves as it heats and cools, and the whole reason we do not just use the mounting plate as our printing surface. The thicker the plate, the more it moves.
No that would just constrain it even more, opposite of what we want. If you went to a super long M2.5mm that would make more sense. Or just over drill your mounting holes to give the m3’s space.
Again, opposite, looser would be better. The bed needs to be able to expand and contract. The goal is to get the insulation off the mounting plate so the bed is not being pushed up by it, and looser mount points so the bed can expand and contract along the bed plane not up and down in Z.
If you put your bed in the freezer and measured it it would be smaller than it would when heated up to printing temperature. Like the expansion joins in concrete allow sidewalks and bridges to expand and contract, we use a loose connection and spring to allow for our beds to do the same. That is also why some thicker beds need time to heat soak, as the heater side expands faster and causes a bulge until it heat soaks and levels out again.
1 Like
Is the bottom washer underneath the bed support? Just making sure I’m following and understanding correctly. I will print up 3 of the ones from the CAD
It didn’t really have any wiggle that way. I will order 2.5mm and that should give it plenty of wiggle room.
Not thinking stiffer to constrain. More thinking stiffer to support the weight and keep this heavy bed off the insulation and just floating on the springs.
Okay so. The bed absolutely needs to be fixed. You want your visualizer to be well under 1mm of deviation. 0.5 is probably average.
With that said I have a theory why your printer is not just compensating and working.
I have bed level compensation set to 5mm. Meaning it is printing to make sure at the 5mm mark your actual print is now perfectly flat and removing all the bed warp out of the part. I thought 5mm was generous. Your bed is out just about 5mm, so it is trying to compensate too quickly. The 3mm High needs to be made up in 5mm of height so each layer needs to be about 66% thinner to make up the distance. The thicker side is easy.
So as an experiment, you can put the printer back together and use the menus to set your bed level fade height to something like 30mm, or the highest it will go. I bet it prints a perfect first layer.
1 Like
Without the bed level fade the shape of your bed’s surface would translate all the way through your part. So if you had a twisted bed, you will have twisted parts…probably even worse than a crooked part.
1 Like
Is it possible the gantry frame/linear-rails are more out of **whack than the alu bed? e.g. Noticed my overall extrusion framed box was squared up. However, my Linear rails were misaligned/skewed because of space/play for the M3 t-nuts to move around within the extrusion’s channel before snugging linear rails up to the extrusion.
**out of whack - an umbrella term for out of square, plumb, trammed, etc…)
1 Like
Ok so just to make sure I’m following along. We don’t think the issue is my actual bed, but the method I was using to mount it. So no need to fire up the LR3 and cut out a new bed lol.
I just measured and the current M3 screws I’m using are 25mm long. I’m going to see if I can find a M2.5 by 40mm to replace it with. I believe I have some extra springs so i will also put 2 springs under each mounting hole to give it more lift and keep the bed off of the insulation. That will keep the looser spring but get the height needed. Also I will print the washer from the cad and put it under (?) the bed support. I can install the bed back like it is now if you just want me to test the compensation but for me i can just wait till the new screws come in. I have other printers I can use in the mean time if something needs printing.
In my head, where it is getting probed would still be flat. As the bed travel down wonky rails, the parts would twist or shift. I think…I try to visualize that all the time when calibrating

You are just trying to keep the spring out of the slot.
1 Like
Ohhh, if that is what it needs then yes, just make sure you are not clamping them so hard the bed can’t wiggle a bit.
1 Like
I have measured everything to the best of my ability several times and it all seems to be in square. I also used the printed guide to install the rails and everything went good with that and it all fit together really well. I’m with Ryan’s thoughts on the bed being pulled down because of my short screws squishing it on the insulation pad is not only bowing the bed but also constraining it and causing these issues.
Got it! Thank you for the explnation. The first pic you posted earlier didnt have that washer so i wasnt sure.
And…I’m an idiot LOL. it didnt have it because it was a zoomed in shot of my printer…DUH ![]()
Is there any issues in just double stacking your springs to get the height needed with how heavy my plate is?
I’m really curious to see how much heavier my plate is than a “normal” plate. Anyone have one sitting around to weigh?
Reading all this I am happy I just ordered the MK4. ![]()
1 Like
Pansy… Where’s your sense of adventure???
3 Likes
As a real example, once I have the printer running I set the XY square by printing rectangular parts and measuring the diagonals. This is adjusted with the belt tension (fine adjust) and X rail in the mounts (nut slop course adjust). After that I print tall objects and then adjust the Y rails up or down in the nut slop to get a perpendicular printed part.
I do always wonder if any of my parts have twist in them because I never really fine tune the Z rails. I assume measuring carefully and centering the Z rails with the jig gets them close enough to where any slop is smoothed out by the spring connection to the bed plate. The only real test would be printing a full bed cube and carefully checking every edge and every diagonal. While my parts might not be perfect, I know they are the most accurate I have ever printed.
1 Like
Once I get this bed issue figured out I really need to do this. Do you have the STLs uploaded to printables that you use for this process??
I have 1/4" acrylic coming to cut the side plates out of to make sure I really hold square. Going to triple check square on the LR3 before I cut them out. I know this printer has been an uphill battle but I know with everyone’s great help this can and will be one bad ass printer when its all said and done! All complete with LED lights and a Custom Milled V1 Serial Number Plate!!!
2 Likes
I believe so I have a calibration collection on there.
1 Like
This means the BL Touch had to move an extra 5mm to reach the bed. If something was tugging on the bltouch end of the hotend, but only in that corner, it would measure lower.
If you use the fade height, then your final part will be the wrong length. If one corner was down 5mm lower, the final part, after the fade, would be 5mm taller than the other corner where it was the right height.
If you don’t use fade, the 5mm lower part will be lower. But it is 5mm 300mm away from the zero location. Plastic flexes some (maybe not 5mm, but easily 1mm).
It is probably splitting hairs. Plastic is an imperfect material. The way Ryan designs his parts, the fade might better because there aren’t often bolts in the bottom 5mm.
But neither is perfect. Neither is terrible. If you turn off the fade and get better results, you have a good data point. Once you get your bed closer, turning off the fade won’t kill you. If you had <1mm error over 300mm, it would not matter.
I’m headed back offshore tomorrow night. New M2.5 x 40mm screws are ordered and will be here May 17-26 according to Amazon. I will just leave the bed off until I get back in town. I wont be back until May 24th, Daughters Graduation May 25th and Party May 27th. So the bolts will be here by the time I have any time to mess with it again lol. I’m going to leave the fade where @vicious1 has it set for now and see what the new looser/longer bolts does to the mesh. We know for sure the short screws I have are pulling it on to the insulation and that is skewing things and constraining it. I think we are best to fix that known issue before we start messing with other things. I’m not sitting here in a bind needing other things printed
1 Like
Ryan does a ton more printing than any of us. So it is wise to listen to him. I was just trying to prod him into being skeptical about it again. ![]()
1 Like