MP3DP v4 - Aza's build

Well done, I’m gonna start watching it tonight. :smiley:

3 Likes

Thank you. Hoping to share a better player experience within a few days.

3 Likes

Wow that’s a lot of content! Incredible job of keeping track of all your work.

3 Likes

149 videos? Wow. Watching those would take me longer than assembling the MK4. :sweat_smile: Sometimes I really envy you guys and the time you have for your hobbies. :slightly_smiling_face:

2 Likes

@Jonathjon just shared that there’s a V2 of BTT’s Smart Filament Sensor .

The sensor seems to be BIQU’s newest released product, with a BLTouch competitor Micro Probe V2.0 For H2 Series Extruders as the next most recent. Assuming the reviews are good, would’ve tried these parts out if building today.

1 Like

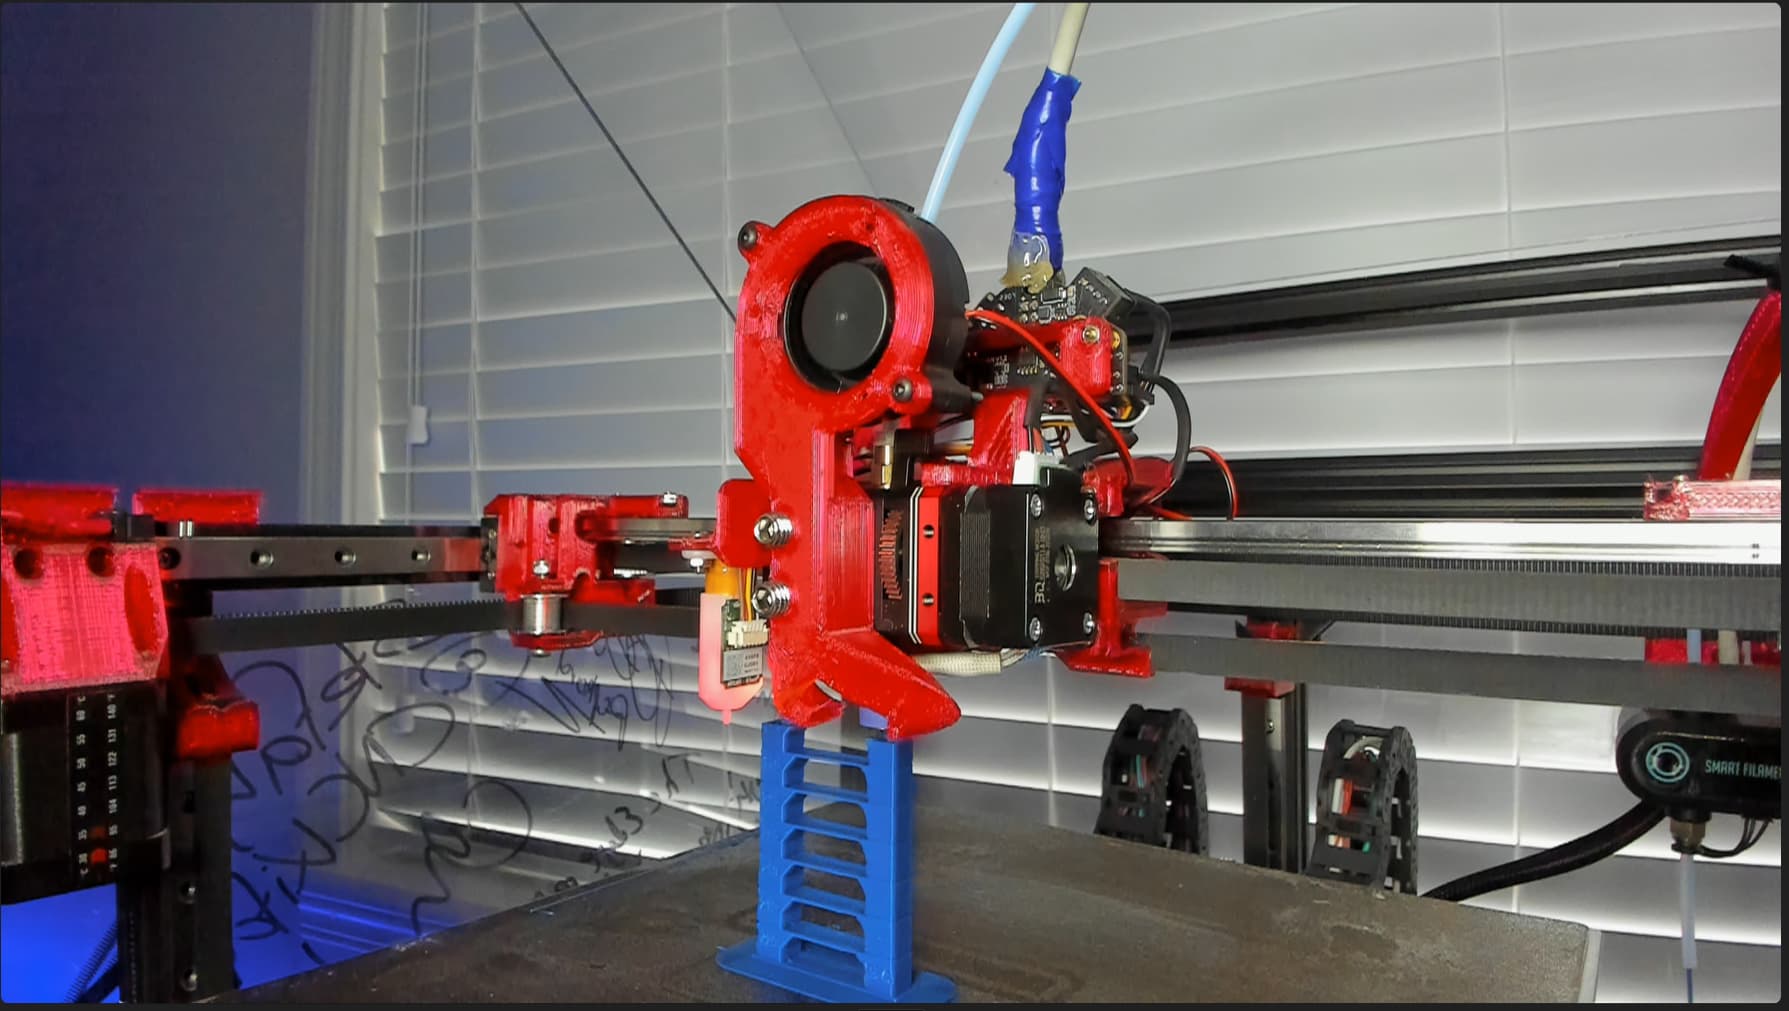
BIQU H2 REVO Part Cooling Fan Duct

After digging around, finally got around to adding a fan duct, with M8 grub screws to seal holes the M3 bolts are fed through…

Shared on Printables

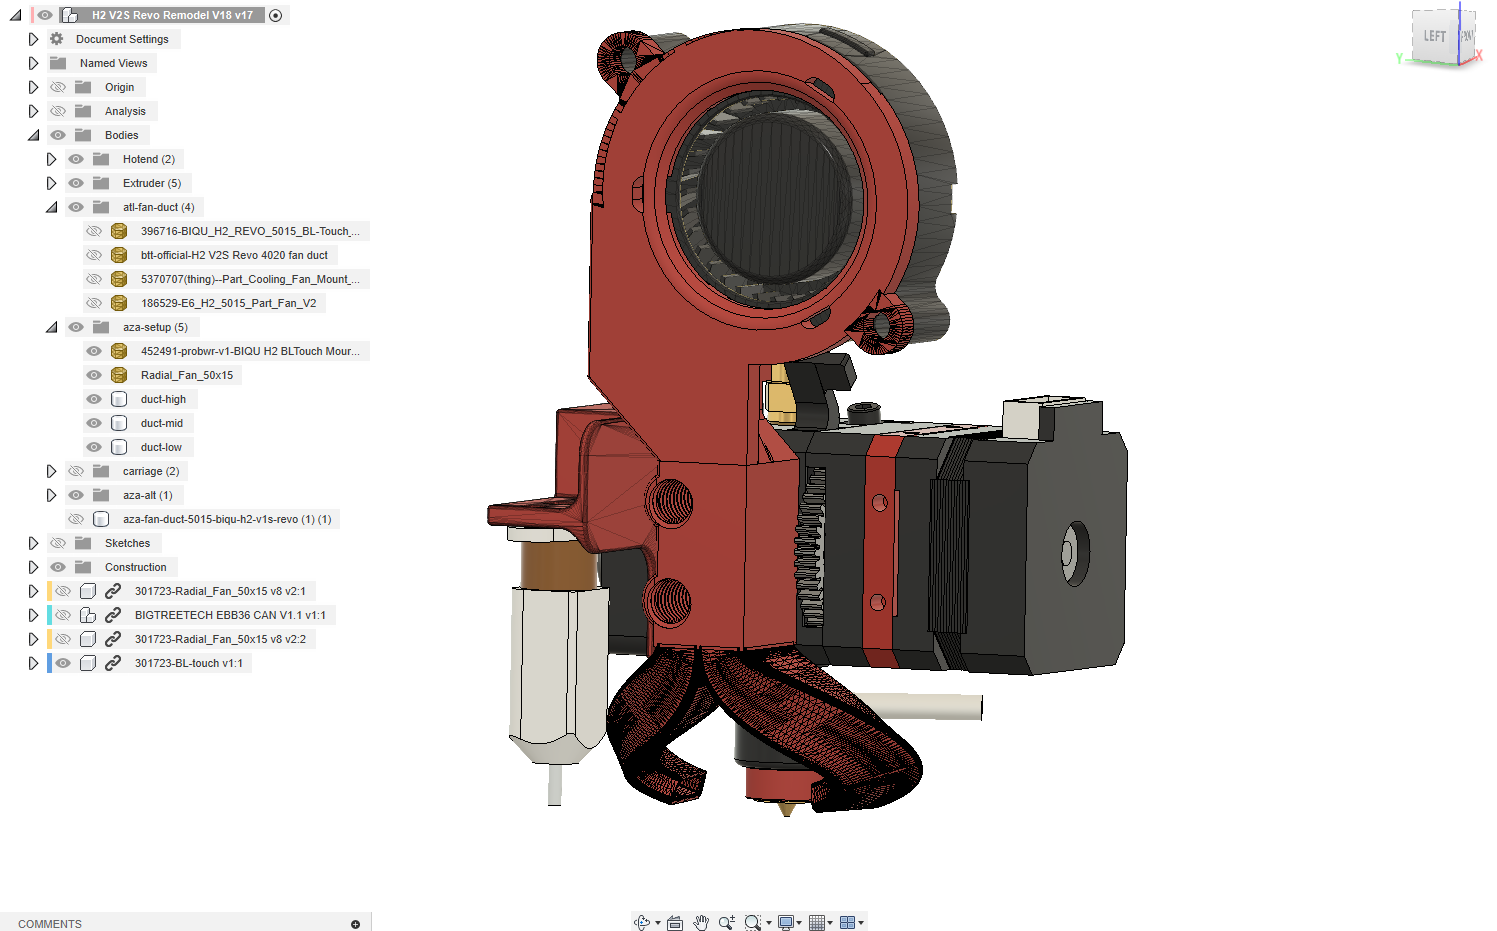
Designed the duct to work with and clear @probrwr’s BLTouch mount. I still need to upgrade to Mike’s latest rail mount.

Heavily based on 396716-biqu-h2-revo-part-cooler-5015-bl-touch-mount, but also steals ideas from several other models I reference on printables.

Created this after not finding what I wanted :

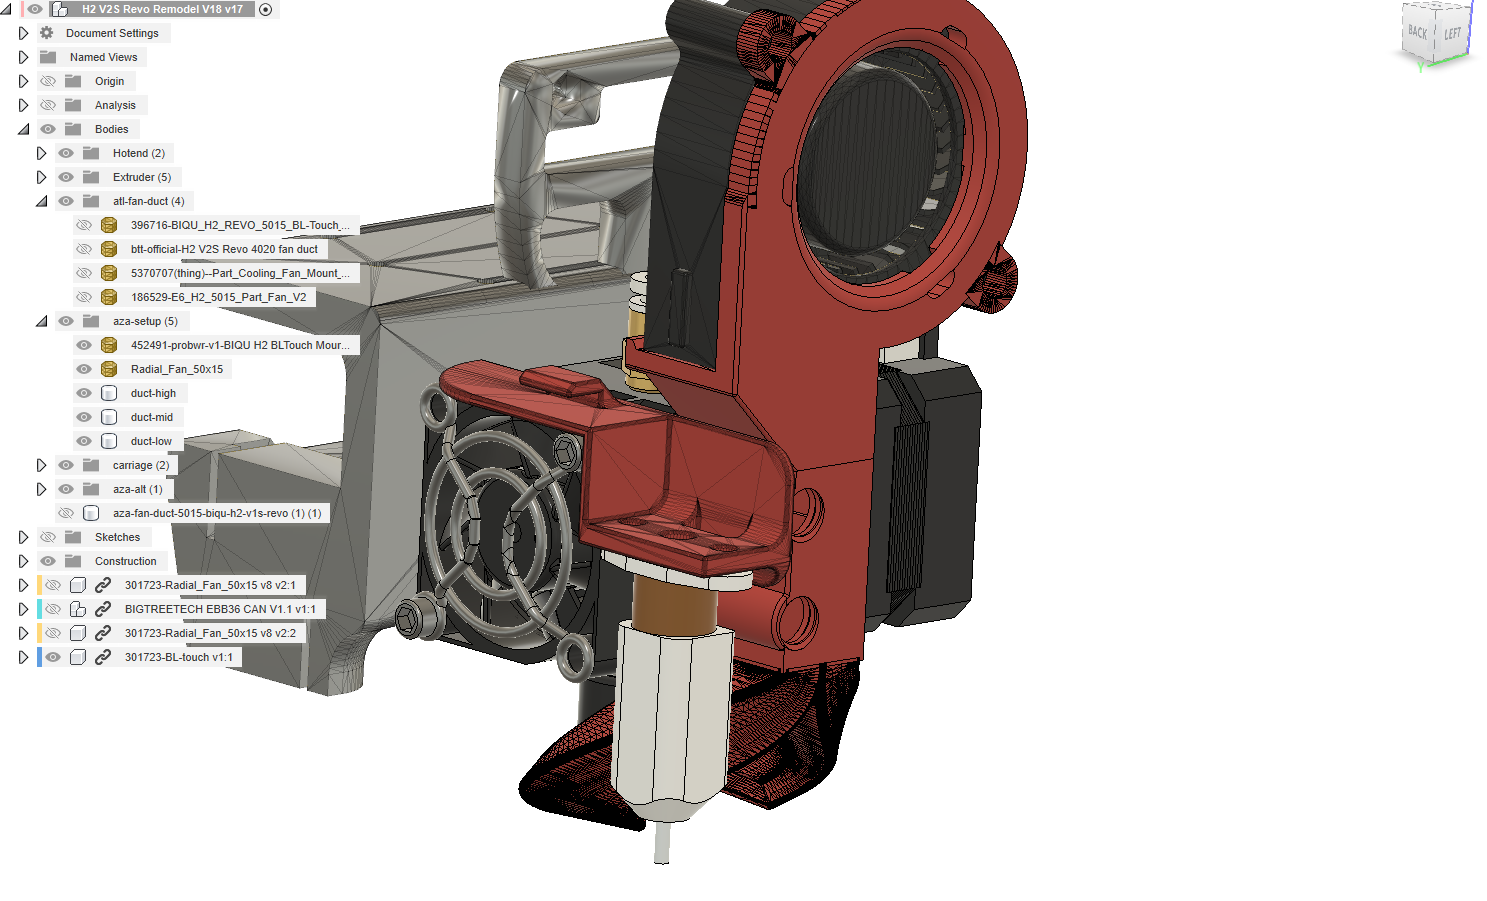
  • Must allow full motion of tensioner arm, which should be comfortable to access.
  • Must enable dissassembly for dealing with filament jam/clogs.
  • Must leave extruder stepper clear as possible for heatsink(s).
  • Must leave front right holes clear for mounting stuff.
  • Must be clear at the front so nozzle can be clearly observed.
  • Must ensure Fan Duct placement is compact and not sticking out too far forward. I have limited front room due to my MP3DP’s polycarbonate lid.
  • Max air flow. Partial success here, I widened the opening, but could have done more to max flow.
  • Nice to have clip holes for custom grill to mount…

Parts

Printed 0.6mm nozzle, 0.32mm layer height. 0.2mm layer height would be better, especially for the grub screw threads.

  • 2x M3x25mm bolts and nuts
  • 2x M8x4mm grub screws/bolts (or shortest you can find, am using M8x8mm from my parts stash).

Klipper firmware config

Updated klipper/printer.cfg with…

[fan]
pin: EBBCan: PA1  # FAN2
7 Likes

Assembly|Problem > Mount XY Belts > Pulley orientation

problem: Noticed belt wrapped around my Right XY stepper is riding up and down when the hotend moves around. Belt seems to be sloped at an angle, stepper seems too low, or…
cause: Dug around for MP3DP pics, and only just realized Stepper pulley orientation is supposed to be different on each side…

Don’t do this…


fix: Got the left side correct, but need to flip my right side. Should instead do this…

Expected Assembly :

  • Left Pulley should have Grub screw high.
  • Right Pulley should have Grub screw low.

Ryan’s MP3DP Left XY stepper pulley orientation

image

Ryan’s MP3DP Right XY stepper pulley orientation

2 Likes

Nice catch! I think I have one of mine wrong too. I need to go look at that.

DAm…I really need to stop screwing around and do some docs updates. Sorry you guys are having all sorts of issues with the printers.

2 Likes

Nothing at all for you to be sorry about. Not one of my issues have been anything but self inflicted. I’m chasing square now. Not knowing how far I need to chase it. Into bed skew corrections now LOL

2 Likes

I mean, you explicitly stated that you were not going to officially support any printer builds, and here you are, helping everybody. :smile:

2 Likes

Am astounded by how much you do. Seems like MP3DP’s not paying the bills, so relying on contributions from the community makes sense to me. Despite embarking on IDEX, am still working on something that’ll help MP3DP builders…

Personally, I view the MP3DP topics/posts as a good thing, we have bunch of people who like to make and solve puzzles/problems, and then continue to tinker/improve things. I appreciate how much people here collaborate and elevate one another to maximize value from a project you generously shared.

1 Like

After looking at the FluidNC Wiki… I realize how valuable docs are and how lacking mine is. I need to spend time on it. After switching computers, I have not set up my git stuff again, editing just on github is not good enough.

5 Likes

Friday fun… Does this snippet look like Plaid to you (despite not being O.G. red and orange)?

3 Likes

Which Project’s docs are most behind where you’d want them to be?

Already got solution in mind (e.g. wikidocs), or looking for something? Personally, I like the mkdocs, and git. Is Markdown vs wysiwyg the main challenge, or something else?

Is there a benchmark shining example of what you’re striving for?

I think they all need a bit of a refresh. some are pretty old. I need to sit down one weekend and at least figure out which are the most out of date. When I made models more often they got refreshed more often.

Oh yeah sticking with mkdocs for sure. just need to update some pictures and verbage.

Actually, when I start adding more of the jackpot stuff that might update a bunch of the oldest pages. Right not it is it’s own page, but I need to clean up the LR calibration section and the milling basics page to include it. That is probably the worst of it really and it is on my short list.

If I find some other pages maybe I can make a contest out of docs edits.

1 Like

Whoops we jumped threads.

After reading some great updates from other community members, am curious about speed capability, and dimensional accuracy of my build…

Currently printing 25.4mm calibration cube using same settings used to print Kobalt Blue Core for my LR3 Idex upgrade:

  • 0.6mm nozzle, 0.32mm layer height, 3 walls, 4 top/bot layers, 45% infill.
  • Printed Core with 120mm/s. Changed to 500mm/s, 1st attempt with 125mm/s initial layer didn’t even stick, so overrided to 30mm/s.
  • This model is so tiny, and won’t save much time despite printer speed increase. I also won’t know/encounter failures that will likely happen when printing larger models, where the excessive speeds will become apparent.

Biggest bang for buck at this (or any) scale is using 0.6mm nozzle instead of 0.4mm.

Edit: 25mins displayed here is wrong. Cause is I didn’t override Minimum Layer Time to be smaller than the default (15s?). So, didn’t matter what Speed and Acceleration values I used here, the print speed ended up being throttled (slowed down) to satisfy the Minimum Layer Time constraint. Posted details in later 10/30 Post.

2 Likes

How was it?

I run a .06 in all my printers. Can still get good detail when i need it but large enough to do all my normal printing a lot faster. I bet @vicious1 would see a difference going from his .5 to a .6 Not as much as coming from a .4 but still makes a difference