Pick all the squares with lighthouses in them.
2 Likes
Sad to say I got which one doesn’t belong wrong.
“Top left? Maybe he used a different software, contrast looks a bit different. Or maybe bottom right, seems like there’s some banding, maybe he increased the speed?”
But no, its the glaringly obvious one with the horse in the picture.
1 Like
I gave a quick try at the NWT method using a 450nm diode laser I cobbled together years ago running at about 4W. I used flat white spray paint (w/ primer) over the cheapest white tiles I could find (~0.15 each).
It only took a couple of tries to overcome my impatience and let the paint full cure to get impressive results.
However, I am getting what I would call a medium gray, very hard bonded image, certainly not “black”. I tried different speeds and power settings and the process appears to be rather forgiving until I drop the energy level enough that it doesn’t burn adequately.
There are a few things I am going to try to see if I can get “black” but thought I would let the expert prioritize my punch-list:
- I haven’t messed with the focus much, but I am using the distance I have developed for laser cutting wood. I could/should run the focusing script on a tile easily enough.
- I tried with and without air-assist running, but didn’t put much rigor in it (forgot to turn it on one time). I don’t see a whole lot of smoke even with it off.
- I can source different tiles - mine are very smooth and shiny and claim to be ceramic (Mohawk® Vivant Gloss White 4-1/4 x 4-1/4 Ceramic Wall Tile)
- I can try different paint(s) - currently using “Rust-Oleum® Painter’s Touch® 2X Ultra Cover® Flat White General Purpose Spray Paint”. I did try a generic “glossy white” and it looked pretty much the same.
- My laser works well enough for most of what I use it for, but I’m not entirely against getting something that has a better focus / more circular spot.
I can try to post a picture of what I’m getting, but I don’t think that will convey much more than “medium-gray” without a nice black reference artwork.
Any thoughts?
1 Like
I started with Rustoleum 2X flat-white paint+primer back during the early days of the pandemic but couldn’t find it when I ran out… so tried several different white spray paints before settling on the Krylon ColorMaxx flat-white paint+primer I’m currently using. All the paints I tried worked to some extent but the Krylon seemed to work best for me. Similarly, all my different laser modules work to some extent but the trusty Banggood/Eleksmaker 2W - 2.5W units seem to work best… having adequate power and smaller spot size than my higher-powered units. These paint and laser selections are now “standard” (for me) and, using these, I consistently follow the procedures I detailed in the first post of this thread.
But most importantly I’ve created a test tile using my chosen paint/laser and procedure as shown here…
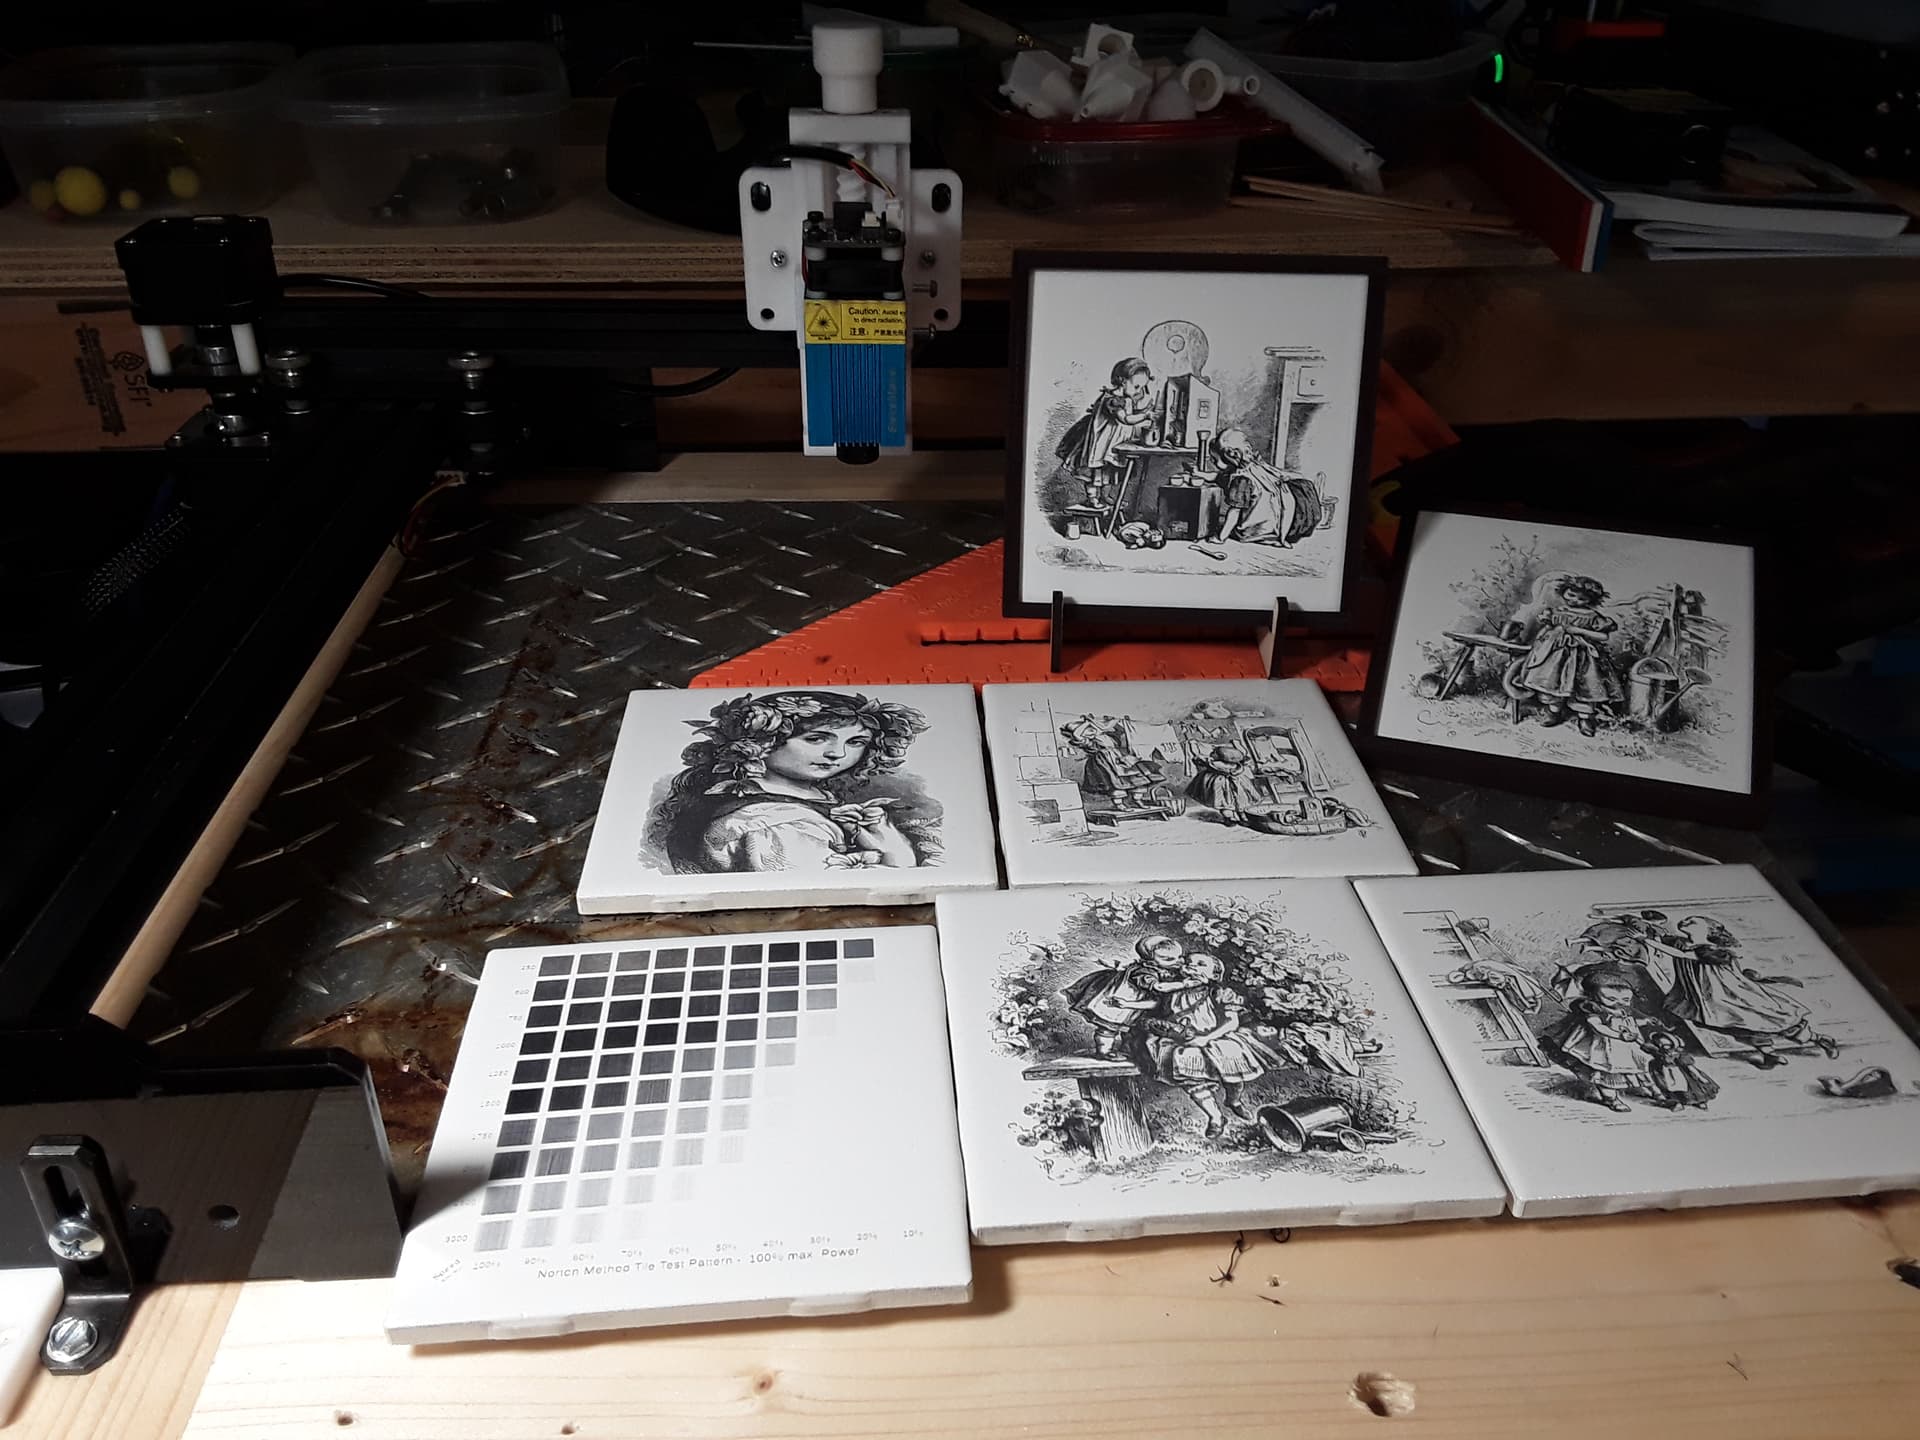
I’m able to determine the fastest speed and lowest power required to get the “darkest/best black” from all the black/gray blocks on the test tile. Most, if not all, the white ceramic tiles shown in this thread have been engraved using the same 2.3W laser, running at 1500 mm/min speed and 90% power. All other settings may vary slightly, depending on adjustments made with Lightburn’s “image adjust” to suit my eye. Also, I use a simple homemade “gauge block” to set proper focus to the material surface… in this case, best focus and smallest spot size is desirable.
Regarding application of the paint… after moving back to East Texas, I had a small batch of tiles I’d painted months before the move, and when I finally tried engraving them I got very inconsistent results, even paint chipping. Since then, I’ve started using tiles as soon as I can handle them… maybe only 10-15 minutes after painting. Since it’s been pretty well determined that the most important (“magic”) part of the NWT method is hitting the TiO2 ingredient in the paint with the laser… I suspect that the “dryness” of the paint is not really an issue.
Air-assist is not necessary – and maybe even undesirable – for the TiO2 and tile glaze interaction. But there is a small amount of smoke created and I use a small personal fan, set a couple of feet away from the worksurface, to gently blow it away so that it doesn’t have a chance to foul the laser lens.
That’s my recipe… and $0.02.
– David
7 Likes
Thank you very much for all the extra detail.
I only have the one laser ATM, but I will try Kylon and a test image.
If I’m not happy with the results it’ll be easier to justify a new laser that I’d like anyway…
I do really appreciate your advice and constant willingness to share!
2 Likes
David,
I’m just starting to explore this, NWT, and am having some issues which I believe is the photo I’m using. I’m using lightburn and xtool d1. When I’ve imported the photo into lightburn and done my image adjustments, the preview looks almost entirely black. I havent tried actually engraving one yet. Your method is well documented doing the engraving, what about some advice in prepping the photo?
any help is apprecaited.
1 Like
Are you by chance trying to use grayscale? That will preview as all black unless you check the “shade according to power” setting. But that still probably won’t look very good on a tile…

My “layman’s explanation”… look at any single row (constant speed) on these test tiles from three different lasers and you probably won’t see a linear white-to-black gradient of blocks on any of them. But that’s what grayscale is doing… it scans across at a constant speed, varying the power, but the paint and tile won’t’ react the way you’d hope. Dithering OTOH simulates shades of gray by varying the density of dots/dashes… so the laser is switching on and off at varying rates and constant power. So all you have to do is pick the nicest blackest-black block on the test tile to determine the best speed and power for your choice of paint and laser. Doing a test tile is crucial IMHO to get predictable results.
All my ceramic tile images are dithered. From the “Adjust Image” window in LB…

I usually set the mode to Jarvis or Stucki and then adjust the DPI… usually 254 or 300 dpi. Then eyeball the contrast, brightness, and gamma to what looks good to you. The enhance radius and amount work together to add “pop” to the image, if desired.
This is pretty much the recipe I follow most times. Hope this helps.
– David
4 Likes
After playing around with samo-same 2.3W laser and NWT process… and fun graphic on ceramic tile

I tried slate for the first time. First, a tiny NWT test pattern with my trusty 2.3W laser on bottom of first victim… yields a surprising range of usable speed and power

So, picking 2500 mm/minn and 80% power, got a fairly decent result first time…
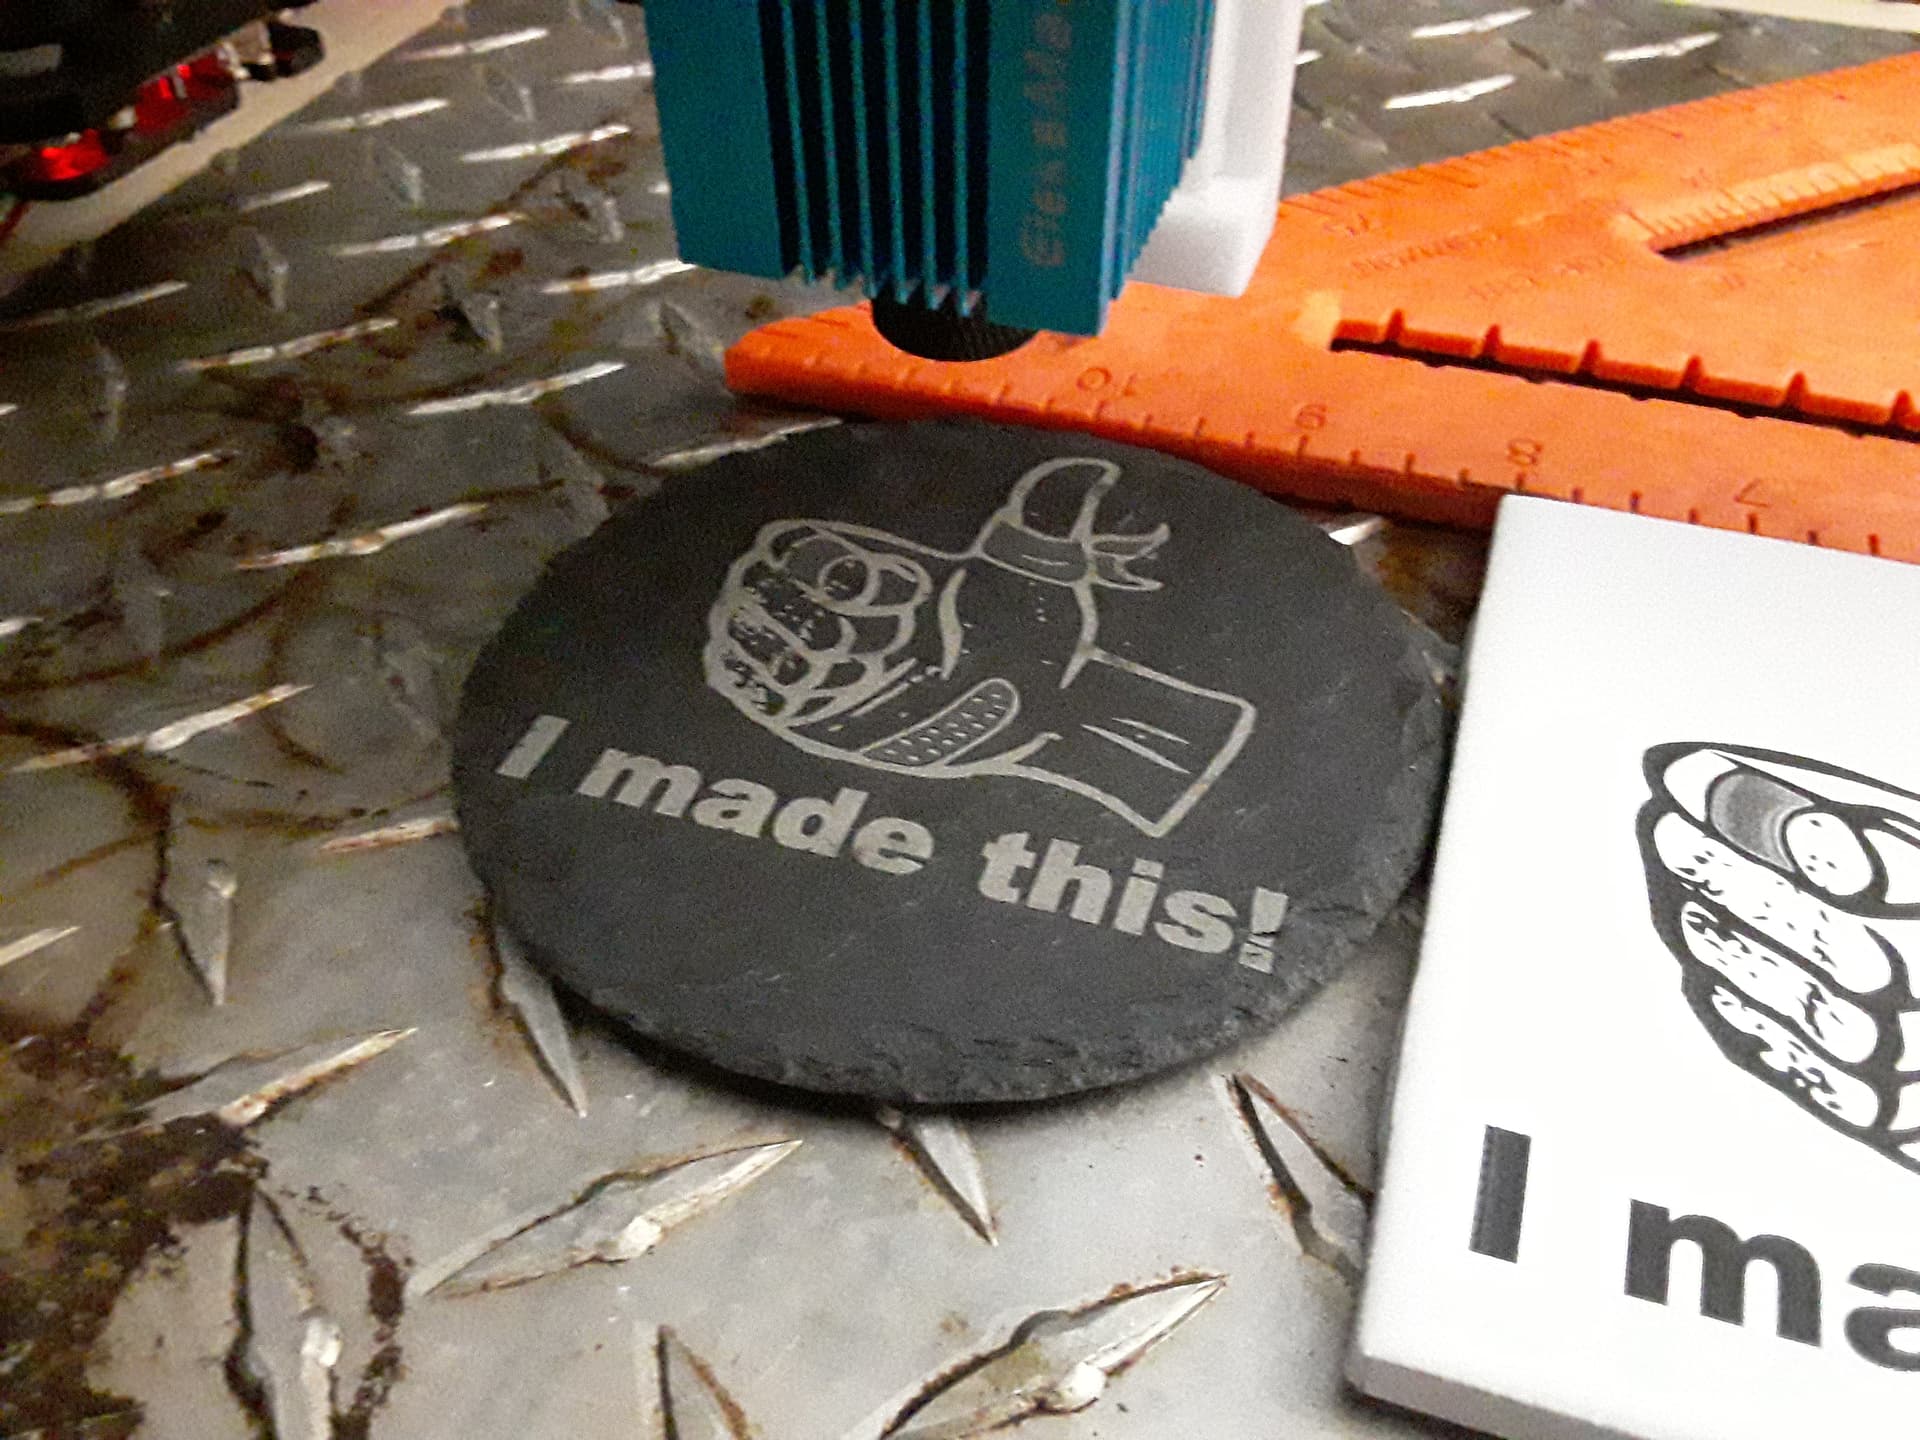
Note that lasered areas turn lighter on slate… will probably need to use a “negative” image for photos…
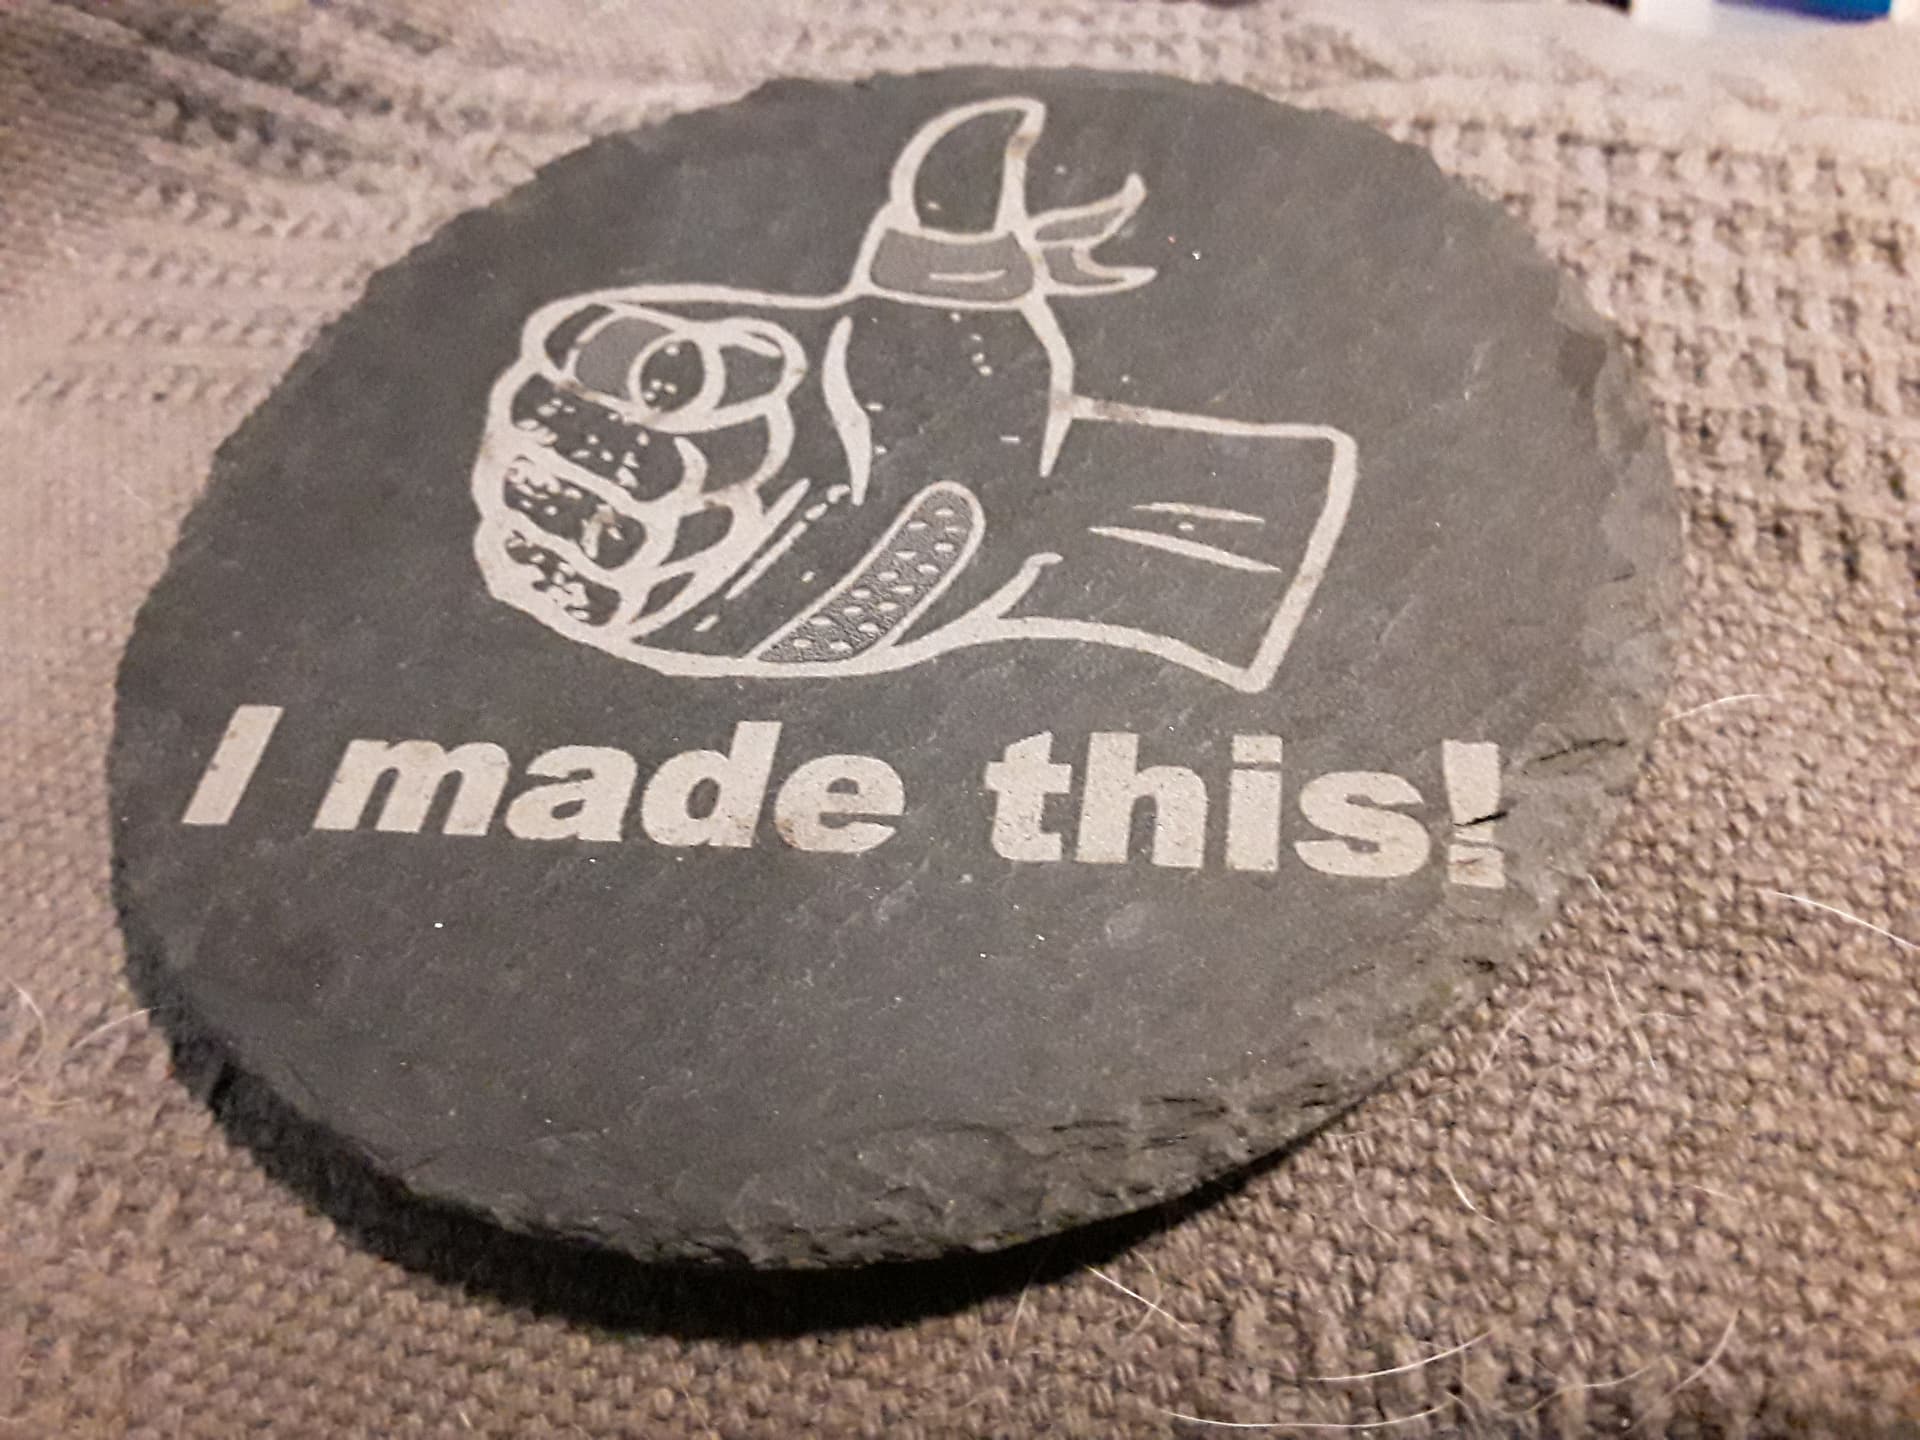
Super easy process for slate. I"m hoping – in my best “Elon-think” – “the best finish will be no finish at all” 
– David
10 Likes
Man, you just keep making the laser rabbit hole more inviting! 
Thanks for a very entertaining (and educational) thread!
1 Like
That is awesome!!!
1 Like
Man i really didnot want to spend money on a laser, but wow!!!
1 Like
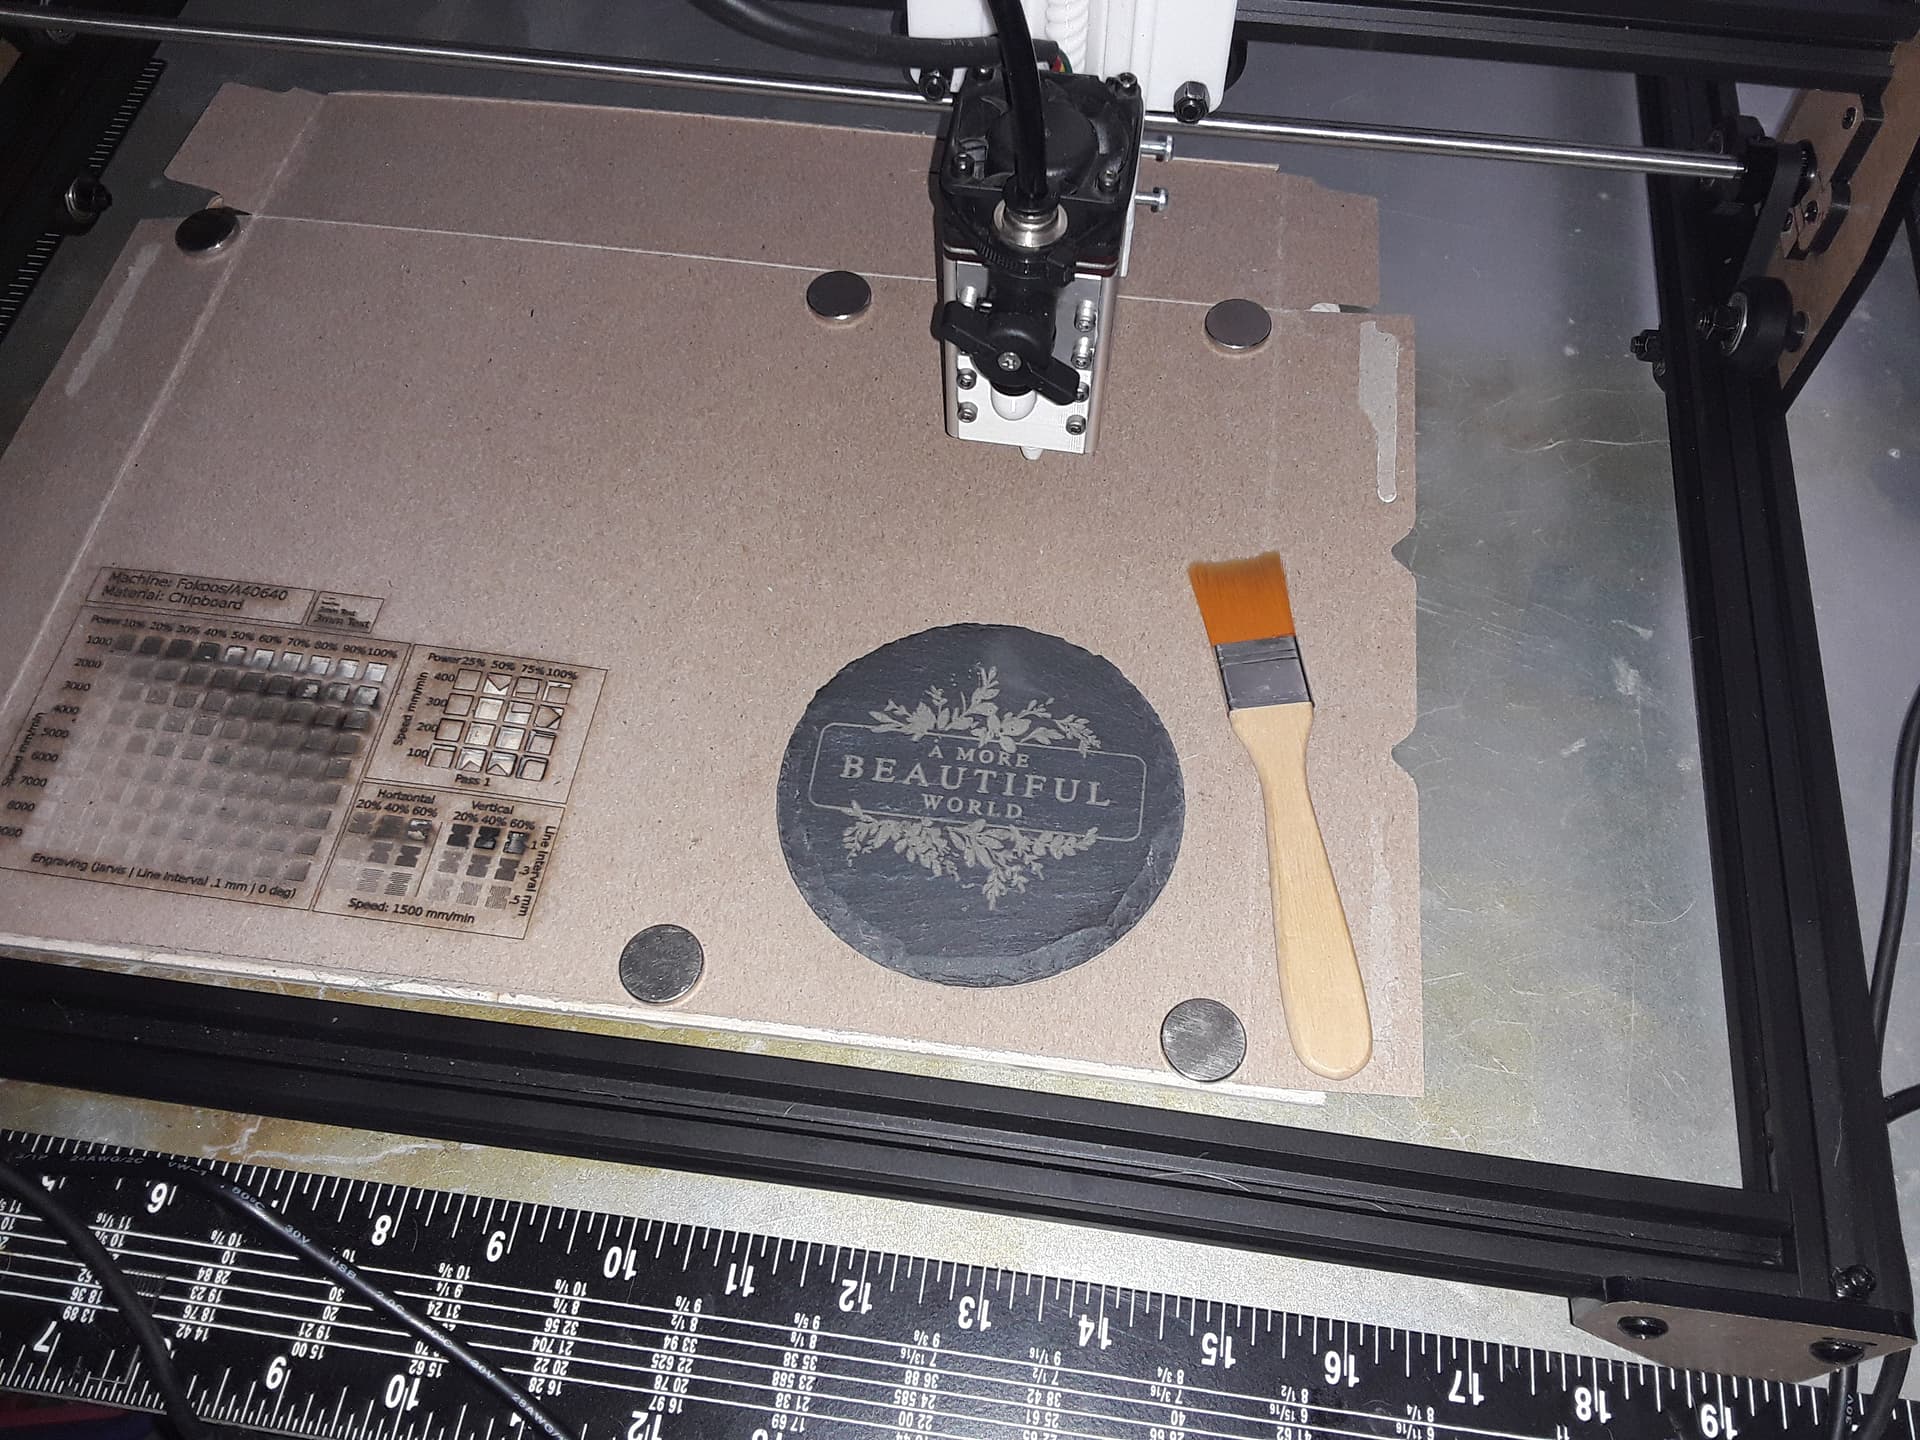
Nothing really new here. I made up a set of coasters for my daughter using my trusty 2.3W laser, 2500 mm/min, 50% power, and 254 DPI…

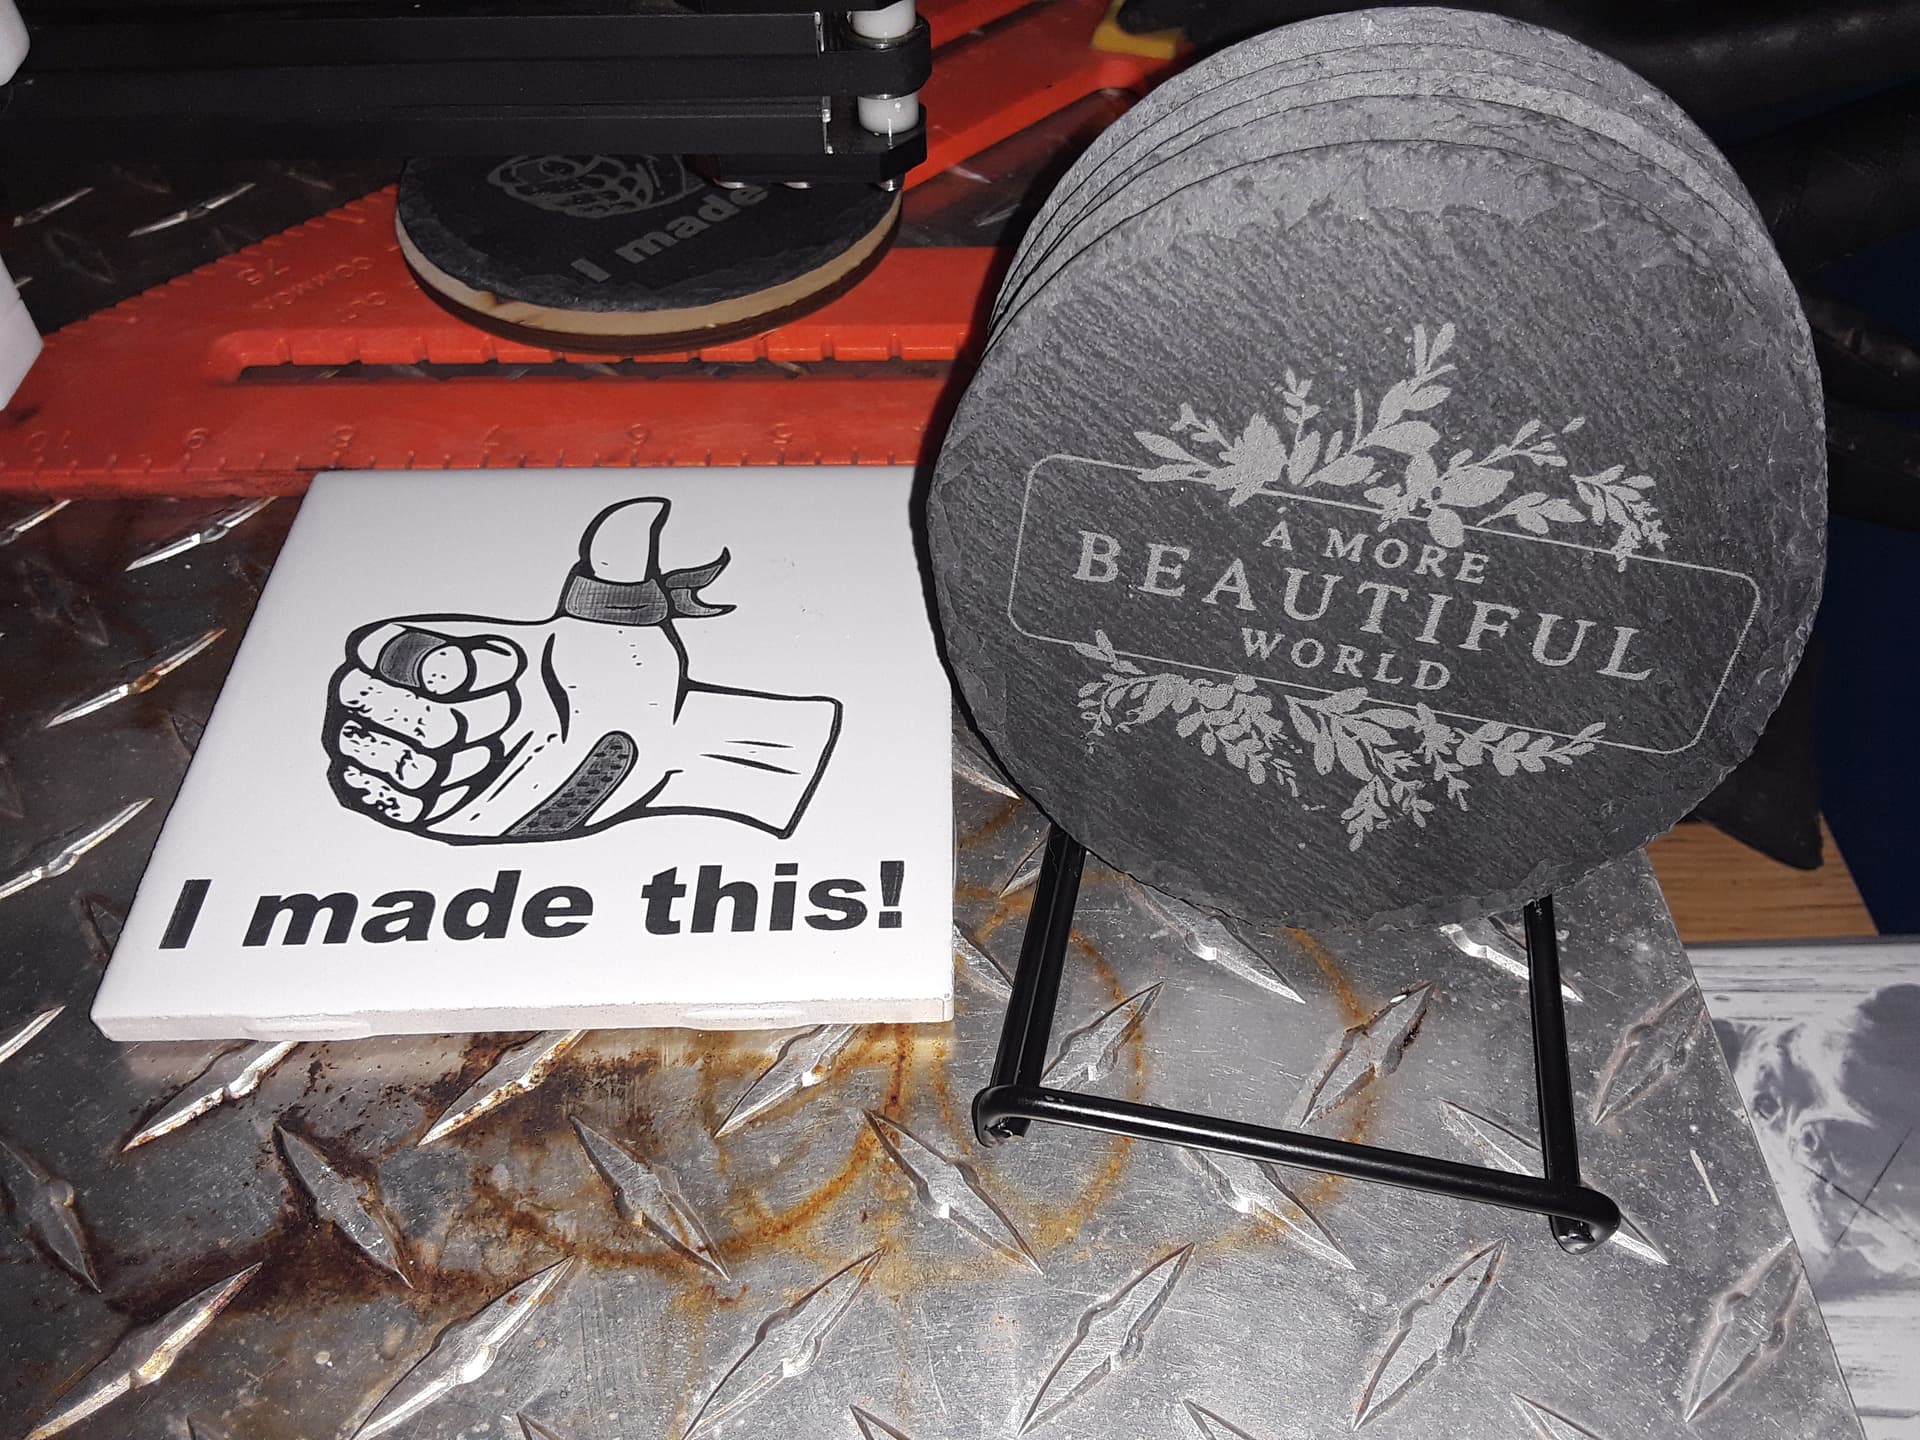
I know I’ve “bragged” so much on my little Eleksmaker 2.3W laser that everybody is tired of hearing it. But I’ve been somewhat frustrated that I’ve not seen similar results (especially with ceramic tile) with my Neje A40640 laser… there should be somewhere in the speed/power range to get comparable results. The “forgiveness” of the slate gave me my chance. Did a tiny NWT test grid on bottom of new slate coaster…
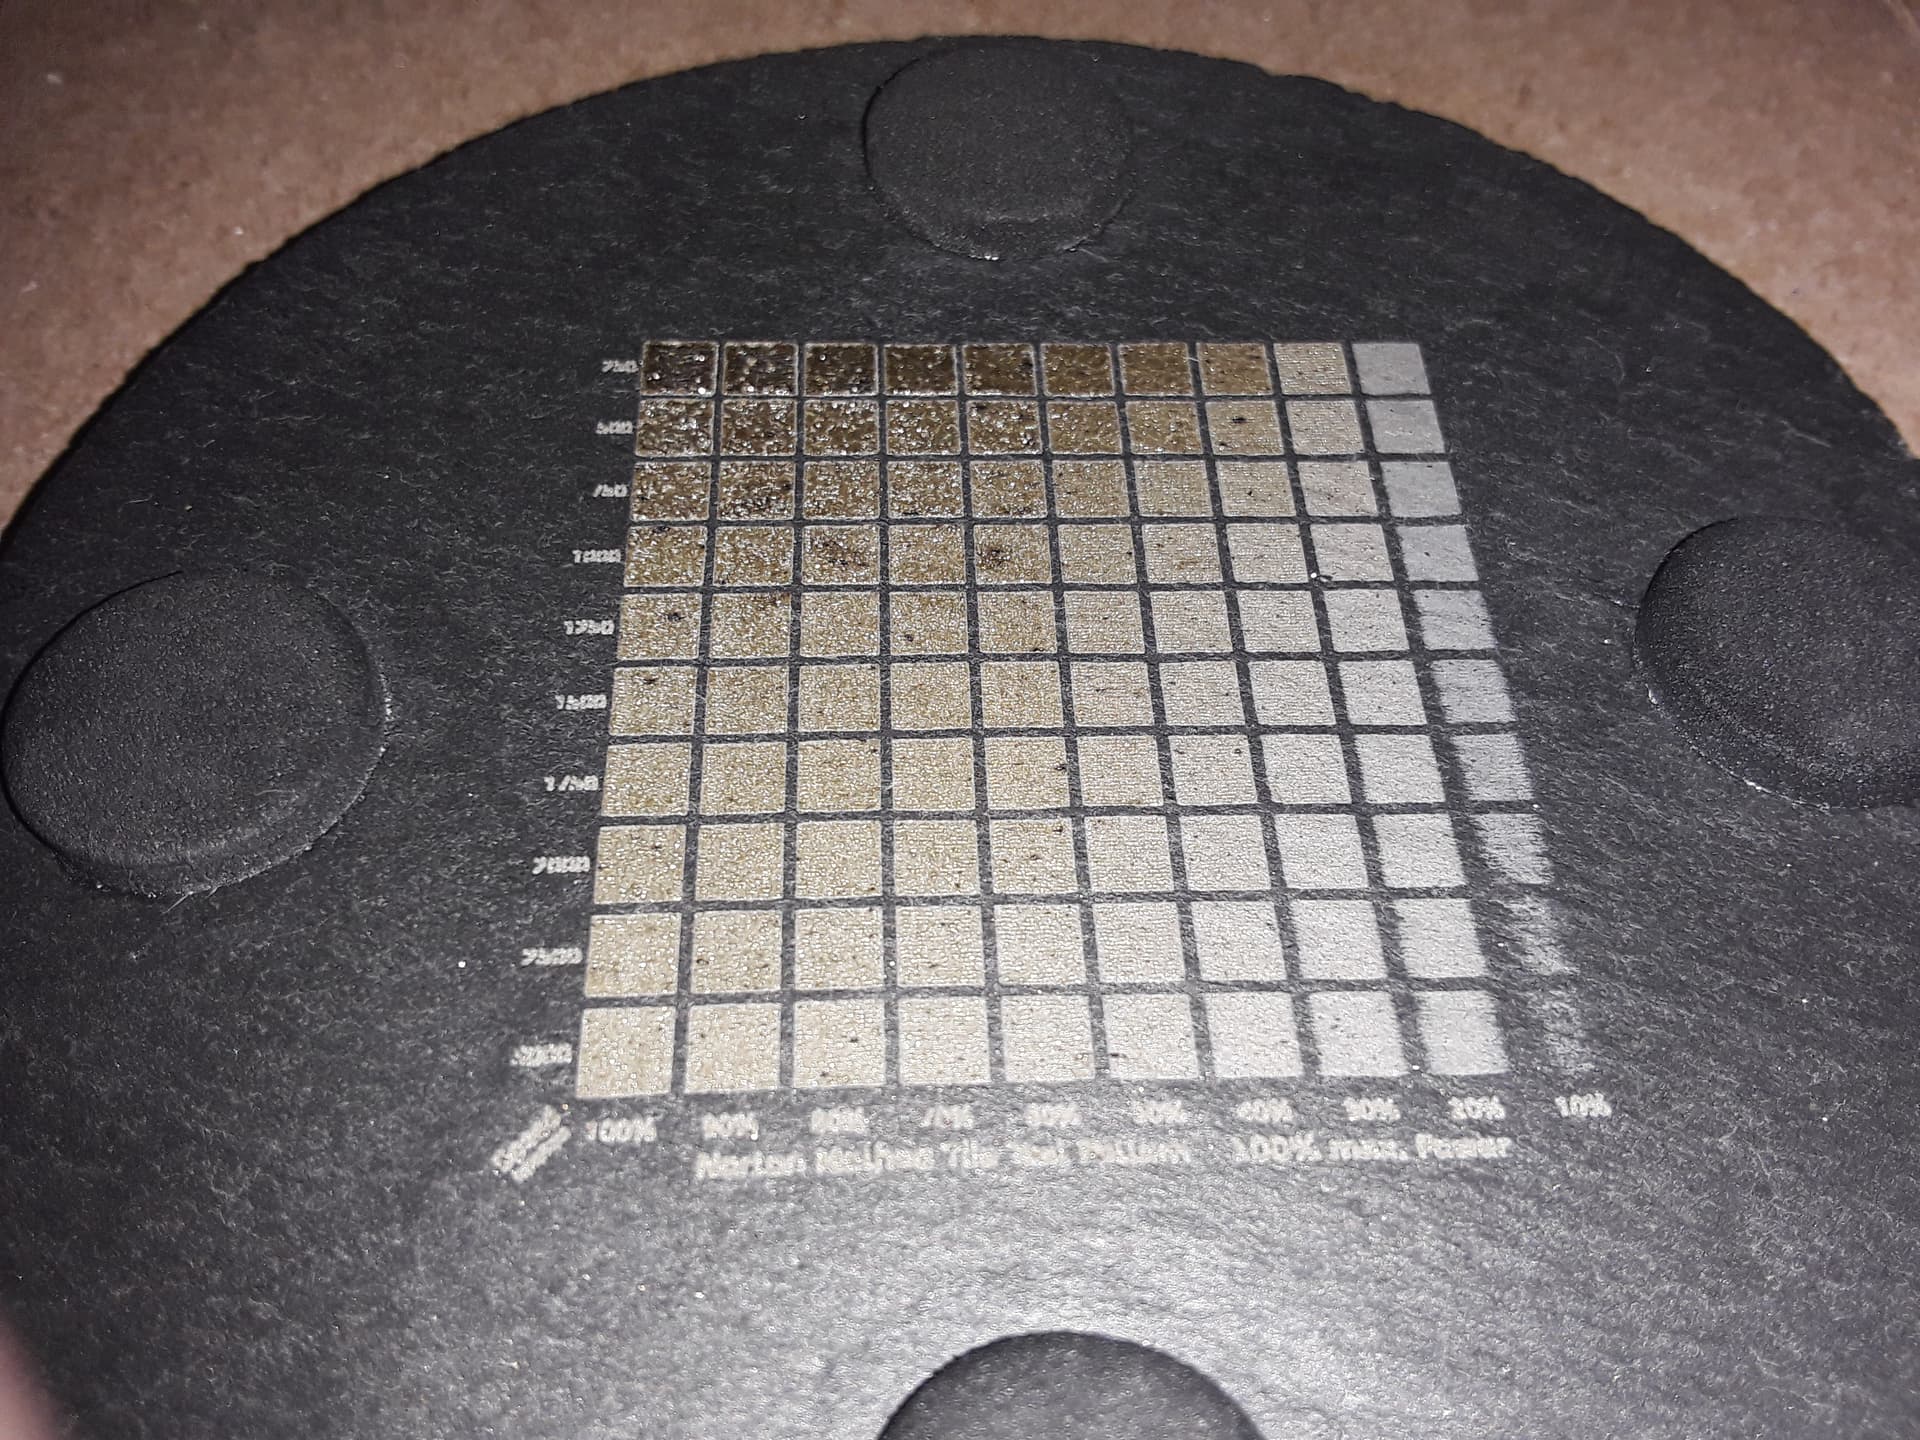
Note that usable blocks can be had at almost any speed… grid ranges 250 - 3000 mm/min and 10% - 100% power. Picking 3000 mm/min and 100% power (bottom-left), I was able to get decent image on slate…
but wasn’t real happy with dirty look and some loss of detail. So, I toned down the settings to 2500 mm/min and 50% power and got a much better result on a reclaimed/sanded test tile…

Satisfied that I can now do slate with Neje laser, I decided to try ceramic tiles again… first a NWT test grid and then one with my daughter’s graphic…

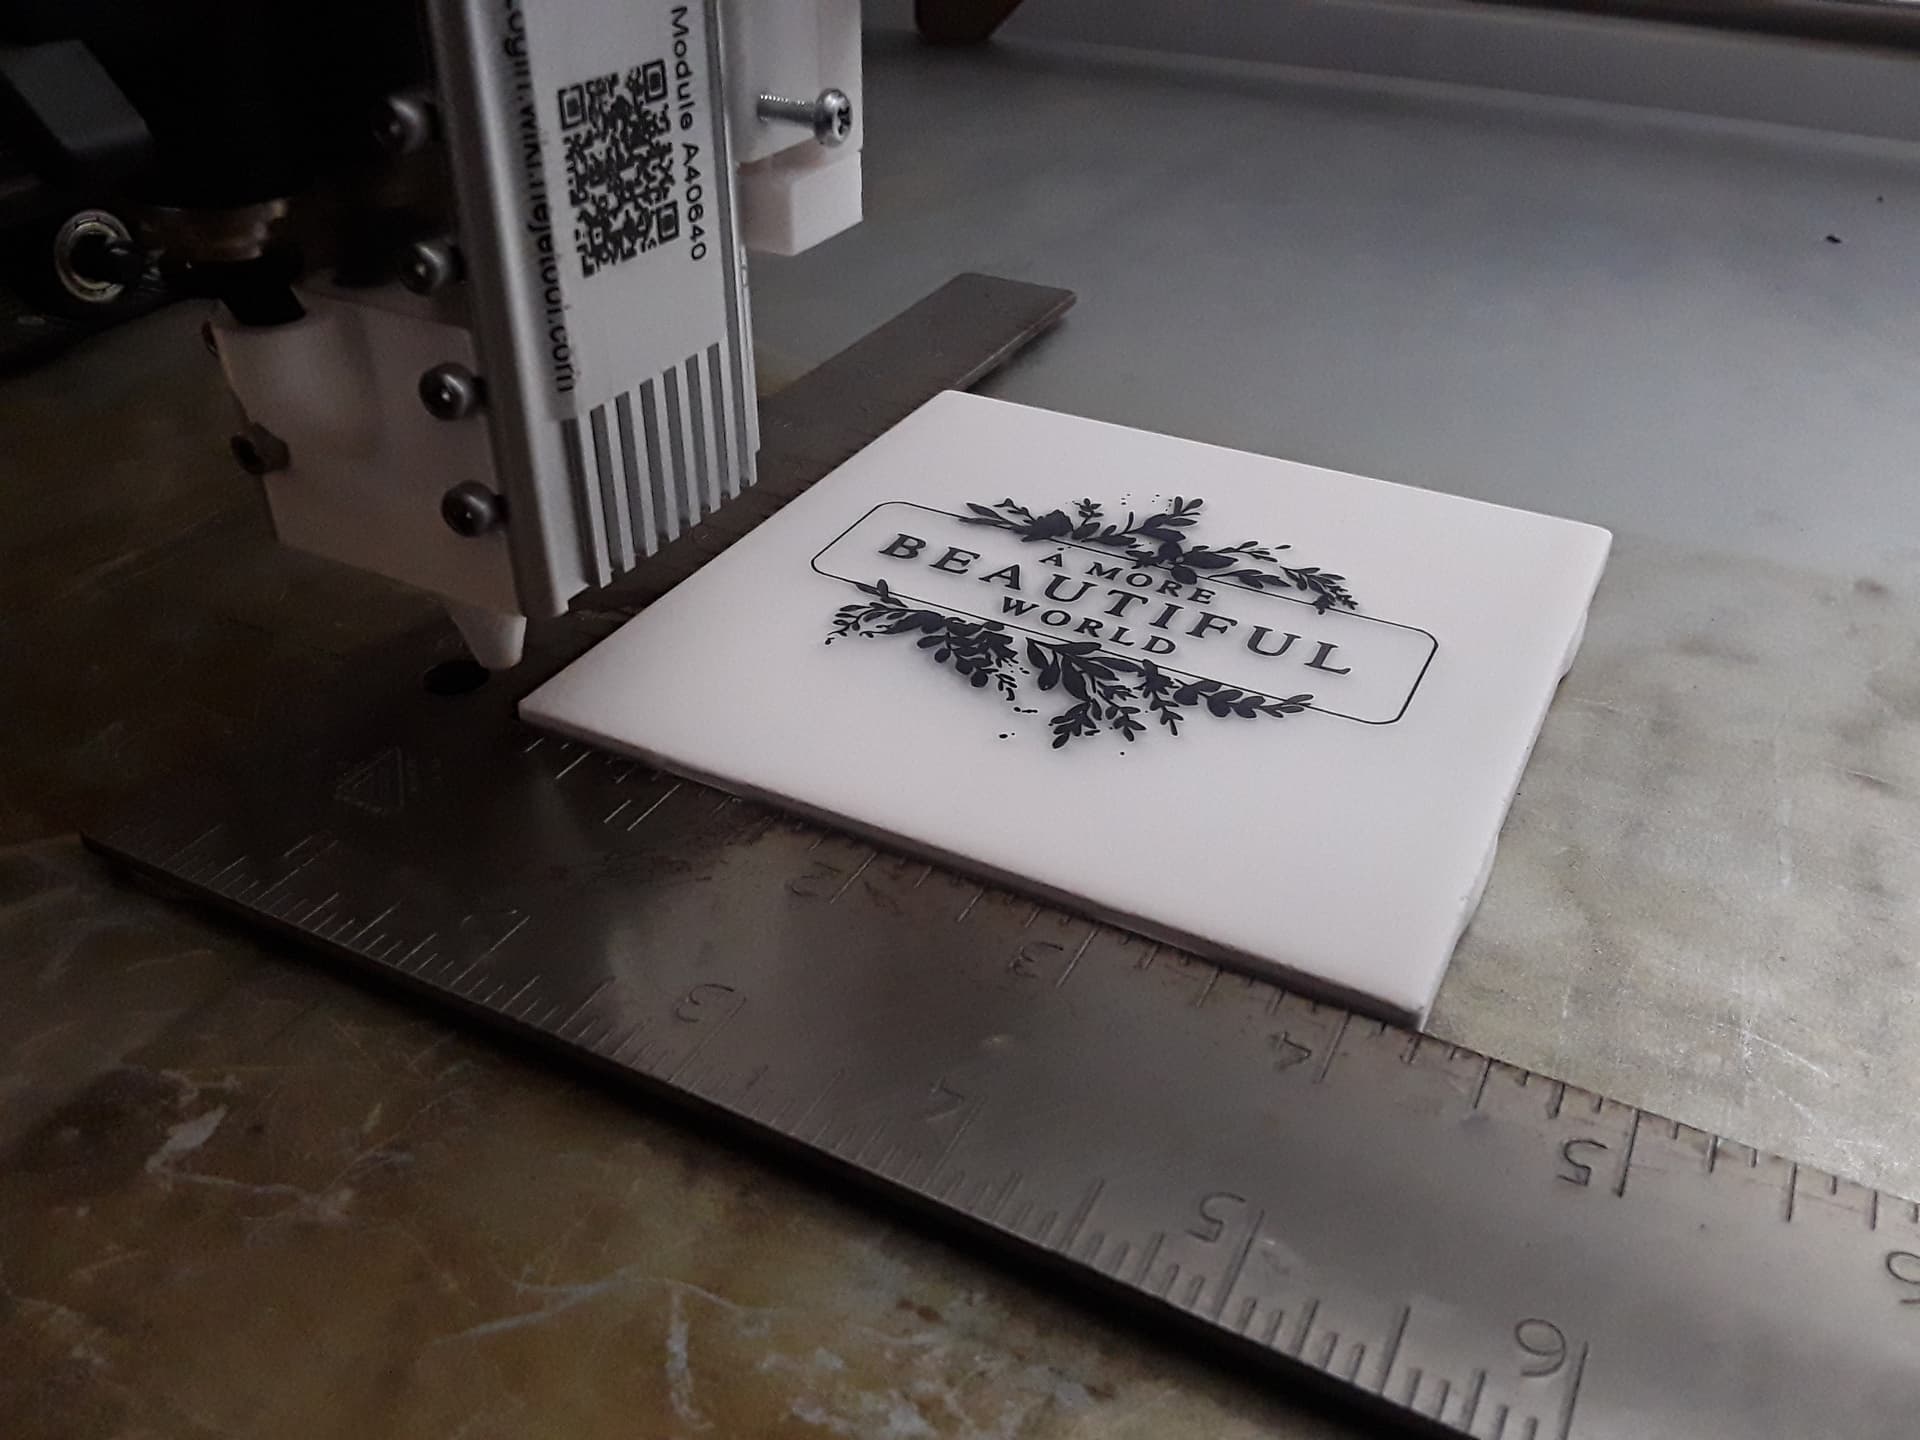
I’m really happy with the way that turned out… and twice as fast as my little 2.3W laser!
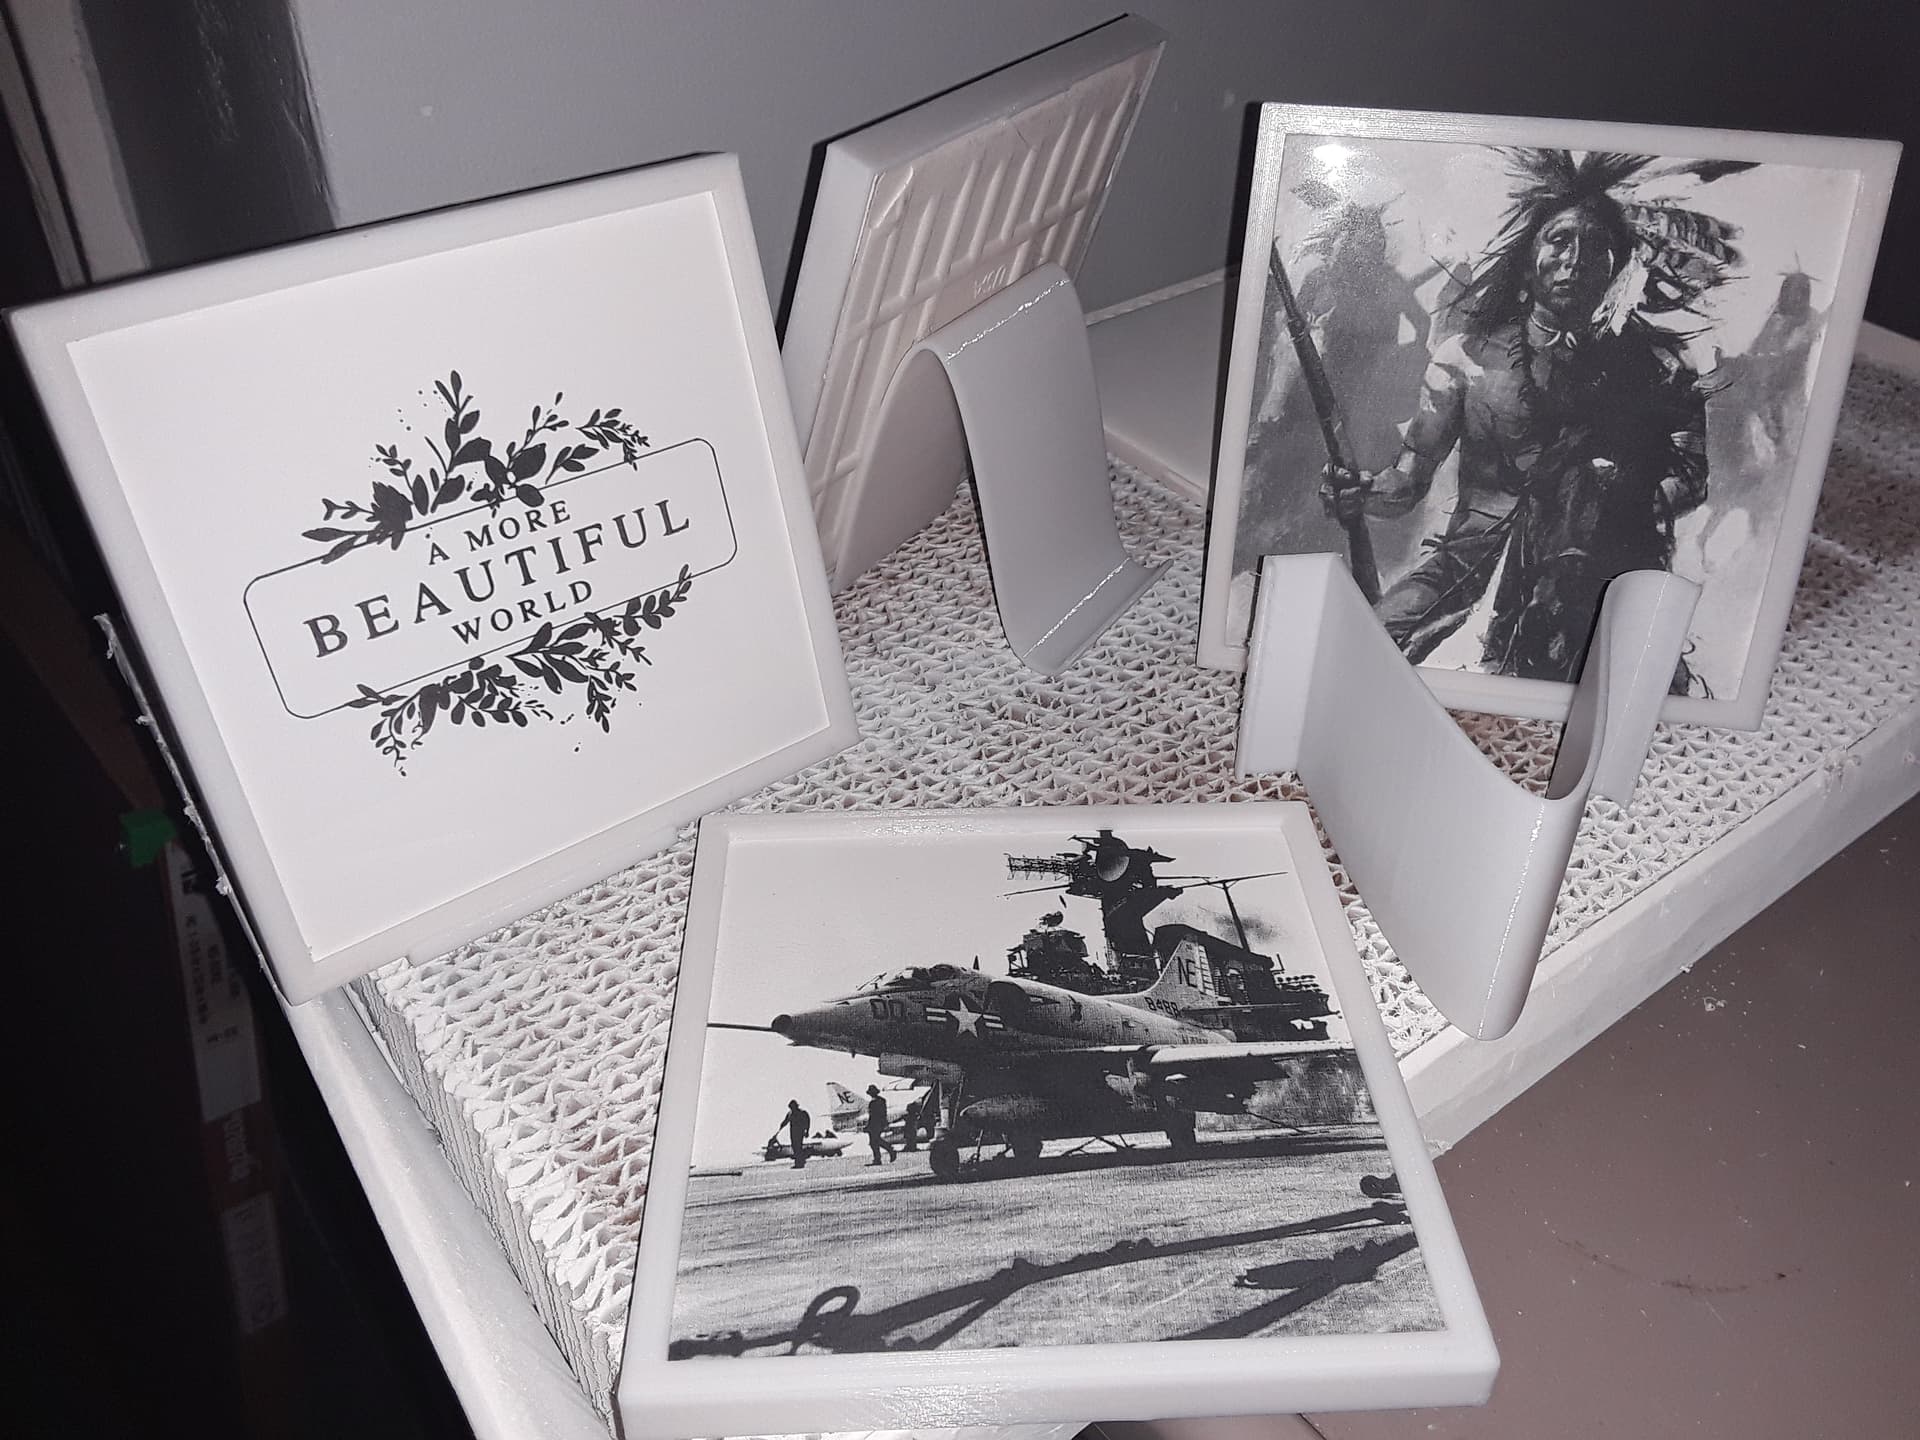
By now, your 3dprinter is a bit jealous and feeling left out, so put it to work making a simple frame and stand for your handiwork…
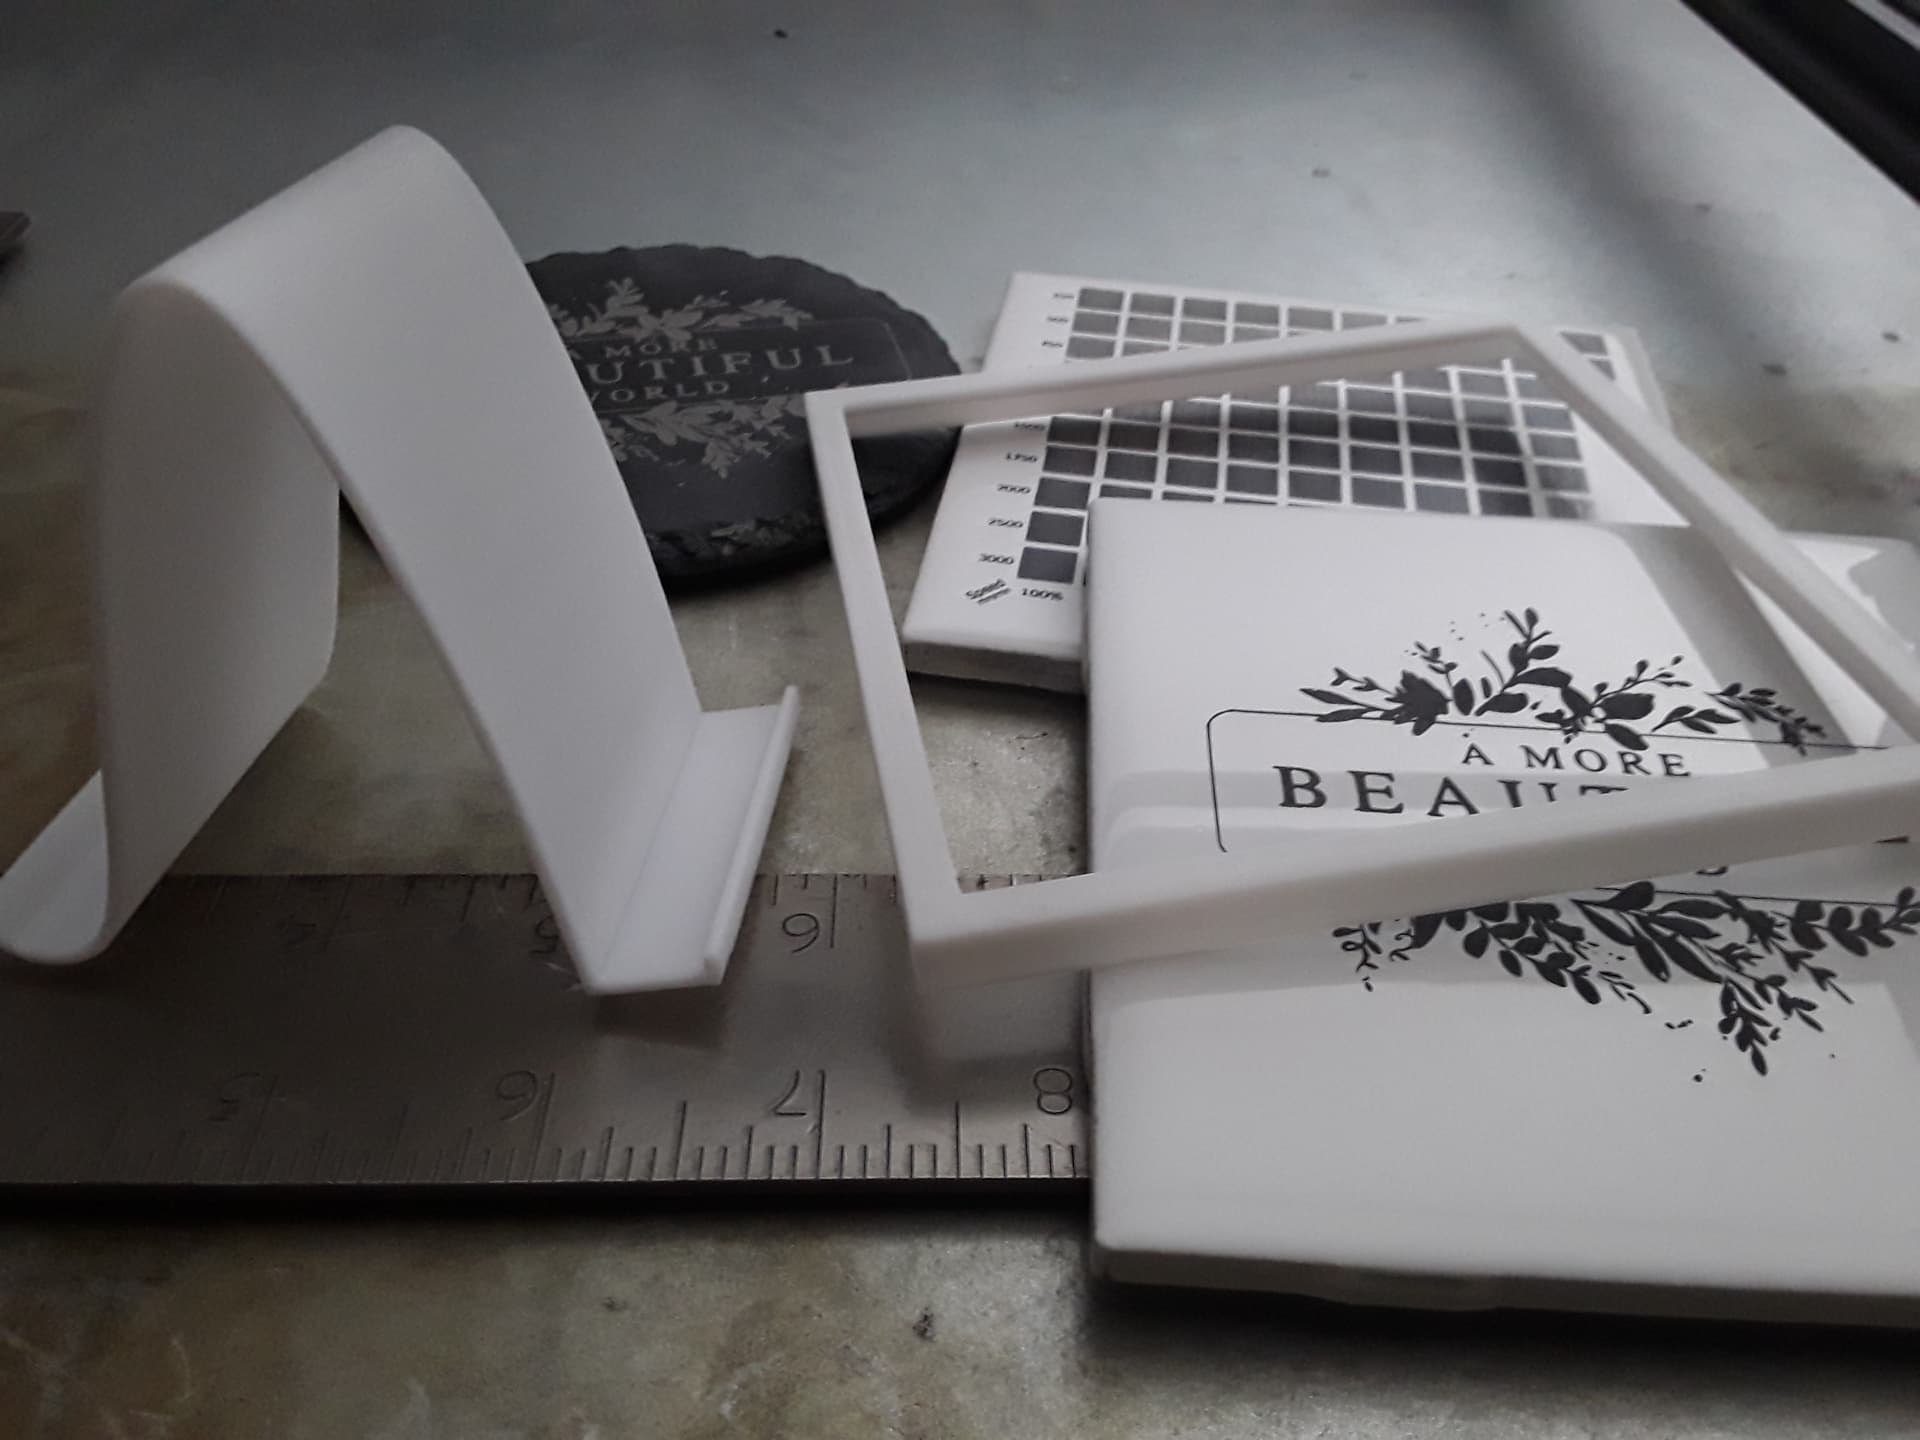
and proudly display it in your mancave, if you can find a clear horizontal surface…
Have fun!
— David
17 Likes
I never get tired of hearing (or at least reading) about your endeavors, David. If your family starts rolling their eyes, just pop back here and share all you want. I don’t always comment, but I always read it.
16 Likes
What kind words… thank you, Jeff! I know there are a number of folks/friends here on this forum – that I consider “home” – who seem to appreciate what I’m doing. With age-related mental issues prevalent in my family, it’s one of my greatest fears… and as long as I can post interesting and intelligible content – and be understood and appreciated so warmly – it gives me assurances I’m okay and a desire to keep on truckin’. Thank you, all, for that! – David
12 Likes
David…you are inspiring me to move forward with a laser type machine, now I just have to wait for the rest of my life to slow down and let me catch up. But please, keep doing what you are doing and you are continuously giving me ideas and inspiration on what I want to do. Thank you!!
2 Likes
Your work has left me wanting a laser even more! I already had my eye on the NEJE A40640. Your post from Jun 8 burst my bubble on that one but you then go on to contradict it somewhat with your tile and slate pics a couple of days ago which look amazing. Is there a real inconsistency using the NEJE with glass or was there a problem with that earlier test?
4 Likes
Wow. Just Wow.
I’m going to need to re-visit this. I already sent a link to the wife. I have a feeling we’ll be making some of this for Christmas presents this year.
I’m wondering if the black paint method would work on mirrors. I’m also wondering if a lathe attachment could be configured to etch wine glasses.
1 Like
I’m sorry. I don’t mean to “burst bubbles” or be “contradictory”. And thank you for the kind words.
I have the Neje A40640 but had never really taken the time to find settings which yielded results comparable to my trusty little Eleksmaker 2.3W laser. And, with the little laser always at hand, I had no real pressing need to spend time “mastering” the Neje laser for tile. But when I finally started playing with the slate’s “forgiving” nature, the Neje easily did the job and I decided to revisit ceramic tile. And, once I did a proper NWT test tile, I finally found the settings I needed. – David
============== SKIP IF DESIRED ==============
An aside and explanation…
I’m a former EE, worked many years in industry on government projects, and often met with customers interested in our progress on multi-year projects that pushed the bounds of current technology. I also have a long-running thread on needle-cutter development on the Flitetest forum.
When development work is done out in the open where everybody can see it… the most accurate information is usually found later, toward the end of the thread/timeline. Earlier findings/conclusions are often “contradicted” by later findings/conclusions when doing something new… but you can only share what you know, or think you know, to be true at a given point in time. There’s no malice/deceit intended, that’s simply the nature of the work… and you hopefully get smarter – and share more accurate information – as you go.
4 Likes
This happens in any industry where design takes place.
We have multiple projects currently deployed in production where it was built with the ‘best knowledge at the time’. Almost all of which are now in our backlog of ‘tech debt’ stories to re-do or fix in the future. The fact we’ll probably never actually get to re-do them is of little concern it seems 
1 Like
Hey, David! I know you and your wife would find this stuff to be fun to do and it’s really not difficult. These tiles/coasters are about the only thing I do that yields anything close to a “finished product” right off the tool. I simply hate, and refuse to do, all the painting, sanding, and finishing most other projects require.
Mirrors are actually pretty simple. You don’t even need the black paint… you simply laser the backside of the mirror and it does the same thing. You just have to remember to mirror the image (since you’re working on the backside) and use a negative image (the lightest areas are where the laser hits glass). There’s some great mirrors in this thread…
Funny you should mention wine glasses and rotary stuff. That’s where I’m headed next, I think. I’ve got a couple of roller type attachments but just never felt energetic enough to mess with them… they’re pretty kludgey for anything not perfectly cylindrical. But I finally found one I like and ordered it… it’s not cheap but far more versatile than any other I’ve seen…
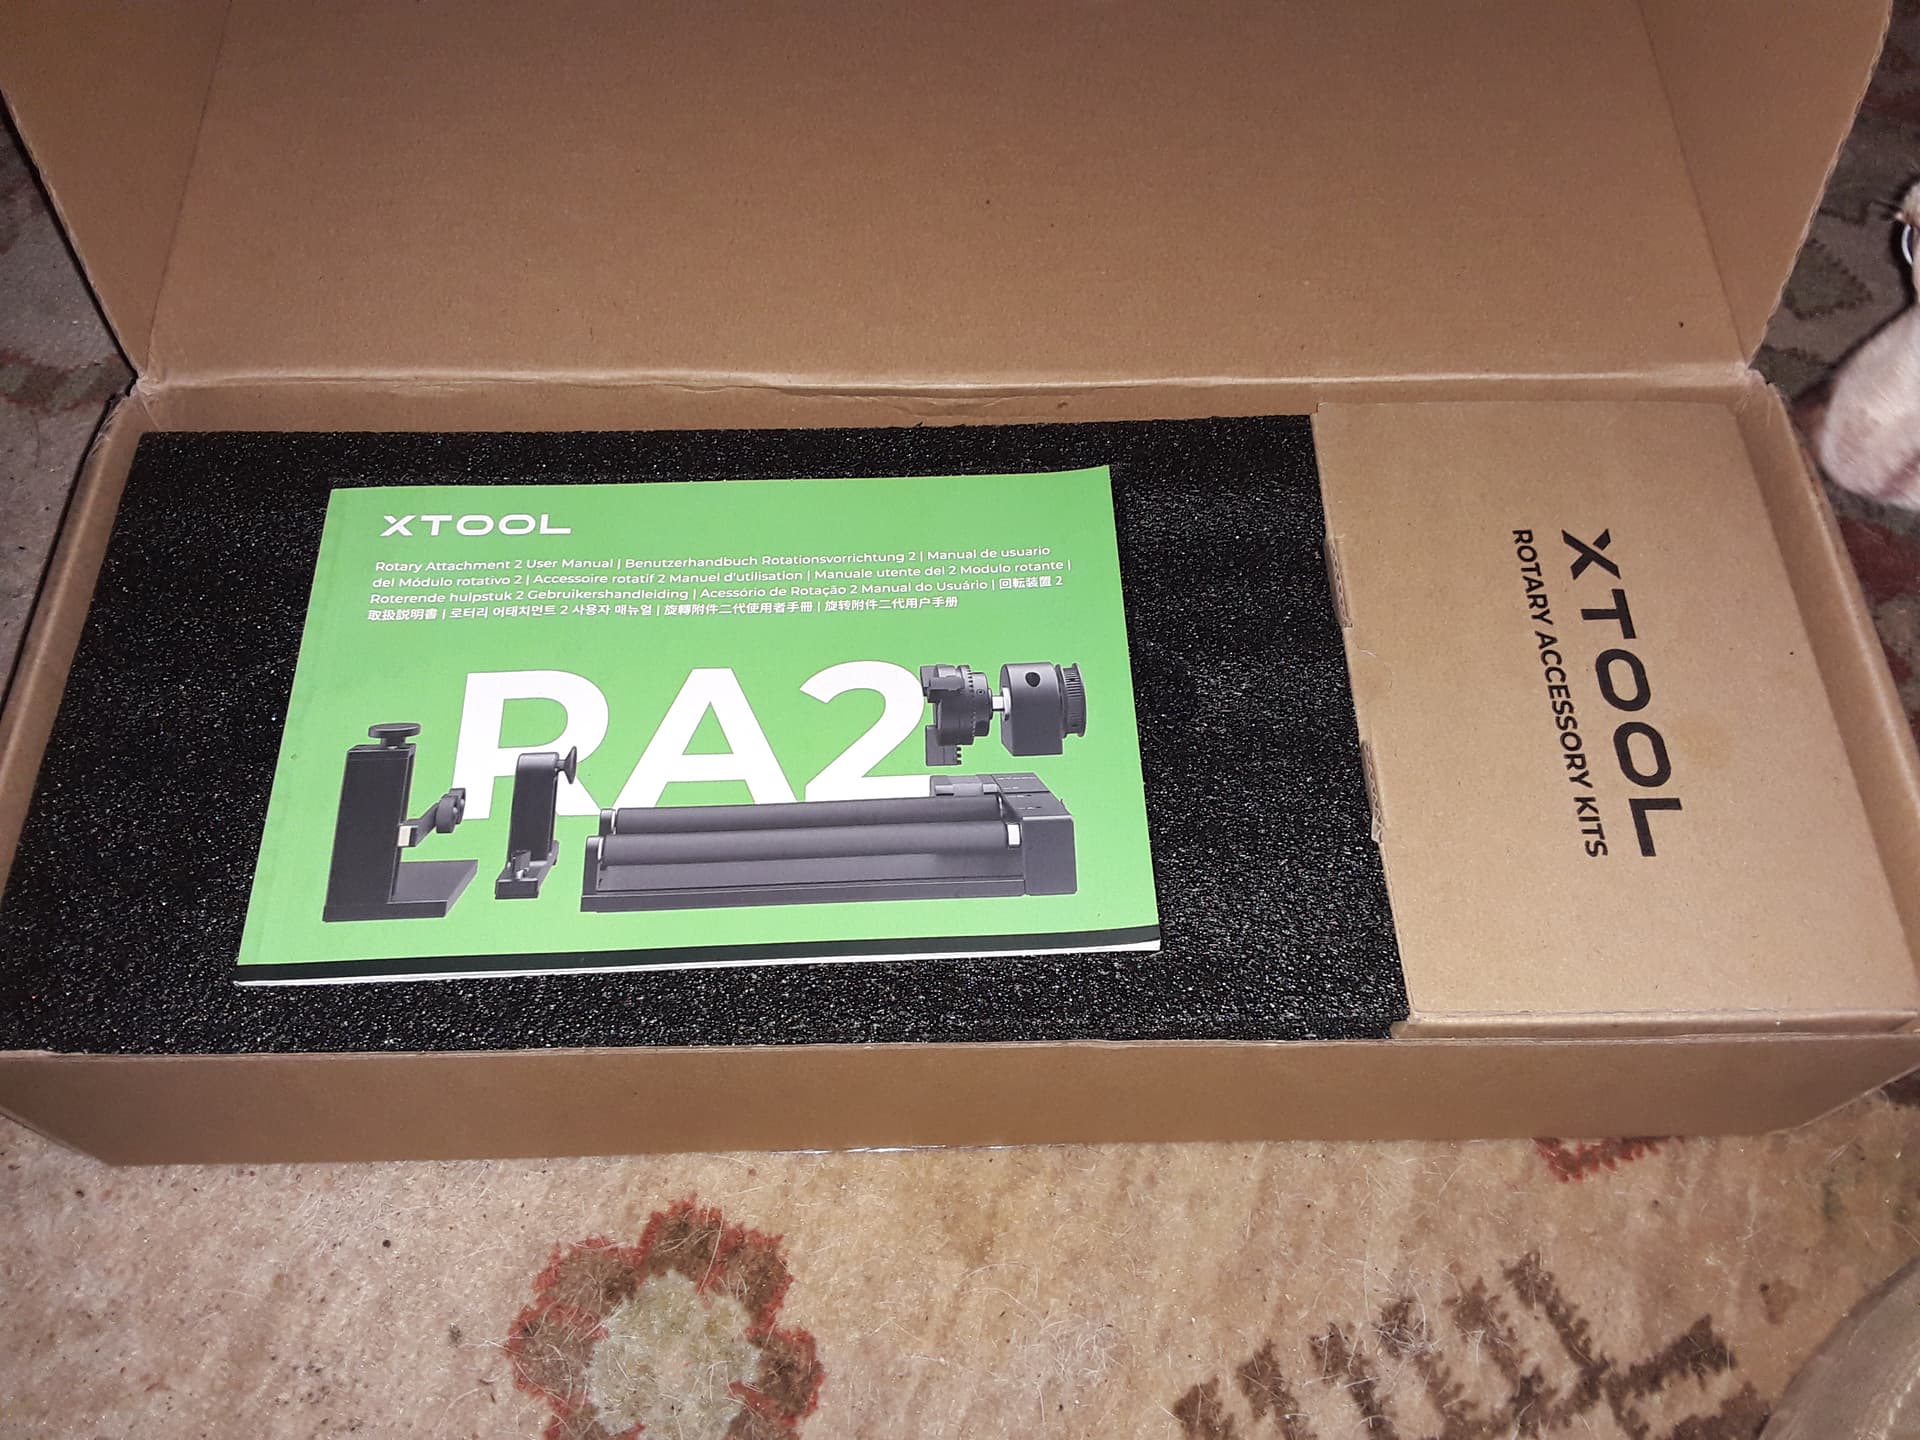
Note that it includes a tiny chuck (much like the one on your lathe) that really makes it stand out in the crowd. Here a great video showing it in action…

I hope to get mine up and running in the next few days. Enjoy!
– David
1 Like