Designer: Derek Hugger
I’m making the sea turtle.
Designer: Derek Hugger
I’m making the sea turtle.
I’m gonna have to look him up! A few years ago I went to a presentation about sea turtles one evening at a local State Park. The next morning, which happened to be my birthday, I was taking my AM walk on the beach and one of the first things I saw were the telltale bulldozer like tracks that meant a turtle had nested during the night. The timing was kinda neat! In my mind I could hear one of my heroes, Jacques Cousteau saying ‘Ze haf been doing zis for thousands and thousands of years’. ![]()
I’ll have to contact the designer, that turtle would be great somewhere in my yard.
His site is here: www.derekhugger.com
Great anecdote about your sea turtle experience. I’m slowly working up to this so I can send it to a friend:

Same designer as the wall hung kinetic.
My high school best buddy and his wife have four sons. The youngest passed away at 4 years old from stage 4 liver cancer. Before he passed, he fell in love with everything sea turtle. I’m in MN, they’re in GA, and I haven’t seen them in 20 years nor have I ever met their children but we still stay in touch online.
I want to build the video above and send it to them one day.
He also has a lifelike motion humming bird.

I was just looking at the designer’s site, he may be responsible for getting the burly pretty dirty in the future. 
Sad to hear of one so young hit with an illness like that. I’m sure that sculpture would be a beautiful reminder of their son.
Funny you mention a hummingbird, I see them virtually every day at the feeder, this past winter it seems some didn’t migrate and wintered over. These sculptures are neat, as soon as I get a little more comfortable with the burly I’m gonna have to make one … or two… or?.
Yeah. I see a ton of Christmas/house-warming/wedding gifts in my future.
Not knowing how much longer things may be pandemic restricted, they’d be a great way to spend some time and likely far more entertaining than TV.
Thanks for posting the link for the kinetic sculptures. Very neat stuff.
The Makita router is the only router I was able to find in stock when I built my lowrider. (Don’t tell my wife I bought it, she thinks I already owned the router.)
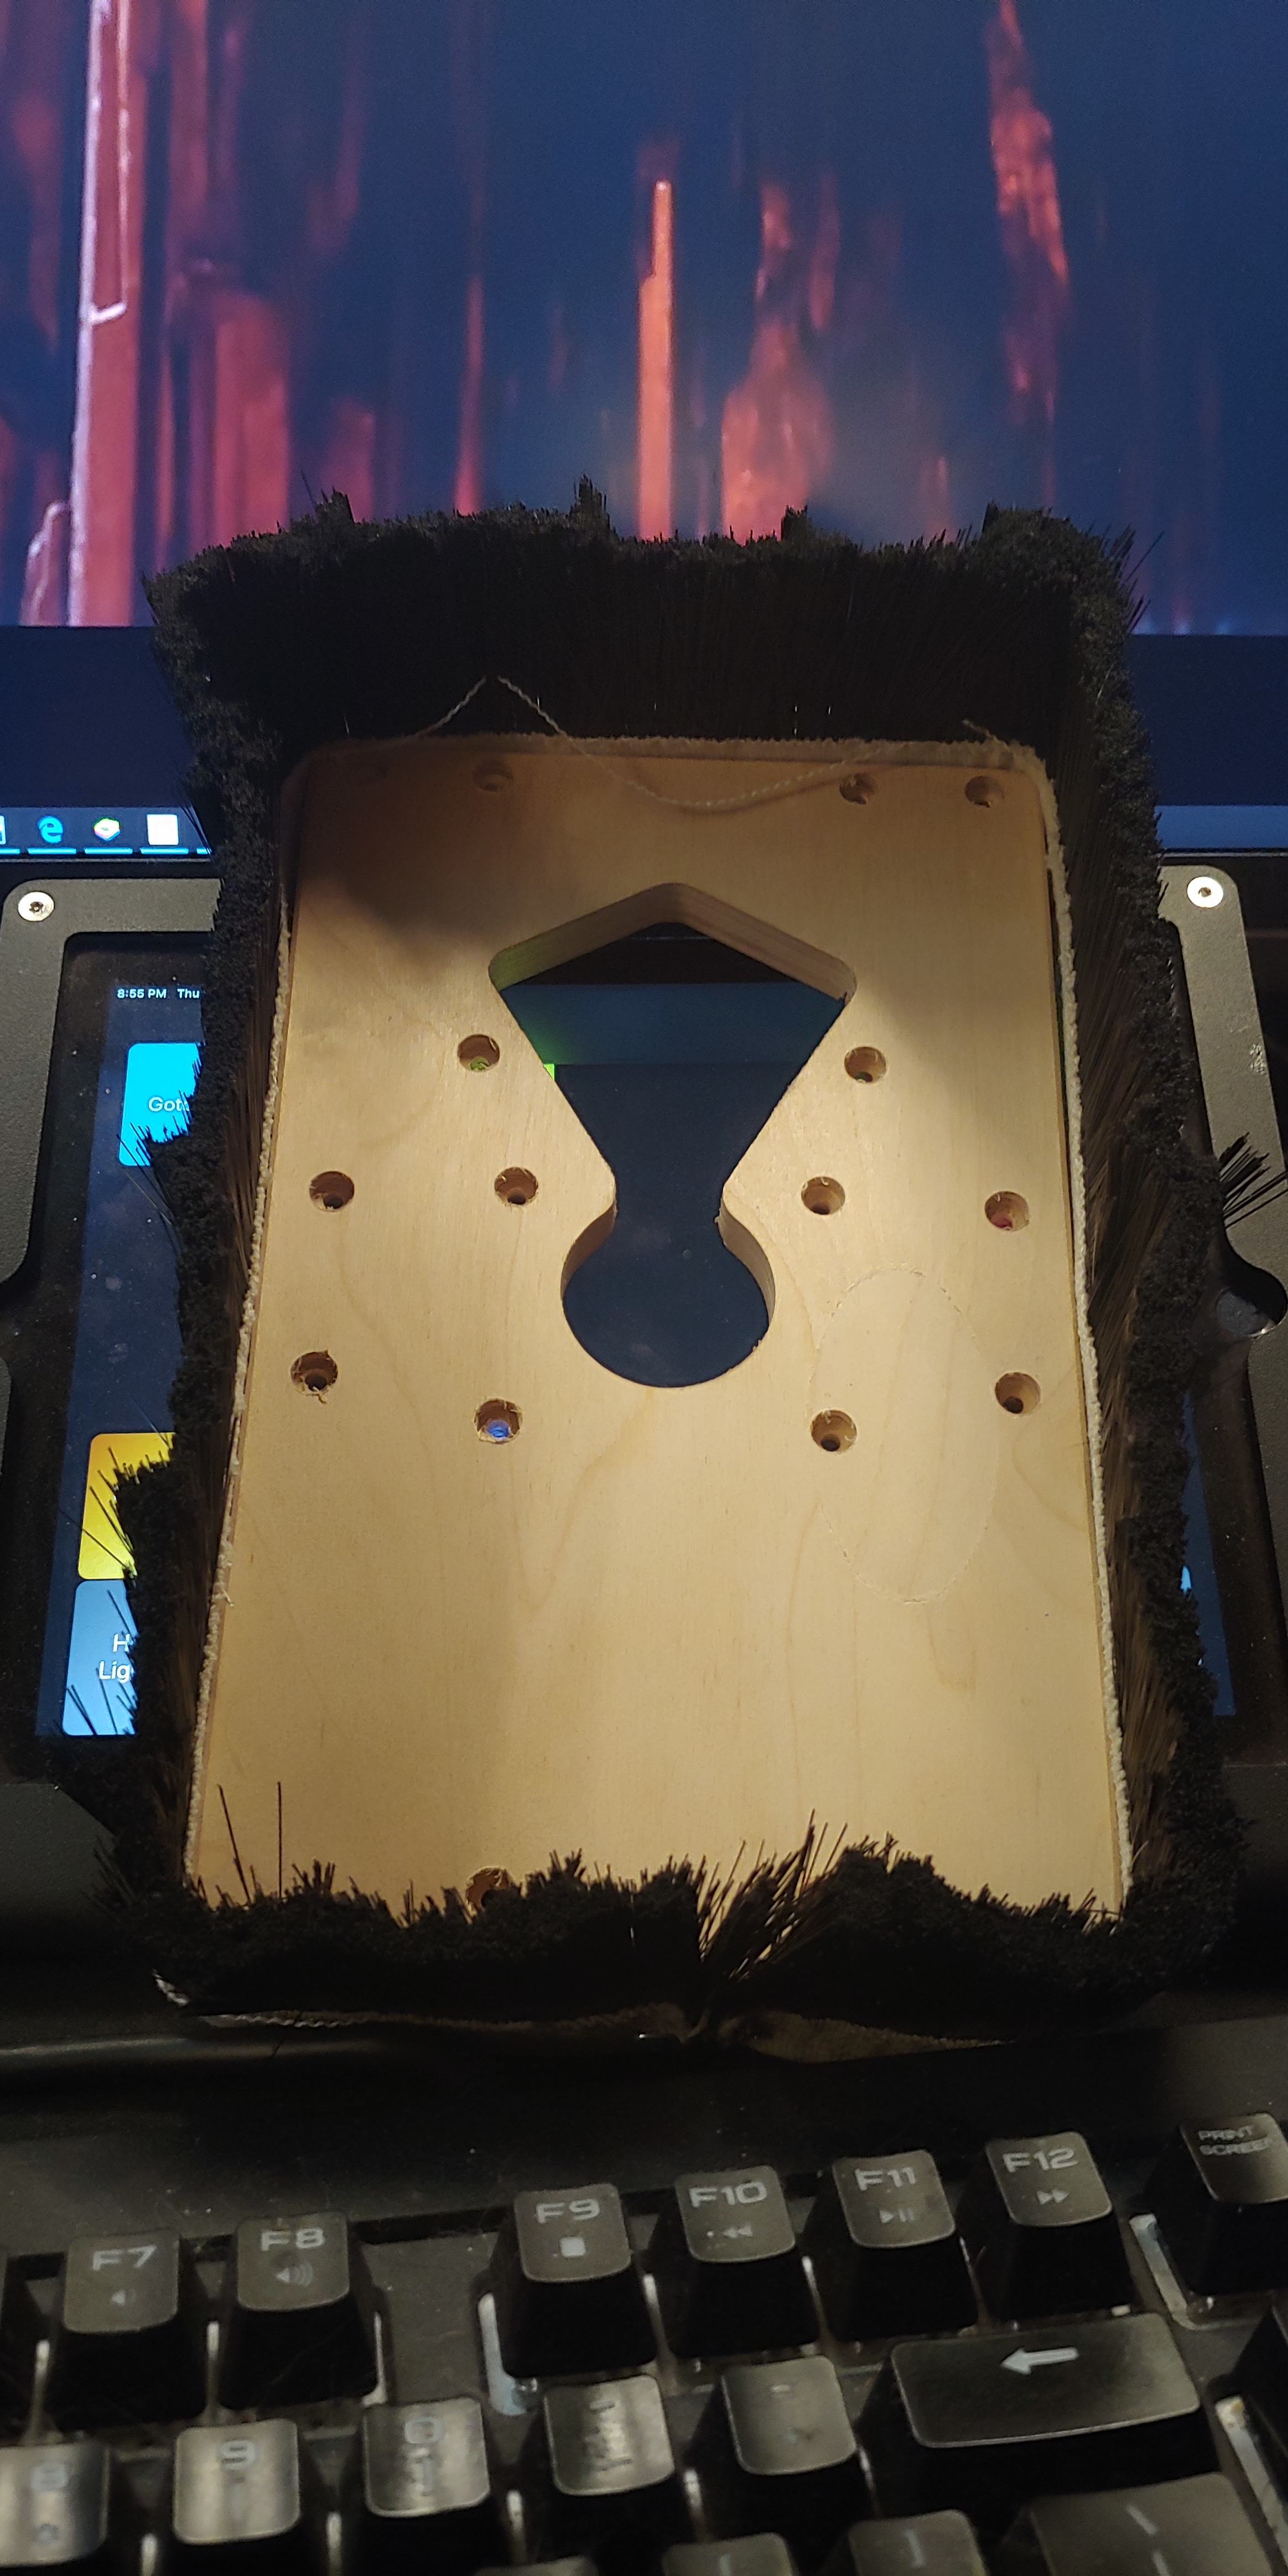
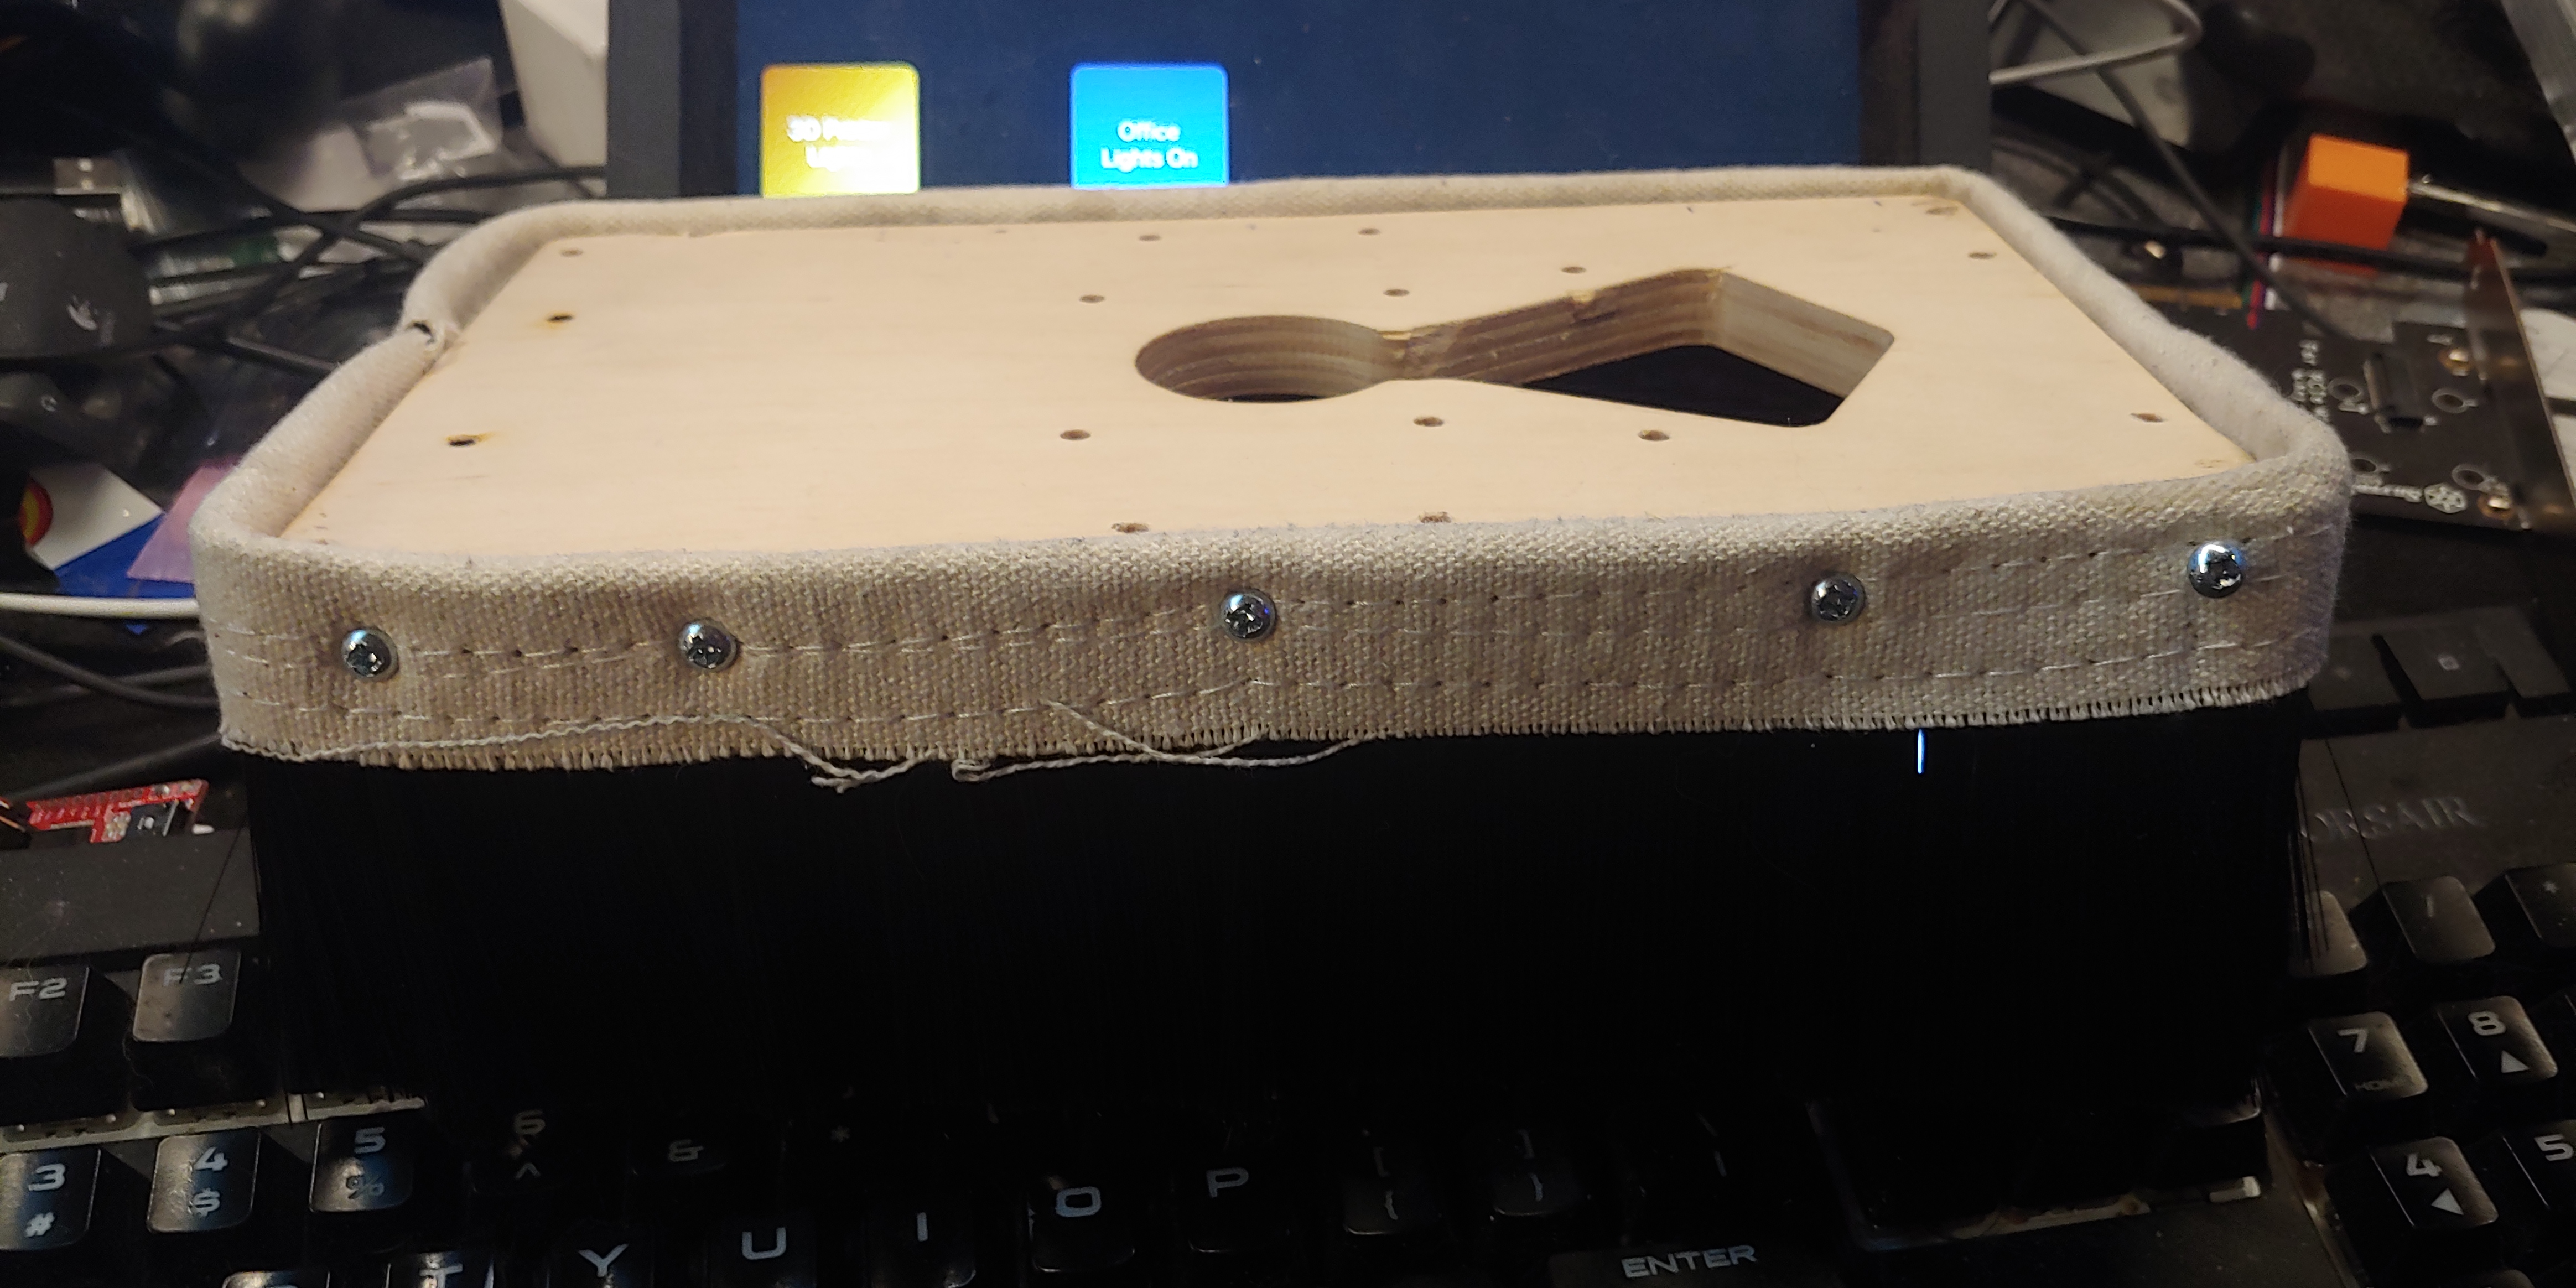
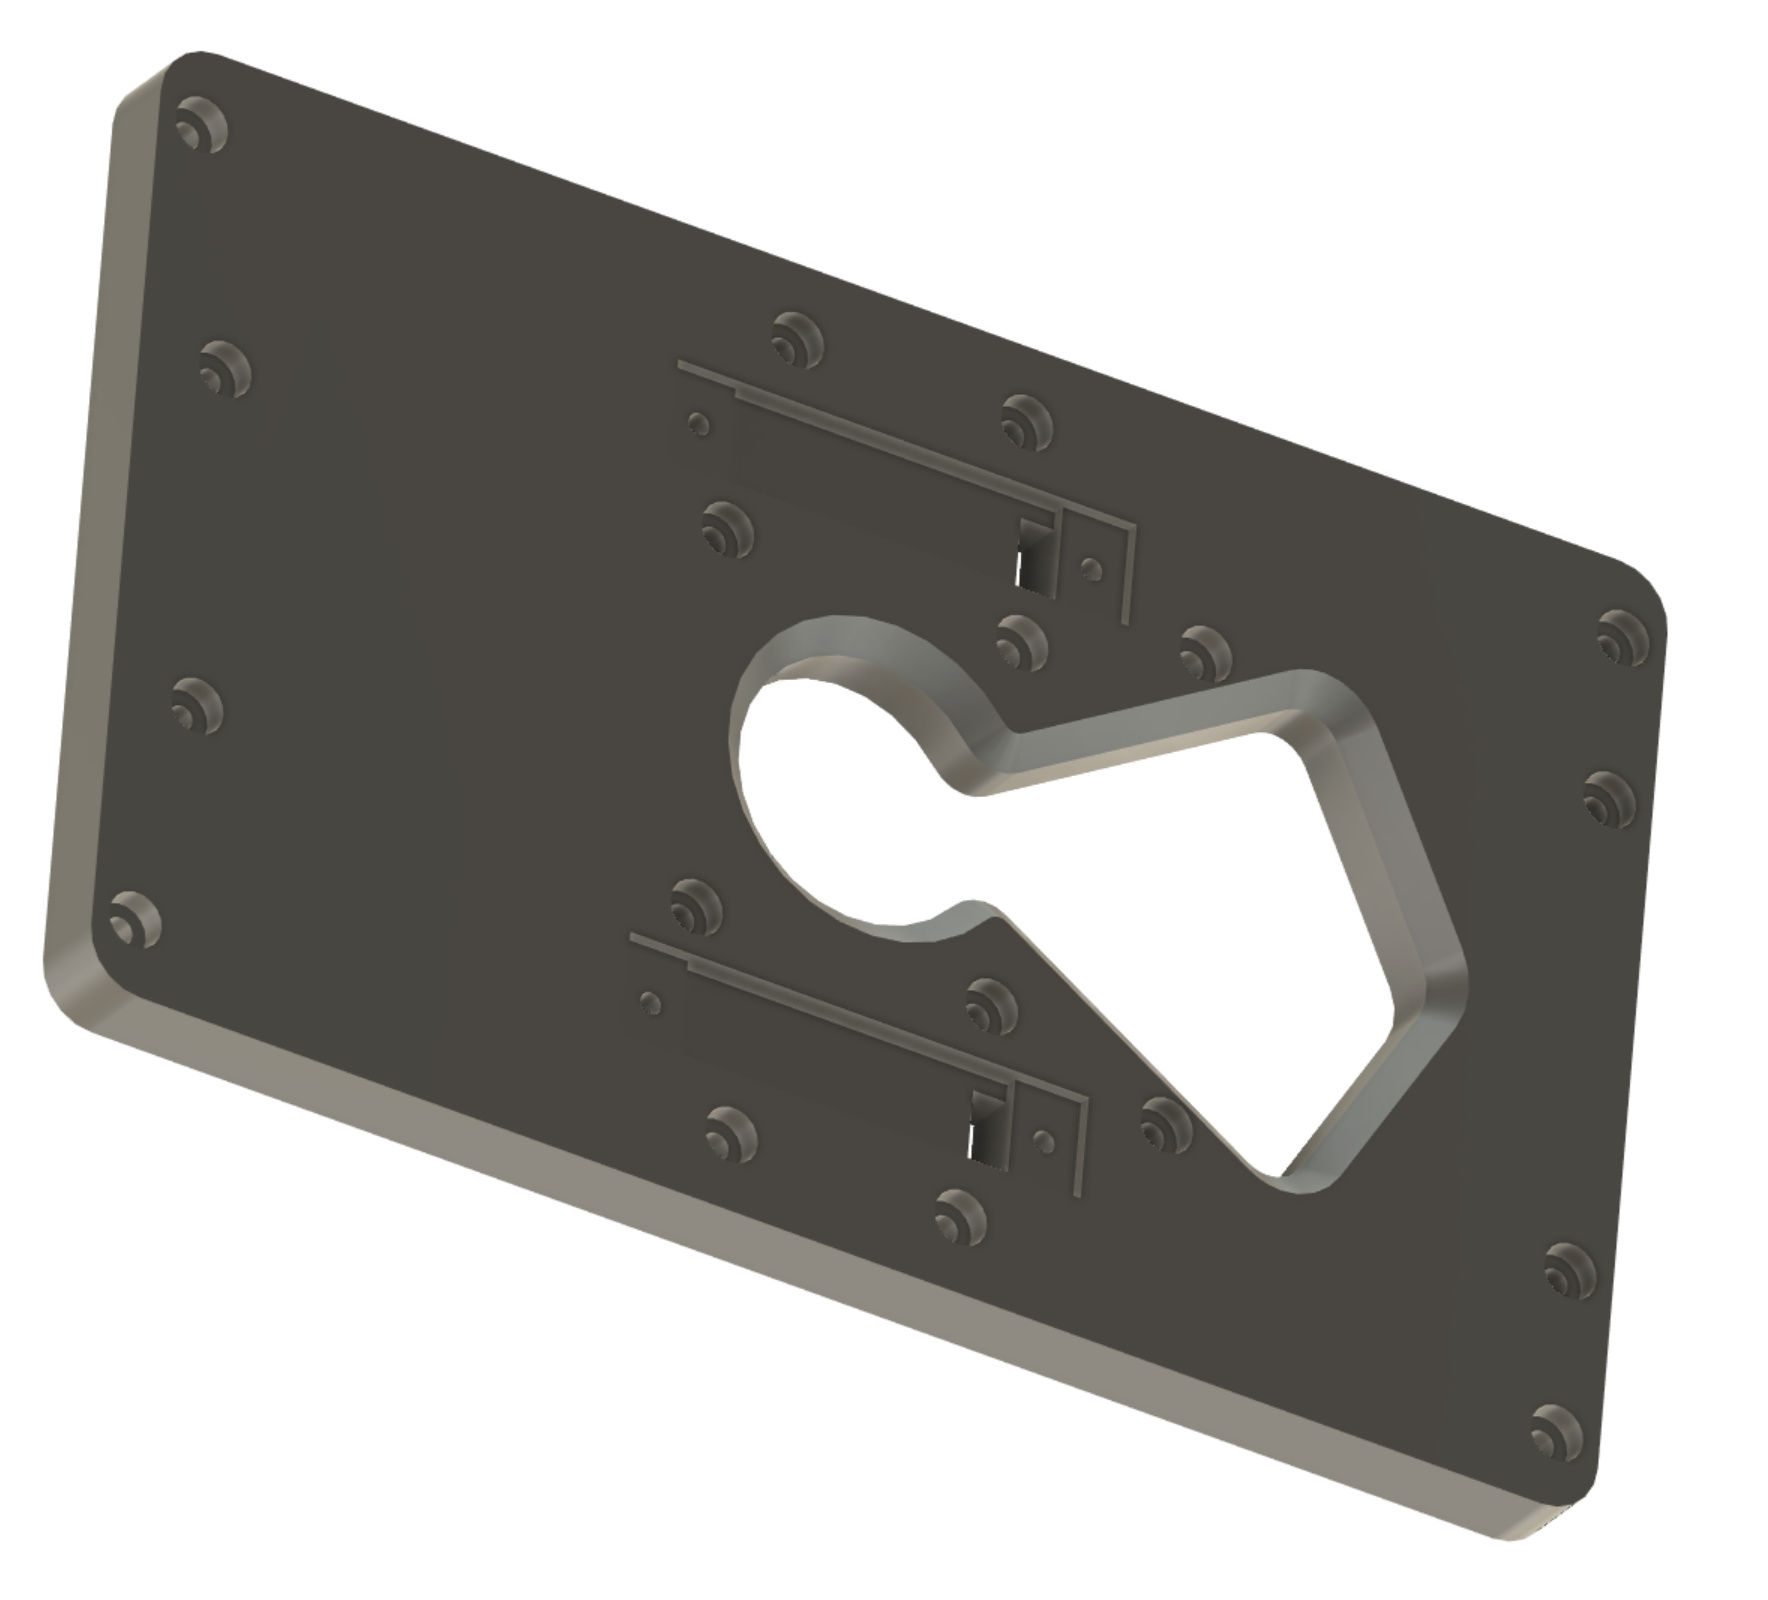
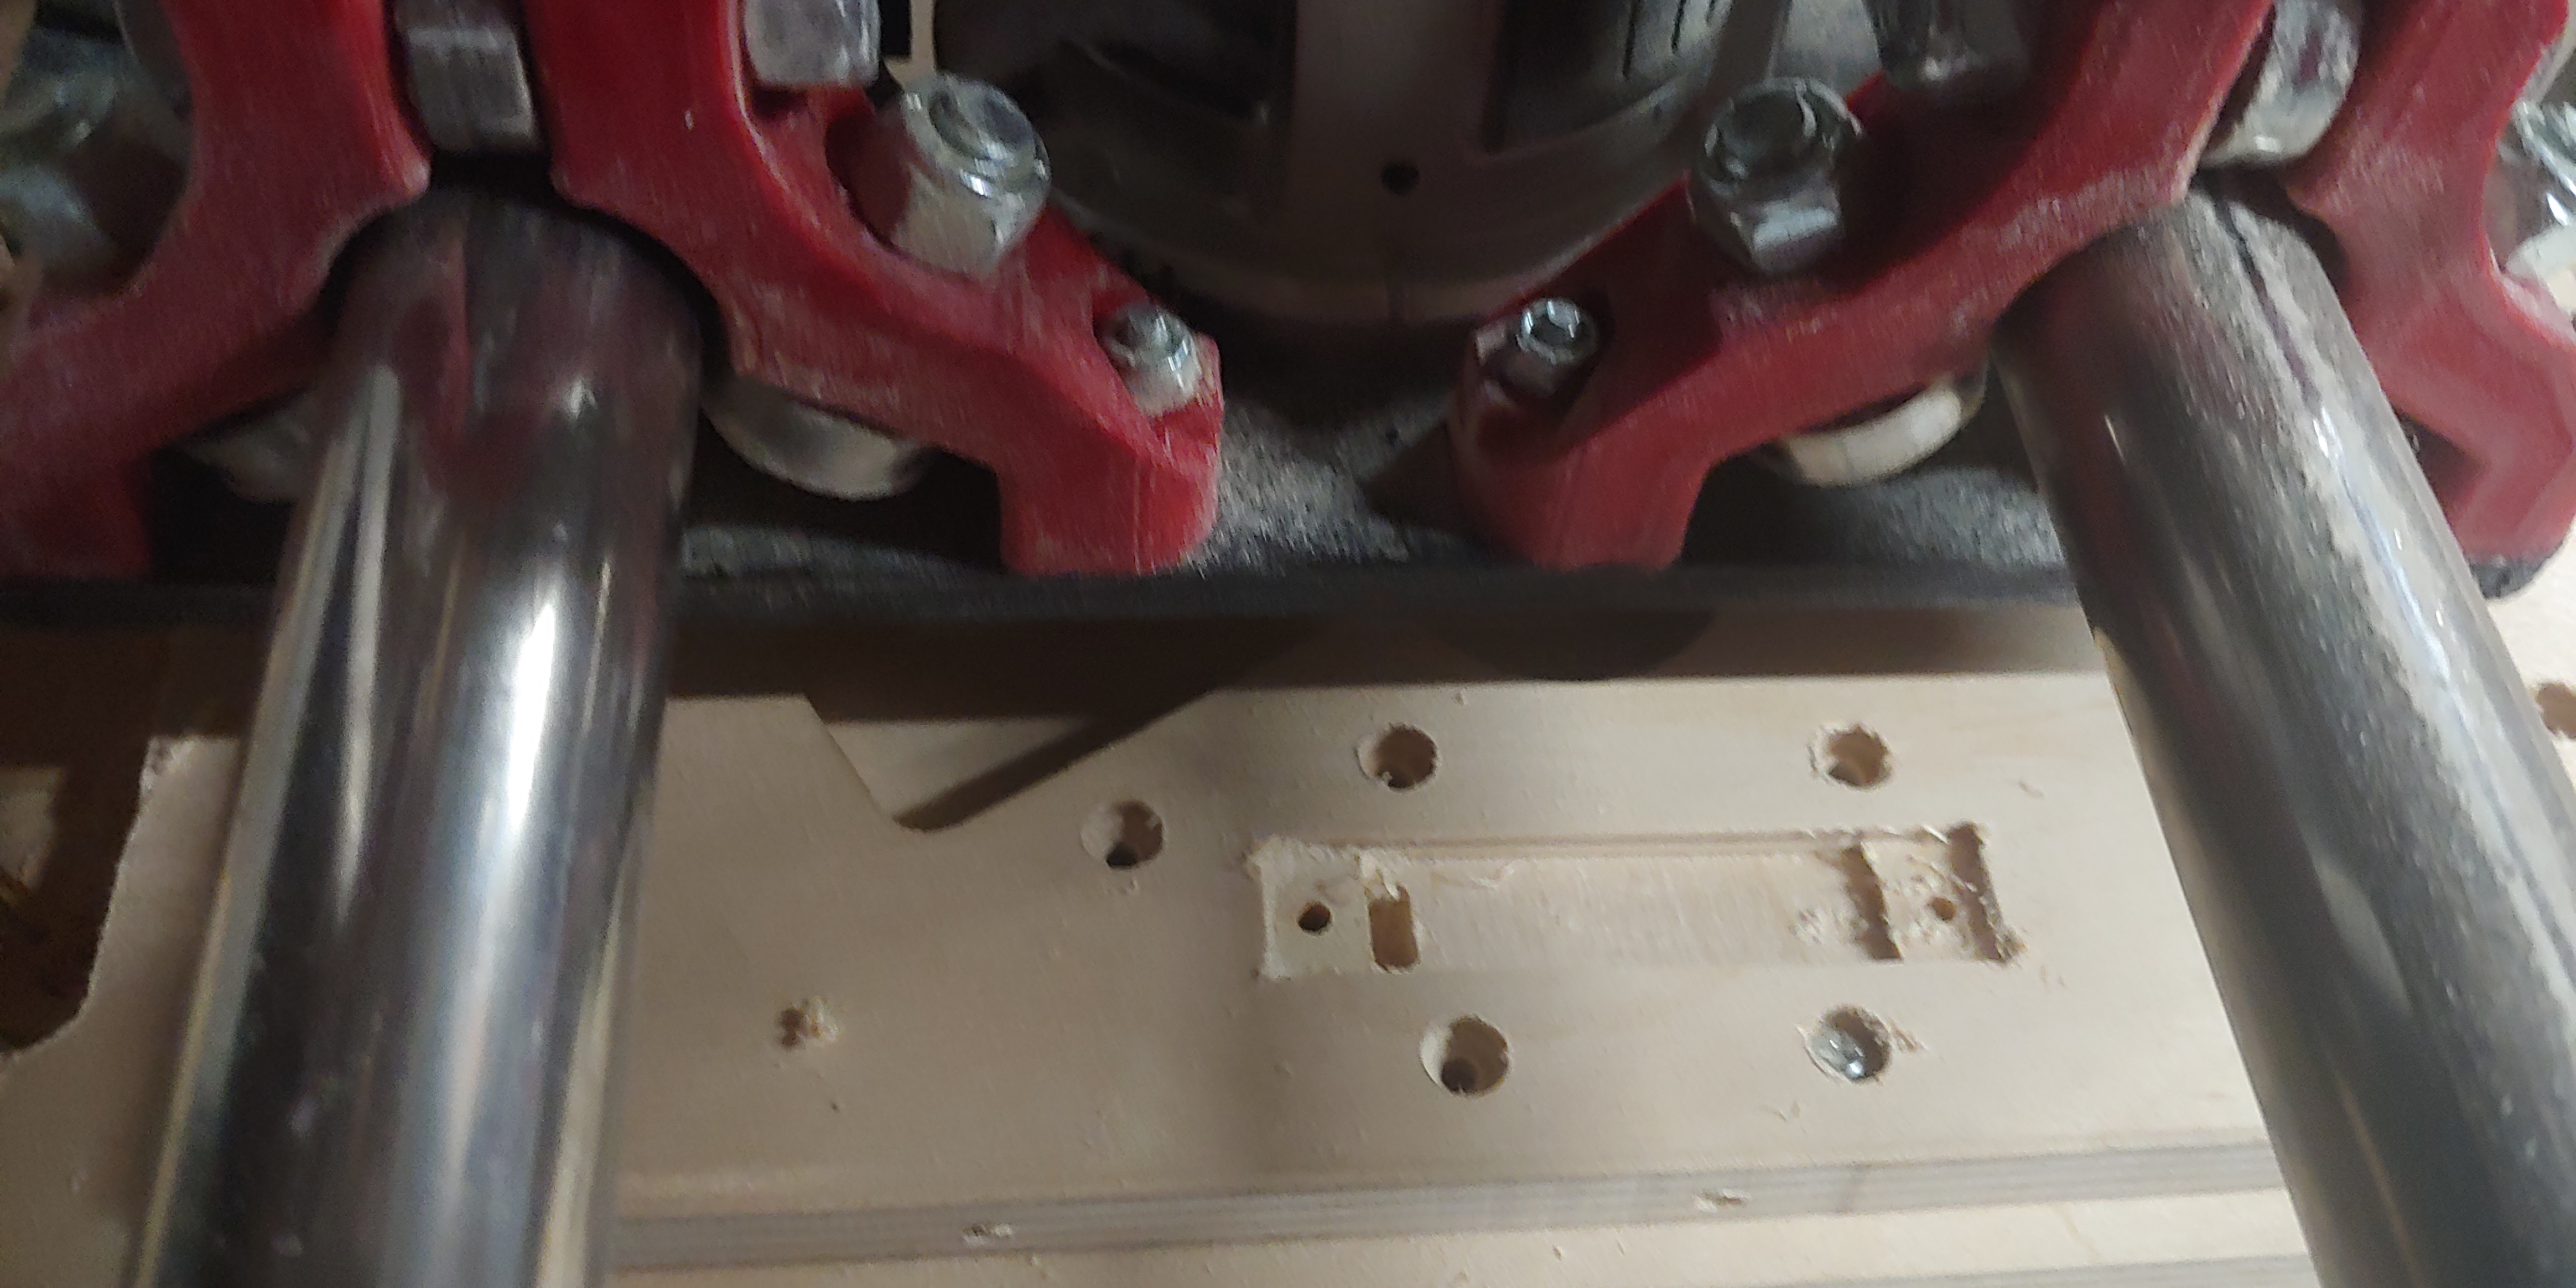
I ended up 3D printing the router plate for the gantry out of pla. I’ve been noticing a little bit of flex with it so I decided tonight to mill a new router plate out of 12 mm Baltic Birch plywood. Part of the issue that I have with the 3D printed gantry plate is the bolts for the axis rollers and for the router mount stick out of the bottom of the plate. I took the dxf file and added pockets for the bolt heads, they are 4 mm deep and allow the heads to socket flush into the bottom of the plate without losing strength or rigidity. Additionally I am finalizing my dust collection by adding a dust boot and brush to the plate. It won’t be quickly removable for accessing the bit for z-probe but I am working on a magnetic attachment to allow me to quickly stick the z-probe contact onto the router spindle shaft through the front port of the router mount.
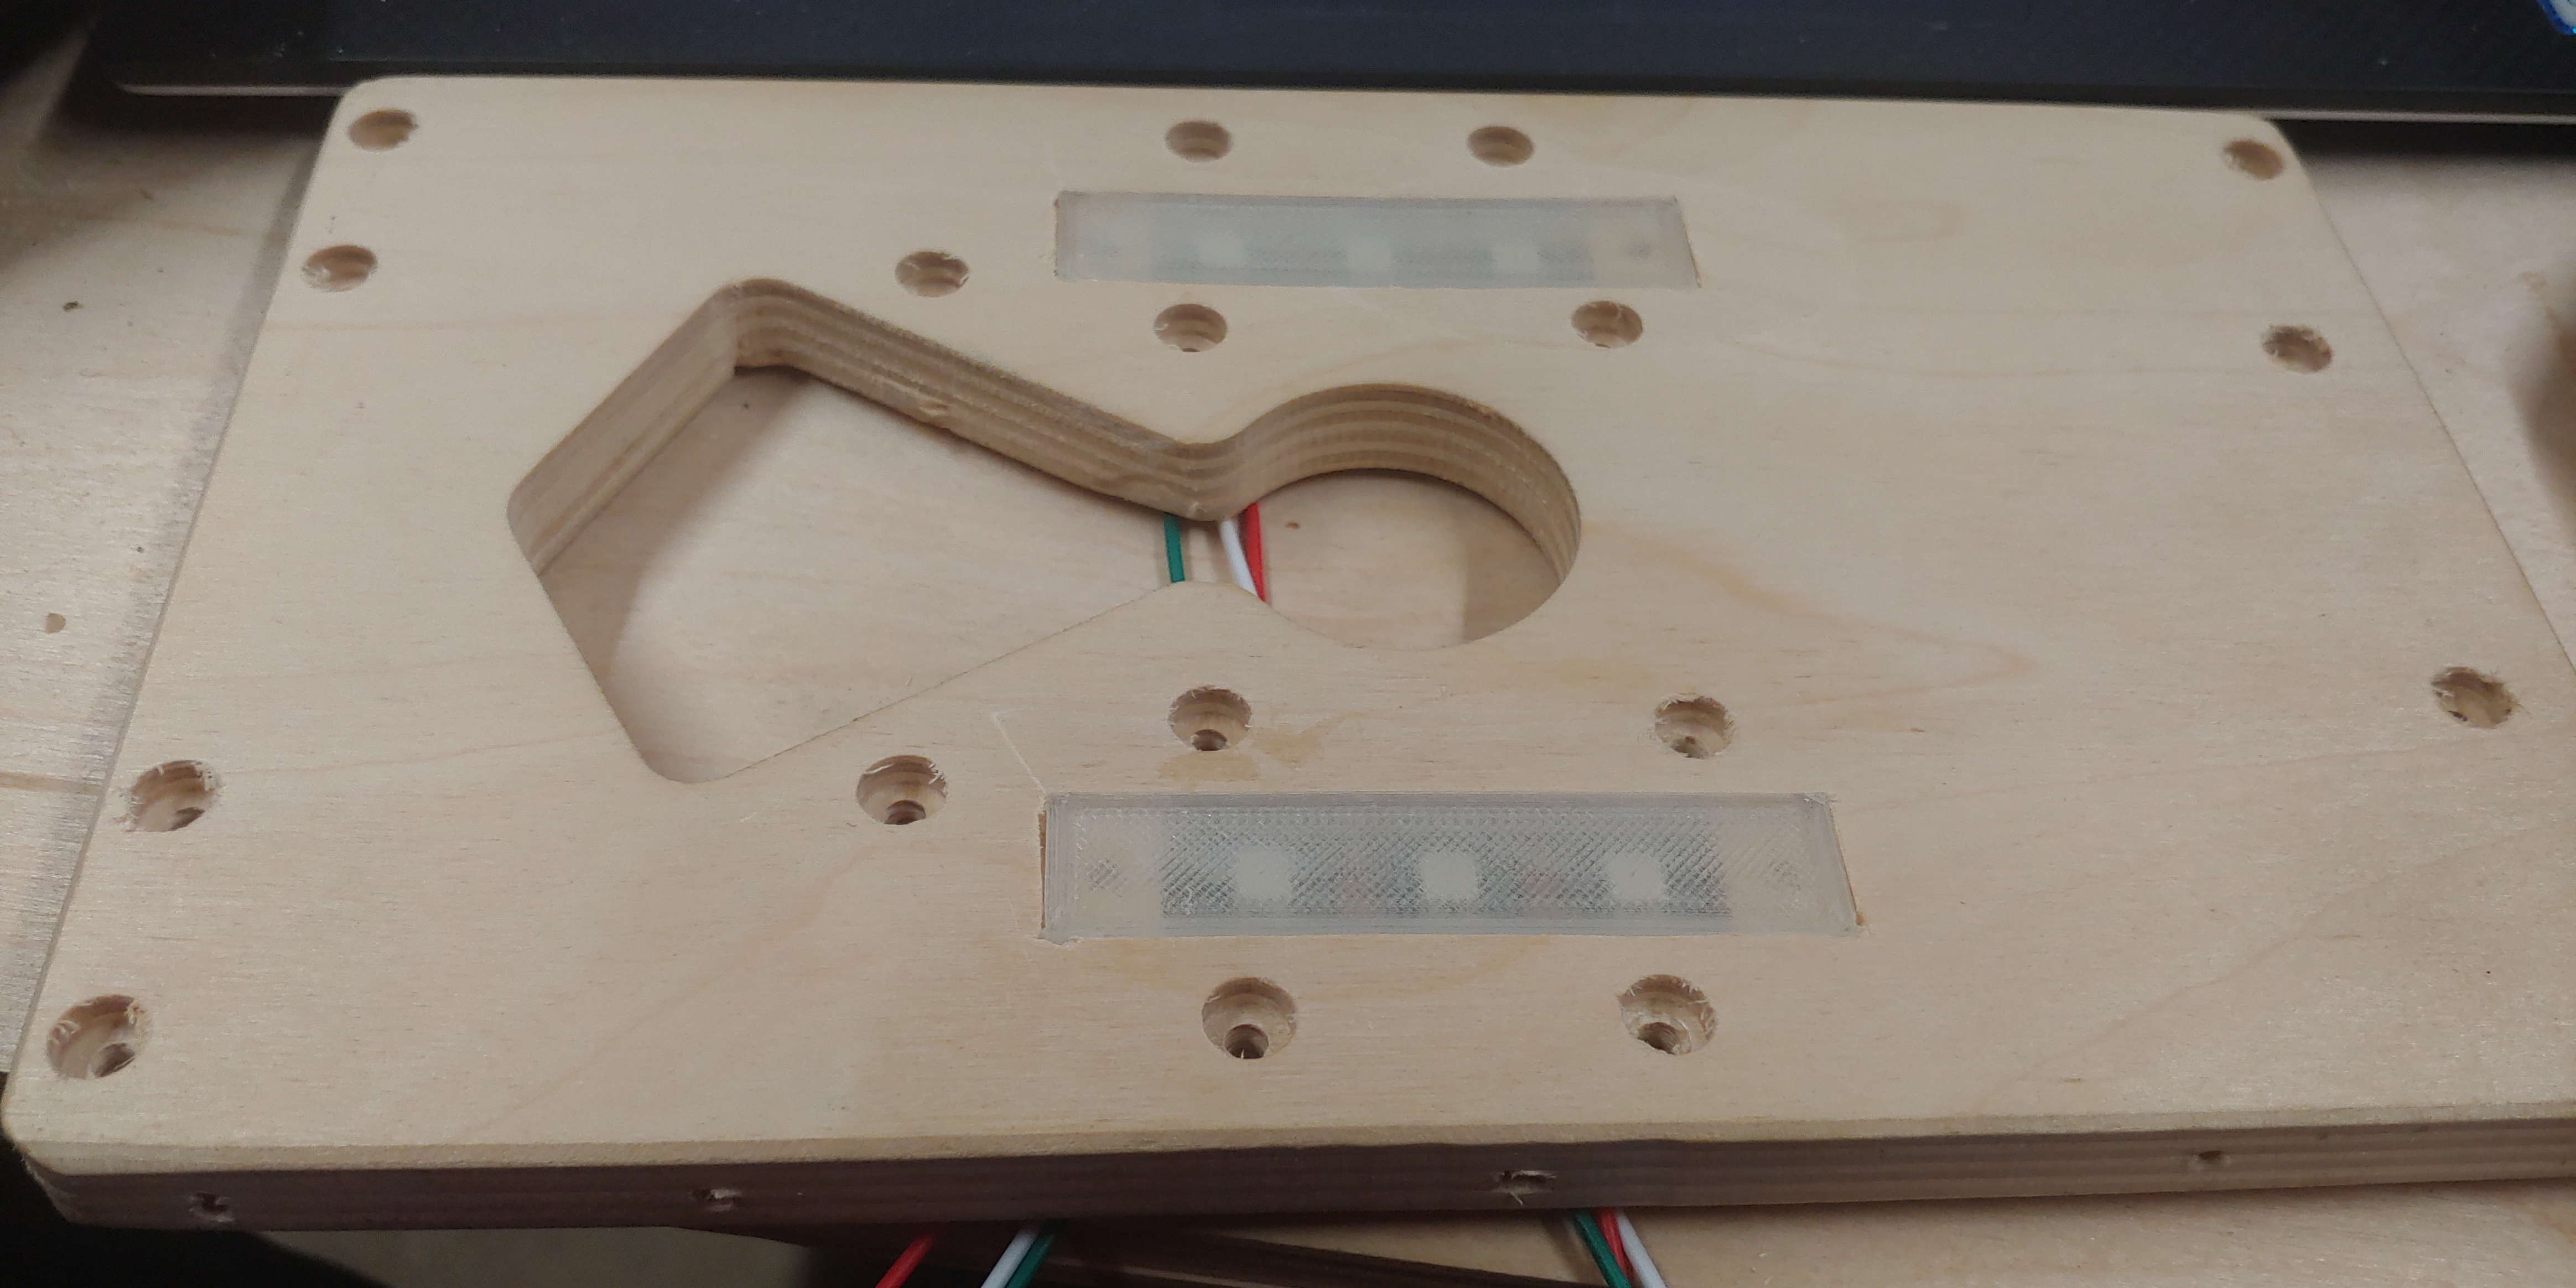
I posted this in my RGB light thread, but felt it should go in the build thread as well.
I pocketed the X gantry plate with two slots to fit some LED strip into. As my dust shoe is going to block my view of the router bit, I intend to mount one of the handful of cameras I have on the plate looking at the bit, and need some light underneath.
A couple of ws2812b LEDs, which is what I currently have on hand, will fit the bill.
These will be mounted in the deepest part of the pocket (4mm), and two PLA covers printed in natural filament (no dyes) will be printed to fit into the 15x70mm slot to protect the LEDs and act as retainers. The shallow parts of the pockets are 2mm deep, so 2mm of PLA should be sufficient to retain the LEDs using a push pin design into the round pockets in the wood. I’ll be using PC9 on Extension port 1 of the SKR Pro v1.2 to provide the necessary signaling to enable these.
My magnets also came in today. I ordered some neodymium disc magnets which have a countersunk hole in them so that I can put a small countersunk machine screw through and a ring terminal and nut on the backside. I have some conductive epoxy to protect the magnet from sharp impacts which can shatter it. This, combined with a Z-probe plate I am having machined for me will allow me to easily Z-probe for material height before a cut. The camera fixture, once I finish mocking it up, will allow me to see the end of the bit for any manual adjustments.
The DW611 has builtin lights (when it’s running). I’m guessing you’re not using the dewalt?
It’s a good idea though. I bought some RGB 12V LEDs that I plan on installing on my 3D printer head to give me some more light. They are around here somewhere…
I have the Makita, it was the only one in stock when I built this. My big router wouldn’t fit between the rails, or I would have tried to fit that one.
I have a 4 LED strip under the fan shroud on my CR-10s printer that light the nozzle and print surface. It’s great for monitoring prints remotely with a camera.
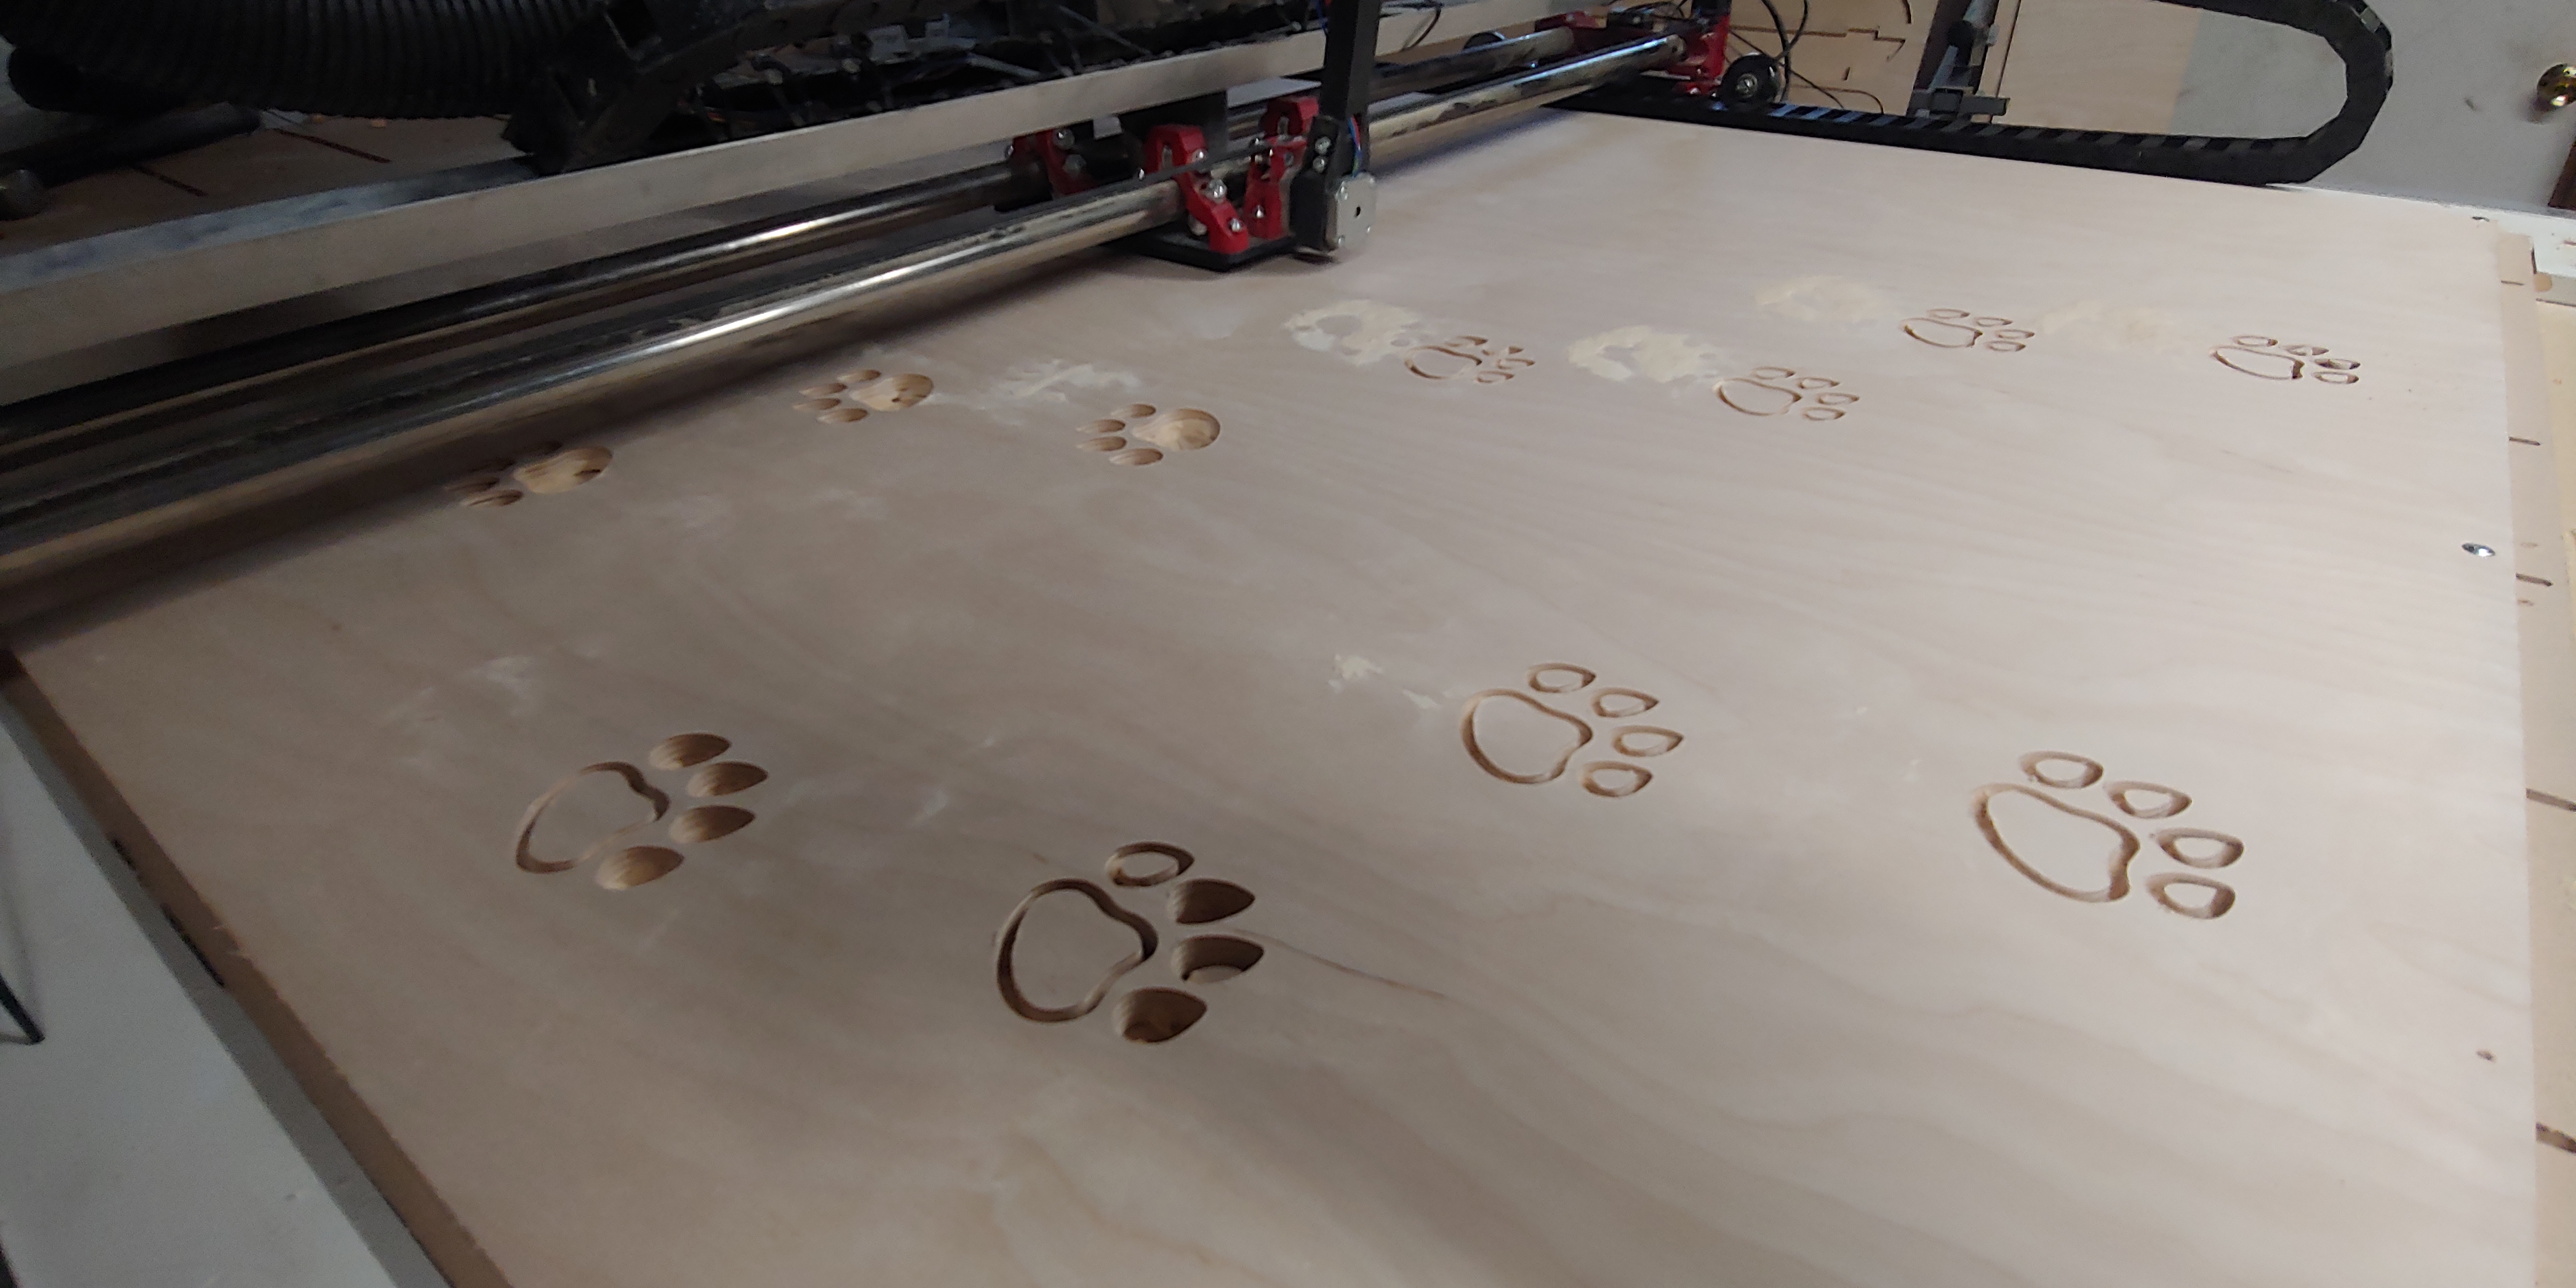
Compression bits only give you the clean edge if you cut deeper than the bottom upcut portion… Sigh
But damn does that look nice.
And routed. Ready to install.
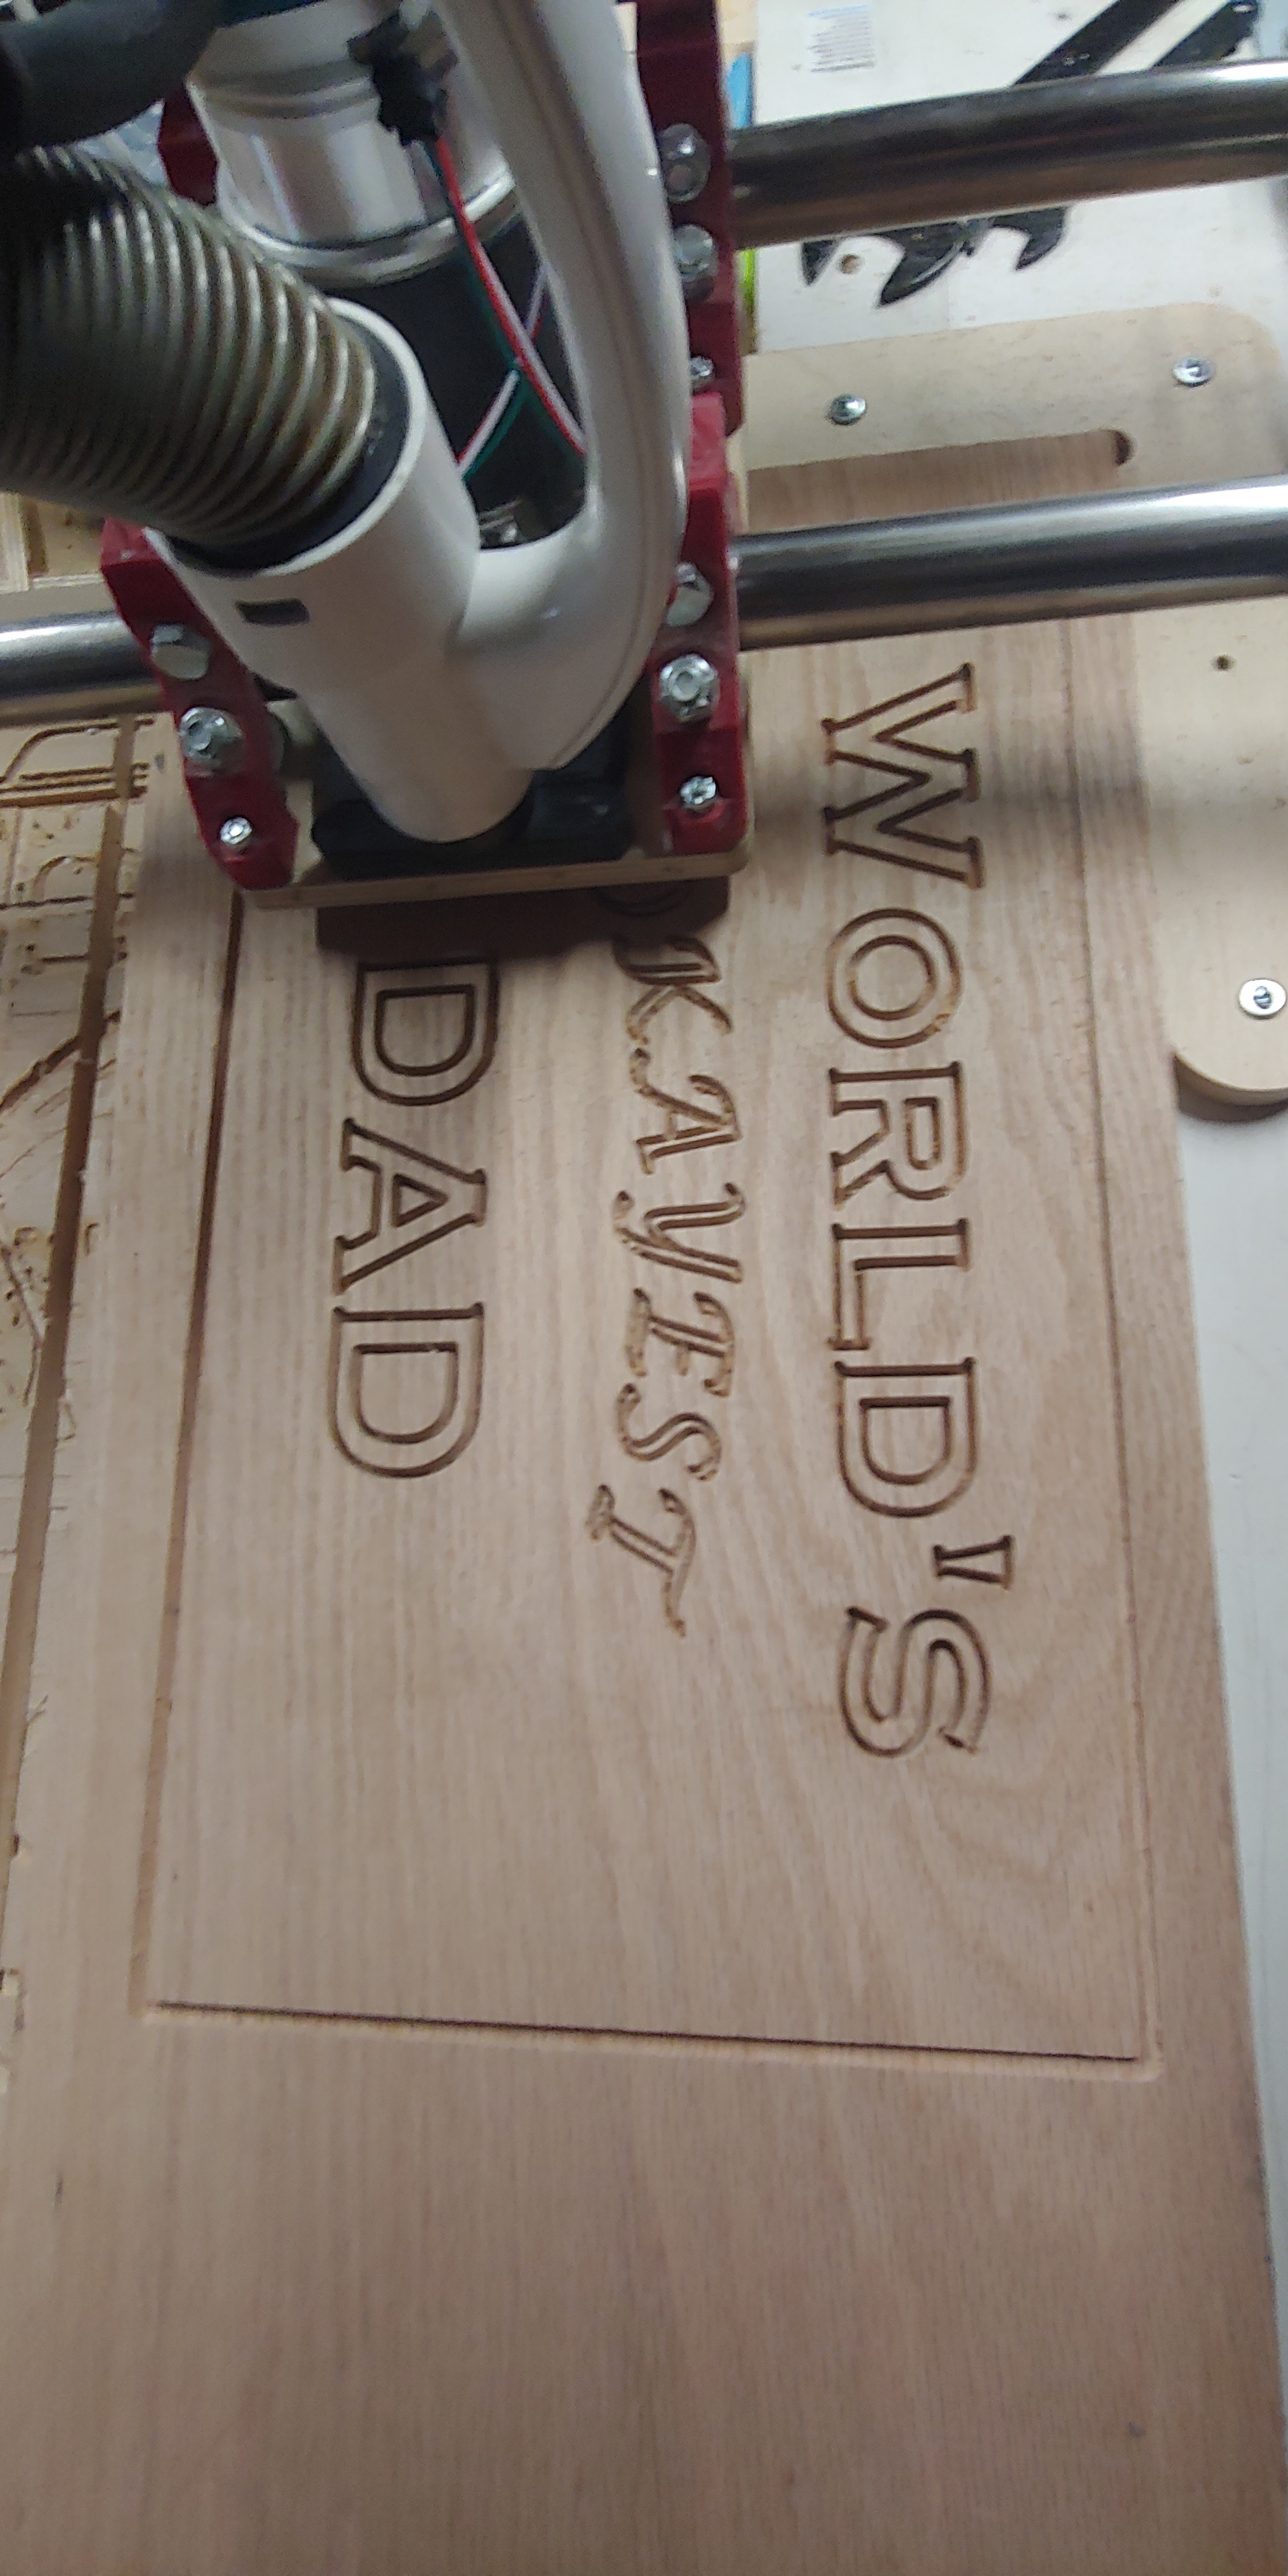
My father called me tonight from the MN/IA border to let me know he was coming into town… From Arizona…
Surprise visits are fun and all, but I wanted a little more time to get this one made.
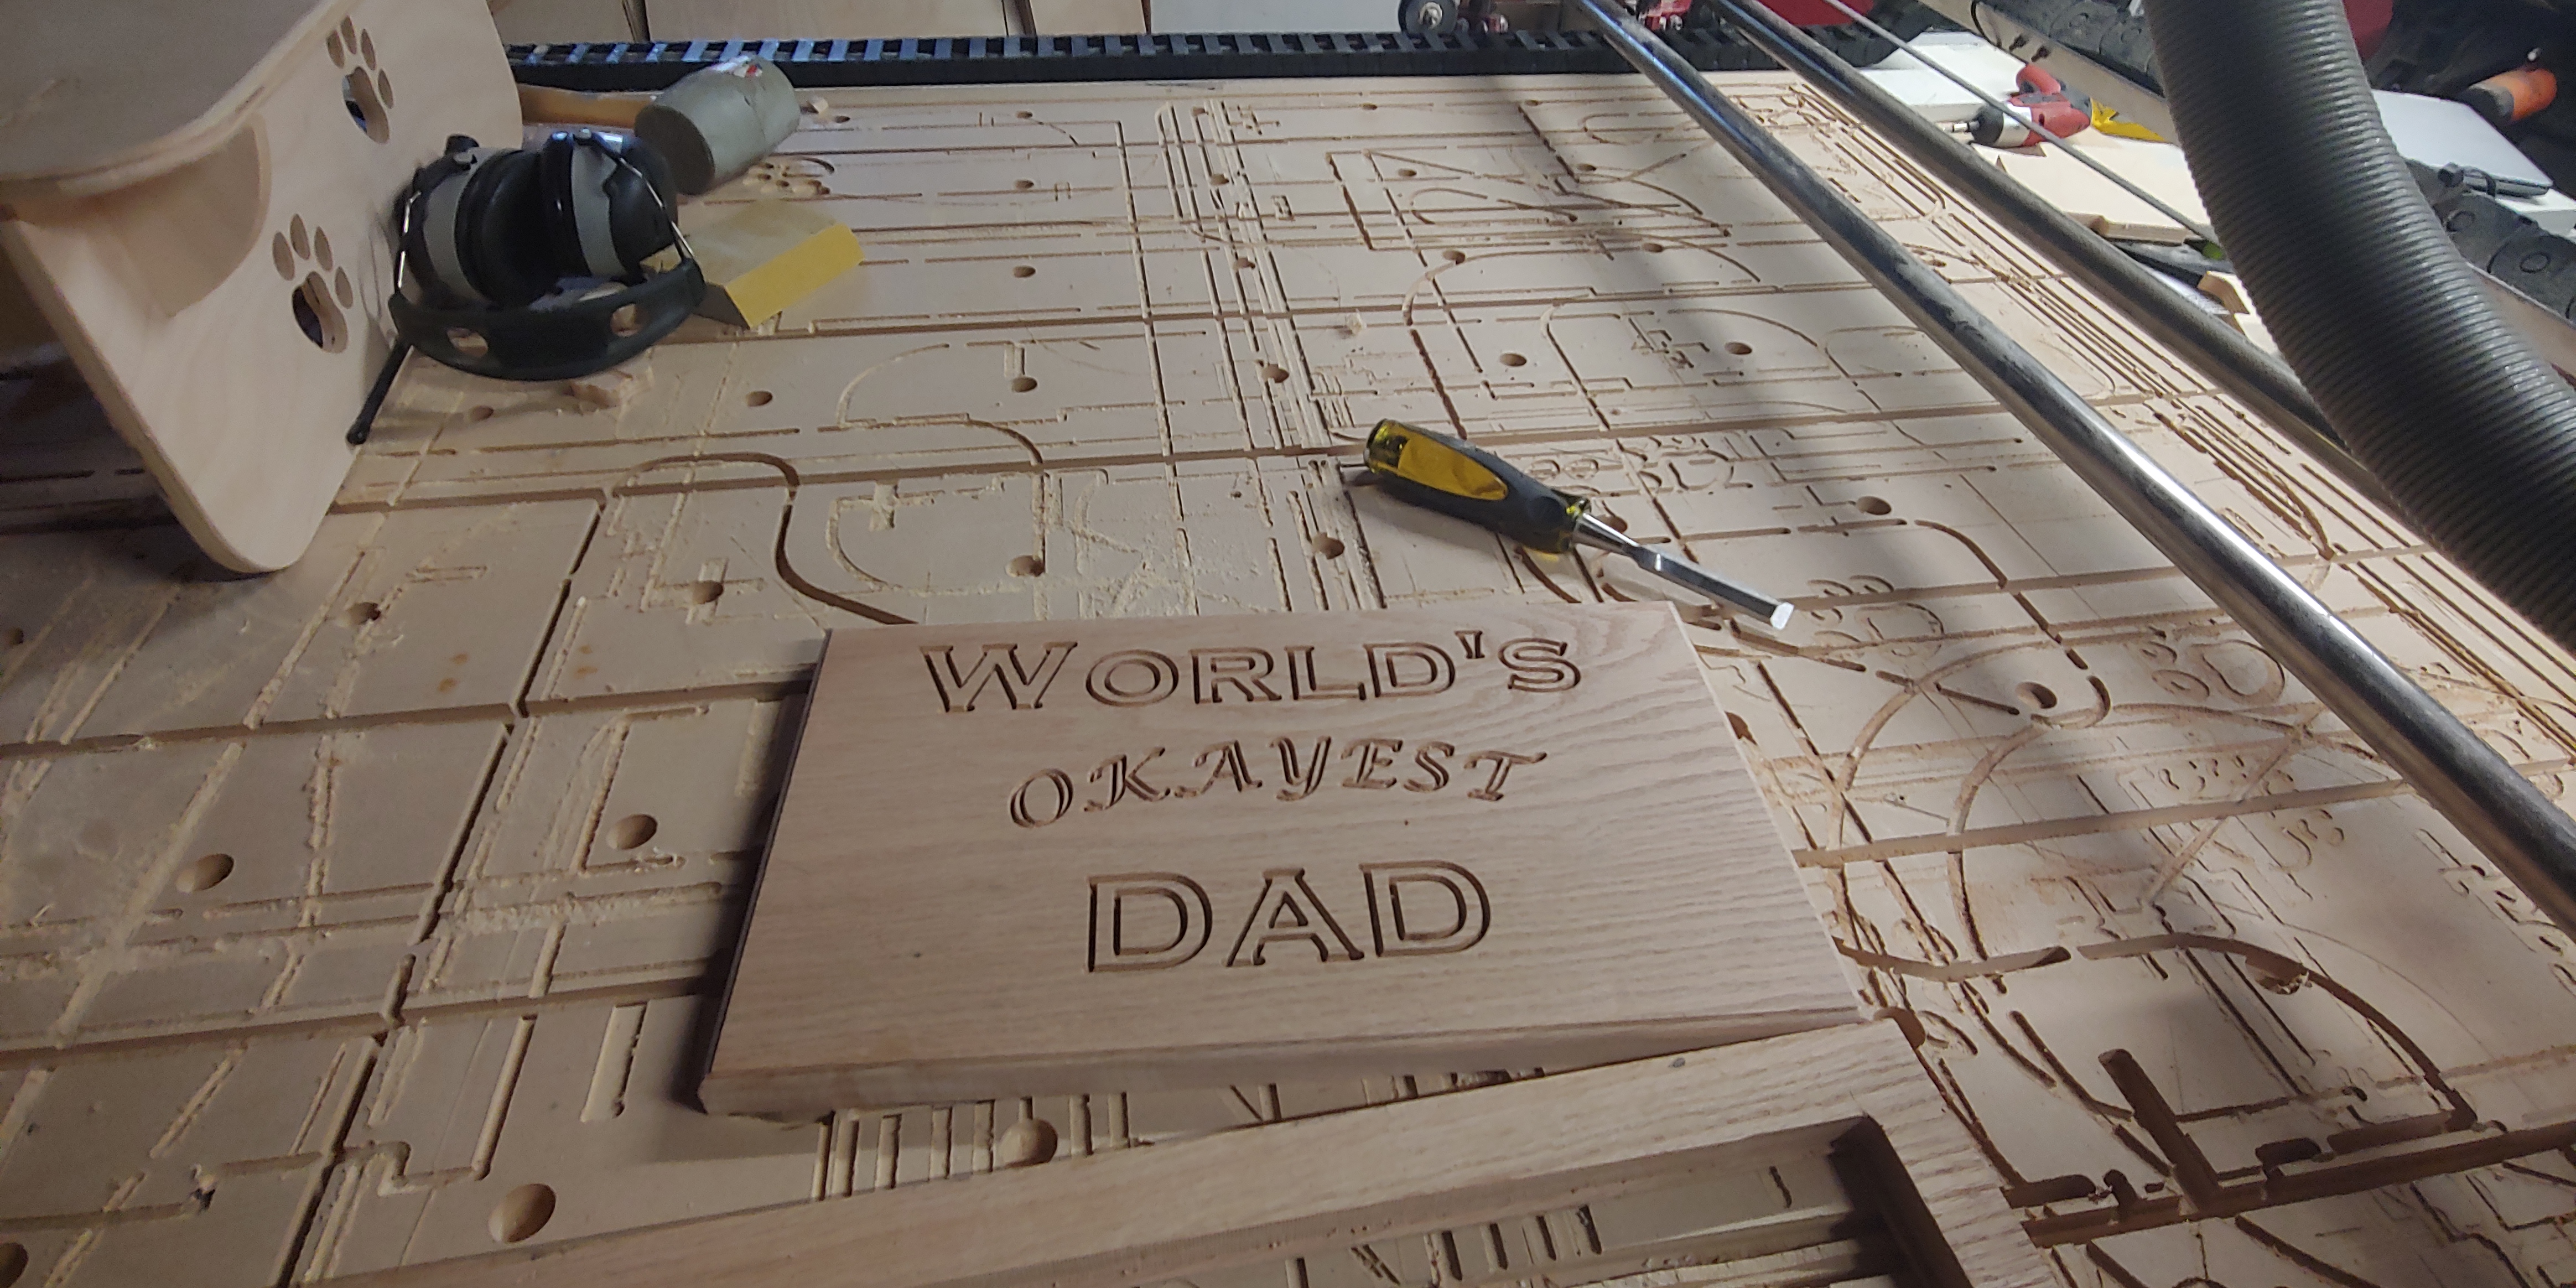
My first plaque/sign, in progress.
Nice looking vcarve he will love it 
Love the holdown did you have a post telling about them.
We always know when our young ones are up to something
That’s just my alignment bracket. It was my 90 degree cut test to ensure my LR is square, and then I used it as my corner sheet stop. Now when I load a sheet, it just butts into the corner this stop makes. The DXF is attached.Corner Bracket.zip (960 Bytes)
I’ll give it a go I like that
After attaching the 12mm gantry plate, I lost some height with several bits and had a few cases of friction related missed steps due to the plate resting on the material surface. Additionally, my dust shoe had to be removed as the bristles were too stiff to allow the gantry to lower enough for some bits to even contact the material.
Enter the Amana 1/4" to 1/8" tool shank extender/collet. It adds anywhere between 20 and 40mm of bit length to my router and allows me to lift the gantry just a little bit to allow me to do deep carves with short carving bits, cuts in thick material, and attach my dust shoe again while ensuring full range of motion. I did a carve in oak with it last night and had very good results with dimensional accuracy. Without measuring runout on it, my micrometer registered a 10mm wide pocket cut path as 10.06mm. I’ll take that as a win.
I also picked up a 24v power supply for my machine with the intent to power the steppers with it. Since I have the SKR Pro, I can run stepper power independent of board power, and can keep my 12v board and accessory power supply while bumping the drivers and steppers to 24.
Now I am working on getting some tool change G-code working. I want the machine to lift from a cut path when it needs to change the tool, stop the spindle, rehome, and then after I change the bit and hit the resume button on the LCD, automatically probe for the new tool length, turn the spindle back on, move back into position over the cut path and kick off the next pass. I’m slowly getting there.
The last piece I want to get working is a Probe button on the TFT. Hit the button and the machine will auto probe at the current location of the bit. Not having any sort of development skill, I’m struggling a bit with this one, as I can’t quite grasp what I need to do to make it happen.