Millmage Quick Start?

Has anyone put together a quick start/jump start guide to get an LR with JackPot up and running with Millmage over Wi-Fi?

As a relatively new participant in the CNC fun zone, the all-in-one aspect of Millmage is quite appealing to get off the ground quickly.

I’d be happy to assist in putting together such a guide if someone can help with the technical aspects.

2 Likes

There is alot of info here:

1 Like

From memory you just tell millmage it’s a grbl machine and give it the IP address, that’s how you do it in lightburn.

2 Likes

We have!
I’m unable to post links yet, but search YouTube for “Getting Started With MillMage”.

2 Likes
4 Likes

It looks interesting enough to buy the license once it is released. But i already have the vectric Aspire license. MM gotta to mature really fast (i dont doubt the lightburn team will make it happen)

I’ll take another look once it’s ‘released’. I’m pretty disappointed with it currently. As a satisfied lightburn user I had hopes. Not even high ones, but it’s a pass from me in its current form.

2 Likes

Well yes. But in maybe 1/2 to 1 year they may have some nice thing going on.
Maybe they can take a look at Vectric tool section (stock) you get a ton of profiles out of the box, and most important, the ability to import tool libraries from Amana, spetool etc.

Do you have specific reasons for being disappointed other than “it’s missing V-carving?” Saying “I’m disappointed” without anything specific is hard for me to act on.

1 Like

I was just messing with it and found a big involving the icons. Is there an official way to submit bug reports? I just emailed support.

Edit: Support emailed me back right away. Very responsive.

V carving is a big one. I get that variable height calculations is tricky.
The inlay tool - supporting V bit pocketing is fundemtnal imo.

The visual communication is also not what I expected.

In lightburn if you set a profile as fill it turns solid - I expected the same visual reference in millmage for pocketing.

For other operations I’m also used to seeing the width of the toolpath reflect the tool used. So I can see immediately if it’s a 1/4 or a 1/8 bit by the width of the line.

The preview keeps defaulting to the wood grain - even if you change it to something easier to see.

There was something else funky about selecting operations and layers but I’d need to check again.

Edit: I explain it in this post:

You can ignore the inlay bit -this was before I understood what I meant by inlay wasn’t what you meant by inlay.

2 Likes

@Aaron_Lightburn - Thanks for the link. I’ve been through that and it is great for covering all the MM basics.

My inquiry was more specific to using MM with FluidNC for the LR similar to what V1E put together for Estlcam.

I plan to work on such a guide once I have a bit more time and have everything working.

I think it would be awesome to have a step-by-step guide that takes a new LR user through all the steps to output the test crown file or V1E logo.

IMO, having a single app like MM to handle everything is much more intuitive for newer users like myself and a handy guide would ensure they get up and running with minimal ambiguity and frustration.

Keep up the great work on MM.

3 Likes

ive been using MM since RC3, here’s some of the things I’ve worked out

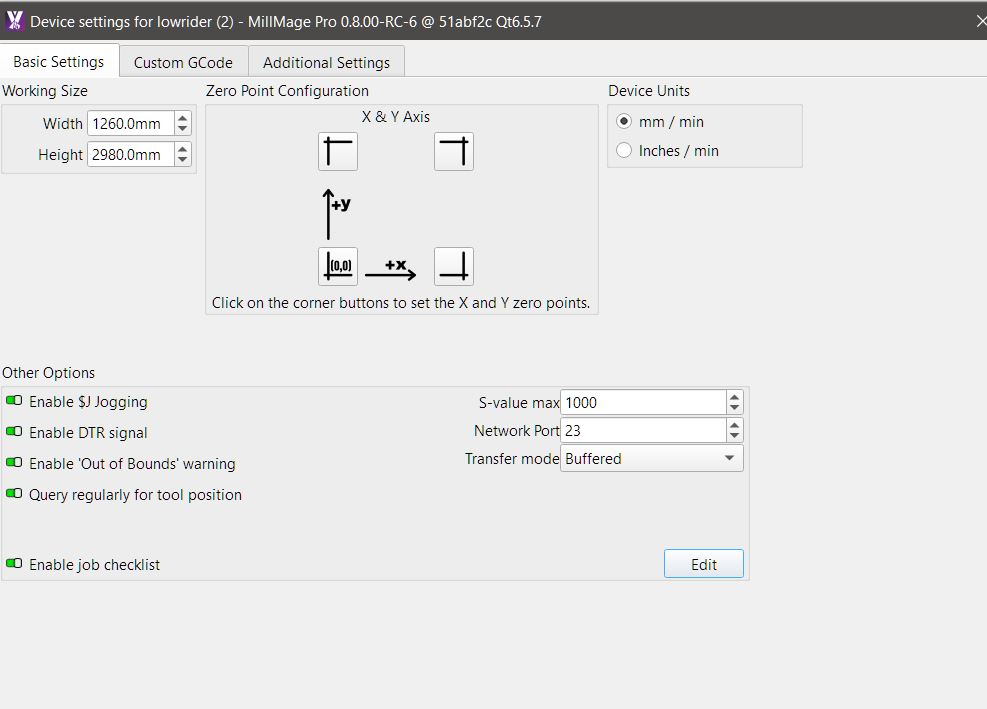
i find enable job checklist handy , you can edit it to what ever you want, it pops up, when you hit the start button saved my ass a few times.
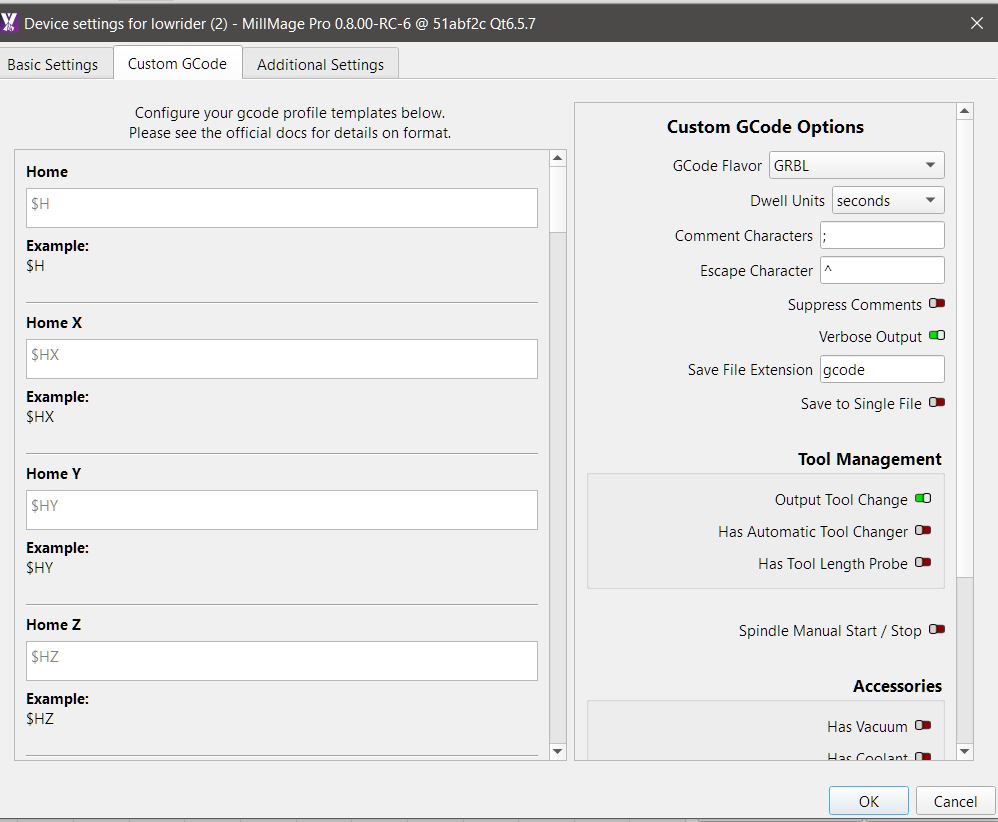
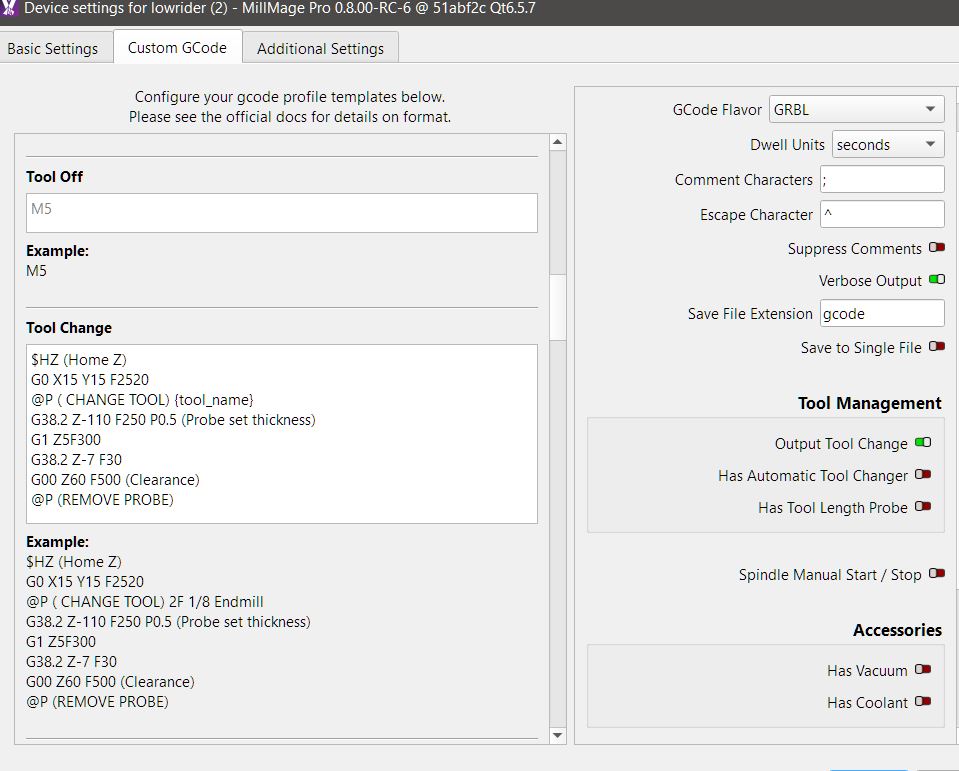
in custom G codes

on report ;

$report/interval=200

when tool change happens, pop up appears telling you which tool you have assigned to next path

(change tool) can be what ever you want ,

Remove probe - a pop up with continue or abort , not remove probe on screen.

User end script:

$HZ

G0 X600 Y300

or where ever you want it to position at end of job.

need the @ as it doesn’t understand the M0 pause command used for estlcam. Have tried few other custom codes ,they either fight each other and nothing works or it repeats its self mid job

eg i used operation end to start with instead of end script and every time it cut and object it would return to end script coordinates haha

when creating new operations , if you use same material/tools regularly once operation created , right click operation and save to operation library, next time you to need run similar job go to operation library, choose your saved operation and hit apply , it saves a lot of time

the one thing which im not sure why, but if i hit stop during job Z axis dives into work piece , it never did this in fluid Nc web ui

if i hit pause Z holds position , than i can hit stop after and it holds position, have created topic in MM forum regarding this

i don’t use MM probe wizard ,always just click ignore and it reads the code set in custom Gcodes

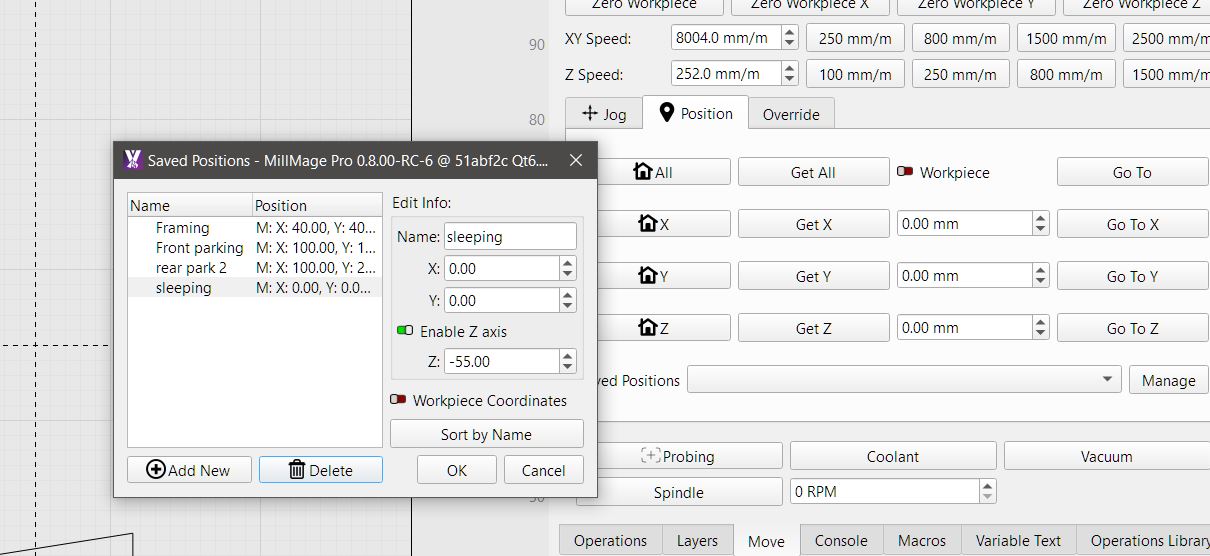
I find the saved positions really handy

once you set them up 2 clicks, and send it where you want

i have a 3m bed so takes ages if i click home or continuous jog, at the speed i have it travelling front parking is 100mm off end stops. i use my framing position all the time , don’t have manually lower z to bring it close to work piece to see where its going to frame . there is currently a bug re using center origin so don’t use that at present.

when using pocket operation it used to cut out line at your feed rate, they changed it for some reason outline now cuts at ramp or plunge feed :(, which is very daunting , they have had lots of comments about it and will be changing it back to your federate.

when setting rest pocket operation, make sure you check clearing tool diameter box, doesn’t always match what your pocket tool is and in preview areas are uncut.

2 Likes

i wondered that and asked the question a while back

if i remember, the reason being, the same layer colour can have various tool paths assigned to it where laser is only 1 and that’s why only visible in preview, took bit getting used to , im used to it now

The visual communication in lightburn is if everything is the same colour it’s got the same settings (fill/power/speed).

If you’re not doing the same in millmage then it makes the idea of layers irrelevant.

Estlcam visually communicates the difference between a slotting and pocketing toolpath very well you can see a pocket as ‘filled’ - and uses colours to delimit different toolpath depths.

No preview necessary.

1 Like