they really are working hard on it rc2 only came out like 3 days ago
1 Like
Yeah I havent noticed anything different but I dont suspect I will. I know they have people with all kinds of CNC’s in the beta testing things.
I don’t do a bunch of V-carve or inlay work. Most of my stuff is plywood so MillMage is great for me the way it is. I am hopeful that when they come out with the V carve stuff it will be better than what Estlcam has and then maybe I’ll finally pull the trigger on an inlay ![]()
For me its just the ease of moving things around and importing multiple things at once. Its just SO much easier than Estlcam.
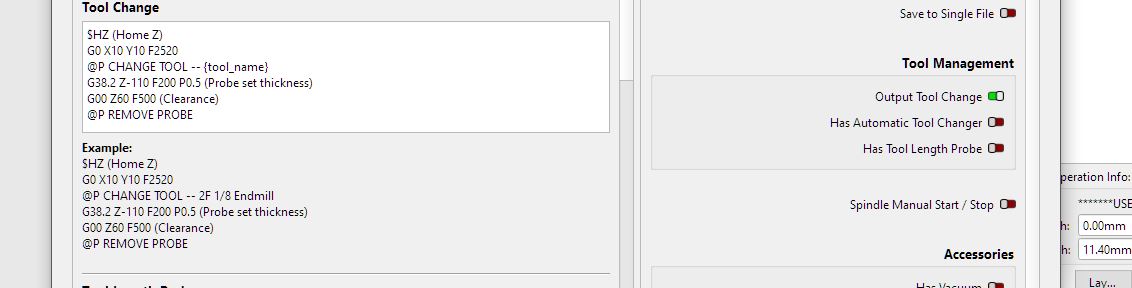
I do remember there being some issues (at least with how we use it) with tool changes early on. I have it turned off now because if you have it on, it does that right at the start of the job every time, even for single tool job. I wish there was a way to tell it to skip the first tool change or assume the correct tool is already there at the start. And that may be done already, I just haven’t tried it. For anything that needed a tool change I just go back to estlcam.
1 Like
The @ Commands are intercepted by MillMage. They never actually get to the board. Depending on the custom g-code flavor you are running there may have been a bug in RC2 that got you that we fixed in RC3.
3 Likes
thought that would be the case , but with my luck at the mo anything would be possible. haha
after i came across the custom gcode video and followed that.i havent had a problem with job freezing at tool change
Dang, Philipp!
I was just about ready to break down and go follow your instructions on how to do routed inlays… and now you tell me “it is a pain”?
You once chided me, back in my “easy inlays” thread that I should start routing my inlays and now that I’m playing with MPR&P and spindles… you’re abandoning ship? ![]()
Actually, I am starting to look at seeing what it takes to do routed inlays, as it appears that MPR&P is surprising me with how well it’s doing, even with a tiny 775 “spindle”. I know V-Carve is out there (I have a buddy who has it…) but I’m certainly not gonna spring for that kind of $$$ just to play around with it for a while. I am, however, starting to play with F-Engrave and this video gives me reason to hope it’s possible to do some nice inlays without great expense…

I’ve played with F-Engrave’s v-carving functionality a bit before but am only now looking into it for it’s inlay capabilties. It’s a bit tricky (terminology?) and I’m not getting a proper fit yet but I’m sure it’ll do what I want it to… so will keep plugging away at it. I’ve also not gotten the proper V-bits yet – they’re supposed to be here Friday – and have been fighting RaspberryPi/UGS disconnects-in-the-middle-of-a-job issues but it gives me a bit more time to figure out how to make F-Engrave do what I’m sure it can do.
I’ve always been impressed with your inlays and pencil boxes, Philipp… and really am serious (though cheap!) about seeing if I can mimic at least some the really neat inlay and carving work you’ve done with my modest new machine. I’m having fun learning some new skills. ![]()
BTW that is a fantastic video you shared a few posts back. I was watching it just last evening and it really explains things well. ![]()
EDIT: Actually it was this one I was watching last evening… super explanation.

– David
3 Likes
Dramatic exaggeration. I don’t do it by editing the files any more though, I just run the beginning of the three files, change the endmill, jump to the toolchange and run those files again from there. ![]()
Yeah, he made the same video again basically slightly different, but his explanation is top notch. ![]() His contraption to strap the inlays down is great as well, though I am happy with my book press.
His contraption to strap the inlays down is great as well, though I am happy with my book press. ![]()
3 Likes
I tested this again this evening and its still doing the same thing. I made a post on the Lightburn forum hoping I am just missing a setting or its something they can add a setting for in the future.
I agree that it would be nice to have the option. I haven’t tried it yet, but I was thinking of trying some fancy gcode with a variable to work around it. So, the starting gcode declares a variable like:
#<IsInitialTool>=1
Then the tool change gcode would be something like:
o100 if [#<IsInitialTool> EQ 1]
  M0 (MSG Attach probe)
  G38.2 Z-110 F200 P0.5 (probe down set thickness )
  G1 Z10 F900
  M0 (MSG Remove probe)
  M62 P1 (If used start spindle pin27 )
  #<IsInitialTool> = 0
o100 else
  M63 P1 (turn off pin 27)
  $HZ (Home Z)
  G0 X0 Y10 F2520
  M0 (MSG change tool, probe)
  G38.2 Z-110 F200 P0.5 (Probe set thickness)
  G00 Z10.0000 F500 (Clearance)
o100 endif
So, the first time, it sees the variable is 1 (it is the first tool), so it runs the starting gcode and changes the variable to 0 (not the first tool). For the next tool, it will do the tool change gcode instead.
I didn’t test this at all. I’m not sure if it will work. Something else I was messing with was making me question if M0 works properly inside if statements but there were other things in play there too.
1 Like
That is all way above my paygrade. So if you get a chance to test it and find it works, please let me know. Its super annoying to have to edit the gcode every time for that.
Now that I think about it. I guess I could just take the probe stuff out of my start gcode and let the tool change provide that every time. Still not how I think it should be. But is a work around.
1 Like
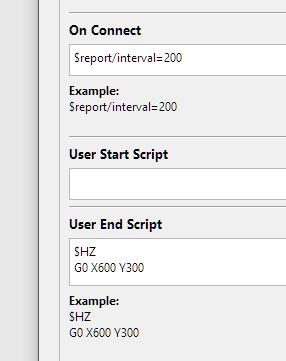
just looking at ur screen shoot
in MM under custom g codes did you write a code in user start script box
i just looked at one of the files ive cut with MM direct , just saved file to compare and its totally different
i had some issues initially due to filling in some of the custom gcode boxes where i thought the text would go
machine was doing weird things
theses are the only boxes ive put codes in now
You need to change M0 to @P in MM if running direct from MM or it freezes at tool change.
i havent actually saved a gcode in MM and sent it to fluidnc to run from SD card
so cant comment on what happens in that case
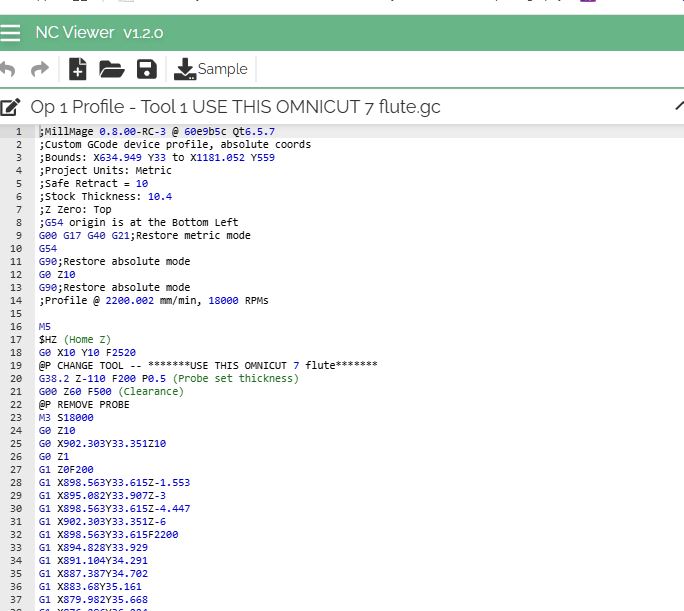
just spotted something else line 31 -40 look like the settings once you set up probe in MM
have you done the probe set up in MM ?
that is where your 2nd probe is coming in …
i did probe set up in MM and ended up with double probing
go to custom g code tab ,delete the probe text
if running job direct from MM, box will pop up on screen that u havent probed
just click ignore and than job should run sweet
ive done about 10 hrs cutting now direct to fluid nc via wifi with MM, but im still less than a novice so it looks fine to me and it works so im ok with it how its working
1 Like
just thought of something out the gate ,just in the way MM has been running with some of the earlier custom codes i had copied from estlcam and boxes they were in
re tool change codes i wonder if :
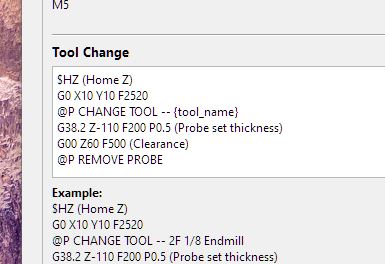
HZ (Home Z)
G0 X10 Y10 F2520
@P CHANGE TOOL – USE THIS OMNICUT 7 flute
G38.2 Z-110 F200 P0.5 (Probe set thickness)
G00 Z60 F500 (Clearance)
@P REMOVE PROBE
needs to be split apart some text in tool change box
@P CHANGE TOOL – USE THIS OMNICUT 7 flute
@P REMOVE PROBE
and some in the tool length probe box
HZ (Home Z)
G0 X10 Y10 F2520
G38.2 Z-110 F200 P0.5 (Probe set thickness)
G00 Z60 F500 (Clearance)
and see how it spits it out when saved as gcode
ill have play with them tomorrow when at machine and see what happens with a live test
1 Like
I do not run the code from MM. I export and run from SD card. My computer isn’t close enough to my machine to want to run it straight from MM. I prefer to run it from the SD card and control with my pendant.
Right now I have the custom Gcode set up the same way we do in Estlcam. That is one of the reasons I made the post on the lightburn form. Its possible I have things in the wrong spot. I don’t have anything in the probe section. Only the user start, user end and tool change
1 Like
yeah i thought u said in earlier comment you were sending to sd card
I assumed at start that commands would go in user start box also , but that caused me issues ,so deleted them,
did my gcode screenshot look more like what your expecting yours to look like
as said i’m below a novice when it comes to commands etc
i spent about 2 hrs , swapping code’s around in the custom gcode boxes and doing air runs until i got it to run in the sequence that looked the same visually at the cnc (not the g code file) as when i was using the webui for fluid nc
less seems to be more in the custom code boxes .its like some of the customs are not overriding the defaults in MM and double ups occur or even conflicts and freezing commands
as in line 11 and 13 of my screenshot G90 runs twice, for the life of me cant find where why or how its there twice, takes like 4 sec to run it twice ,so i just deal with it
just passing on what’s working for me and hopefully you can dissect it and help you
1 Like
I’m not much over a novice if even that ![]()
Mine runs perfect if I have export tool change turned off. With it on, I always get that top tool change gcode inserted. I am about to go run this code now with the top code deleted and a tool change later in the code so we will see how it works.
I am thinking about giving the way you are running it a try, but need to move some things around so I am closer to it before I pull the trigger.
try deleting the user start code and leave tool change in
how far away is cnc from computer , i was dropping connection or not even getting connection with brand new fluid nc with computer 1 foot way from board, i went and bought a tp link archer tx20u plus external Wi-Fi adapter havent had an issue since with connection , my laptops 6 m away my my lowrider now
1 Like
I cant do that right now. Well not without being a pain. The start gcode is what sets the zero for X and Y. Its easier for me to just delete the extra tool change gcode for right now lol
I have a mesh node for my WIFI in the garage so I don’t have any issues dropping signal. My thing is I want to be right by the machine running it, and the only computer in the garage is on the other side by the primo. So I am looking at other things to have something much closer to the LR4 then I will feel better about it. For now I just adjust the gcode and upload it from the webui from my office computer, then control the LR4 from the pendant.
1 Like
You know if you put klipper on it, you could just use your phone after uploading the gcode. I’ve asked about putting an “upload gcode to klipper” just like orcaslicer has, but if it even made it on the list, it is way down the list.
1 Like
With Fluid I can do that already. ![]()
Also no klipper on a jackpot
And I hate dealing with the tiny phone screen lol.
Jackpot and millmage would be a better combination anyway. You need a kindle tablet? I have a 7" I can send you.
1 Like
I appreciate it, but I have an amazon tablet that I don’t even use anymore since building the pendant. This is more about me wanting to use actual MM functions than needing a way to run the LR4
3 Likes