Matt's MP3DP Repeat Build

don’t think so.

Hmmmmm, lemme think about it.

“Should” be a pretty easy conversion. Mp3dp doesn’t have many fancy options.

I don’t think I have ever showed my camera setup. Here is a camera arm I drew up to travel with the bed. Also has a light bar. Simple, gets the job done.


5 Likes

It looks so nice!

Screenshot 2023-03-21 110639
This assembly is reverse. The bed plate needs to be on the hard surface or the spring will flex as you add material. Spring goes on top.
Also it seems you are missing the slot in the bed support. Does your bed have much freedom of movement?

Oh interesting. I am not sure how I never noticed this before. I have never had issues with the bed movement/flexibility. It has plenty of movement per axis when keeping the other axes still. Seems fine. But I will switch it around and see if it gives it more movement.

I realized after I cut the plate that I did a hole instead of the slot, but I went with it anyway and it works perfectly fine. Realistically, the bed should never distort itself more than a few millimeters. When it rests on the bottom of the machine in the “off” position it should be pretty flat and then when you G34 it shouldn’t have much adjustment. So I have never come across a situation where the flexibility has hurt me.

No slots is fine, they are there for future non planer, if it happens. But the springs need to be on top for sure. Your print quality should go up a smidge, in the Z axis I would imagine…

Non planer would be awesome…

I will switch the springs around the next chance I get. I am going to do an acceleration test before and after switching the springs positions. Wouldn’t you think the ringing affects would decrease? I would think the bed being less bouncy would help with that. When it makes a rapid movement/acceleration I am sure the bed rocks a bit on the springs.

I doubt you would notice it close to the bed, I assume it amplifies as it gets further. With no slots though, you are better off than most.

1 Like

So I have switched the springs around to the top of the base. If I am being honest, I think it may have had more flexibility with the springs on the bottom, if not atleast the same. As far as vibrations go, I ran an acceleration test before and after switching the springs around and the ringing is pretty consistent between each. Looking very closely and being hypercritical, I’d say the ringing is slightly better with the springs on the bottom. I think the springs act as a dampener for the bed and reduce the vibrations that the frame experiences. I’m going to keep it the way it was designed though, with the springs on top. Just wanted to provide my findings.

3 Likes

Yeah without the slots you are pretty rigidly tied to the Z posts. With slots the table is a little less coupled. Just know now with a giant print your bed will not compress any springs, that is the part I am most concerned with.

1 Like

Slots would allow it to pivot more. On the railcore, we don’t use springs at all, just some rubber faucet washers.

1 Like

Ive been considering doing something like this. Since I don’t see going.non-planar any time soon, not having that freedom of movement isn’t a problem

You need a little, keeps things from breaking.

Hello @MattMed! Thank you for sharing your MP3DP v3 and v4 build journeys.

Looks like you have 200 x 200 x 200 usable area? Curious what bed material and bed heater you’re using, happy with your setup? Cheers!

I am quite happy with my build, yes! Still working through a few issues that I have come across recently, but I have plenty of successful print hours logged on this machine.

Here is the heater I am using:

My machine is running 12V so this would not work if you are running 24V. You can find different build plates just like this though.

On top of the heated plate I have the Fula-Flex 2.0 Magnetic PEI Sheet for my actual print surface. I have been very happy with the PEI sheet so far.

1 Like

Well then…

I originally had a foam square sandwiched under my bed to help keep it warm but doing that made it so that there was no rigid way to bolt it down. I could tighten each corner of the bed separately and squish the foam more and more in each corner. So there was no way to guarantee that each corner was at the same height.

SO, I put these spacers on each M3 bolt that holds the bed down. This should guarantee that each corner is at the same height. Atleast I thought.

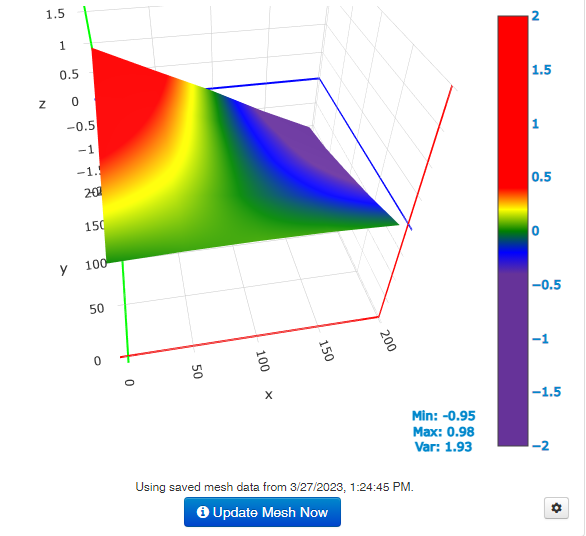
I also did the test with the bed at 70C.

The front corners seem perfect. But the back corners are definitely bad.

Maybe it is the umbilical cord? Think it could push and pull on the print head? Hard to believe it would be pushing and pulling that much.

You can’t rigidly mount a heated bed, they expand and contract. You need some sort of give somewhere or it will bulge up or down.

1 Like

Can’t tell how thick your Alu bed is, 1/8"? Seen bunch of builds using 1/4" thick, which seemed oversized to ignorant me (e.g. my ender 3 310x310 bed has 4mm glass, 3mm Alu), but maybe 1/4" helps/needed?

It is a 1/8" thick bed. I could see 1/4" keeping its shape better for sure.