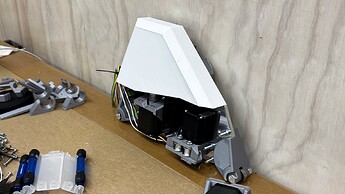
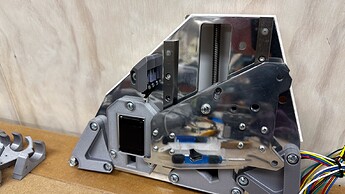
Me too! Perhaps if you were to get a block of 2" acrylic you could machine some clear covers? ![]()
Considered 3D printing and/or CNC carving some molds for resin? Or carbon fiber plates?
Your sweet cyber looking YZ plate looks like something you could injection mold, at scale?
How big is your build? My 4’ usable X is ~59" wide and weighs many freedom pounds. With bulk of the YZ plate carrying load, that transfers from the clips, guessing the clips need to clip well, and clip holders need to be beefy enough for the gantry weight and loads to resist vibrating/flexing when cutting, assuming you’re using a router and not something lower load like laser? Random thoughts, hope something helps. Looking forward to seeing how your build turns out.
I send you my address so you know where to ship them when you buy them ![]()
Be my guest! ![]() If they work as well as I imagine, they will certainly make the machine look worlds apart from it’s “skeleton” form.
If they work as well as I imagine, they will certainly make the machine look worlds apart from it’s “skeleton” form.
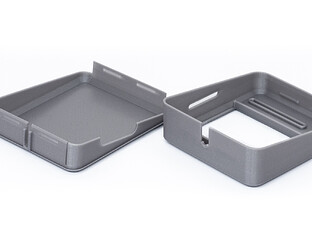
They are set up to print on a 200x250 bed and clip on an off in two parts. I think the clips are going to be OK to shorten for a twelve mm version if anyone’s interested.
The top half is tilted 5 or 6mm from perpendicular but in the right direction to add some draft to the interior for mould release.
I reckon a carbon fibre version (printed in PLA but on a textured bed to give the woven fibre look could be cool, but we’re getting ahead of ourselves here - let’s get the prototype working first!
If there’s any interest a version for 12mm plates will be easy enough to do - but as I said in the last sentence - let’s get this one done first!
I’d rather vacuum form them, lighter, cheaper, and a lot lot quicker!
You just need to print the master (and sand/polish it)
You could also use transparent sheet and just spray paint the inside, just like an RC car shell
I was going to suggest that too - hadn’t thought of spraying from the inside, which would be very cool, It would be easy enough to replace the clips with a couple of screw or clip fasteners - they’d be exposed from the outside, but that could be OK.
I’ve manually formed some simple shapes mucking around and it’s great fun - wanted to build a forming machine just to make a toolbox liner, but I couldn’t think of any other use for it.
Come to think of it I don’t really have a use for a cnc machine anyway, so I might put it on the list for the heck of it!
Vacuum formed a RC car body ~32yrs ago, lots of fun. But mine end up very fragile.
No idea what’s possible today. Naively speaking, could see DIY vacuum forming being useful for aesthetic non structural panels, but not for a rigid structurally strong part to support a gantry? However, if you reinforced/filled with resin/concrete/something-else (?), could maybe make that work…
Edit: So, thinking about it, the aesthetic skin panels clipped onto stock plates even, could functionally serve as dust and air ducting/venting shields. That’s in addition to adding to the aesthetic styling that makes for an attractive machine…
Dust, rust and kiddie fingers are top of the list, and while this one is open from the bottom and the aluminium plates will make terrific heat sinks, air ducting is certainly worth thinking about.
Lol. A vacuum forming machine was one of the usage cases I started looking at using my CNC for, (not that I couldn’t build one with the table saw) but never did get around to making.
Vacuum forming can make some very rigid parts from lessrigid material. A simple version, I made a (more) rigid cross member for my self designed 3D printer by puttung a 50° bend in a piece of 5mm acrylic. The acrylic itself would have been very floppy, but with the bend in it, it was more than rigid enough without requiring as much assembly.
So I could see vacuum forming the right material making some nice parts. Resin fill could make good solid parts, or if weight isn’t a factor, cement and steel wire.
Time for a bit of admin. I like to keep tabs on bits I’ve designed by cataloguing them on Printables, if anyone else finds them useful that’s nice of course, but a lot of this stuff is just so I can find it easily later.
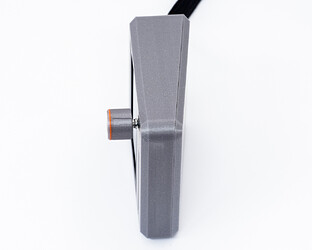
So here’s my reinvention of the Full Graphic Controller Case (link here) - there’s nothing wrong with the one I’ve been using on the LR2 ( @vicious1 original design), but I wanted to push my boundaries a bit and in a way test a few things for the fenders - tolerances for the clips for instance. This has 0.1mm clearances and works really well.
This is arguably more in keeping with (my) LR3 aesthetic, snaps closed beautifully with no other fixings, and can be opened again by pressing on the raised cable exit to release the snaps. None of that matters to anyone else but it was quite satisfying as a project in itself.
Oh! The Hilbert Curve top and bottom is a sneak peak at the finish I’m planning for the bottom of the fender. (Steve - @pony1023 it would look sensational with a few coats of clear over it!)
Right after a bit of graphite powder rubbed in. ![]()
Oooohh…this is the way!
I may be stating the obvious, but I don’t think Peter’s plan has the “fenders” supporting the gantry. Just decorative from what I can tell. ?
I’m pretty sure you’re correct Doug.
From what I understood it was to give it a bit of the bel-air fender vibe or look to the machine. To go with is the lowrider 3 logo, mimicking the bel-air badging.
And as I thought he stated, to keep the dust minimized, and keep tiny fingers out of the easily reached, pinching parts. (I think I read that) Maybe even the wiring away from access from prying small hands as well.
Or maybe I’ve just created these thoughts in my head, and I’m in left field.
Today, I’m not exactly sure which is more accurate.
https://www.hemmings.com/classifieds/listing/1957-chevrolet-bel-air-west-deptford-nj-2709065
Picture 62, is probably the best one to see the bel air badging by Chevy, and compare that to what a great job Peter did to mimic that, for his Low Rider 3 logo.
Body looks close to original, with major modifications underneath.
Well spotted and explained! I originally had a curved cover, which needed to be printed in a vertical position and there were all sorts of support avoidance issues. The XY is a terribly ill proportioned thing when it comes to making a neat cover and I have tried dozens of different concepts - had a couple that were close and it was touch and go whether to keep the rigid geometry of the “hip” or to run with a ‘Coke bottle’ style - I think the rigid form is closer to the rest of the LR styling though.
Perhaps Ryan should have the casting vote" ![]()
The Chev is certainly where the colour/styling inspiration is drawn from - perhaps it’s ending up closer to a '70’s Impala though! ![]()
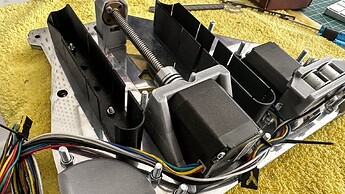
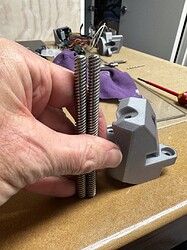
It’s the afternoon and I haven’t done a lot today but I’ve bolted in the prototype clips, which immediately feel way too soft. I’d underestimated how springy PETG is after working with PLA for so long, and I forgot to add a fillet at the bottom, so one of them has snapped off already and that was just installing it!
That’s why we make prototypes boys and girls! ![]()
And while I was at it I I cut down one of my LR2 lead screws to get two new ones of exactly the correct length.
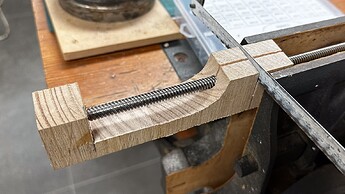
If you know how to cut screws accurately you can avert your gaze now while I go into tutorial mode, but if you don’t; - do this and you will never struggle to cut a screw of any length or size again.
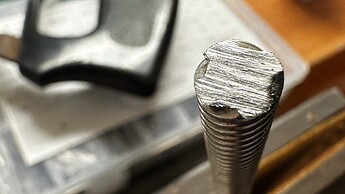
This is how you cut any sized screw to any length accurately, to identical lengths and without making a great jagged burr on the end. No need to thread nuts on, no need to file away the three threads that were marred when your saw (or Dremel) skipped starting the cut.
It’s worth taking just a few minutes to make a small jig every time. It’s amazing how quickly you can cut even hardened stainless steel with a blunt hacksaw when you are holding the screw securely and guiding your cut.
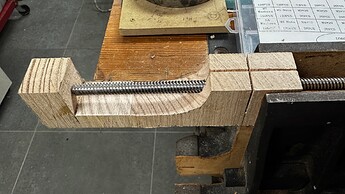
Grab any old scrap of wood, drill a hole in one end big enough to snugly hold the screw. Make two cuts, one through the hole along the axis of the screw so that the wood will clamp tight when it’s placed in a vice, and another at right angles to that one, to serve as your cutting guide.
For shorter length screws the jig is slightly different and I’ll photograph that when I’m up to cutting all the M5’s to length, but for now, make a cut exactly one desired length from the cut guide, and hog out the material to expose the stop so you can get the screw out later.
A bandsaw makes this really easy and it takes less than a minute to do, but I’ve been using a hacksaw for this since I was a kid. (Just make sure if you do that, that your father isn’t watching)
Now clamp it in the vice, and saw away.
You’ll find the cut is perfectly clean with no burr, just a slight “wire edge” which you can thread a nut straight over, although I prefer to clamp the screw in my drill and give it a light touch on a belt sander.
Voila! Two identical screws - on the left is my cut on the right the factory job for comparison.
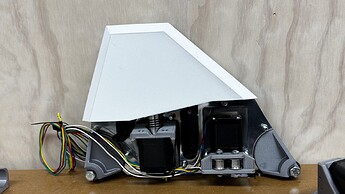
I’m calling them fenders because that distinguishes them from other covers that might bob up from time to time. I do apologise if my excitement is becoming quite palpable.
Hot off the press is the upper fender part.
First impressions -
- It fits like a glove
- It’s as rigid as I’d hoped (2mm wall thickness all round makes for a slow print though)
- The clips are not strong enough - I’ll increase the wall thickness to 2mm instead of 1.2 mm and hope I don’t have to increase the depth of the “catch” because I do worry about not getting it apart.
- Even though the clips aren’t strong enough for my taste, the precision of the fit makes everything rigid and it has quite a solid feel about it.
I’m pretty excited to see how the bottom is going to go - might see if I can get Royal assent to printing it overnight.
This is something that I ponder upon quite often. How do we get creative input and stimuli? I enjoy making things work, but what can I actually achieve with them? I plan to make a post on this question, just warning you ![]()
I think you just did! ![]()
Looking awesome!

