JJ's V5 Build

I should be using one of the positive connections on the heater port for the single wire right? I know how to attach a wire to the board, just was not sure on how to actually get the heater pin to trigger the relays.

I believe i have it all wired up correctly, so im thinking now i need to modify the config file to turn on the heater pin im using to trigger the relays.

Im using PD1-4 (+) for my trigger wire for the relays, how do i go about setting up this pin in marlin to trigger the relays at the right time?

I believe the pin triggers on the - side. I think those ports always have 24v +. Someone will hopefully correct me if I am wrong. I know for my Manta board the pinout shows VIN on the positive and the Pin number on the negative.

As far as Marlin configuration goes I will have to pass that along to someone else. I never was any good at working with it. Klipper is much easier for me LOL.

Set Pin State | Marlin Firmware You can use M42 to turn a pin on and off. Use it before homing and after your print.

Make sure to give the relay a moment to trigger by setting a slight dwell time.

If that doesn’t cover it, open a new thread and we can go into more depth there for your specific situation.

3 Likes

Sorry @Jonathjon for blowing up your thread with my issues :melting_face:

It’s all good!! No problem at all! I think he suggested a new thread so people will see what you are looking for and not see it as just another comment on a build thread they have already seen

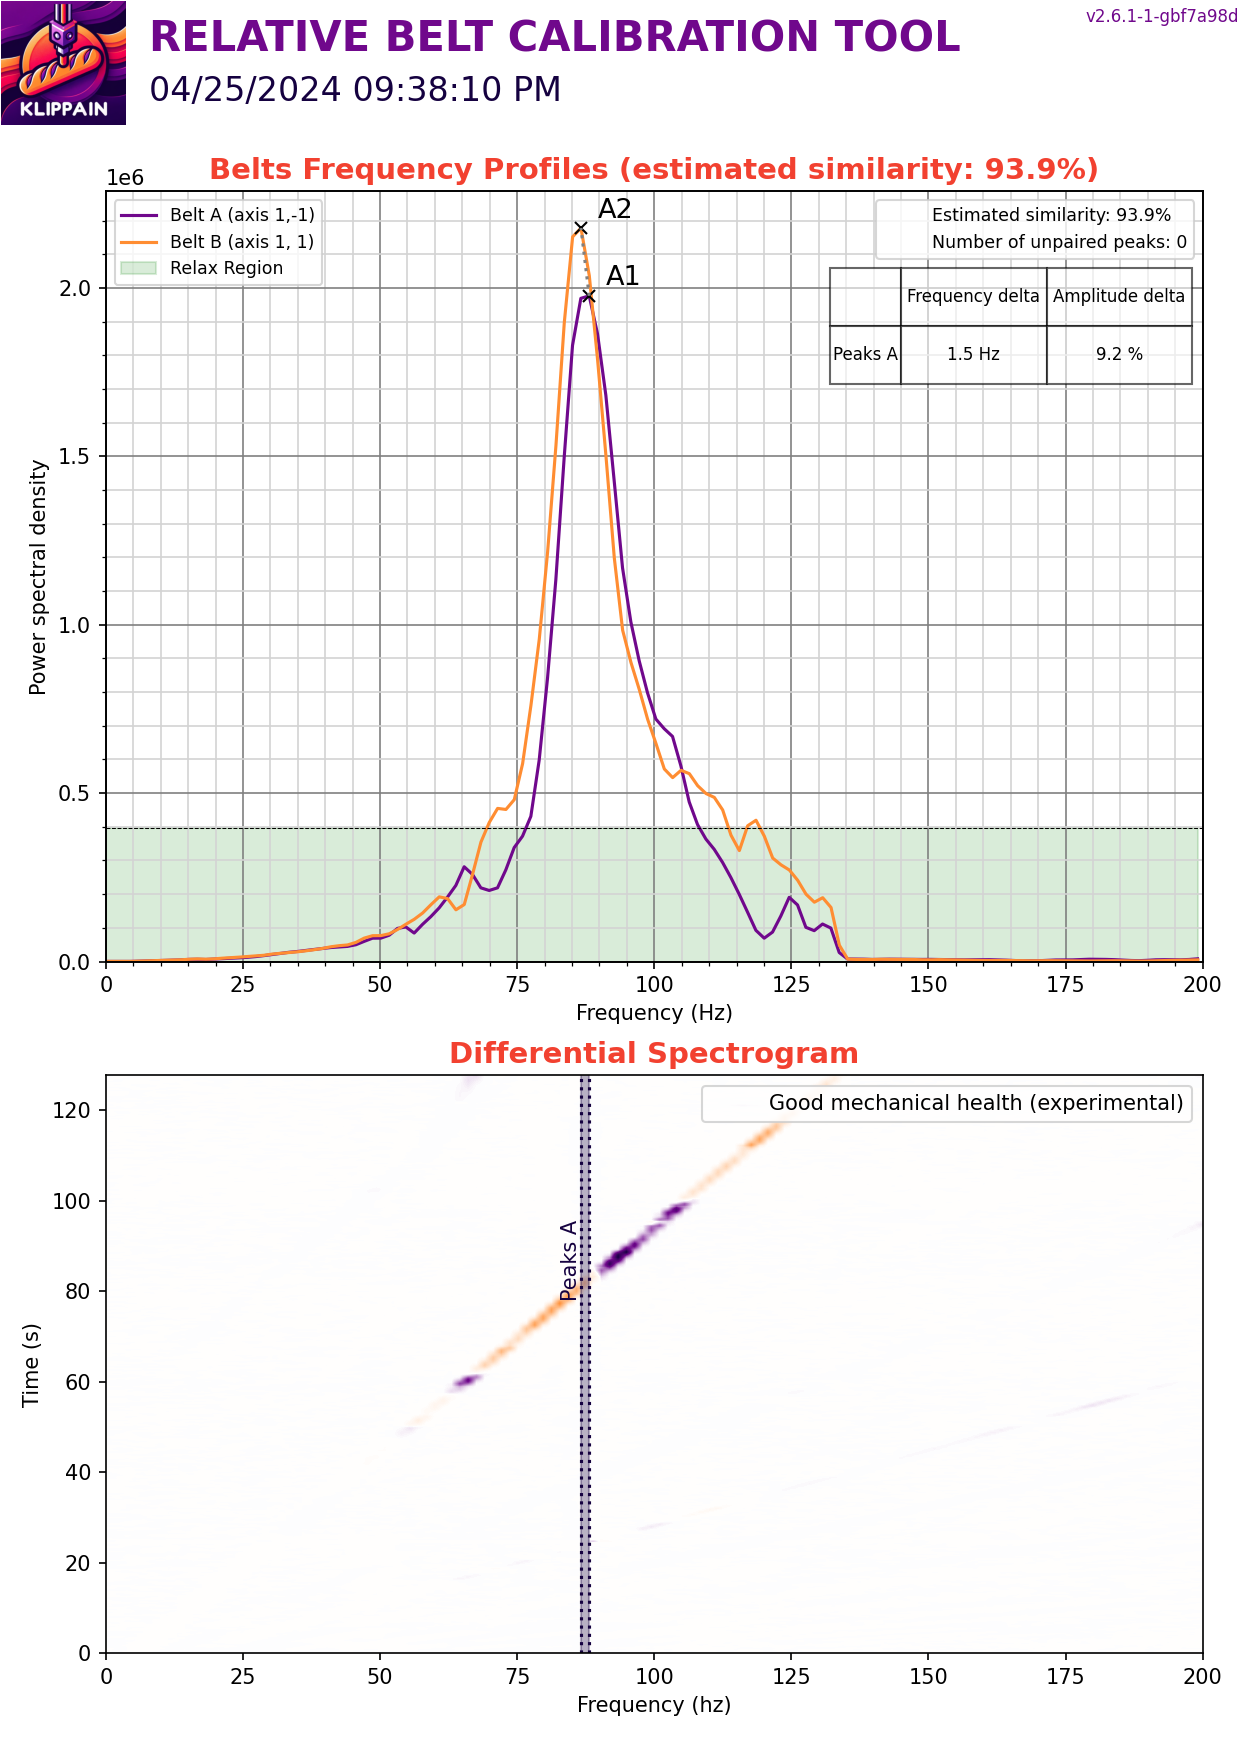
Finally made it back home yesterday and able to mess with the V5 some more. I spent almost an entire day before I left trying to get the belts to even out. Figured out after I left that I had screwed up originally tensioning them. Loosened them all up and did it right this time and they came out MUCH better…

After that I ran input shaper to see how it looked…


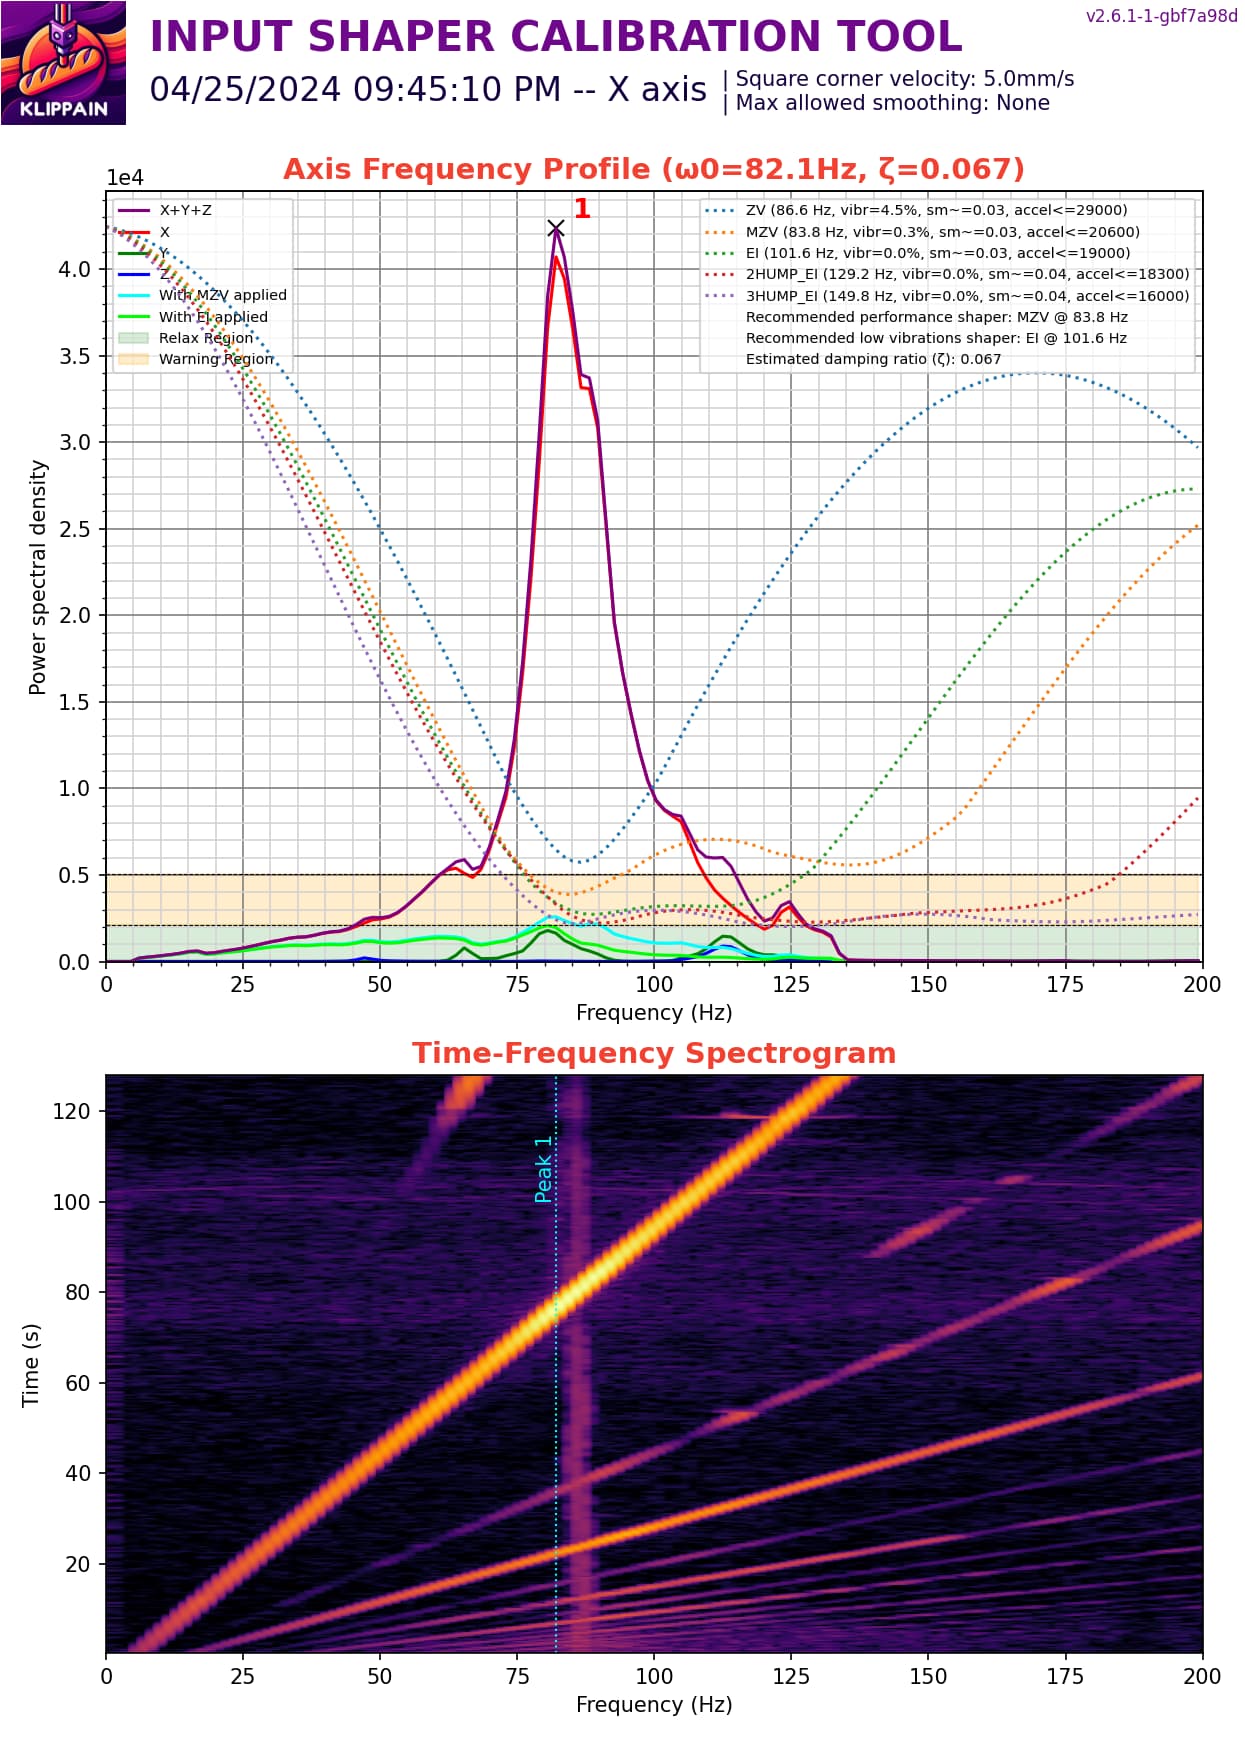
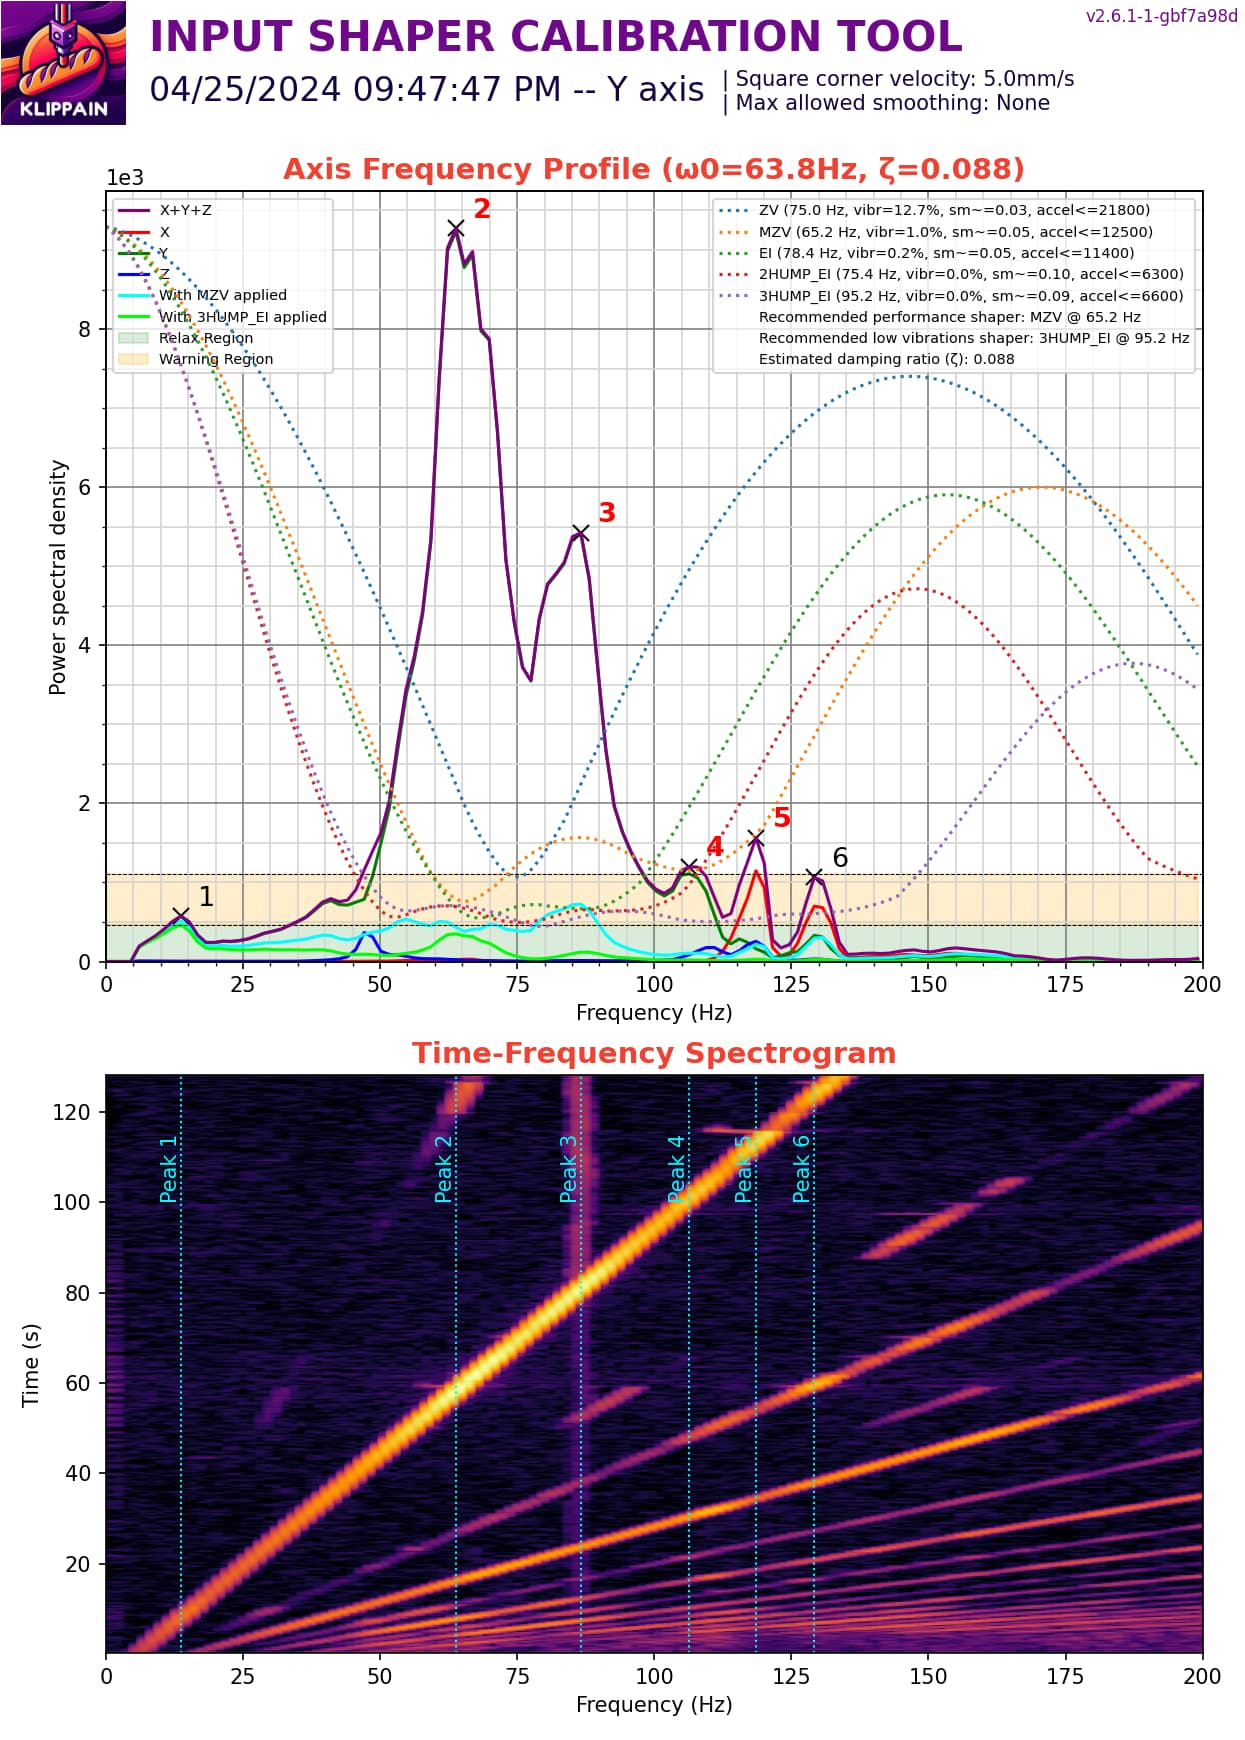
Needless to say I am very happy with those results. Ran a print for a screen mount last night at 10k accelerations and it printed amazing! Will post a pic of that when I get it all mounted.

Right now I am trying to desolder the RJ45 connector off the M8P so I can replace it. I tripped over the wire last time home and basically ripped the connector apart lol. I much prefer having them hard wired when I can vs wifi so want to get this fixed up correctly.

Soon to come is some slide in panels for the top and front then start testing with some ABS to print the ERCF V2. Not going to be putting it on this printer but this is the closest to enclosed printer I have so I think it will be best for printing ABS

4 Likes

Got my panel mount solution printed up and mostly installed. The 2 upright sections I will lay the printer on its side to install so I don’t have to deal with the T nuts sliding. I also have the panels drawn up. Just need to cut them on the LR3. Getting closer to ABS testing so I can print the parts for the ERCF V2


2 Likes

Also installed a nozzle brush and purge bucket today. Only done one print after it so far but it’s working good.

Purge bucket is mounted with 6x3mm magnets

3 Likes

Neat idea, I have a big one I just wipe stuff into. :smiley: What are the brushes for? Cleaning the nozzle?

Yes sir!

1 Like

But how does the robot clean the brush?

5 Likes

I like the acrylic cutouts. Looks really good!

1 Like

Thanks. About to go cut the enclosure panels and see how well they slide in lol

How are the prints? My RMRRF printer has ringing on the X axis for some reason. I guess I need to rerun some tests, maybe slow down the accels. They print so fast and so accurately I am really starting to hold them to a very high standard. These are smacking down the V4’s but maybe I am going a bit too fast.

I still need to do some fine tuning but I think its printing really well. I’m running 12k accelerations and 200mm/s infill and its running just fine. I think on some finer details I’m printing too hot but for 98% of my “functional” printing its doing amazing. Will take some pics and throw up in a little while for everyone to judge LOL

Do the flipping belts slap against ptfe spacer at all, or at the same time?

How do you track down vibration source(s) without access to slow mo guys’ cameras?

Mine are smooth sailing.

Run the accelerometer test, find the odd peaks, run the shake tool and touch or listen to parts until you figure out what is moving.

Same

Yep. That test tool is a wonderful thing!

2 Likes

Got the rest of my panels finished and installed. Man does it make the printer quieter with the panels on lol

Also printed and installed a “Bento Box” for some filtration with the upcoming ABS printing

https://www.printables.com/model/601990-bento-box-filter-with-hepa-carbon-4010-or-4020-fan

4 Likes