Ok, in this case the Z movement You need is a lil’ more than 4”, the other 5” of height can be added by rising the LR’s tracks, this will keep your machine more rigid and stable, but gives you all the clearence needed.
If the shortest tool You use, with the Z to the lower position, can overpass the spoil boar (let’s say 2mm), the Z movement you need is only lil’ more than the workpiece thickness.
thanks @Rico_LRS.
the only problem with raising the rails up is then I can’t cut smaller pieces like 1/8" or 1/4". I need the range from 1/8" to 4+".
I have had many discussions on LR3 vs LR2 (including in this thread) about the heights and rigidity, but I do appreciate the comments.
for this thread I would like to keep the focus on adding the Jackpot control board to my current LR2 ![]()
And…I received the board and endstops yesterday. Thanks @vicious1!
I have the case for the board printed along with method to mount it to my LR2.
I’m planning to first get the gantry to move with the new board and then work on the endstops.
Hopefully by the begining of next week I will have it up and running.
1 Like
Progress.
I have the Jackpot installed and all axis are working according to how they should.
I just want them to work different ![]() I can never make things easy on myself.
I can never make things easy on myself.
Currently X and Y are oriented as shown below.
However this is not how I stand at my table.
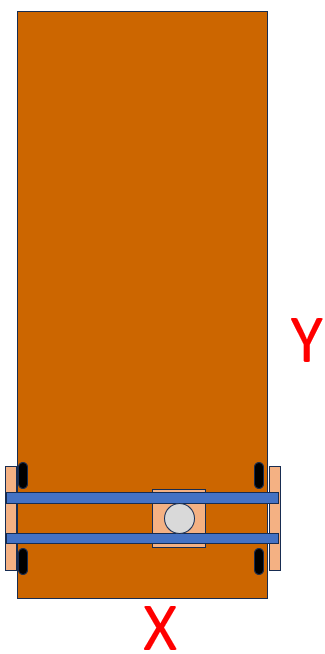
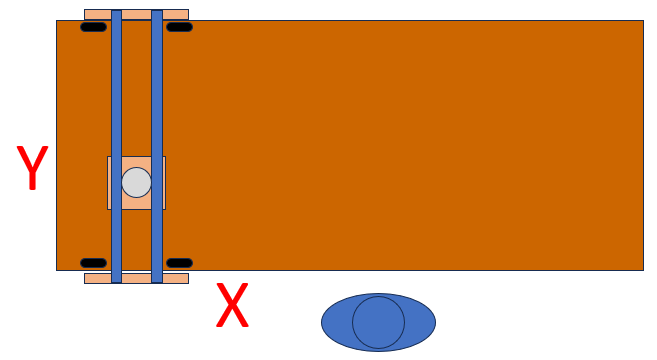
Due to the space in my garage I have the long edge of my table against the wall and stand along opposite the long edge.
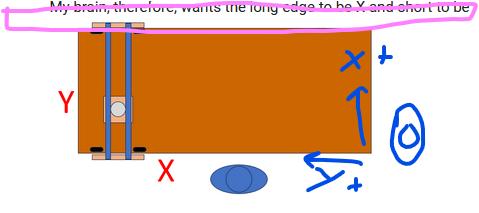
My brain, therefore, wants the long edge to be X and short to be Y, like below.
Changing this with the mini rambo was easy since the steppers were wired together, I could simply swap X and Y.
Curious if there is a way to do that on the jackpot?
If not, I just need to retrain my brain. and redo any Gcodes I might cut in the future.
1 Like
Yes you can switch it all, and you will have to for each config update as well. You will be swapping the pin numbers for X and Y Y1.
This is exactly how I look at my table, but I still load it from the front. I set my table size in CAM and orient things pretty easily that way. I take them off the table as you show and park my machine at 0,0.
Either way it is easy thing to do.
So you say… ![]()
I’ve never done that sort of thing. I’m thinking of setting it up like yours and making it simple. that way I don’t need to worry about remembering for config updates either.
Next step is endstops.
1 Like
I would, at least for now, I am sure we have some config changes coming soon so keep it simple.
1 Like
OK, I’m rethinking homing Z on the table vs homing z max. this is more me thinking out loud…
The LR3 has a rail that it rides along. This prevents the gantry from being shifted over on the table
This is one thing I defiantly like about the LR3 (I’m still not upgrading at this time)
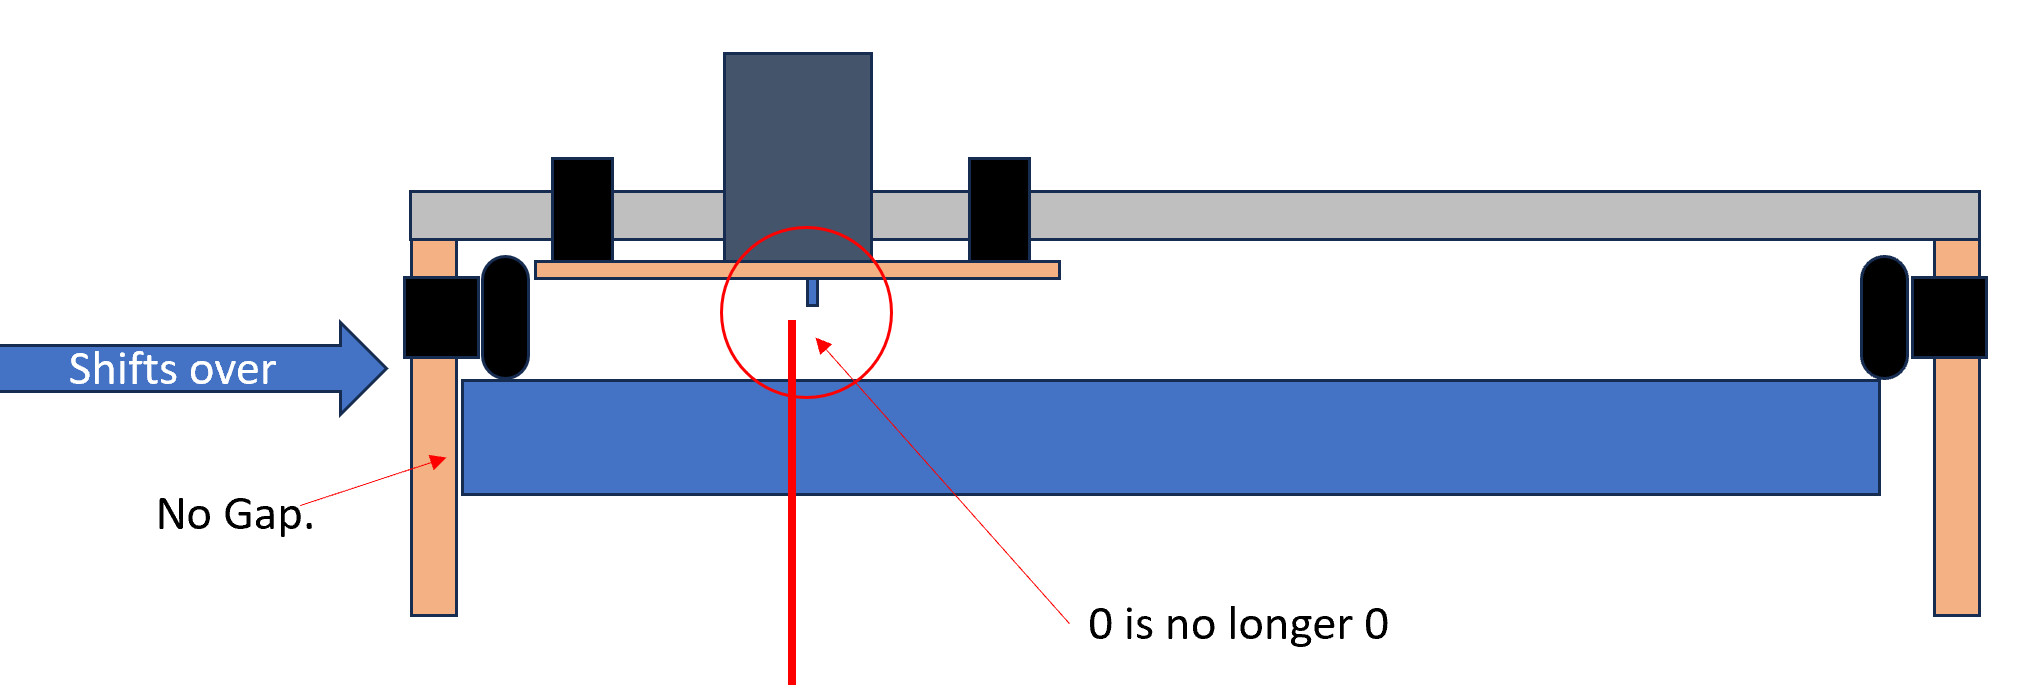
The LR2 does not have this.
With the LR2 there is a gap between the tubes and the sides of the table.
and the router sled homes to to the side plates.
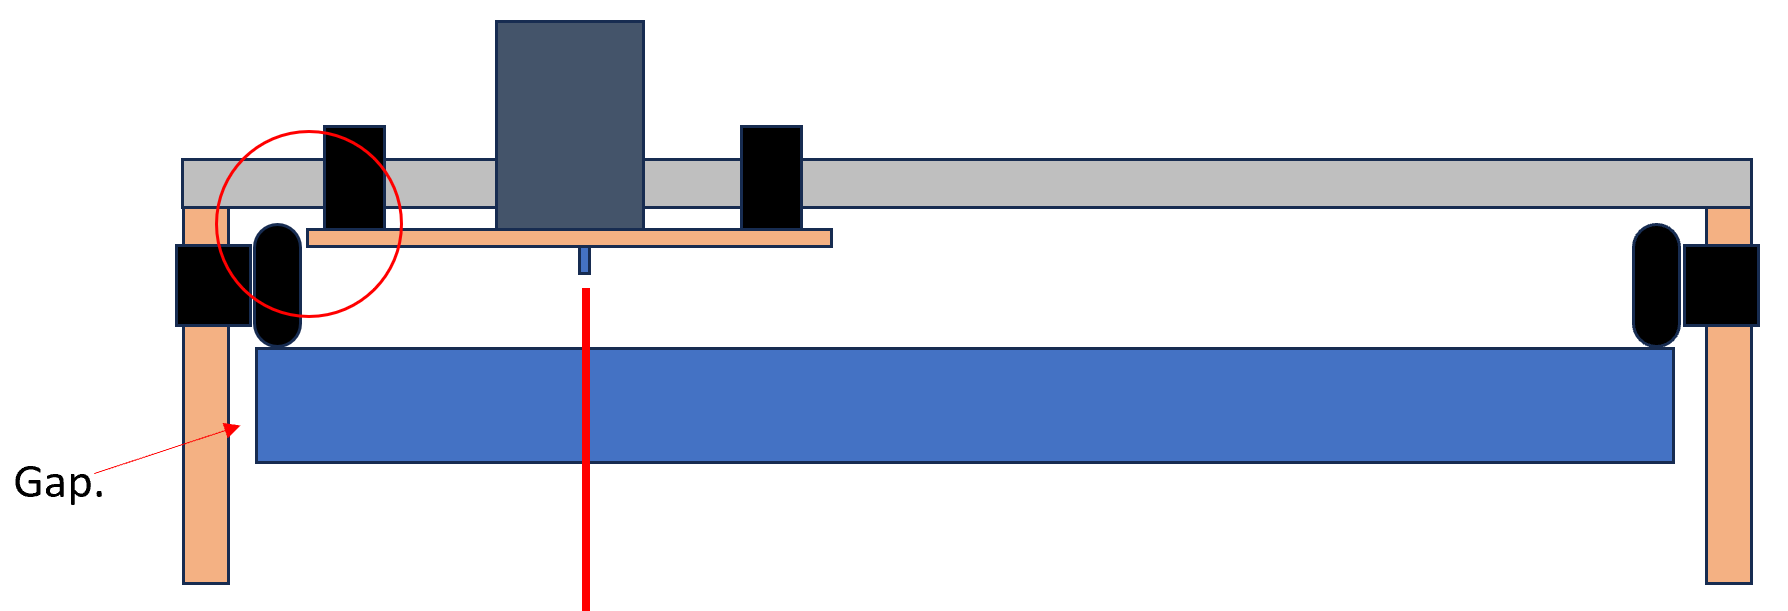
this means if the entire gantry is accidently shifted, 0 does not equal a previous 0.
this is not good if trying to do multiple cuts on a single part.
However, if I add a block on the table (green) and home to that…
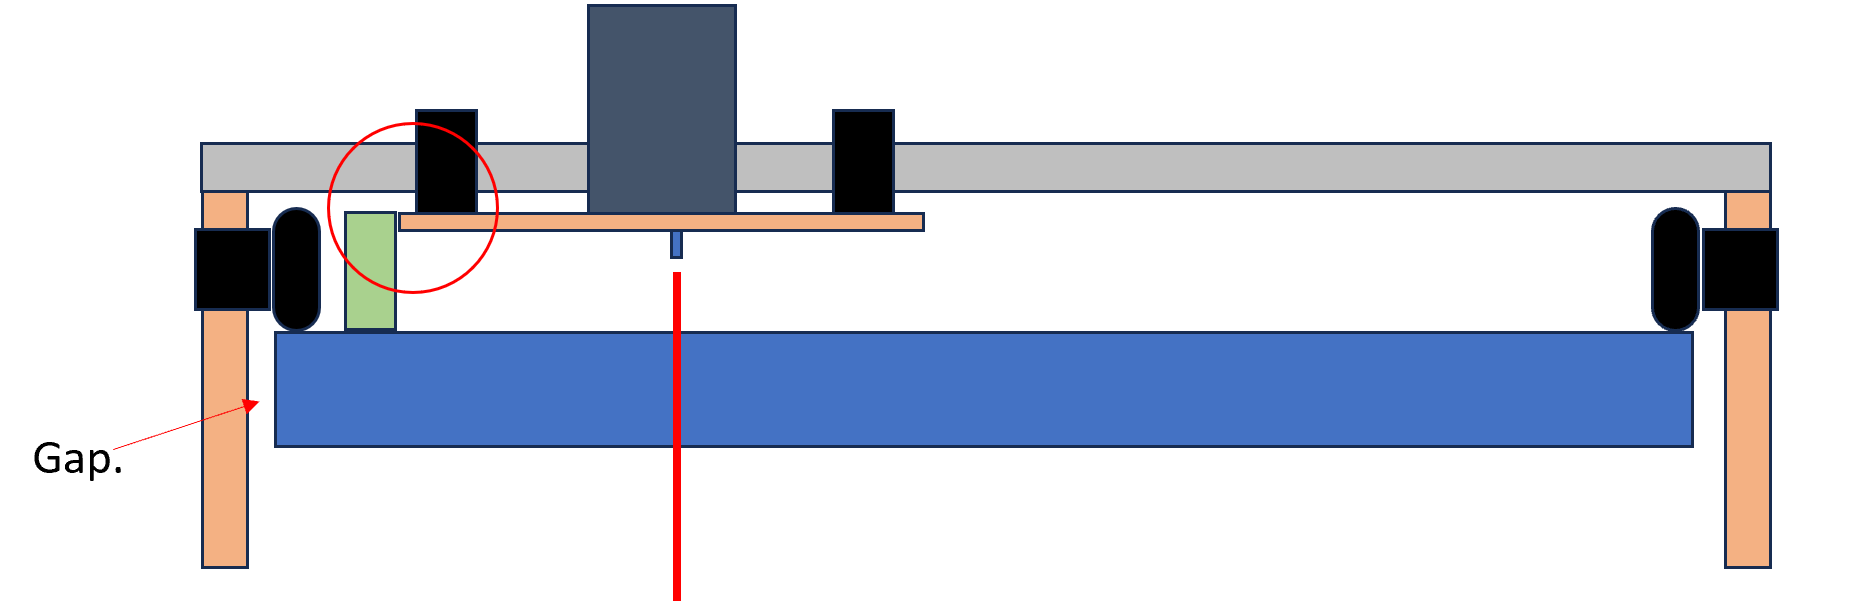
…then if even if the gantry is shifted over, I can keep 0 at 0 every time.
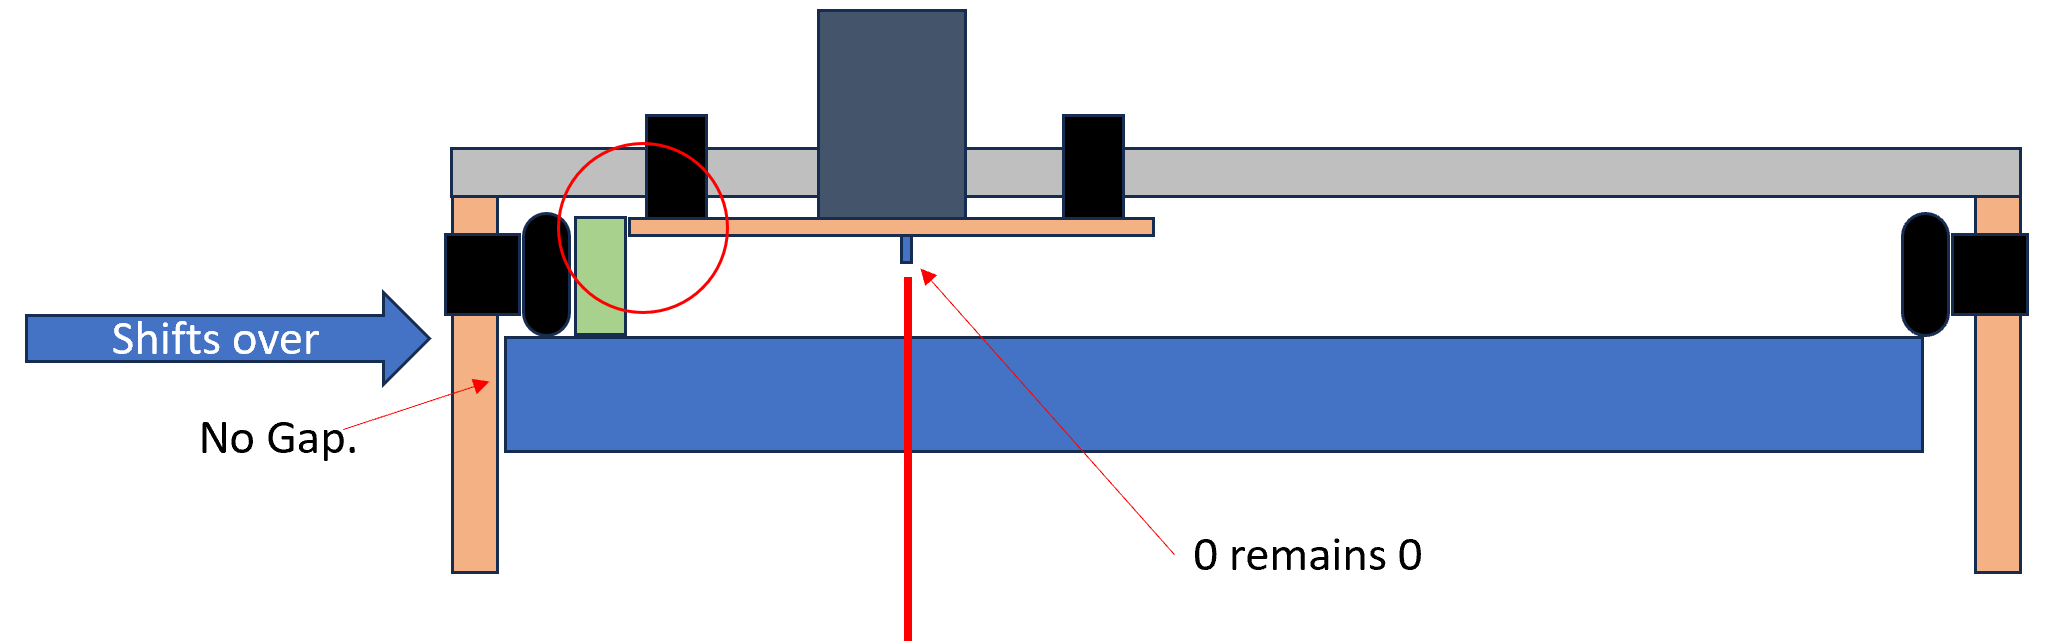
the problem is, in order to do this I need to home Z axis to the table so it is low enough for the router sled to touch of the block.
I suppose I could home the x axis (router sled) then home the z max?
Hmmmmm. that might work.
is homing default to Zmax?
How do I tell it to home Zmin?
But not if the gantry shifts back in operation?
My guess is that you would need to drop a couple of battens or angles beside the wheels to stop this drift, (there were plenty of builds that did that).
2 Likes
You’re right, it could happen anytime.
It’s probably pretty unlikely that it would get shifted at all. But in a garage environment you move things around and it can get bump. During operations that’s less likely to happen.
This just takes out any mishaps before a cut starts.
But still want to know if homing to zmin is possible.
1 Like
You can home to zmin, but it causes problems. For one thing, the router and but need to clear the table. Secondly, the Z0 doesn’t make much sense. You need to use the probe to set Z=0 to the top of the work surface.
To change it, you have to change Z_HOME_DIR, and change the Z2 endstop to zmax in configuration_adv. You have to disable the zprobe because it is configured on zmin.
An easier solution might be to just add some physical tracks to consideration it. I used some 3/4"x3/4" strips of wood nails down with a brad nailer. I made sure the first one was square to the table. I used the gantry to align the second one. They were just inside the wheels.
1 Like
I hear you, but…how often might this happen over the course of one job? I think trying to be careful around the machine during a multi day job is better than homing to Z min. If you think this is a big problem you can always have each job start with some alignment drill points to make sure they still align?
Also you have been getting along really well with no endstops, this is going to be far far far more accurate than that. I think the machine shifting is a non issue. If the machine is in a high traffic area maybe add a parking shim to the side plate when not in use to make sure it can’t move.
yes
z:
    steps_per_mm: 200.000
    max_rate_mm_per_min: 1200.000
    acceleration_mm_per_sec2: 80.000
    max_travel_mm: 300.000
    soft_limits: false
    homing:
      cycle: 1
      positive_direction: true
      mpos_mm: 0
      feed_mm_per_min: 300.000
      seek_mm_per_min: 800.000
      settle_ms: 500
      seek_scaler: 1.100
      feed_scaler: 1.100

    motor0:
      limit_neg_pin: NO_PIN
      limit_pos_pin: gpio.32:high
      limit_all_pin: NO_PIN
      hard_limits: false
      pulloff_mm: 4.000
      tmc_2209:
        uart_num: 1
        addr: 2
        cs_pin: NO_PIN
        r_sense_ohms: 0.110
        run_amps: 0.680
        hold_amps: 0.500
        microsteps: 8
        stallguard: 0
        stallguard_debug: false
        toff_disable: 0
        toff_stealthchop: 5
        toff_coolstep: 3
        run_mode: StealthChop
        homing_mode: StealthChop
        use_enable: false
        step_pin: I2SO.10
        direction_pin: I2SO.9
        disable_pin: I2SO.8

     #B
    motor1:
      limit_neg_pin: NO_PIN
      limit_pos_pin: gpio.34:high
      limit_all_pin: NO_PIN
      hard_limits: false
      pulloff_mm: 4.000
      tmc_2209:
        uart_num: 1
positive_direction: true -change to false
motor0:
limit_neg_pin: NO_PIN
limit_pos_pin: gpio.32:high
swap the pin/no pin on both motors
max_travel_mm: 300.000 - Change to your exact Z range.
With that said, I am not sure how the probe will behave at that point…I assume it still works provided you are still in range. You will also always need to home to the table and not your work surface or you will overdrive your Z.
A Few obvious start and toolchange and end gcode tweaks will be need in your CAM as well so you can move it to a safe place for a tool change.
From there make sure to always drive it back to the exact same point after a tool change to reprobe the surface to set the bit length.
I actually tried this before and had more issues.
As for homing, I think I can also simply home X and Y first and then home Zmax using touch offs on the ends of the tube. Then I don’t need to changes anything.
I forgot you had a jackpot. My advice on configuration was for Marlin.
1 Like
Ok, running into another issue unrelated to the jackpot, but I didn’t want to start a nother thread.
While moving the router sled back and forth a bit I noticed it does not have a nice rolling sound.
Here’s a video of what it sounds like.

Thoughts? I’m hoping its just one of the bearings loose and just need to tighten it. I’ve gone through them all but still making that sound.
That’s hard to say. Check all the screws real quick, the bearing tension could be it, might even be too tight. Could just be a loose screw vibrating, or that vacuum plate in there. Unplug the X axis and move it faster. Swapping the board is a good time for a nice cleanup, get all the gunk off, clean the rails of any schmoo, wipe down and relube the Z, stuff like that. Some people have found cracked parts.
Yeah…that’s what I kinda figured. Ill clean things up today and see how it goes
I have some of this stuff on hand for grease. Will this work for z-axis or should I find something similar to what you provide in your kits?
Super Lube-21030 Synthetic Multi-Purpose Grease, 3 Oz. https://a.co/d/3aro6ex
Absolutely fine, shouldn’t take much either.
Thanks @vicious1
Progress! Endstops are installed. Hopefully tomorrow night I can get them connected on the board and tested
2 Likes