Sorry for being a newbie, but I don’t understand the explanation on the page; maybe it’s the language. I’ve already built my machine and everything works in Fluid, I just need help with the auto square. Thank you very much.
If you press the Home button, what happens?
Are you referring to the home ? If so, nothing happens, only home Z, home X, and home Y move.
So that works. What does not work? ![]()
1 Like
Maybe they’re talking about how to measure and set the end stop pull off distances when the machine homes, so the machine will auto square during homing?
EDIT:
Is there a good succinct walk through video for new Makers? This one doesn’t cover the process fully.

I think Bartman or someone wrote up a decent process ~yr ago.
EDIT 2:
Found @Bartman’s https://forum.v1e.com/t/complete-lr-calibration-sequence/49819/34, very detailed and very useful. I thought the docs were updated to incorporate this process? I will check when more awake.
The thing is, not everyone should feel required to go through those steps on day 1…
The squaring process in that topic is great for people needing (or just wanting) to cut very precise parts with their machine.
That said, definitely do the calibrating squaring process before cutting permanent Struts.
But, honestly, my first few projects with temporary printed struts like drawing a crown, and cutting simple fun signs didn’t need belt calibration or squaring to be done.
3 Likes
siiii, eso es
Yes, that’s it.
4 Likes
Thanks for the link to my thread. I hope people find it useful. Your link is for the last post in the thread. Here’s a link to the start of the thread…
Note @vicious1’s comments in post #24 (also flagged as a solution) regarding preferred sequence, and the comment that most users won’t need to perform all steps.
3 Likes
Thank you very much, I can’t open the link.
Lo siento, no entiendo. ¿Qué enlace no se abre?
Sorry, but I still don’t understand how to square the car. Maybe I don’t understand because I’m not technical and because of the language. Thank you very much.
Go to the top (first post) of the linked thread, and follow step #1.
The idea is that you are marking out 4 points of a rectangle, and then measuring the diagonal distances of that rectangle. If your corner angles are 90 degrees (square), then the distances should be exactly the same. If the distances are not the same, then you have what is known as a parallelogram (side distances are both equal and parallel, but angles are not square).
You want to adjust the endstops (physically for large differences, in software for smaller differences).and repeat the process until the diagonal distances of your rectangle are identical.
1 Like
- Home the X and Y axis
- Move the machine in a rectangular pattern (as large as possible)
- Use a V-bit to create marks on painters tape at each corner of the rectangle (lower Z until the V-bit just touches the tape)
- Measure the diagonals of the rectangle with a steel tape and compare for different lengths
- Adjust the Y endstops as necessary (my endstops have threaded adjustment screws). If no adjustment screws, use M666 Y(n) to compensate for Y offset
- Repeat above steps until the diagonals are within +/- 0.5 mm (pretty much the measurement granularity using a steel tape measure)
- Save settings with M500
1 Like
Here’s a drawing that hopefully explains the concept:
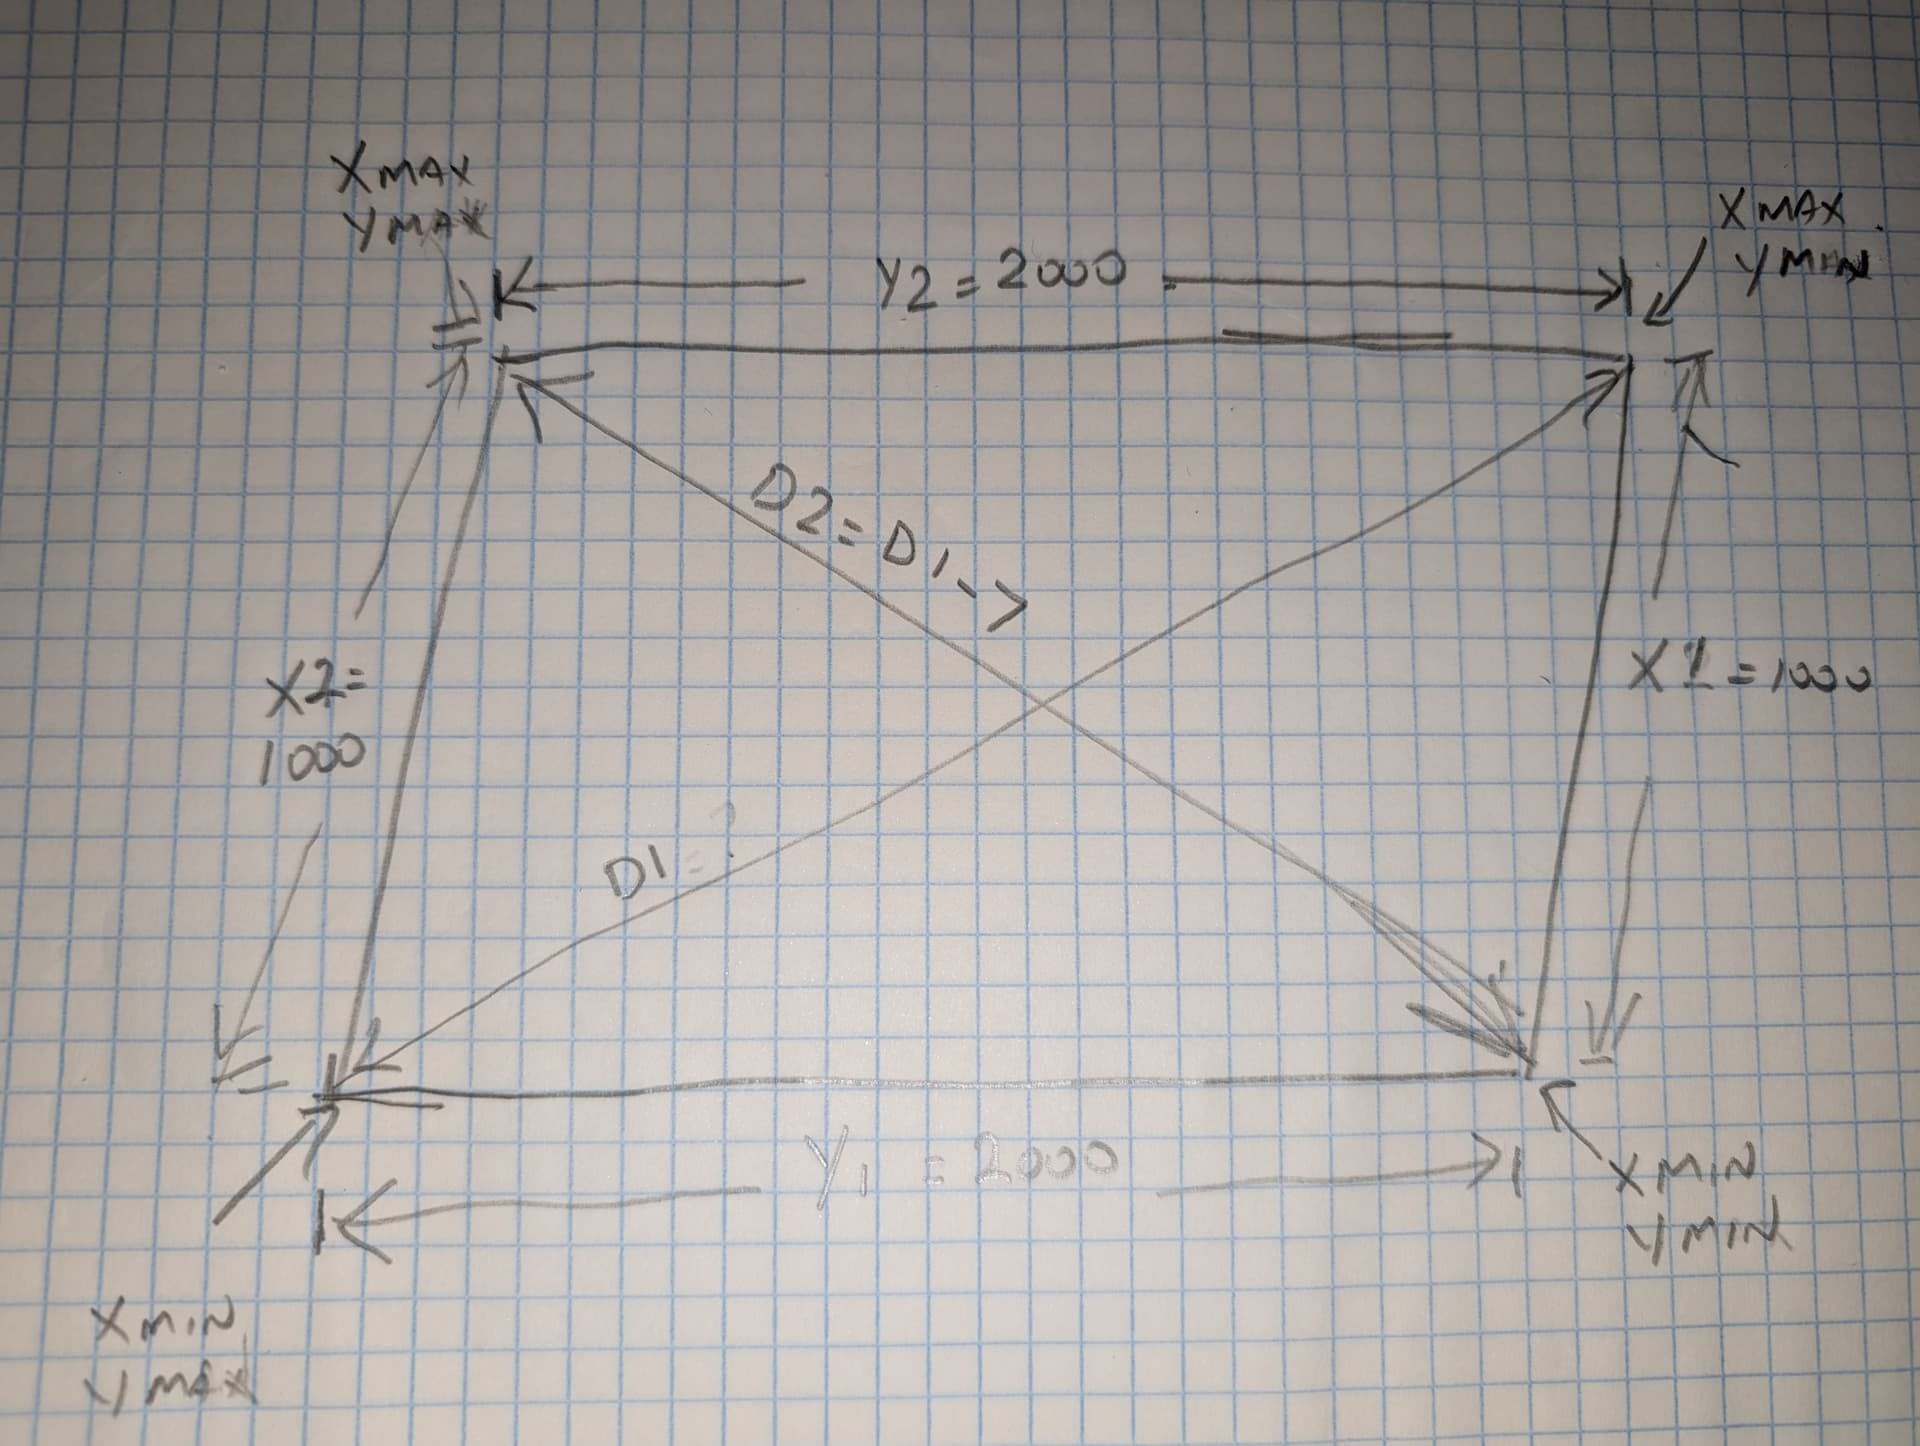
In the drawing, the endstop at XMax YMin is too far to the right (or the endstop at XMin YMin is too far to the left) and the result is that D1 is 7mm longer than D2.
By repositioning one of the endstops (XMax to the left or XMin to the right), you are bringing the angle closer to 90 degrees, which will result in D1 being closer in length to D2.
If the difference between D1 and D2 is only a couple of mm, then the M666 method is appropriate, as it is fairly difficult to make such fine adjustments by repositioning the endstop hold down screws (which is why I used an adjustment screw on the edges of my endstops).
1 Like
Perfect, crystal clear, now I understand. I thought it was something inside the machine. Thank you so much. You guys are amazing!
2 Likes
Feel free to mark one of the answers as a solution. It will help other users to find the correct answer quickly.
ok perfect