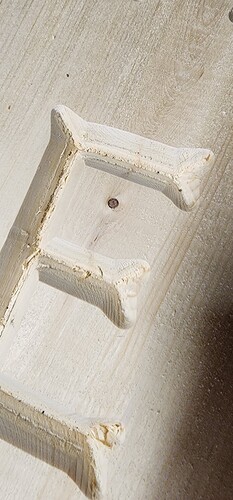
Ok i am not sure what is going on here. No matter what font i select i am getting ugly corners in my letters (not square). Everything is tight and level just to get that out of the way. Can some one please help me figure this out im getting so frustrated.
It looks like you’re using a V-bit. I’m guessing you don’t have the bit defined correctly in your CAM software.
It looks like your top is also not correct at the top of the material. It appears that the Z=0 point there is down some from your material top. This means that the machine stops making sharp corners before it gets to the actual corner, and the radius of the bit there bulges outwards.
V carving requires a very accurate probe to Z=0
Screenshots of your EstlCAM toolpaths and endmill settings would help as well.
I’m not sure this is still the same issue or if that was resolved but here’s a related thread that provides some context.
This was a seperate issue. My z steps were incorrect at that particualr issue.
You really need to provide us screenshots of your settings and toolpaths, otherwise we could also just ask a crystall ball. ![]()
We are willing to help, but guessing just isn’t helpful at all.
Agreed either the Z zero is too low, or the bit angle was set wrong.
I have made alot of mistakes v carving and this is what i see. Also for that font i would use a lesser angle. Maybe a 30 or 45. You may be using a 90. Also be careful, let the v carve set the depth, do not tell it a start depth. Hope this helps. Have a good one!.
Screeeeeeeeeeeenshoooots… ![]()
I can provide screenshots however I am not using estlcam with this particular cut. I have been experimenting with vectric aspire
So i did set the zero slightly lower than the workpiece and the reason i did that for some reason when I set zero with the very point of the vbit the first pass barely touches the workpiece at all and yes this was also with a 90 degree bit. I did lower the angle, I tried 89, 88 and 85 in which 85 looks a bit better but then the inside of the letters are also still rough and not super clean like i was getting before
When you guys are saying bit angle is set wrong do you mean even though the tool is stated to be a 90 degree bit i would need to modify the settings and say its something else? like 89 or 88 degrees?
No for v carve to work appropriately, you do not falsely report tool. Nor do you set below surface. But you should get a different tool. There are 30, 45, 60, and 90, just to name the typical. 30 will give deeper more defined cuts. 90 will need large fonts to be successful.
To get a perfect 90-degree corner, you need the point to be perfectly on the surface. This will give you a sharp corner. You do not have this, so start here.
If you use a probe remember the probe offset.
Surfacing the piece before starting can improve the accuracy of carves too.
Thank all of you for the replies and help. The boards i have been purchasing from home depot are def warped, which is why i was forcing the zero down more that directly at the surface, however it is impossible to get boards that are not warped from there. So it seems based on your replies i have several issues. Warped boards, forcing the zero lower than material surface and using a 90 degree bit instead of a 30 or 45 degree. So i guess i will need to start surfacing every board which will suck, and get some more bits. I do have a surfacing bit however any recommendations on any tutorials on the best way to do that? Ive pretty much been learning as i go and have built my own machine since i first started with the mpcnc and am just trying to get this thing running perfect so i def lack some experience lol. Again i greatly appreciate all of your guys help seriously.
This is by far the easiest for me…
https://vector76.github.io/gcode_tpgen/
Click on Surfacing on the left. Then put in the size you want and the DOC. After I put in all my info I click generate, then open the downloaded gcode in notepad, there I delete the G92 X0 Y0 Z0 and I paste in the start gcode from the milling basics page for my board and machine. That lets me probe at the start to set zero. Sometimes I don’t want to probe right where I want X0 Y0, so I will move the spindle with the jog controls and figure out how far where I want to probe is from where 0 needs to be, and set my X and Y to be that distance, so instead of it setting at 0, it will know that its however far, after probing it will move to where 0 needs to be and start there. Hopefully all of that made some kind of sense ![]()
Oter options a thickness plainer and sled or jointer a,d thickness plainer or wide sander. Also truemill shops or specialty wood shops will flatten boardsor possibly a community college or such could help?

