I have a lot of ideas now that I’ve seen some of the capabilities of the library I’m using. I may need a normal mode and a fancy mode. Normal mode would be just a color for different states and having a different color that tracks the current position, likely covering the width of the core. It could perhaps change color when it reaches the limits.
Fancy mode could do more interesting things. Like displaying the lights in a wave traveling in the direction it’s moving. Maybe in the alarm state have a flame effect coming from the core.
I don’t think I have a good way of getting if an endstop is triggered without wiring something to the endstop pins on the Jackpot.
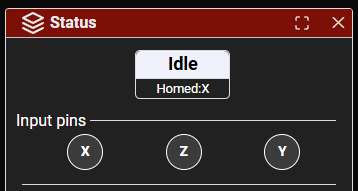
the Pn:XY I believe tells you that X and Y are triggered.
I’m just on the simulator at the moment and can’t tell you exact what FluidNC reports. I’m not sure individual switches will show. Might just be one per axis
Thanks. I missed that one in the giant list of things that can go into the status string.
It does appear to be one per axis but that is still be a useful indicator. Even if not displayed directly, it might be good to show some kind of warning color maybe with blinking if an endstop stays triggered for more than a second.
I couldn’t figure out what you were talking about. Then I realized that doesn’t happen in my themes. It shows the circles but doesn’t highlight when the endstop triggers. That should be an easy fix.
Is there any way in FluidNC to tell if the machine has been homed yet? Showing the X position on the LEDs doesn’t really make sense until the machine is homed.
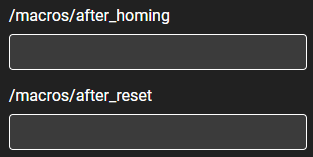
I thought about maybe using these macros to initialize and set a variable but I’d rather not. I assume that after_homing gets called after any axis is home and I only care about X.
Maybe I just assume you’re going to home the machine. During homing, it could show a wave in the X homing position. I would have to determine which direction is currently homing. I think I can only figure that out by change in X position.
Also, this Youtube series on the FastLED library I’m using is very well done. I’m not sure how many of you care about the code and math behind LED animations but I think it’s pretty interesting. I don’t need to know most of this, but there’s a lot of useful information in there. https://www.youtube.com/playlist?list=PLgXkGn3BBAGi5dTOCuEwrLuFtfz0kGFTC
How is everyone mounting LED strips to the bottom of their LowRider beam? Just sticking it right to the strut plate? Clips? Channels? Something else?
Are you using a separate power supply or the same one as for the board? Mine is the 24v 2.5 amp (60 watt) one from the store. I need 5 volts to power the LED strip and the ESP32. I’m assuming I can add a buck converter to the existing power supply to power both. If I need to, I can add a separate 5v power supply. The one I have is 5v 3 amp (15 watts).
There are a bunch of different types of buck converters. Any suggestions? Not sure I need 3 amps but I don’t want to undersize it either.
I use a buck convertor to run about 45 5V LEDs on a 0.75 m strip. (60 LED/m). There’s no signs of it browning out or color changing at the end of a strip.
I’ve used a LM2596 that worked fine. If you need more power based on the number/draw of the LEDs in your strip, you may need a second power supply.
For some reason I thought @jamiek’s next gen conduits had integrated LED or optic fiber mounts . Jamie has a cool break away feature integrated into the 3D design. Personally planning to just rely on the strip’s adhesive, after that fails E6000, if/when that fails maybe print straps and/or CNC some thin bendable plastic covers to hold midsections of the strips up.
Anyway, am curious what others are doing too? The $$ LED Channel+diffuser lens are nice, but they’re $$ and negates the MacGyver’sm look am striving for.
I’m using a full meter so 60 LEDs. Maybe I just use the 5v supply I have and skip the extra converter.
Yea, I only need a meter but I can’t find any without spending at least 20 bucks. I mean that’s about as much as the ESP32 and LED strip combined. I’m not really too concerned about it being diffused since it’s going on the bottom but I’d like some protection.
I think I’m just going to 3D print some channel/clips and get IP65 LED strips so they’re better protected.
Also, I got one of these Seeed Studio XIAO ESP32s to try out since I only need 1 pin for this project. I knew these were small but geez. This version (ESP32-C6) has a built-in wifi antenna too.
Went down a rabbit hole or 2 which shouldn’t surprise anyone. I was struggling to figure out how I was going to get this off a breadboard which is a common problem for me. Then I realized that there had to be hardware already out there so I bought one of these which I can put my code on. It’s kind of expensive but assuming it works, it will likely save me money in the long run. If it doesn’t work, I’ll use it for playing with WLED.
Personally bought SP108e controller couple years ago after verifying how WLED firmware update could be done… Compatible controllers - WLED Project Guessing there’s better featured/priced compatible alternatives now, with documented steps for upgrading firmware. Your ESP32 one will be neat for tinkering.
Wrong side of the Atlantic for Jason but I’ve bought a couple of things of this guy over the years and his wled boards are a lot more reasonably priced Mottramlabs-Products