Looking for someone who has experienced this before.
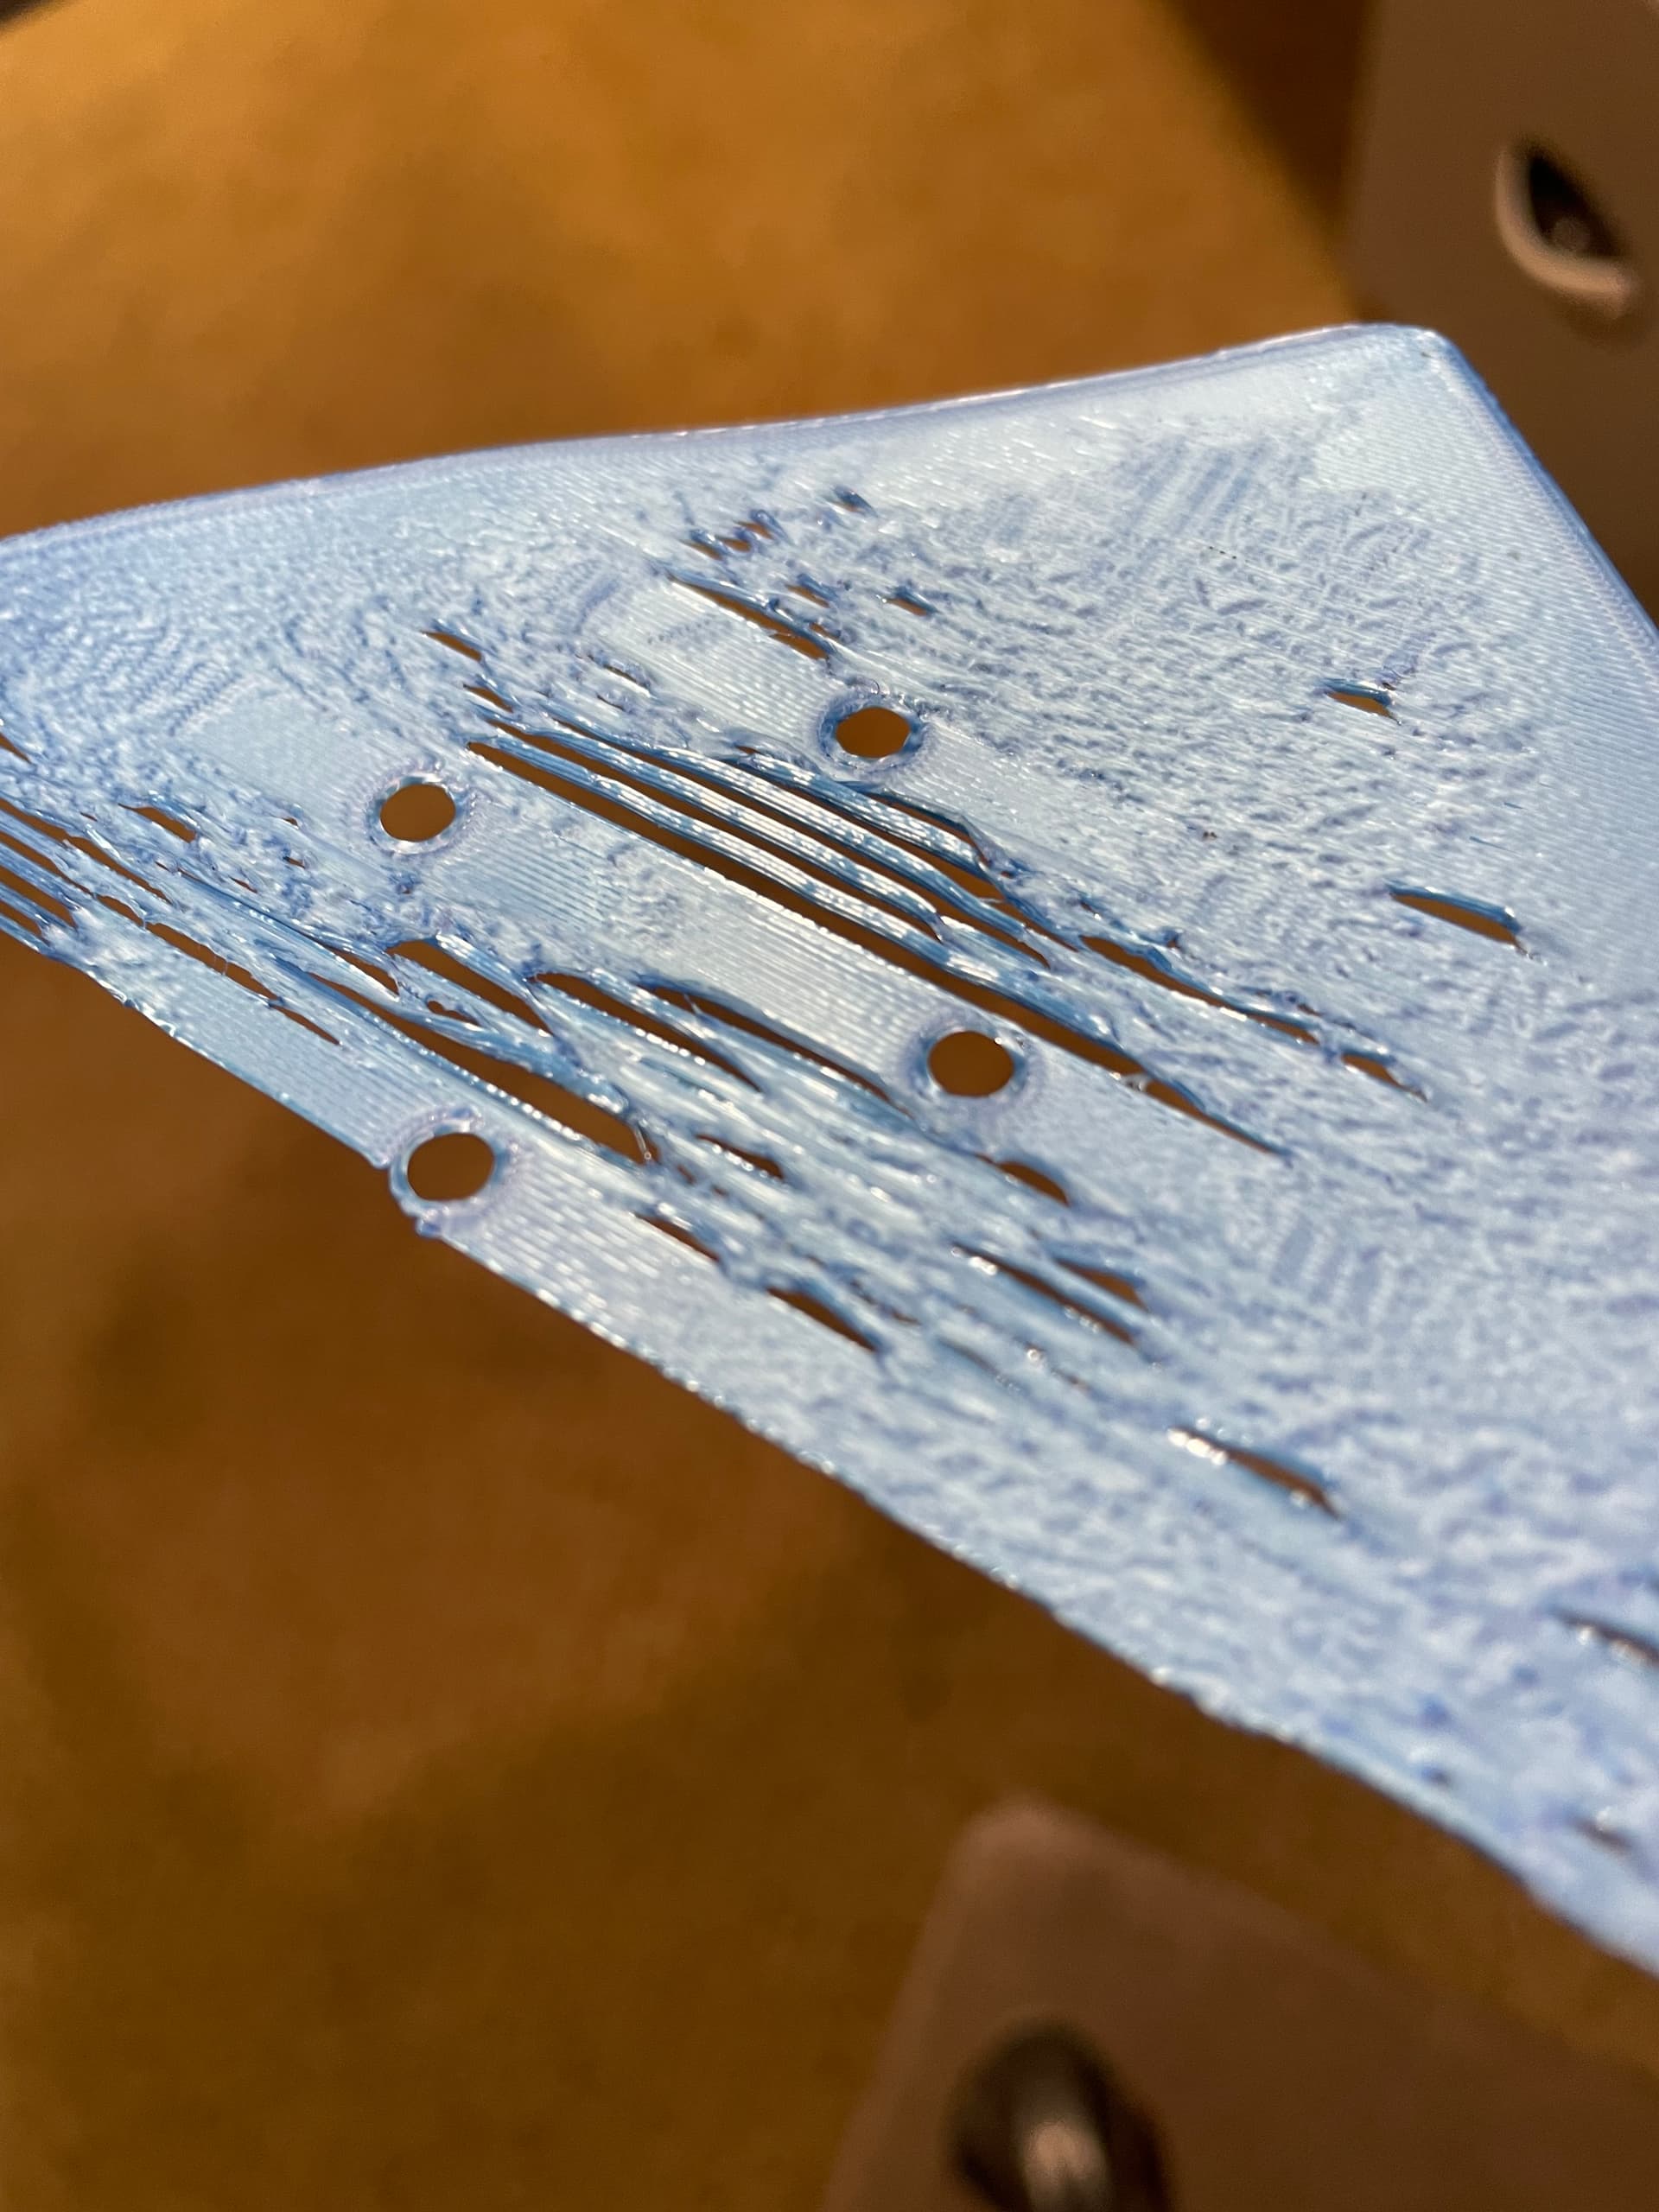
When I am printing parts with a large surface area/bottom layer, I keep having this issue. Smaller parts print great. It just seems when it extrudes long lines along the bed right next to each other it has issues. It’s hard to say that is a bed adhesion problem if you were to watch it closely as it went. It’s not that each line isn’t sticking to the bed, but it looks like as the next line comes back beside it tends to peel up the previous line. Kind of like the lines are too close to each other or something.
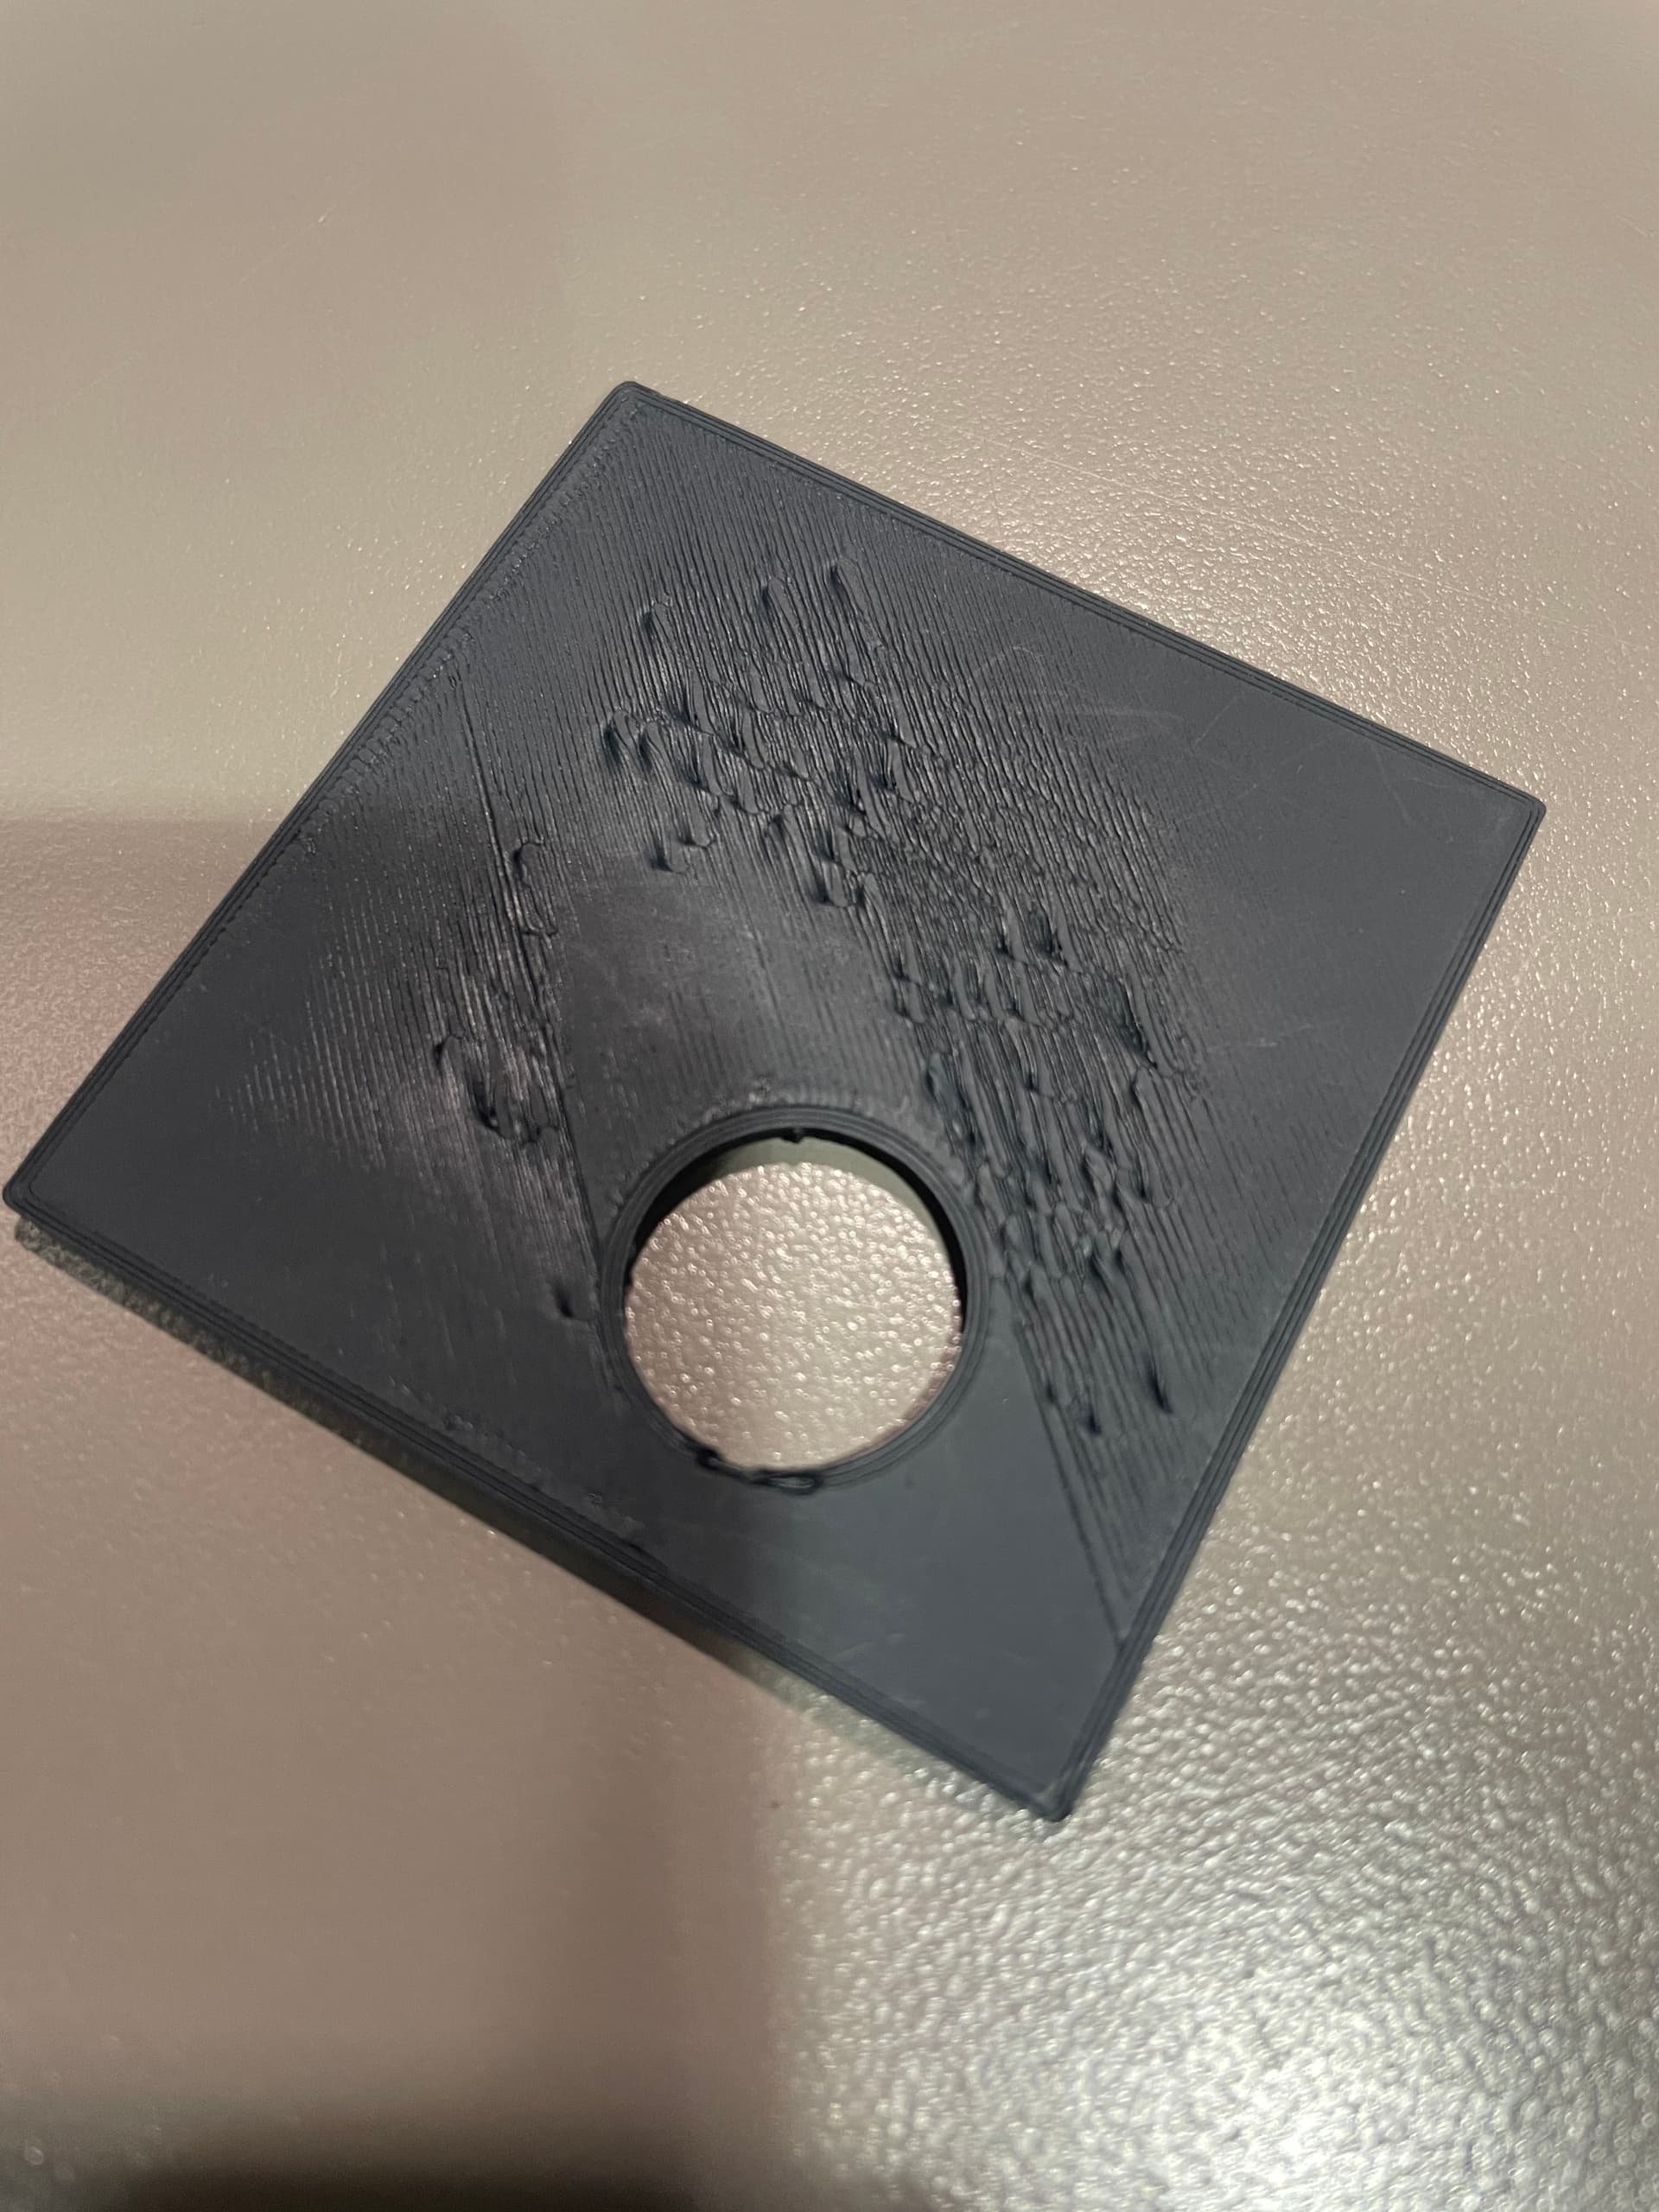
The example in these pictures are from my Ender 3 V2. However, I first noticed it on my MP3DP V4. That makes me believe it is something in my slicer settings.
What I have tried to fix:
Reducing the first layer extruding width from 110% back to 100%. I use Fulament Fula-Flex magnetic print beds and it recommends increasing initial layer print width up to 110%-120%.
I have played with different temperature ranges for both the nozzle and the bed
I have recalibrated the z offsets on both machines to be sure that the gap between nozzle and plate are good
For reference, here is an example of a test print on my Repeat V4. You can see the corner areas are laying down nicely. But there are a bunch of spots throughout the middle where the individual lines are peeling up as the extruder passes by.
When I first started out with my 3D printer, I had a problem that produced nearly identical results to what I see in your picture. I tried a bunch of things to fix it including varying temps, adjusting the initial Z height, and consistent cleaning with alcohol. I even purchased a Raspberry PI so I could map the surface to see if flatness was the issue. My fix came from a forum. I sanded my build plate then cleaned it with acetone. Problem gone. Even with that sanding (and a few additional sandings), that build plate had a long life, and I’m still using the backside of that plate.
Then about a year later, the problem was back. The second time it turned out to be a melted housing around the hotend. The hotend was no longer held tightly, so it could ride up or down just a bit. When conditions were right, the tip would catch on the plastic. I printed a new housing, and the problem disappeared.
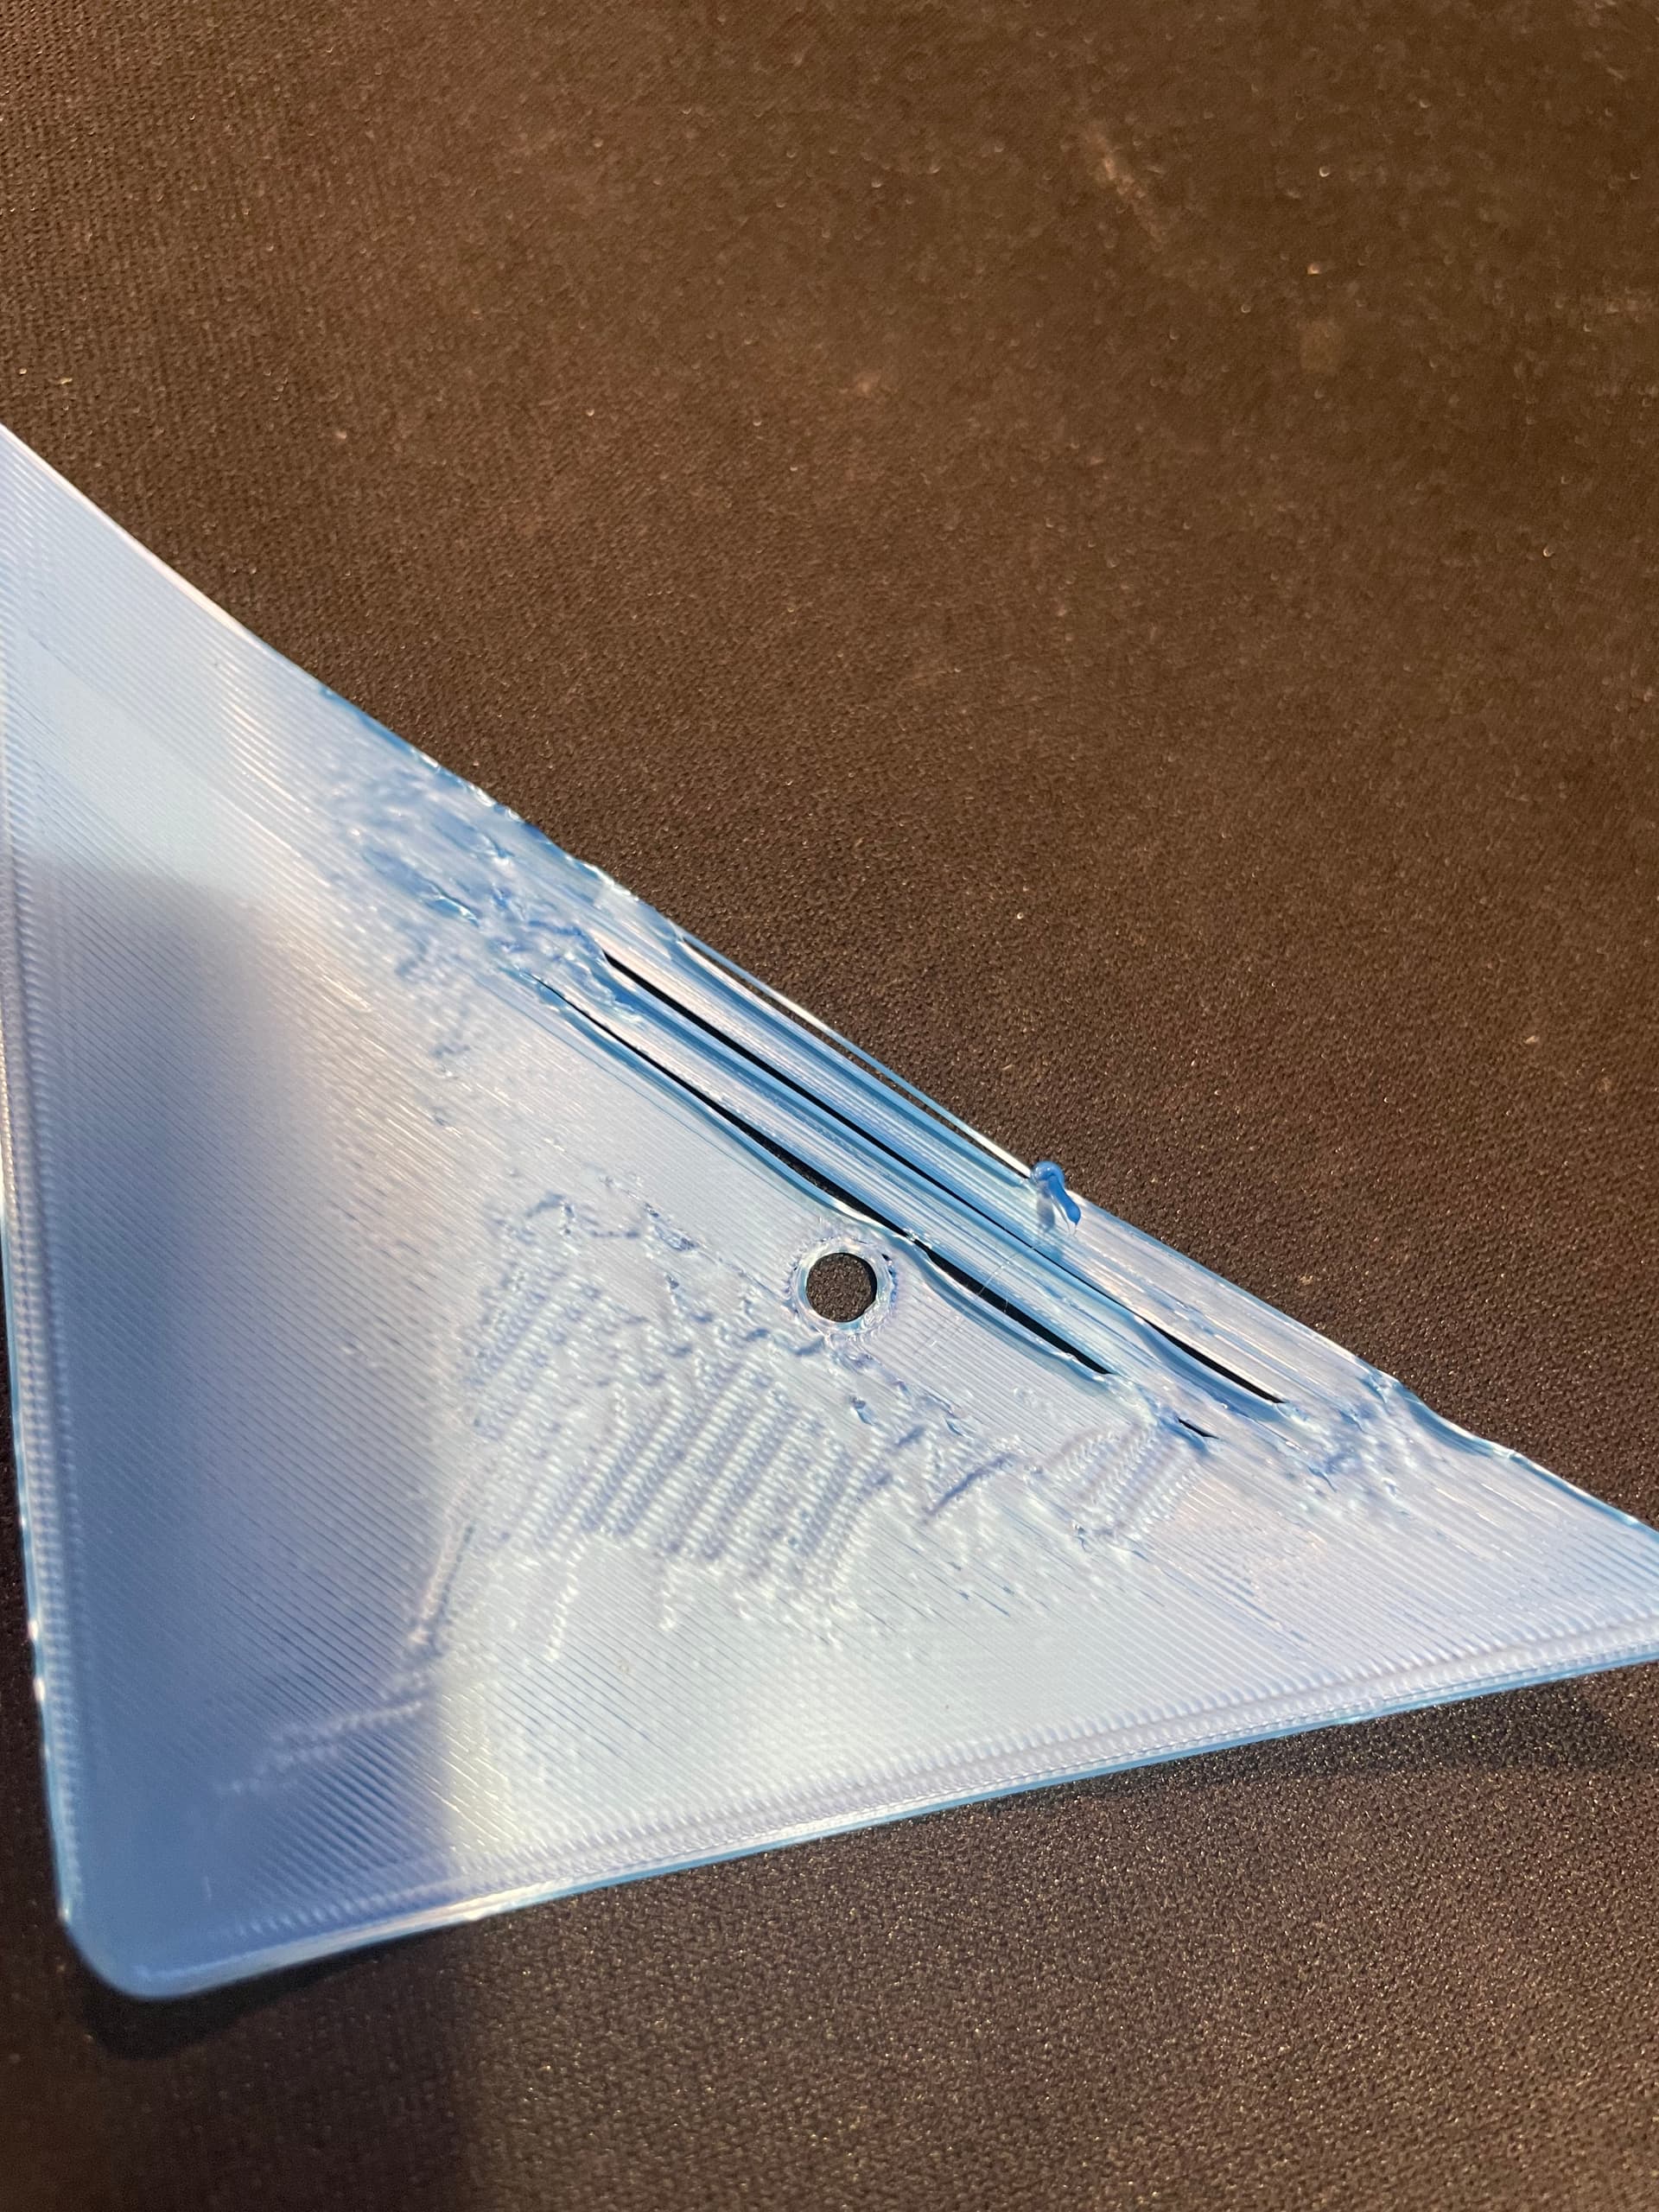
I get better adhesion when I spray the bed with a 3D printing spray (hairspray essentially). So I just did another test:
Flipped over the magnetic build plate to the smooth side. You can use either the rough side or smooth side, I was using the rough side in the previous pictures.
You can see it printed okay for a little while and then it started too peel itself. I tried to get a good video but its hard to focus the camera when the print head comes coming in and out. But if you were to watch it closely it really does look like the nozzle is pushing the previous print line up while its coming by laying the current line.
I hear you on your solution when you printed a new housing. But I can’t see that being my issue, because I am getting the same result on two different machines.
Let me try this same exact print on my Repeat V4 and see what happens.
There are a lot of things that can cause that. But my guess is that your Z is too close to the bed. And it may not be level. Do you have babystepping enabled? In Marlin mode of the lcd, you can fine tune the Z height while it is printing. You may be 0.1mm too low.
I usually use ipa (not the beer, the rubbing alcohol) to clean off the fingerprints and dust. But after 10-20 cleanings, the PEI doesn’t stick as well. So I wash it with soap and water in the sink. I sometimes scratch it with 0000 steel wool. PLA sticks great to PEI when the PEI is warm and clean.
My guess is that you have some adhesion problems, and you adjusted the bed too low to compensate. Now that you have the hair spray, or you have a clean sheet, you can back off and get better results. The perfect first layer (IMHO) has very small gaps between the infill. The bottom of each infill line is flat, but in between lines is a tiny gap (maybe 10% of the line width).
3D printing has so many variables, what Bed temp and initial layer speeds? What’s the environment like, do you have an enclosure, a space that’s warm without any draft? Hopefully the filament is new’sh and kept dry in low humidity space?
On the off-chance this helps, my printer has bed leveling with a BL touch. Which is very good. But my print bed actually changes shape while warming up. So I added a few pauses to keep warm for 5 mins before probing. That 5 mins is well worth the better quality first layer. Although I would love a nice new chunk build plate someday to alleviate the issue.
Agreed. And even before that, the lines that were pretty consistent have a lot of build up at the ends, where the nozzle turns around. That means there is too much filament for the space, which is probably because it is too close.
Already used teaching tech calibration site to help dial in esteps, flow, extrusion, temp and retraction settings? I use the site when ever switching to different filament manufacturers or types. Some people go so far as to calibrate for different spools of the same manufacturer and type; to each their own.
Material: PLA
Bed Temp: 68C
Nozzle Temp: 225C
Print Speed: 50mm/s
First Layer Speed: 70%
I use a BL Touch with physical and mesh leveling on the Repeat V4 and I use a BL Touch with Mesh leveling on the Ender 3.
I will go through the calibration steps from the Teaching Tech website and see if I can get everything right. It’s just weird that I only recently started having this issue on two different machines. So hopefully calibration and altering my slicing settings will get rid of the issue.
I also just tried microstepping during the print. I microstepped up in 0.01mm increments while it was doing the perimeter lines till it got the point where it wasn’t stick very well at all. Then I went back down about 0.02mm to where it was sticking again. So logically, this was the right spot. So I left it to continue. Once it finished the perimeters, it started infilling on the first layer and the same issue appeared.
I will some calibration and report back. Thanks for all the input!
I advise you to clean your surface bed very good with IPA Alcohol. At first i had your same problems, then i cleaned with IPA. In the past 4-5 years i never had a failed print. I manually set the bed. Al prints have a high quality bottom. Only with a lot of force i can get the prints from the bed. Ender 3 PLA 60/210 Celcius 50 mm speed. Some 500+ hours of printing on the same bed
Be careful if you have an acrylic enclosure too. If IPA evaporates from a hot bed inside an acrylic enclosure it will fill your nice clear panels with hundreds of micro cracks. Ask me how I know!
Appreciate this info. Thoughts on Polycarbonate panels instead of acrylic, or apply a protective finish/sealer? Would like to use something transparent, but not glass.
Am searching the web on hot bed options. But am curious what folks here love and hate, PEI, Glass, G10, something else?
All my BIQU B1’s have that stock flex steel magnetic removable with crinkly surface, and with some hairspray on them, they work pretty much flawlessly for me. On my big Ender Extender 400 XL I upgraded the print surface to a flex steel magnetic removable with PEI coating, and I also use a coating of hairspary. It’s been working flawlessly too.
From what I understand acrylic is more transparent and less prone to scratches and PC is more durable? Not really sure of any downsides to using PC if the price is comparable.
Personal preference I like textured PEI spring sheets. They work with about everything and are convenient to remove. Need to try some garolite for printing nylon on. The nylon I have doesn’t seem to like PEI too much.