I feel like “it’s my thread and I’ll spam it if I want to” even though it’s not! So sorry @jamiek !
I thought this was interesting and quite cool - but how does it work out when to release the hot air, and for how long?

I feel like “it’s my thread and I’ll spam it if I want to” even though it’s not! So sorry @jamiek !
I thought this was interesting and quite cool - but how does it work out when to release the hot air, and for how long?
That SOVOL dryer looks pretty interesting. It seems to be trying to cover a lot of what I thought would be valuable… Keeping the hot air within the enclosure and circulating that then venting some of it at a much slower rate. The ability to be sealed when not in use to act as a dry box as well. It’s difficult to tell how much would actually vent out of that tiny hole in the lid, although I guess it’d be pretty easy to test given that it can measure its own RH. Run a cycle with it plugged, see what it recovers to, run the same cycle with it open, see what it recovers to.
I’m not entirely sure how I’d go about actively venting one. I think the aspirational goal would be something that can run entirely unattended and without user intervention. It should stay sealed enough to prevent the needing to be re-dried too often. It should only vent enough to keep the drying process proceeding effectively in order to avoid energy waste. It should be able to vent effectively enough to dry some packed-in silica gel buffer (tens of grams of water removed per hour, potentially).
The easiest approach would be to have something like a tortuous path for intake/outlet. These could be either positioned such that a small amount of the internal stirring air goes through them, that the temperature differential causes them to passively flow or have a small fan in line. That’d be cheapest to implement but the worst seal. In theory it should be possible to calculate the water ingress rate for a given temperature and RH differential. Maybe it’d be best just to have the thing automatically re-dry itself every few days? That’d be an interesting hypothesis to check.
The most hardcore approach would be some kind of mechanically controllable seals for inlet/outlet and active ventilation. Could be a solenoid valve for low enough airflow rates, could be a ball valve or flap valve for higher airflow rates? Could be the ability to just lift the lid mechanically? Perhaps the ability to hook up to a CO2, high-pressure air or low pressure compressed air line as a purge gas? Mechanically open a valve, puff some dry compressed air in to displace the hot moist air, close the valve again.
Perhaps the more ‘realistic’ set of options would be something like a low pressure flap valve, similar to a dryer vent or something. It could be sprung to keep a decent seal while inactive but open enough to allow air to trickle through when pressurized by fan pressure. One opening into the enclosure, one opening out, a fan at the intake to pressurize the enclosure very slightly. It could either run consistently with low airflow or briefly (5-10 seconds) periodically with higher airflow, just whatever is needed. This might need a fan with some decent static pressure or a relatively large flap vent to achieve.
Finally another idea is that we don’t actually need airflow ‘through’ the unit as the air internally is getting stirred around quite a lot, we just need a way of getting air in and out. Something like a diaphragm pump without a check valve could work, something where it’s just moving air back and forth which would be enough to achieve some air exchange without needing a specific inlet/outlet. Perhaps it could slightly pressurize the container and then turn off, letting the pressure equalize back out through the pump, transferring the moisture out that way. That could have the positive scenario of also blowing some warm air down the bowden tubes, perhaps.
I hadn’t really considered it before, but the idea of having it be able to run entirely unattended could actually be kinda sweet. Rather than triggering it manually, it could just monitor its own RH and run a dry cycle once the RH starts to climb above a set amount. I wonder if it’s more efficient to spend something like a few hours fully drying the filament and then trying to store it vs heating it up for half an hour and then venting that a bit but repeating that as needed until the RH stays below a certain amount.
It’d be interesting to see how much energy it uses to dry a given quantity of filament vs something that’s blowing the air through constantly, I suspect quite a lot less although likely limited by how good the enclosure is at insulating itself from ambient. That may not actually matter all that much, either. I tend to inherently think of efficiency as higher always being better but if it’s a difference of even a few hundred kWh a year when used with 10s of kgs of filament then it’s not really a big deal. On the other hand if you’re using it in a A/C’d space then that extra heat load added can multiply pretty quickly.
That’s similar to what I do with mine manually. I just have a little printed nubbin that clips onto the lid and lets it vent a little while running which I remove and drop the lid while it’s off. I’m sure there are significantly better ways to do it in a designed-in type of process, but for retrofitting things without heavy modification it’s hard to beat something like a weird micro-servo based contraption!
I am not sure about that “act as a dry box” -if it’s for long term storage that’s an awful lot of infrastructure for a spool or two of filament, however in a worst case say a 24 hour print in Nylon, once the material is dry, why not keep the ambient at a relatively low 40° and backed up with dessicant? Isn’t the goal just to keep the moisture out of really hygroscopic materials while they print once they are dry?
That’s why I think drying and storage are two different things.
It would be interesting to see the range of use cases. I’m personally not worried about having a dozen different filaments on the go, I tend to have 2-3 available and one that I’m actively using, with that loaded and ready to go. Being easily able to start a print at any point and get something out in whatever filament I’m using as ‘standard’ quickly is more valuable to me than having a huge variety of different colours/filaments available etc. Changing filament being accompanied by a couple of hours dry time isn’t a huge dealbreaker, although adding the capability for a 2nd roll or a 2nd dryer for dealing with changeover would be helpful.
If you were wanting to approach that as something where the drying and storage are entirely separate then that means the sealing is probably irrelevant beyond lowering total energy usage. That’s probably fine to either have fixed small vents on the top and bottom to allow air to naturally flow through or a small fan to drive a little bit of airflow as required. The main issue is the dryers that use ambient air as the intake to the fan/heating element.
I really don’t know if just being warm is particularly useful there. I think we’re exploiting the shape of the curve between ‘hot’ and ‘ambient’ where we start with unconditioned ambient air and by heating it and the filament we’re simultaneously making the air low RH (by significantly increasing the saturation pressure) and pushing the filament to a point where it either holds less water or can more readily release stored moisture. Starting at 20degC, 60% water content in the air and 1% water content in the filament then going to 70degC, 10% water content in the air and 0.1% water content in the filament then, using silica gel, back down to 20degC, 20% water content in the air and 0.1% water content in the filament is the path that most are following. Going to 40degC, 30% water content in the air and ? in the filament may not be a useful mid point.
So I (finally) started designing/building and for the first version I’m skipping the TEC idea and using pure heat, and for expedience I’m going to use a 3D print bed as the heater. This also makes it easy to control the temperature.
The concept is a modular, stackable system to reconfigure for regeneration, multi-stage “boost”, heated filament drying, or other possible configurations.
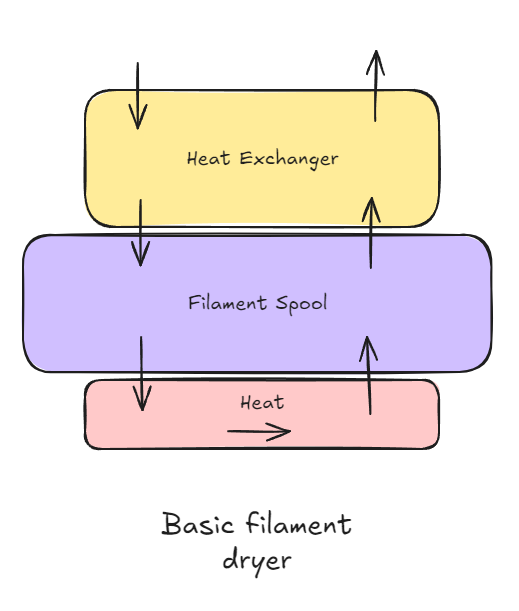
Here’s the basic “heated filament dryer” that would take the place of a food dehydrator, but with a heat exchanger so it’s not throwing out all the heat after it passes through the chamber once.
In place of a spool, if there’s a canister of silica gel, it can regenerate the silica gel to moderate RH depending on ambient RH.
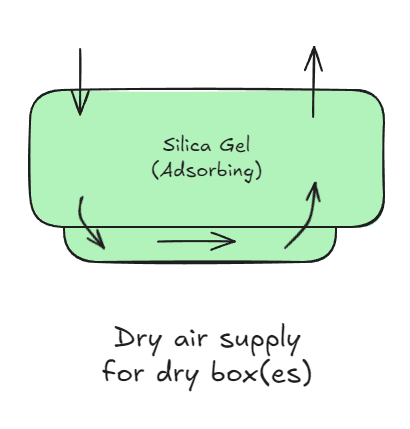
A third configuration is for using previously-dried desiccant and circulating flow to one or more dry boxes. It uses only a bower and no heater, so it doesn’t waste tons of electricity.
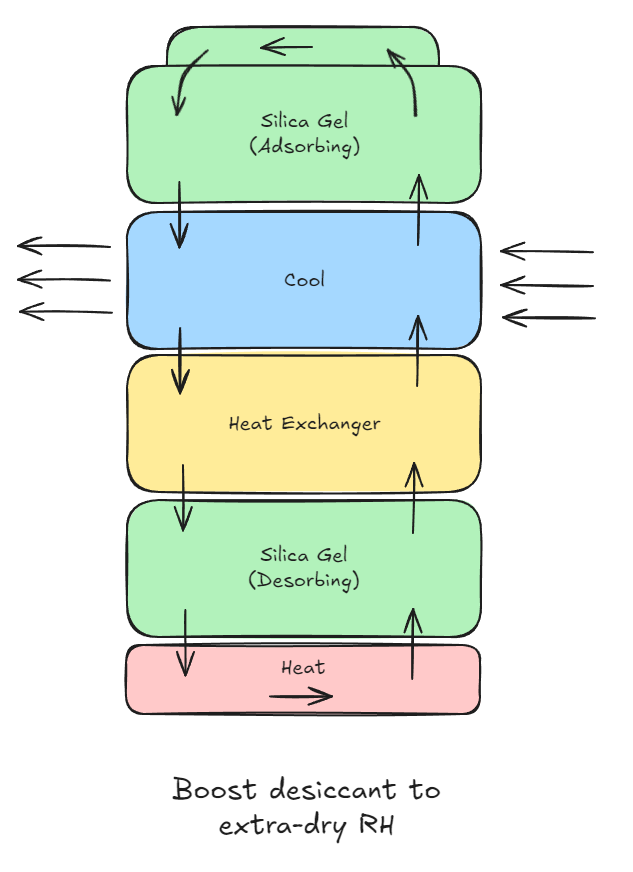
Another option is for creating extremely dry desiccant when the ambient is not very dry. By regenerating two canisters to “moderately dry RH” and then using one of them at room temperature as the “virtual ambient” and heating the other one, it should be able to regenerate down to much lower RH than a single stage is capable of.
(The cooling module is needed or else the desiccant on top will slowly build up temperature and lose some of its effectiveness.)
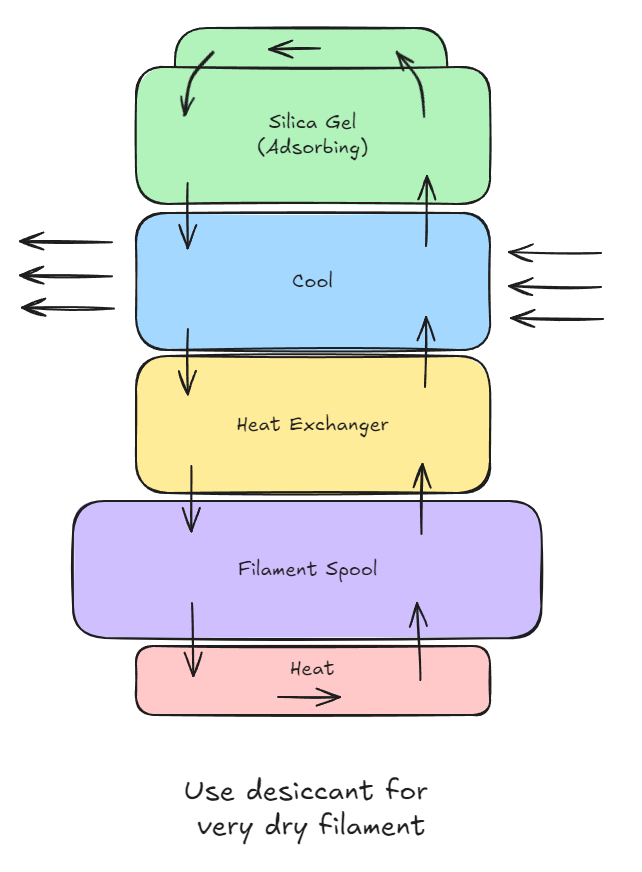
Finally, if the “food dehydrator” or “dry box” configurations are not dry enough, a heated filament dryer with cool desiccant adsorber should be able to achieve very dry filament. Even better if the desiccant has been dried to the level of the two-stage setup.
Initially I was hoping for TEC for better energy efficiency, and I wanted automatic switching between different configurations so it would be “set and forget” and achieve multi-stage drying. But for something practical and simple for a first version, those requirements got thrown out.
The good news is that I think the entire system can be 100% 3D printed with the exception of a few blowers to circulate the air. The total cost should be super low.
Also as another feature of the modular stackable system, it should be straightforward to interpose a block that indicates temperature and humidity, without having to have them permanently installed or figuring out how to make the measurements.
I’m also thinking if the parts are printed out of ABS or ASA, then when regenerating the silica gel, the temperature can be cranked up to maybe 80C or 90C, and then when using the system for filament, it can be down at the appropriate level for the filament, perhaps 50C for PLA.
We have bad humidity here at times, and as such i never thought much of my dryers, just basic, no air flow ones (cheap). Til one day i went out there and found massive condensation on one of them. I posted a pic here but i was never able to find it. So my belief is they really don not need air movement, but probably would speed things up! I keep my rolls in large ziploc bags from amazon. They hold 3 rolls each and place packets in to grab any moisture. (which i probably should put in the dryer overnight to renew).
Just saw this and I like the concept of a filament storage box with a dryer dock.
When it was released I thought it was a good concept, then I realised I need Twenty of them!![]()
Agreed. I like the concept but not the extended price.
I know a couple guys that have them. As far as they’ve mentioned, they work well. Just pop the box that needs a touchup on the dryer. They feed their bambu and prusa multimaterial printers from them.
Just for information on this thread.

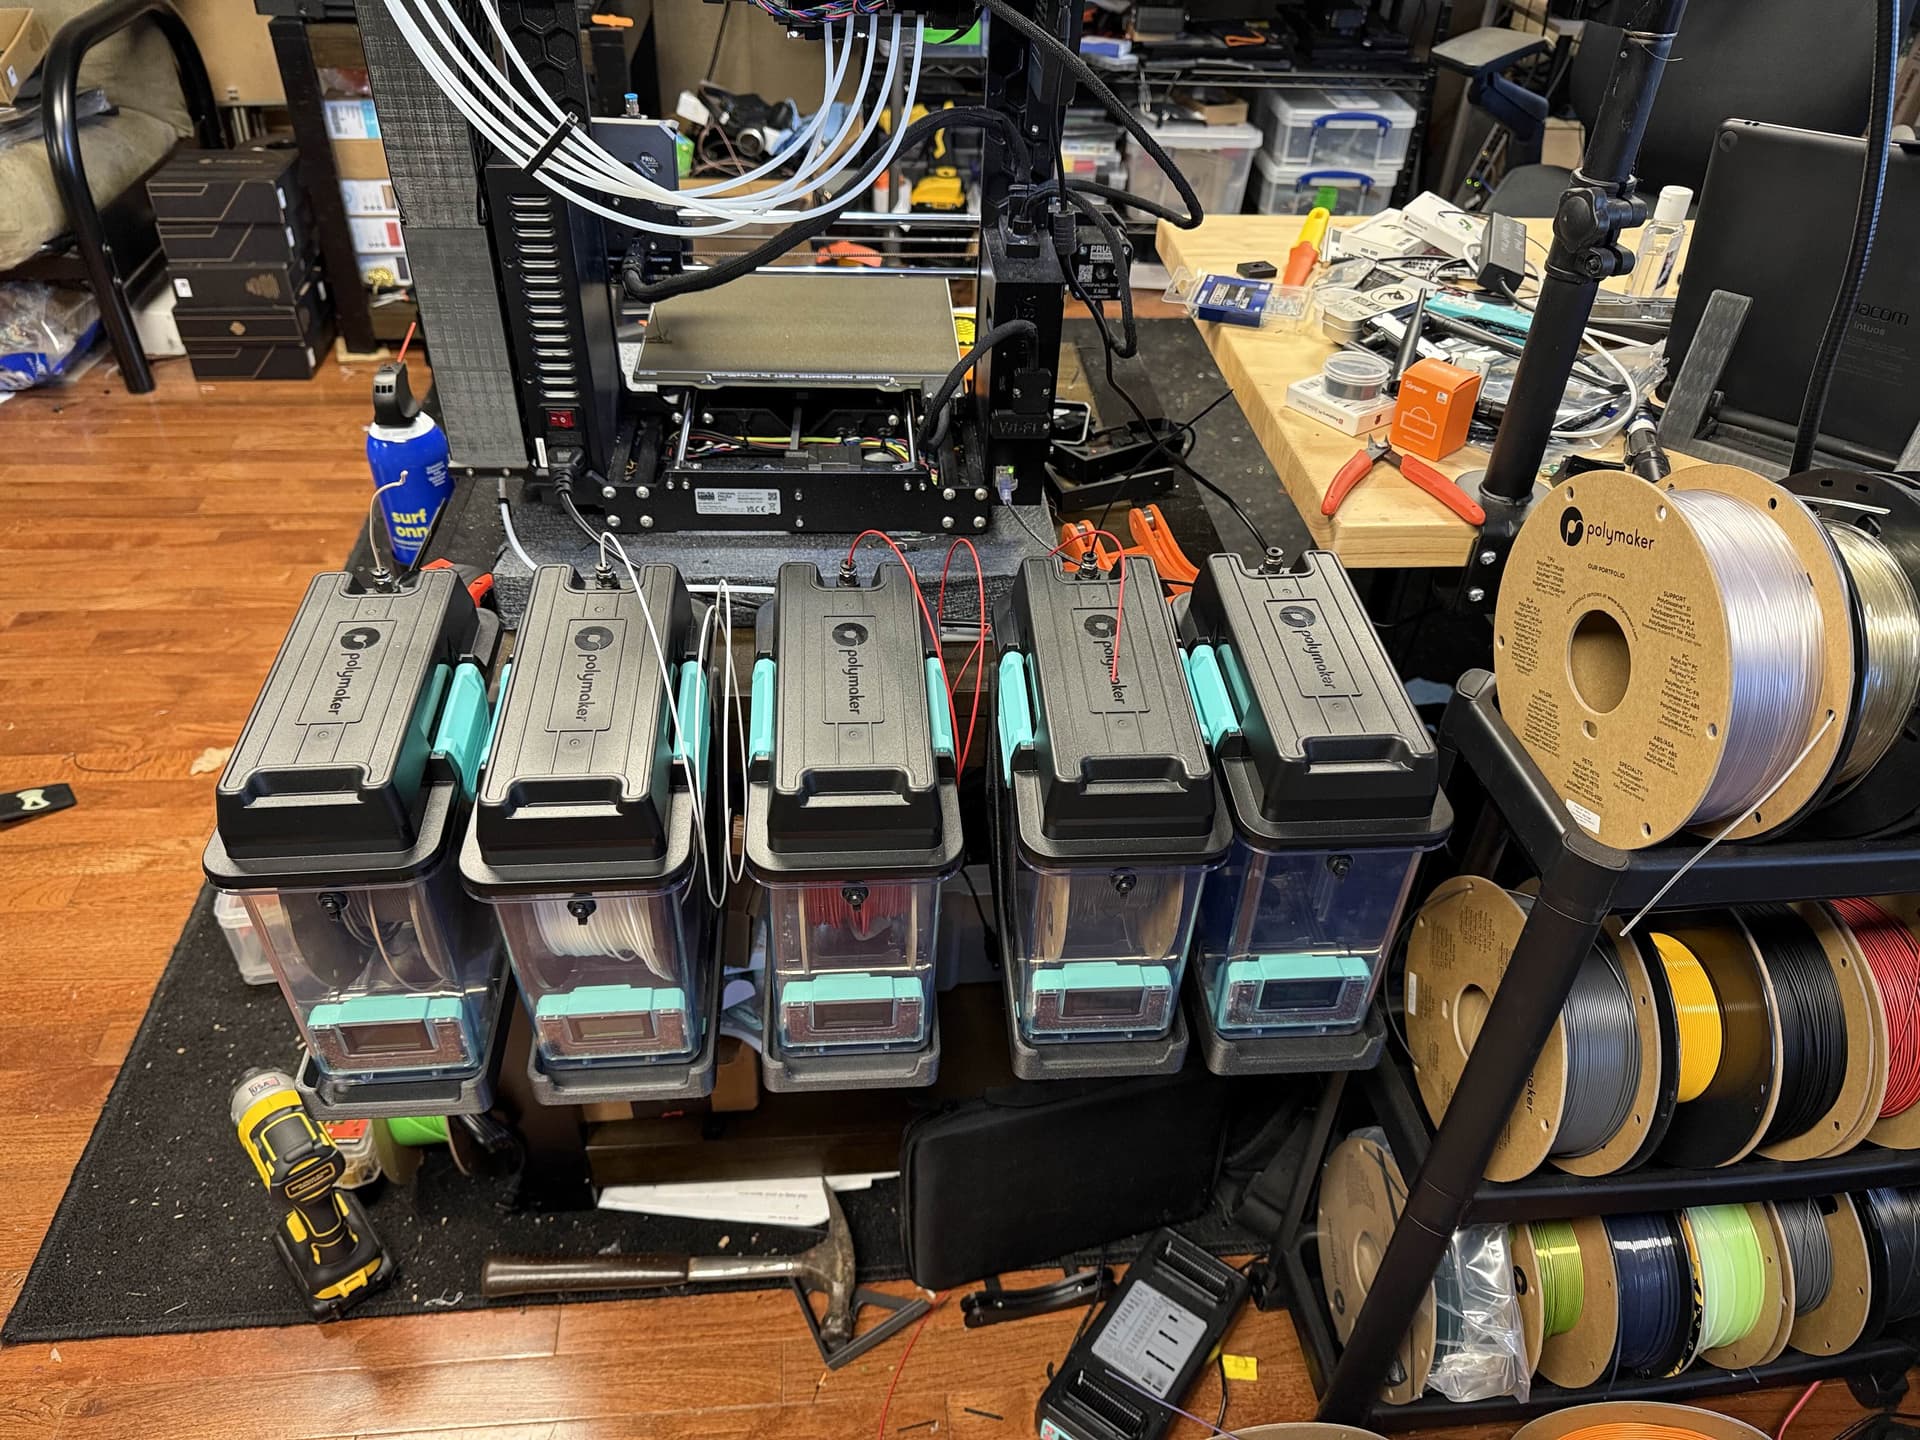
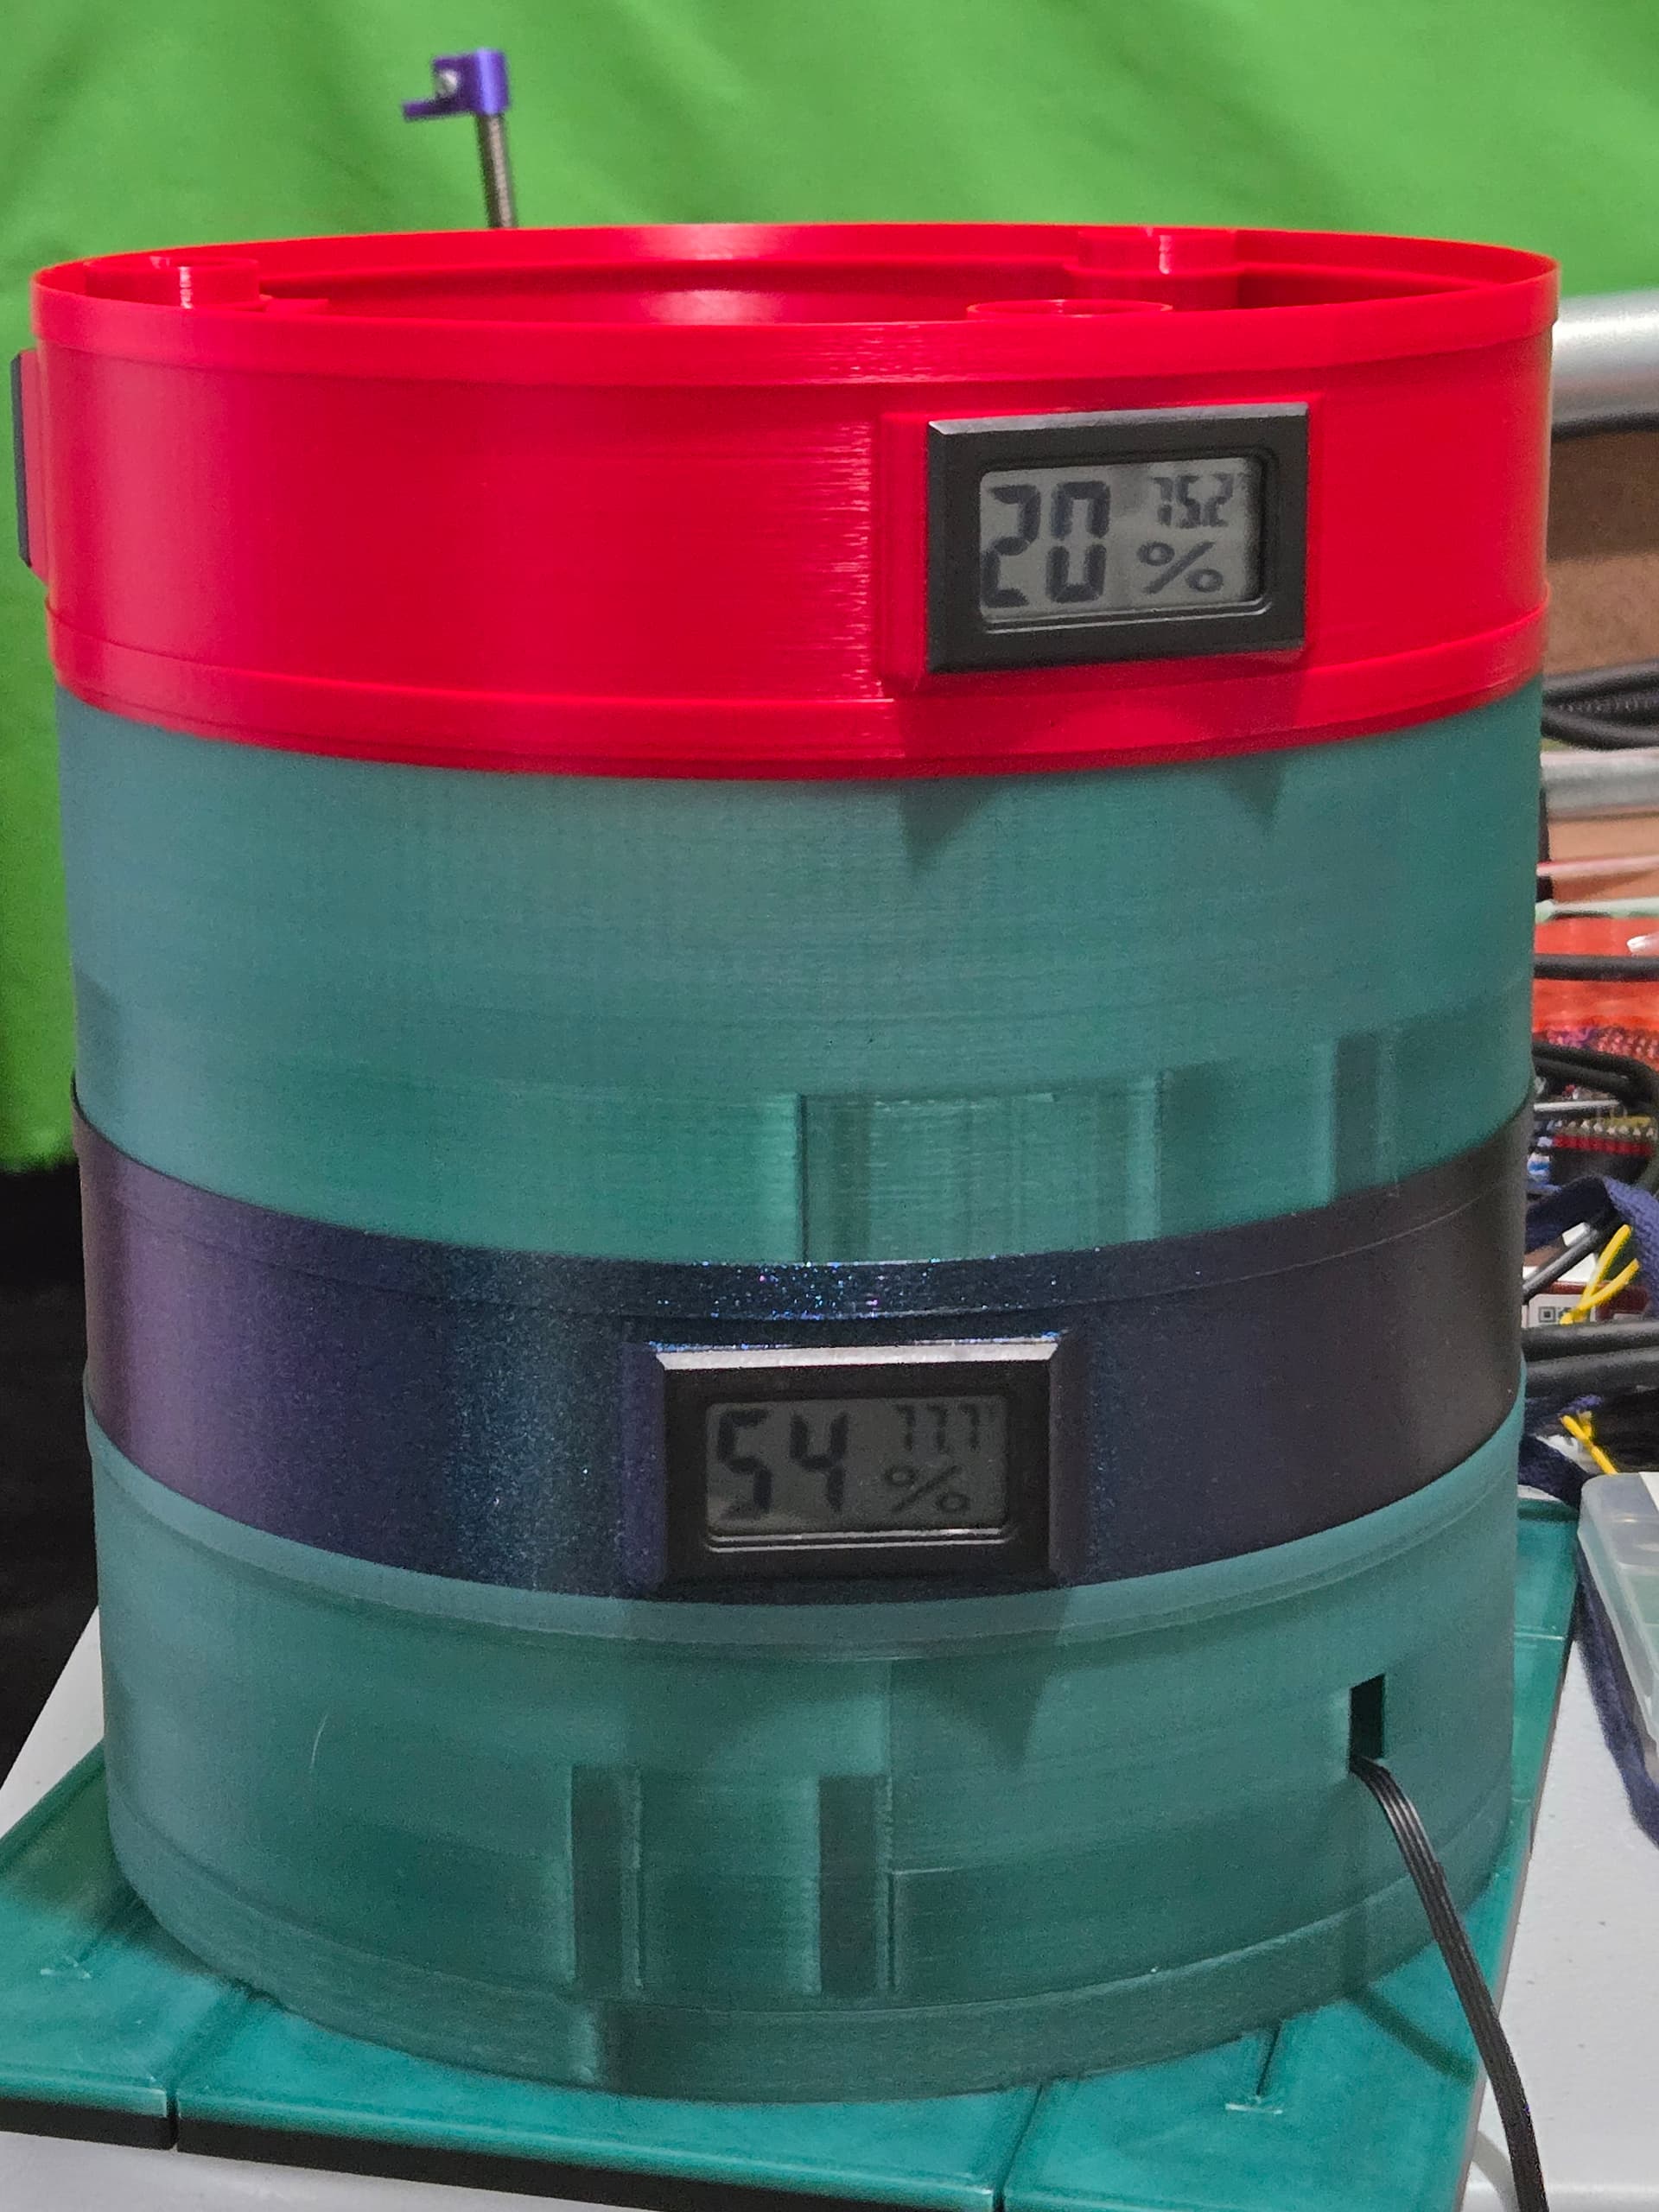
Okay, this is taking a bit more work than I anticipated, but I have some partial success.
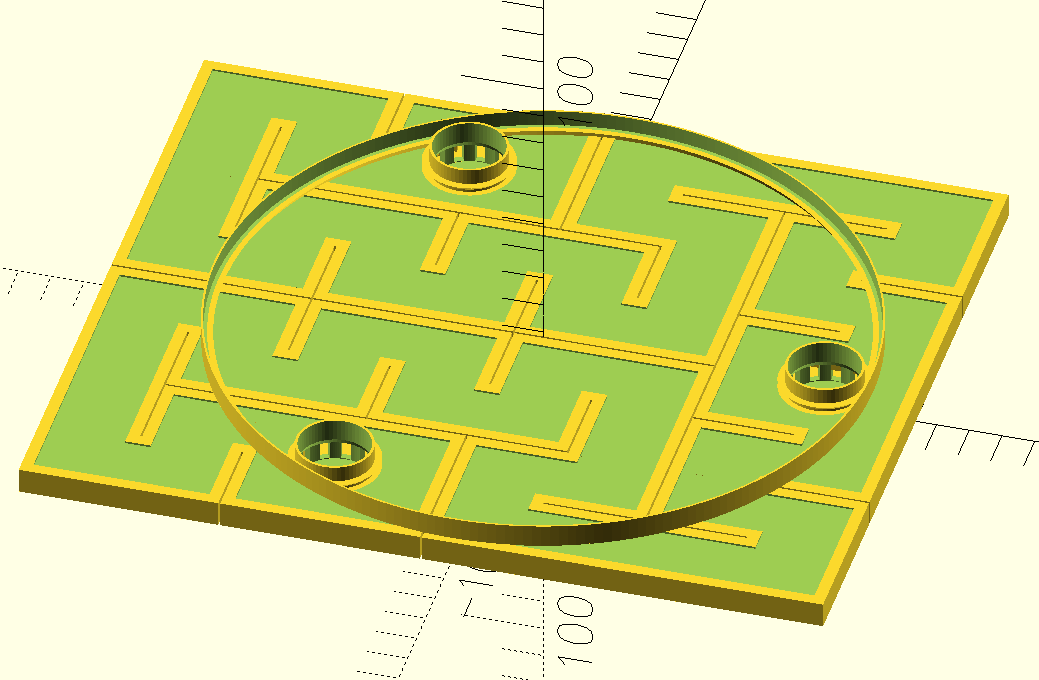
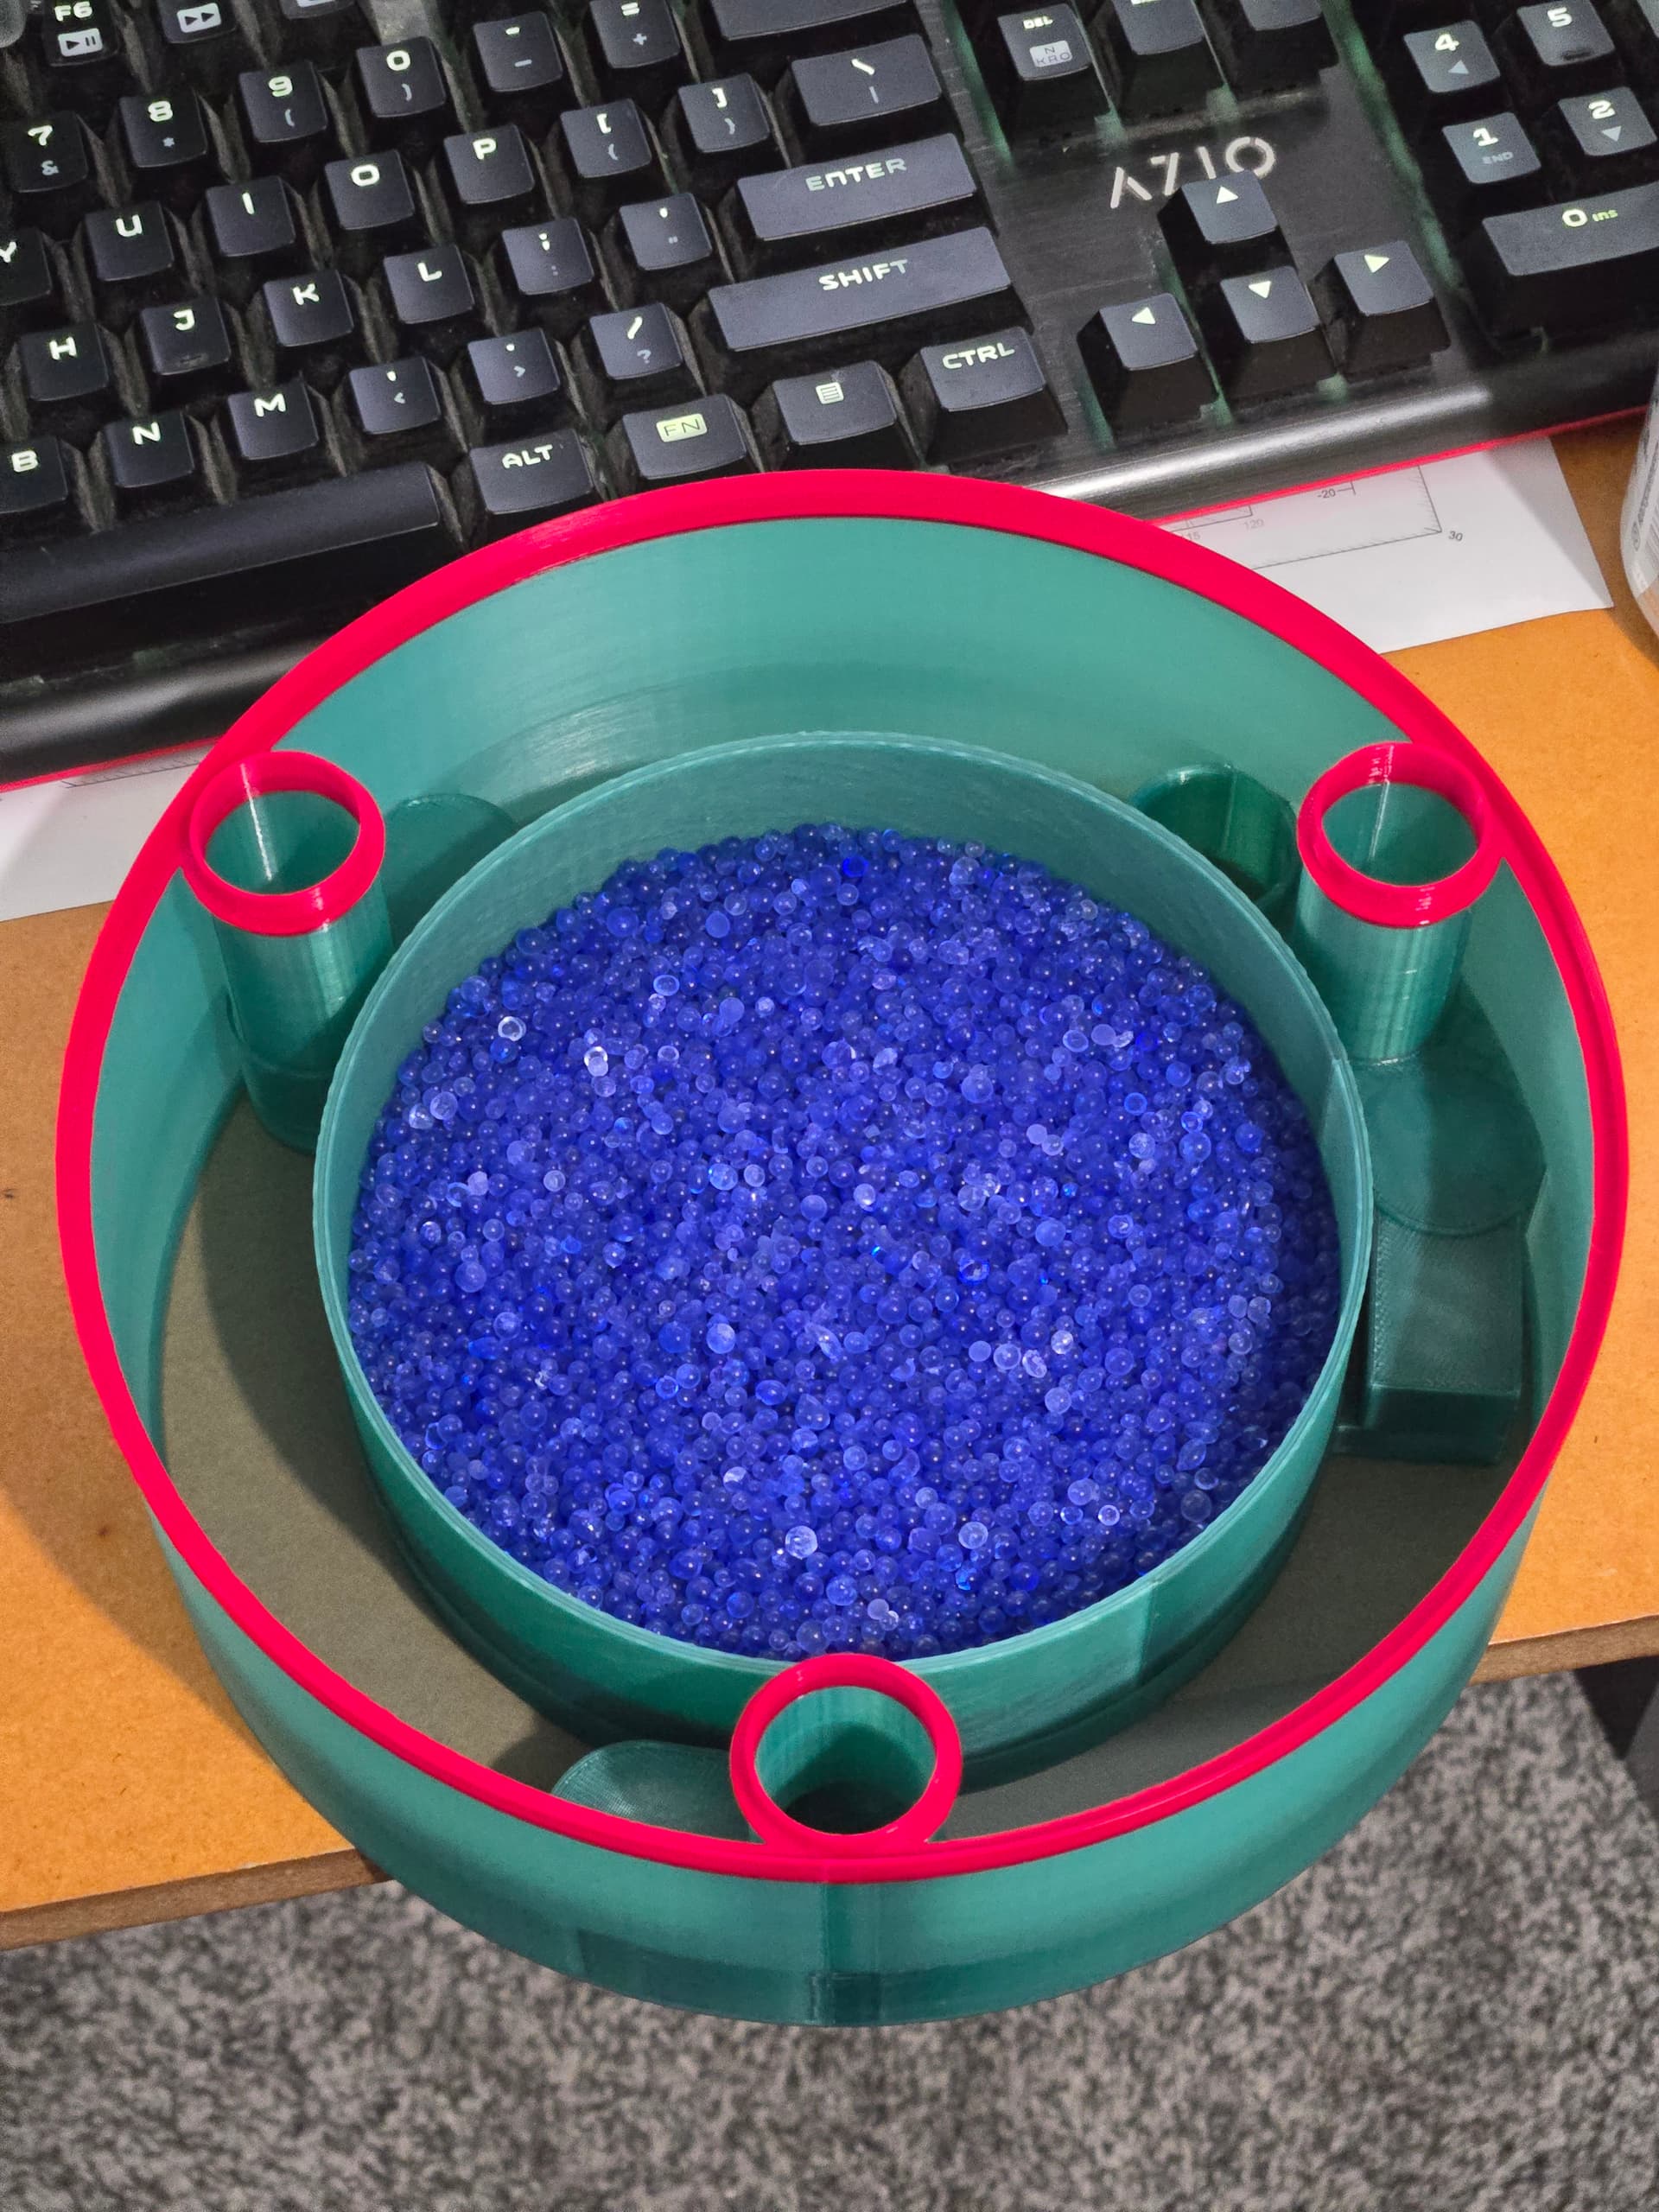
Part-way through, I became paranoid about leaks. I have to have somewhat loose-fitting joints (relatively speaking) because it’s 3D printed, and there are a lot of joints. If the ambient is high humidity, then the leaks in/out from the system could perhaps produce a bigger moisture load than the filament.
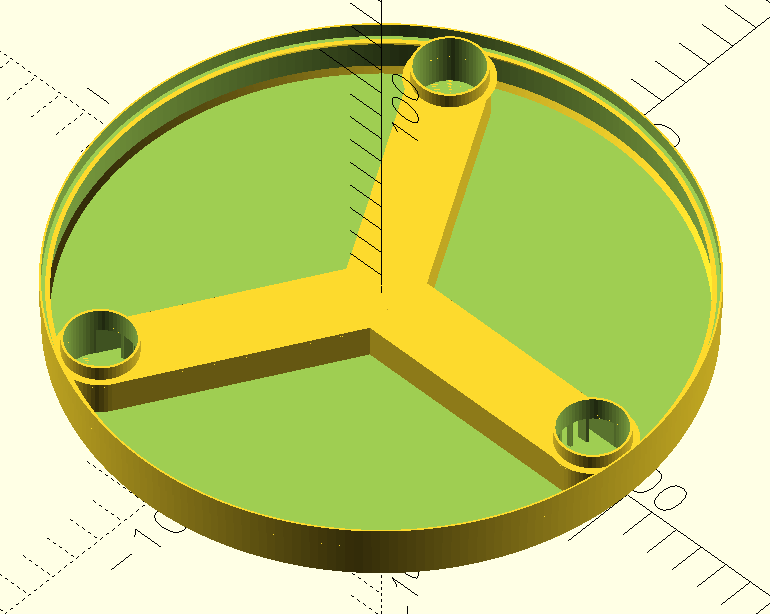
The approach I took is to have an outer skin that is round and with an overlap, it shouldn’t be too terrible, and tape could be used to seal the outer skin completely. Internal leakage that recirculates a lot, like 10%, through unwanted paths will just mean slightly reduced effectiveness, whereas 10% exchange with humid ambient could be catastrophic.
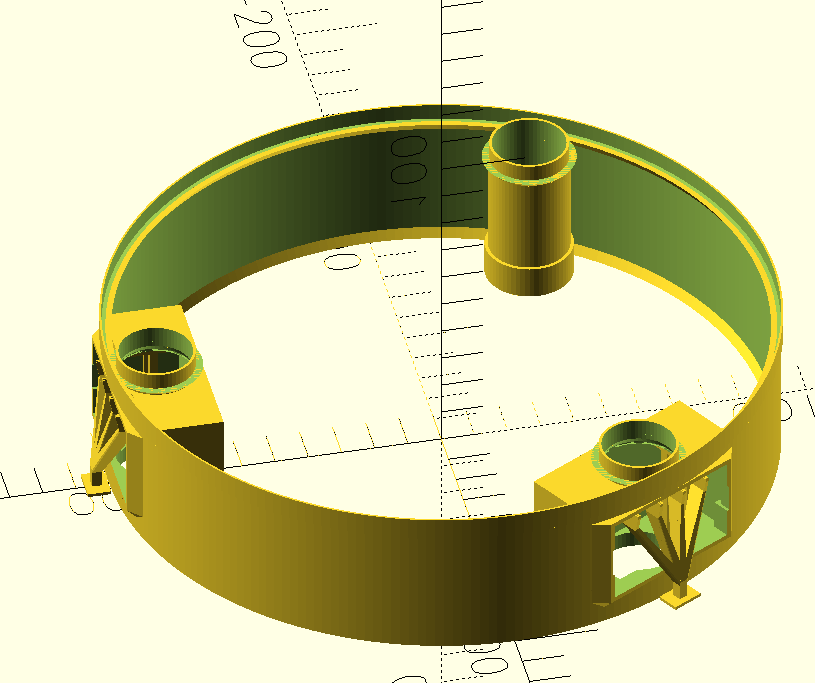
The three ducts are intended to have one flowing upward and two flowing downward.
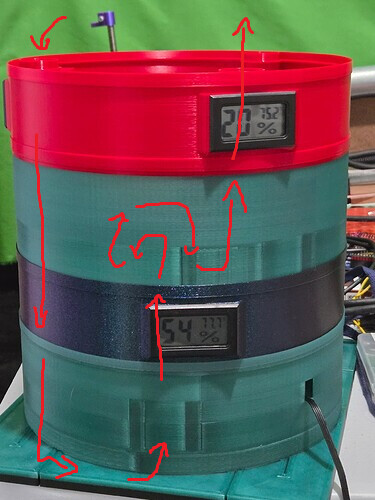
So the first picture was (from bottom to top):
Heat module on bottom (but not being heated)
Then blower module
Then sensor module
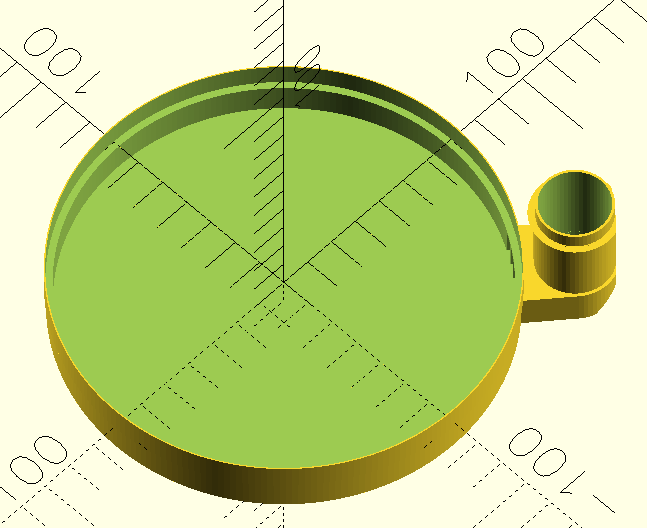
Then silica gel module
Then another sensor module
With the blower turned on, it pushes air through the bed of silica gel and the upper sensor reads lower humidity (and in this demo the dry air is just dumped into the room).
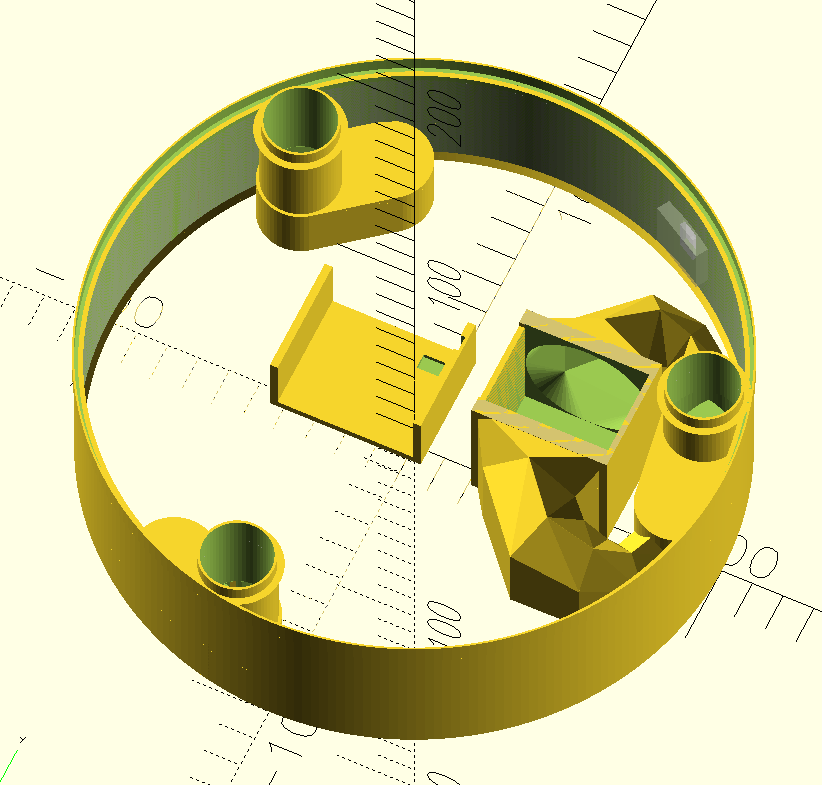
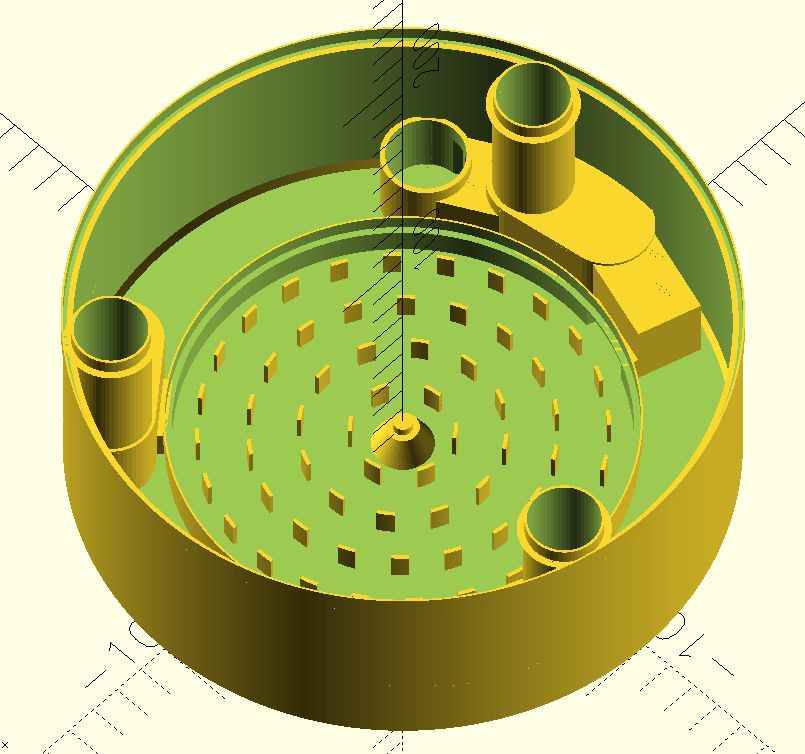
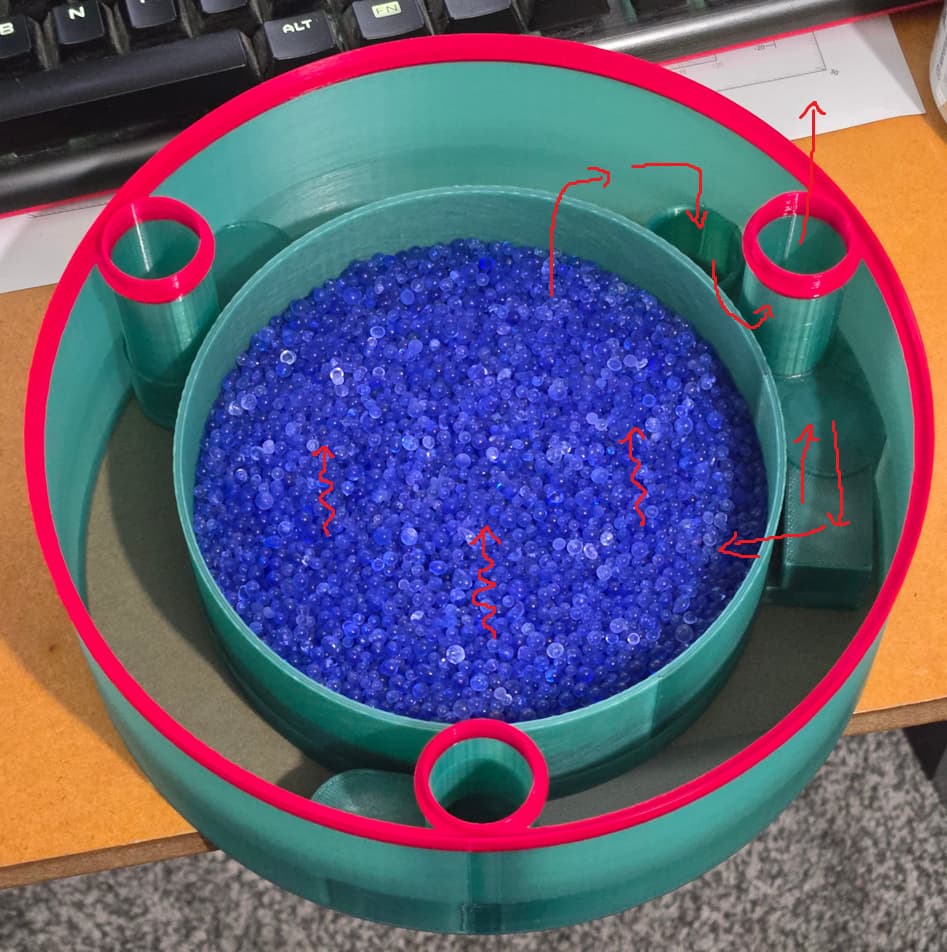
The airflow in the silica gel module flows up through the bottom, then through a duct into a sub-floor below the silica gel canister. Then it flows up (hopefully evenly through the entire area) through the silica gel, and then the lid redirects it downward into the internal output port where another duct directs it up again to the next module.
I’m also burning through a lot of filament so I’m using up all my old stock of random colors. I’ve probably wasted used about an equal amount through failed experiments learning experiences.
I also have a bottom-redirect module when heating is not needed, e.g. when using the silica gel to pump dry air into the dry boxes. The heat module can also work but this would have a bit less resistance to air flow.
I am working on the heat exchanger and I’ll also make a top redirect module to recirculate output back to input for the “boost” cycle.
Maybe 3d print some TPU gaskets?
You must’ve just pulled something off of that upper module- no way it is 20% open air like that if the lower one is at 54% pulling ambient air.
(thinking about that- where did you get 54% ambient air in Colorado? It was below 20% over the weekend)
At any rate, that’s looking really great.
The chamber between the two sensors is silica gel, and air is being pushed through it. Here is the path:
The complex path in the middle is trying to illustrate the path through the silica gel, shown in more detail in the other post.
So the air after passing through the silica gel is dry, which is not too surprising. Evidently the air flow is slow enough to get a chance to dry pretty well in a single pass, but still fast enough to keep the sensor from seeing any of the ambient air right above it.
As for the ambient humidity, we’ve had a warm and wet spell the past couple days:
At the moment I am glad because it actually illustrates the desiccant doing something. A week ago it was colder and indoors was about 35% RH so it would have been less of a demonstration.
I am still struggling to get my head around that a bit - if the silica gel is removing moisture from the fresh air (which it is) - how does it recharge? Or is that a manual thing,
It wouldn’t be too difficult to modify my dehydrator to do that I think - using a few pipes or perhaps a double skin wall for return air, and a layer of silica gel at the bottom. My head keep saying that if the gel is drying from the heat then the moisture above it must have increased, but I know that’s not what’s happening.
in the meantime -

It’s a manual thing. You bake it.
So it would in turn dry itself as the humidity is removed, or you can bake it like barry stated.
Just to be clear, I talking about @jamiek 's version - the silica can’t both remove water and put it back at the same time (dry itself) … or can it?
Yeah, I love that bit - they are bouncy little buggers.