Filament Dehumidifier

I use them to compute a weighted average of the indoor temperature. But it doesn’t change fast enough for my DIY thermostat. So I compute an offset between the average and the one wire sensor on the thermostat. The one wire sensor is used to turn the heat on or off. But the offset is added so the house average is comfortable.

I do things like remove the weight from my office on the weekends and the bedrooms during the day too.

They are great. I replace the batteriesaybe once per year. Much better than the ilea zigbee stuff.

Yes, this is a significant consideration for the design. Some of the heat/cooling would be lost to ambient or just flow backward, some of the heat will be lost through the air temperature, and the intended heat flow would be through evaporation/condensation (technically desorption/adsorption).

I think by pumping the air slowly, or in bursts, the proportion of heat carried in the water vapor vs. the air temperature would be improved. If the air is circulating quickly, then I could imagine a huge fraction of the heat being wasted.

A more idealized setup might use a heat exchanger to allow exchanging the gases without exchanging the heat, or a different idealized setup might do the entire thing in a vacuum and let the water vapor move by itself. It’s conceivable that even diffusion of vapor from warm to cold could even work. But I think with some care, slow or intermittent forced air can work well enough and it’s cheap and simple.

Parts of Texas can be very wet or very dry. Where I’m at, it’s let’s say 60% depending how you measure. You’re right, the left side circulates to ambient, and the right side circulates to the dry box. Circulating through the dry box should be much better than drawing ambient and pumping into the dry box, because the ambient will be a huge load compared to the dry box return.

What I’m expecting is that the energy required for one stage to pump 1g of water will depend on the RH difference between the inlet and outlet. Higher RH differences will require higher temperature differences, and higher temperature differences will increase losses worse than linear. Heat losses are generally linear with temperature but the TEC becomes less efficient at higher temperature differences and past a certain point it is almost 100% waste. This is where the multi-stage approach comes in. You have to pay for the latent heat of vaporization multiple times, but two stages where each stage has less than half the loss can be better overall.

Here is a totally made up chart:

This is a graphical illustration of what I’m expecting to happen, described in the previous paragraph. A single stage gets increasingly expensive for high differences in RH, but for low RH differences it benefits from only having to pump the water once. For a high RH environment or to drive extreme low RH in the dry box, more stages can be more energy efficient despite having to pay the heat of vaporization multiple times.

Another dimension I haven’t really thought much about is whether it’s better for a high capacity (in terms of grams per hour) system to run at a lower duty cycle, or a low capacity system to run at a higher duty cycle. My initial thought is that this affects mostly the physical size of the system and doesn’t hugely affect efficiency or number of stages, in which case a smaller, cheaper system might be more than plenty for a filament dry box. That’s my hope anyway.

2 Likes

Stage 1 begins!

I have a self-inflicted shortage of filament all round but here’s my current schedule for the next month or so.

  1. check the hygrometers in the “dry boxes”.

Despite what the internet says, a couple of tablespoons of wet salt in a jam jar lid are busily at work in the first (empty) dry box. After a couple of hours the meter is right on the button (75%) but last time I did this I had a few percentage points either way. I will check again in the morning after roughly 12 hours, and move on to the next box. 12 boxes, so see you in a couple of weeks I suppose.

This time I’ll note the differences on the box.

  1. The tiny food dehydrator arrived today.

I’m currently printing some new sides initially to stack two spools of filament in it, and am awaiting the arrival of yet another hygrometer/thermometer!

We’re away for a few days, so early next week I’ll start weighing and drying filament (again).

  1. I’m going to do some serious mods to the Eibos eventually, but for now some interim ones coming and will update here for want of a better place.

  2. I’ll make some new drying canisters for the storage boxes, dry the silica gel (measuring water loss) and then set the boxes up with dry filament and 200 grams to see if that works.

Curiously my PLA and PETG have been playing very nicely after six months or more at 50%+, but I’ve got a couple of flex and ASA projects and some PC on the way, so just getting prepared!

1 Like

After 4 DAYS in the test box - the one hygrometer has fluctuated between 75 and 77% I have no understanding of how that is possible, but will put it down to “economy of instrument”.

Will give them all 12 hours or so in the same atmosphere and see what we can learn from that.

I don’t know what I was thinking when I said “I’m currently printing” because that was today!

Tomorrow I’ll follow up with a bit of an analysis of the thing, and see if I can melt the PETG sides I’ve just printed.

The first round of data is in!

There’s another not in the picture also reading 77%. After 7 hours, they all “should” be reading 75% - my observation is that they do fluctuate somewhat, but this is good enough given that none of them are mission critical.

The few percentage points of error are trivial except for the circular one, which comes from the Eibos Cyclopes filament drier, all this time when the humidity in the dryer has been reading 12%, has it really been 25?. More on that in a future post.

One of them has given up. :frowning:

1 Like

A new battery or 20 will arrive today! :smiley:

1 Like

A small update:

On the coldest November day in a decade and humidity we can live with! :rofl:

The circular gauge from the Eibos is quite disappointing, but as for the others, a six point difference in temperature I can live with, and also a few percent variation between.

If my “salt test” is accurate, most read one or two percent over 75%, but scientific instruments aren’t required to monitor filament “dry” boxes.

I have almost no filament in stock at the moment, but I am going to load 200 grams of silica gel into an empty box and see what that does over the course of a month.

I guess it will take a few weeks for Black Friday filament to get here, so I’ll repeat that experiment with freshly dried and “wet” filament. Surely not all the IKEA airtight boxes leak?

2 Likes

That can be another part of your experiment. Put the small coil of filament, some desiccant, and a gauge into a vacuum sealable bag, seal it. Put more desiccant, another gauge, and the sealed bag into the box. Close that up and monitor it against just a sealed box with filament, gauge, and descant.

1 Like

No progress, but progress…

I’ve finished the mods to the el-cheapo food dehydrator. It’s 240mm diameter which is just enough to fit a spool, so I’ve made a couple of extensions. I’ll post some tear-down stuff later, but for now there are no surprises: with the temperature dial set at 70,° after half an hour or so it almost made it to 50, so my PETG extension is safe!

Note the humidity never got below 19% on the “calibrated” dial, and the round one is from the Eibos, filling me with false expectations!

More disturbing, or interesting perhaps was that following a throw away line in the discussion above, I decided to dry some old spool centres. After an hour (four of them) had lost 8 grams (cc’s) of moisture in total, after two hours another 1gm. So it’s pretty clear that the first couple of cc’s from every spool are coming from the centres and not the filament.

Pressing on, I emptied all my silica containers to dry the contents properly rather than just waiting for hours in the filament dryer. There are a lot of them, so it’s going to be a pain to refill!

That did give me a kilo and a bit of silica gel to properly dry in the oven. So I poured it into a box overnight, and got the humidity down to 19° - which in my world is close to as low as it can be. Note that it’s the same number exactly as the one on the dehumidifier - presumably the same as it would have been in the oven, and therefore I am thinking that’s just as dry as I can make the dessicant?

Today’s temperature continues on the tail end of our cold-wave, and the humidity is having a day off too!

I am not sure if I’ve drawn any conclusions here, but maybe I’m satisfied that this is the baseline for me. I should note that I have had some printing issues with cheaper PLA and PETG in the past, but the more expensive stuff (mostly Prusament) has not been an issue.

TPU and ASA need a lot more nursing, but then I’ve only used “lesser” brands of that as well so that may be a pointer.

2 Likes

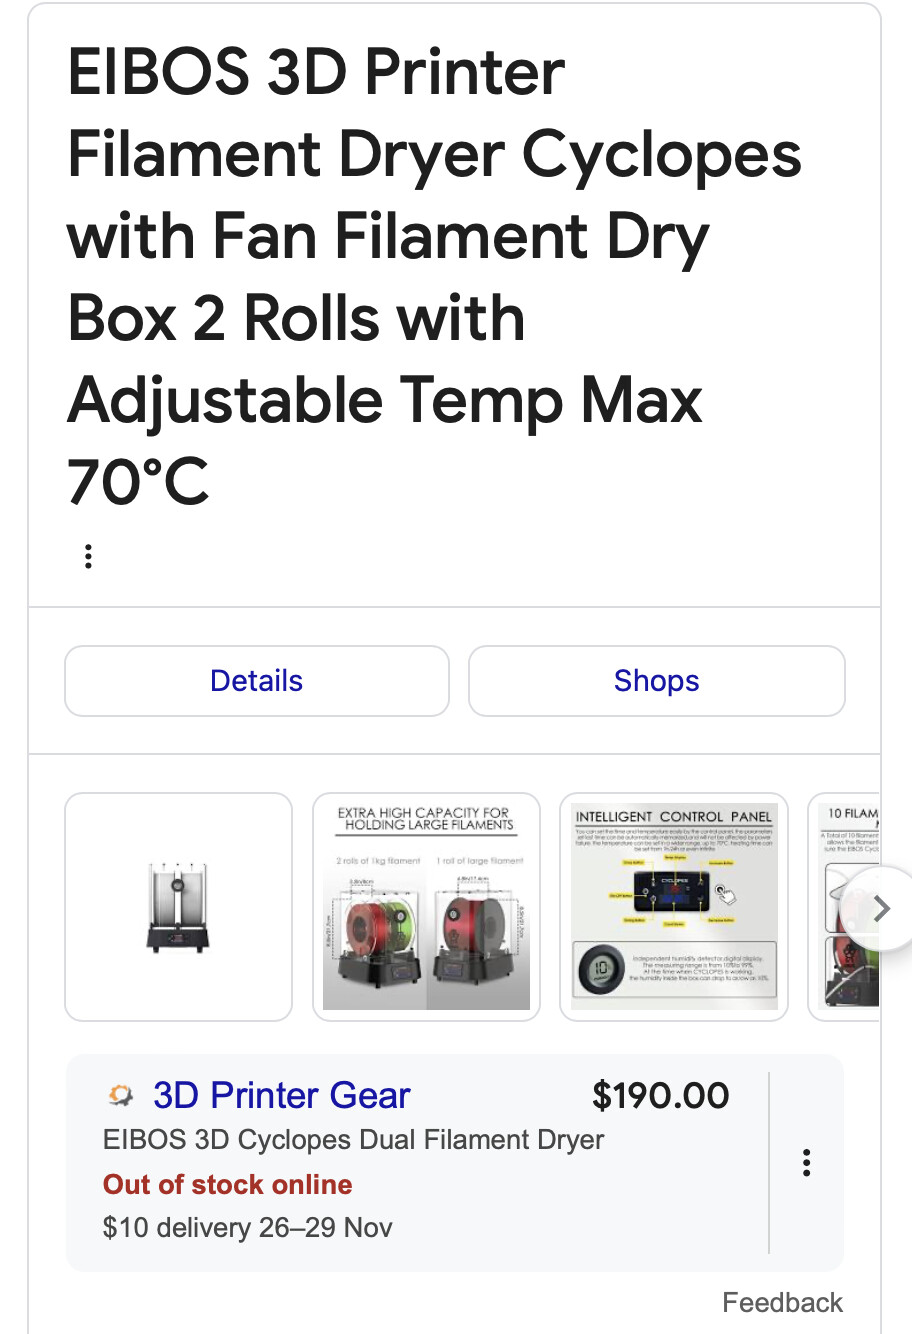
A LONG POST COMPARING THE $200 (AUS) EIBOS CYCLOPES FILAMENT DRYER WITH A $45 FOOD DEHYDRATOR.
I’m posting this long and sometimes sad story so that others don’t have to repeat my mistakes!

1) THE EIBOS

Let’s start off by saying I’ve had some very pleasant correspondence with them after they discovered a few of my mods on Printables, and approached me. I understand they made some attempt to address some of these things with their latest and greatest model, but I do feel entirely cheated and this is still being sold in its current configuration!

I am at war with even some of the YouTube tech guys you may appreciate for their apparent thoroughness. It’s pretty clear that being able to dry a wet sponge in their tests does not make a great filament dryer, but at the time, this one had a few things that the others didn’t so I bought it and gave my perfectly good dehydrator (thirty years old and bought second hand) to my Grandson.

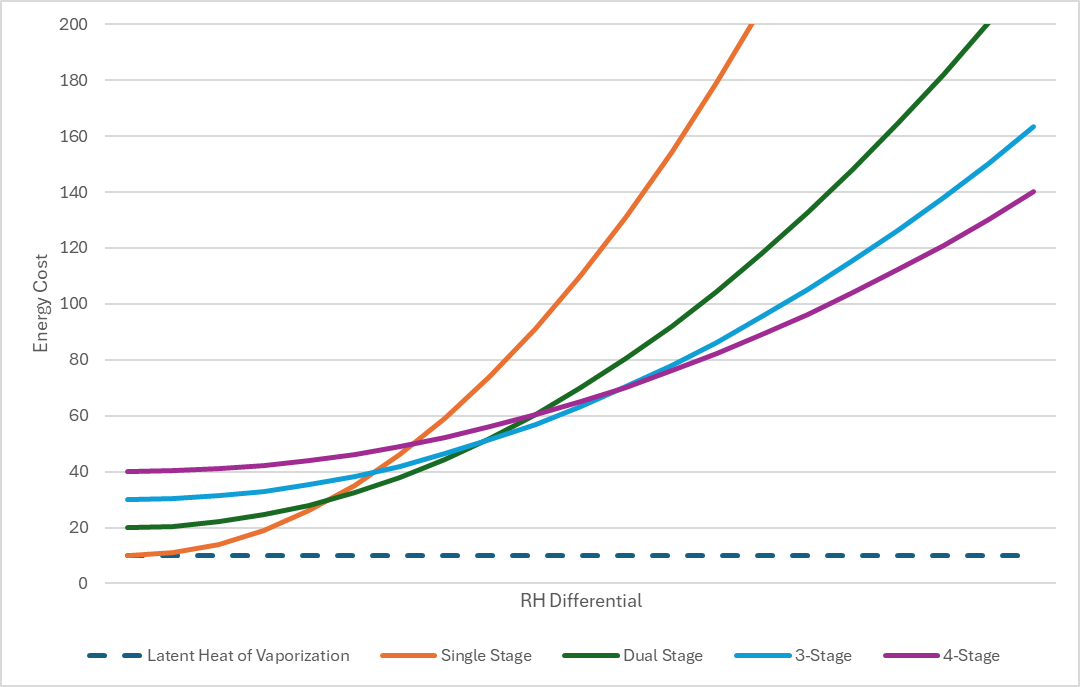
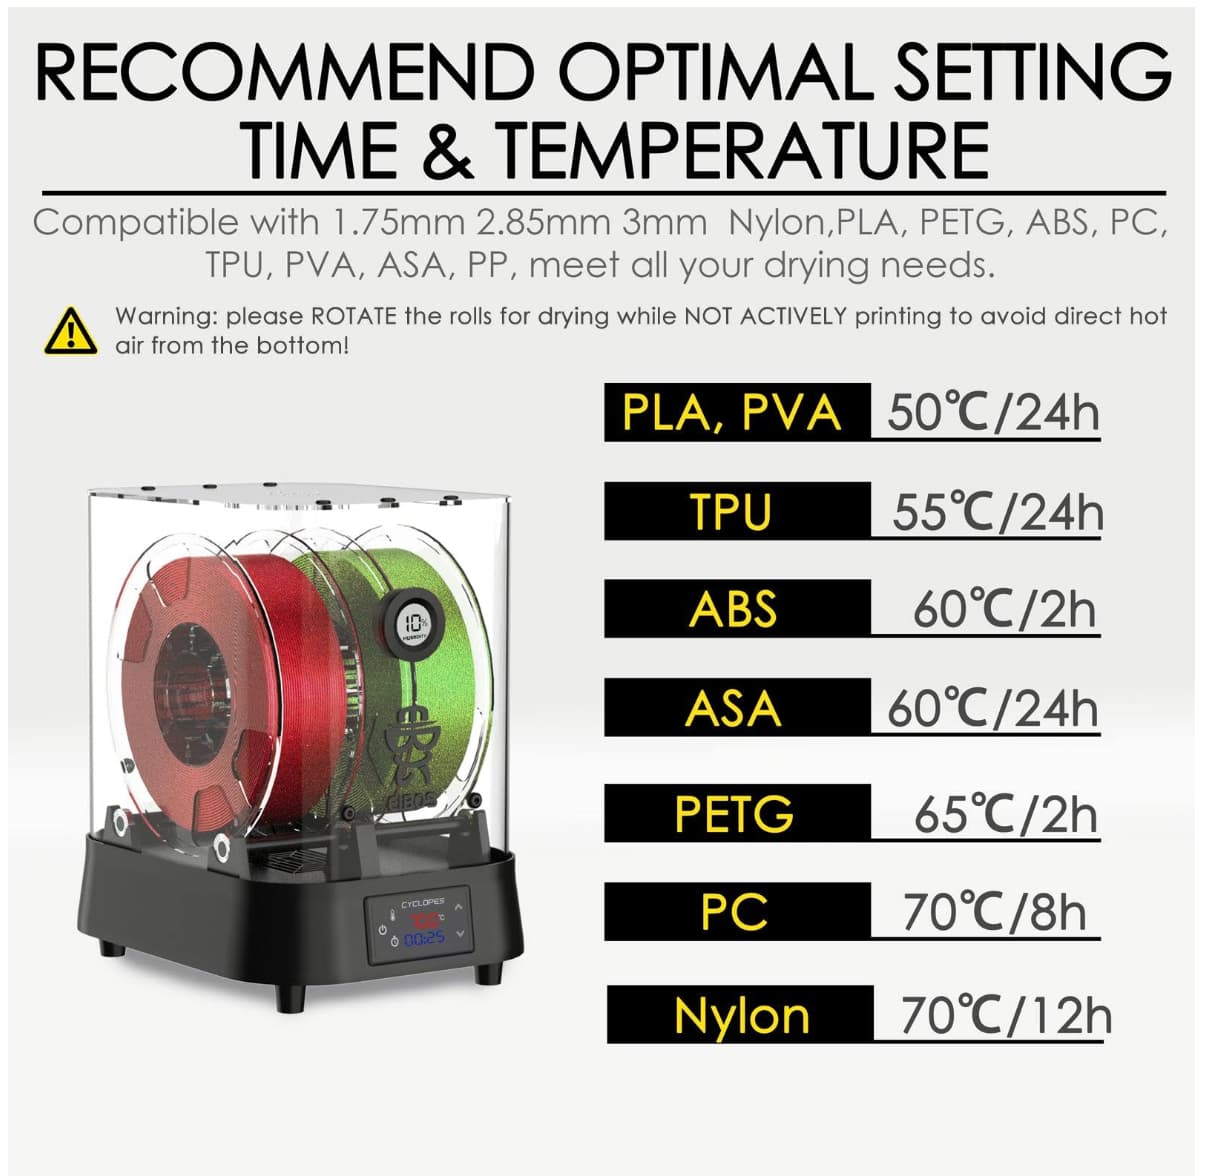
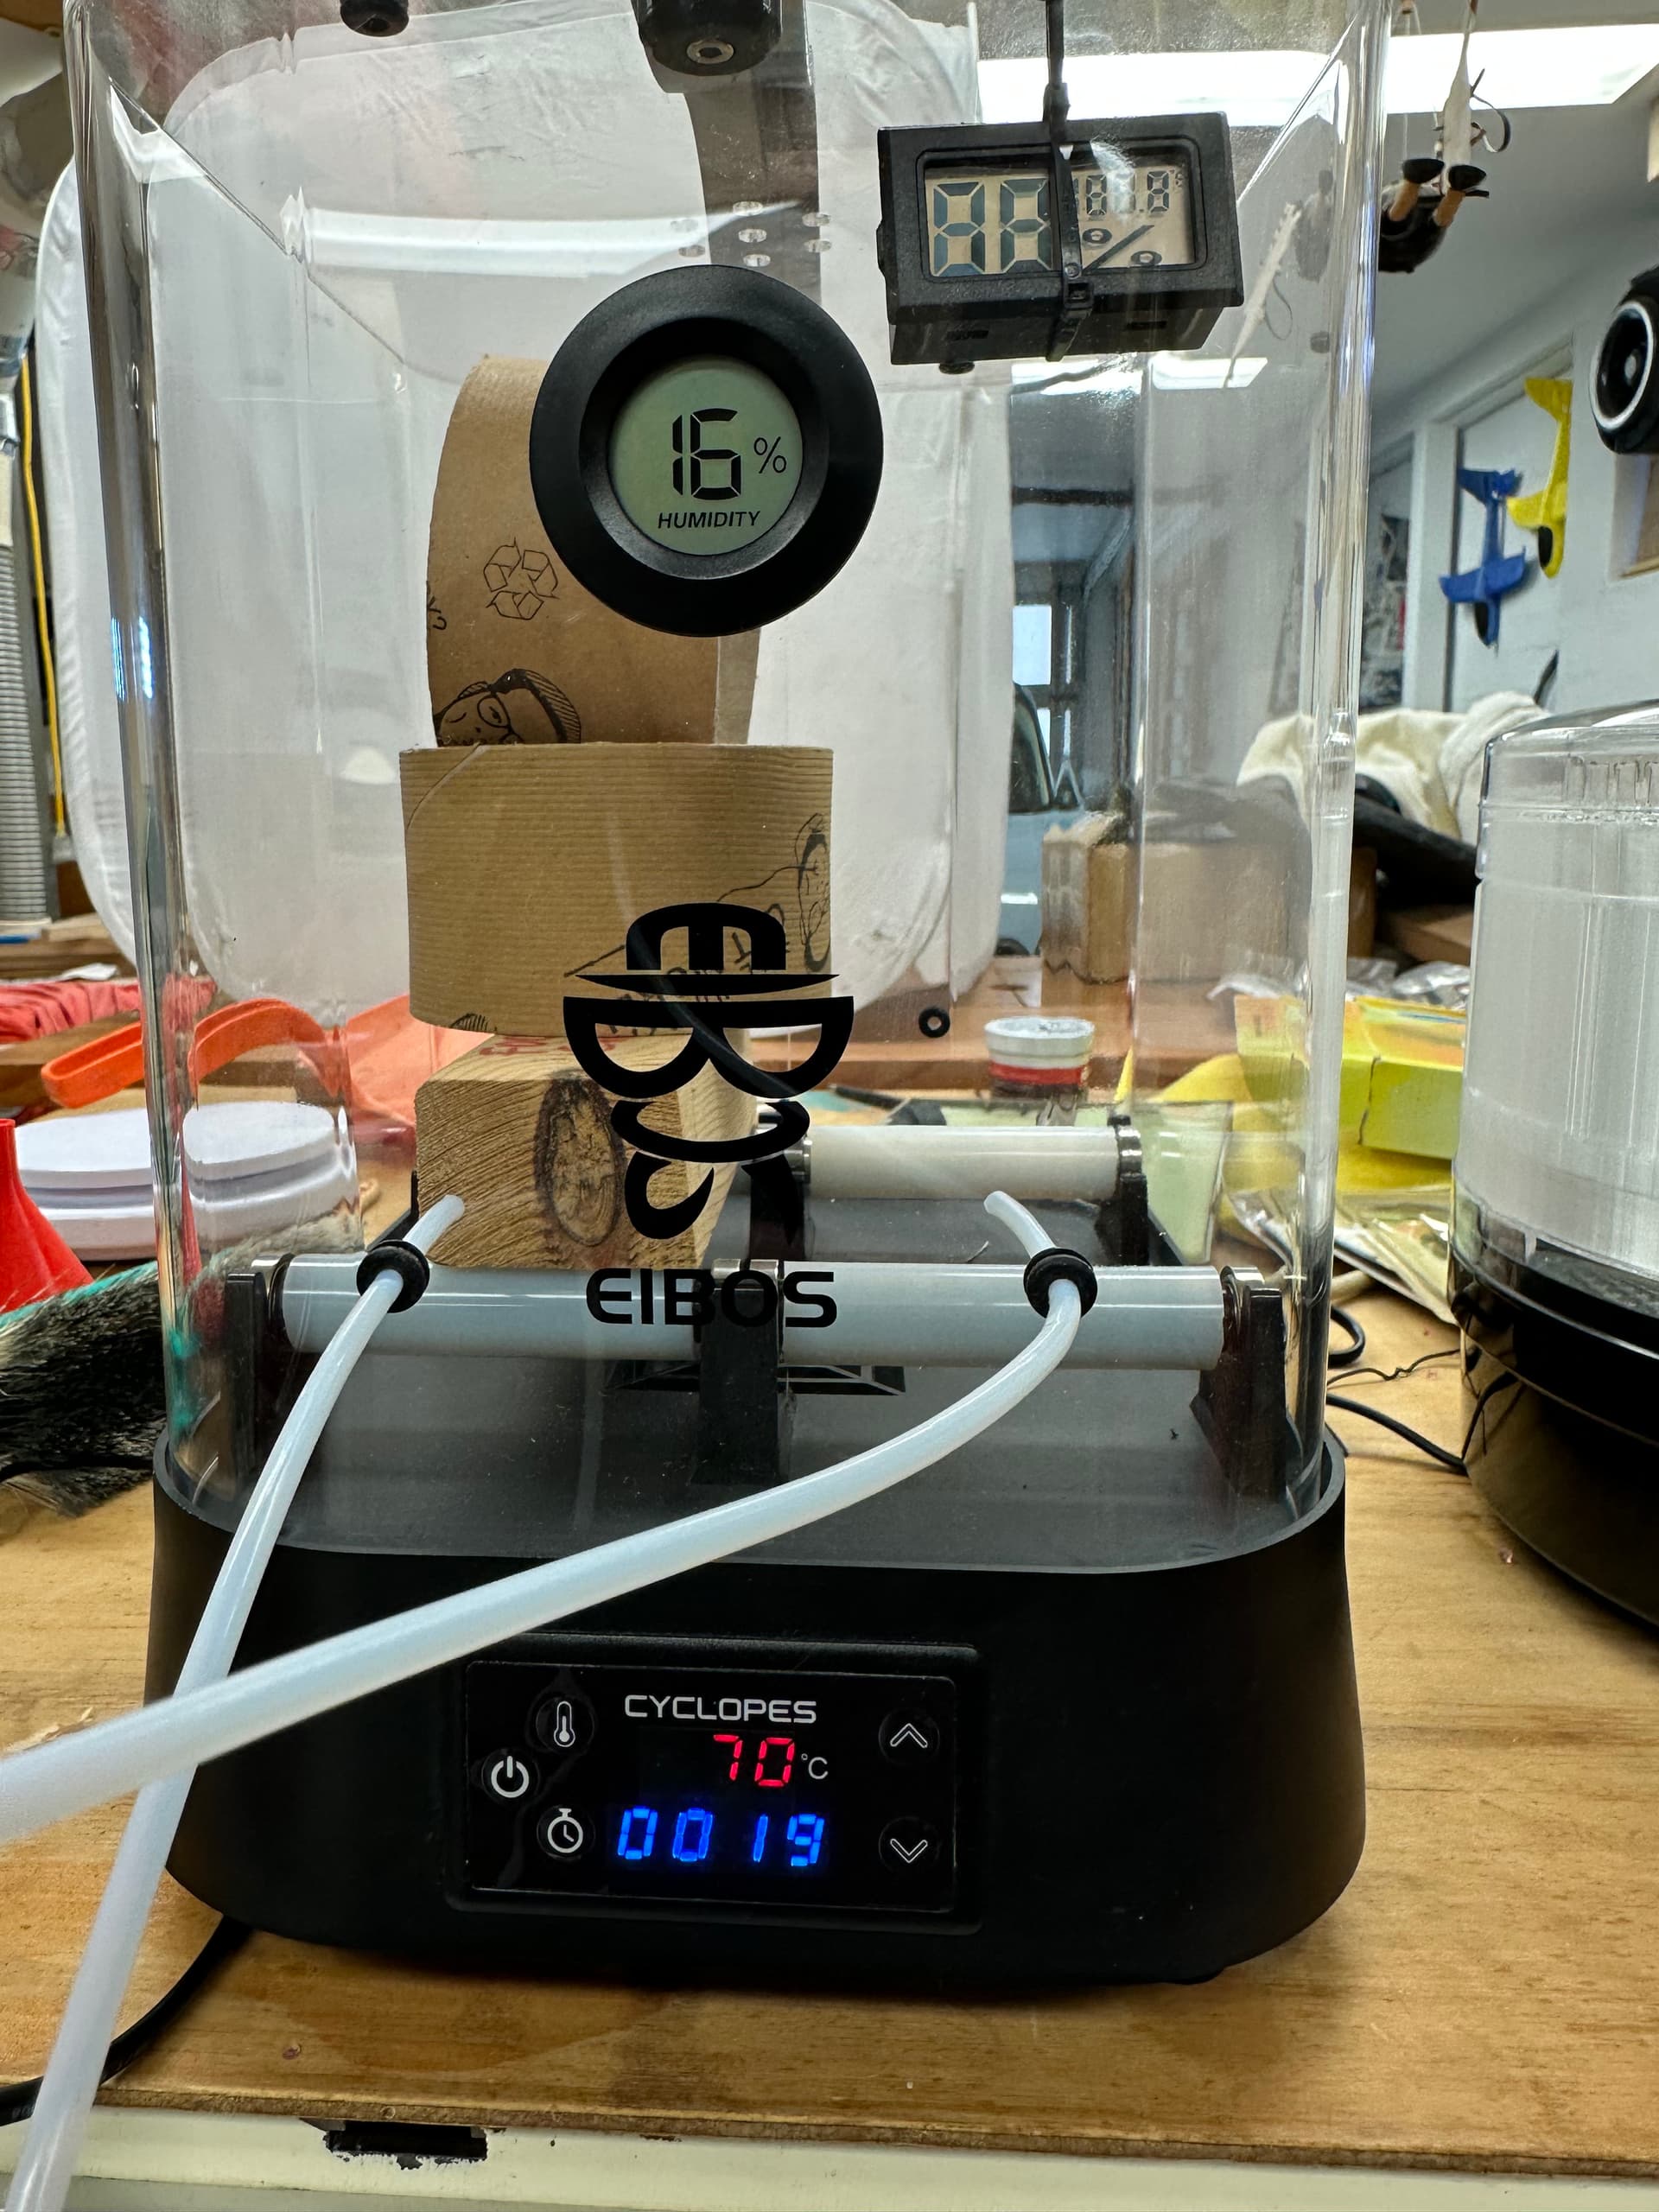
All the tests and the advertisements indicated and still do, that the chamber could be heated to 70° It can appear that way if there’s nothing in it, but what is happening is the hot air is funnelling straight up the centre and out, and not circulating around the outside of the filament. Actual measurements below.

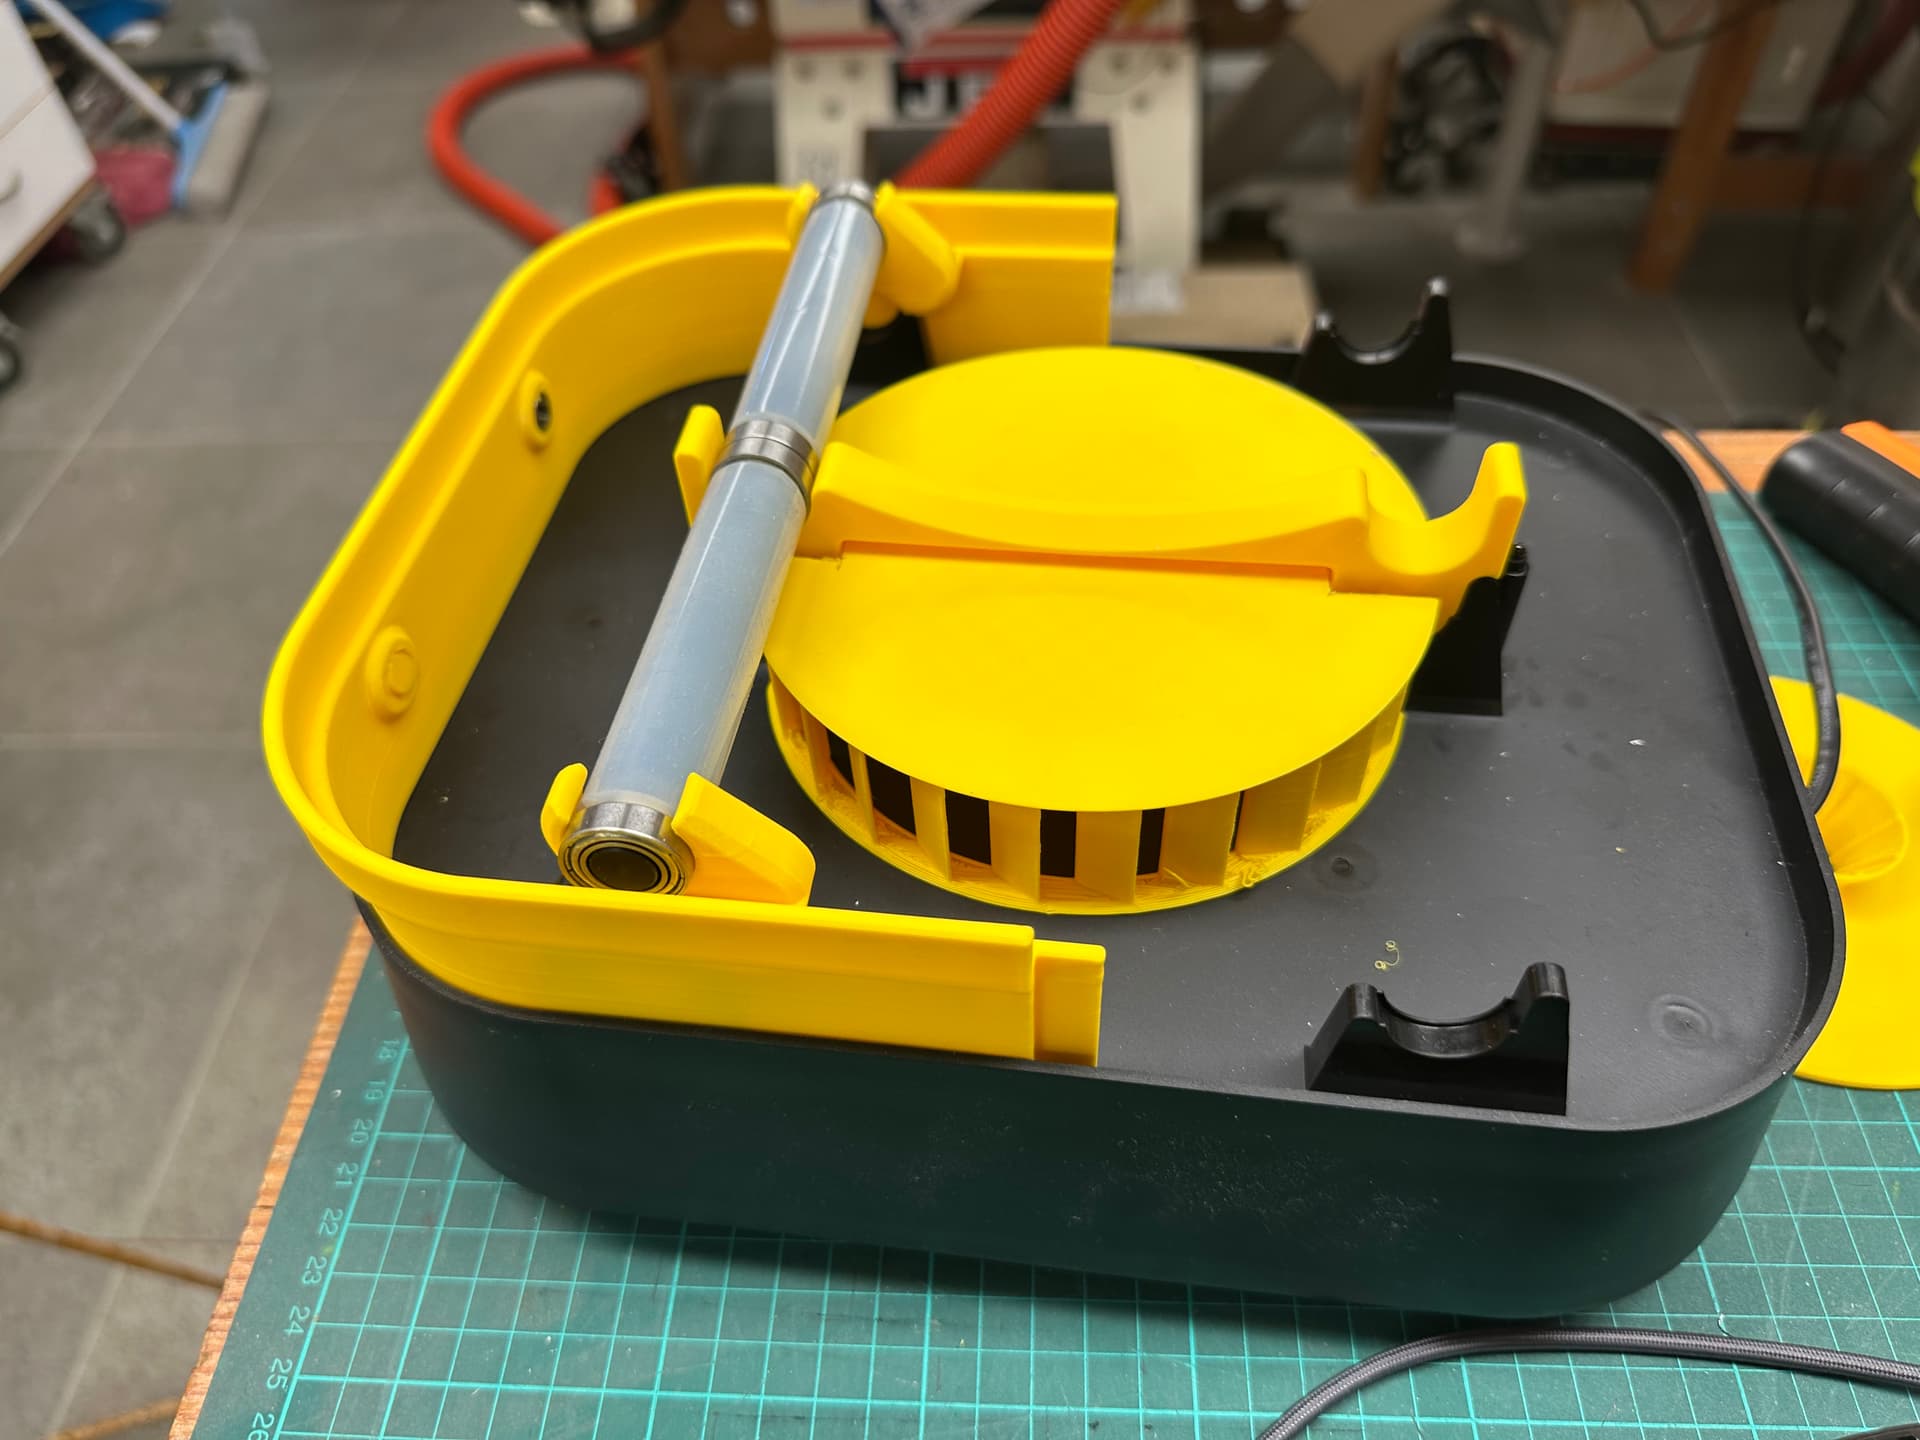
In use it was “awkward” to be kind, as it doesn’t come with a handle on the lid, and the filament feeds out of the lid so one has to juggle the lid with the filament on the base, feed it out the short run of Bowden tube, then try to do it a second time without knocking the first spool over.

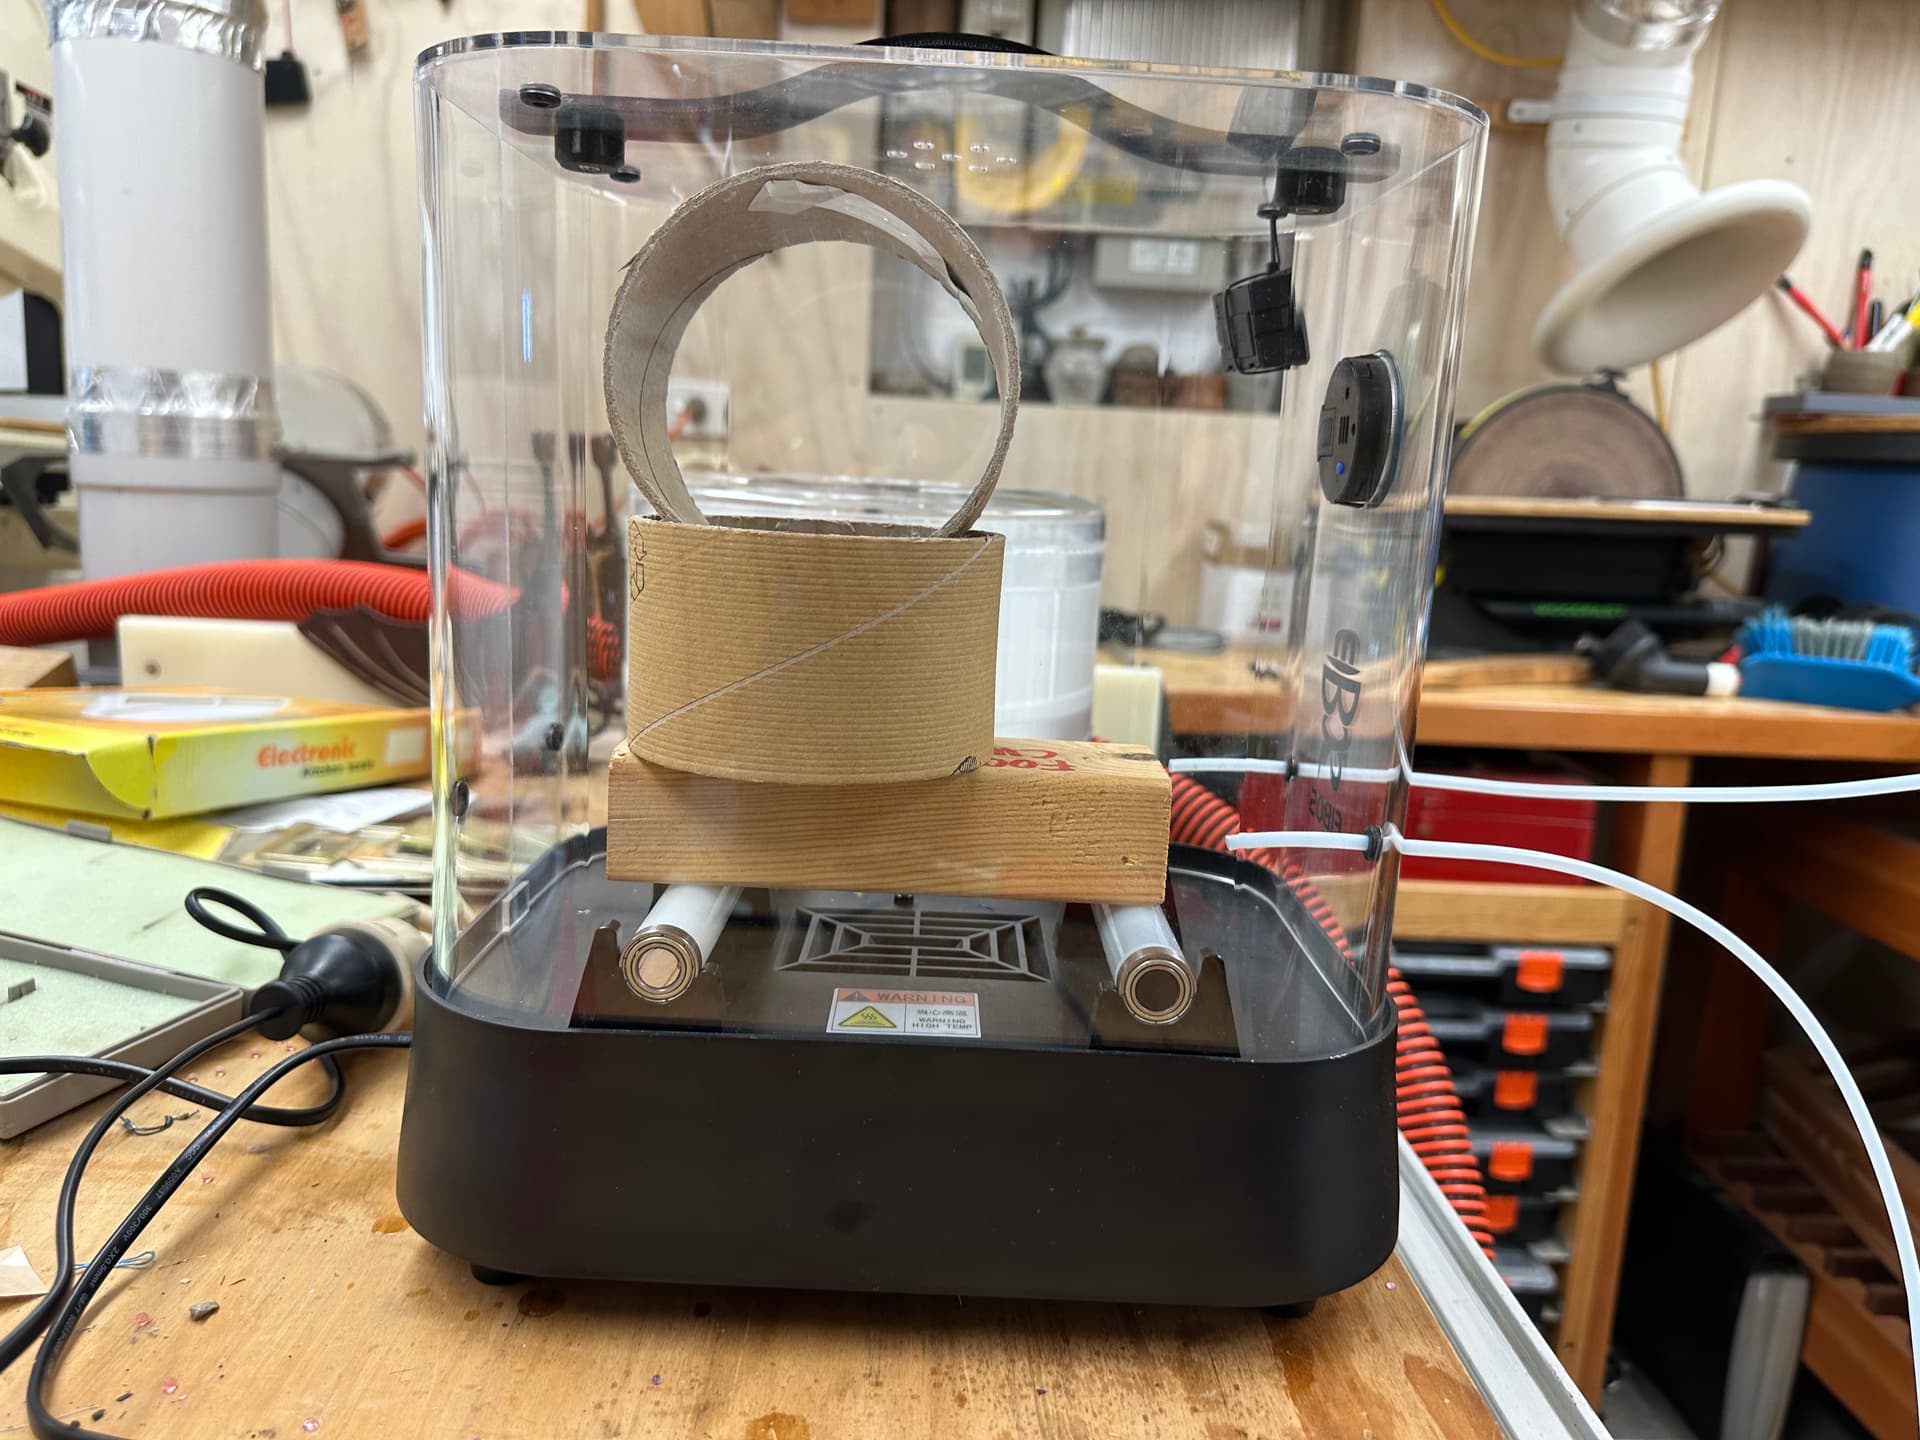
The worst defect, is that the element can deliver extremely hot air, but the filament is positioned just 12mm above the outlet. In use, this means that filament quickly overheats, the thermostat is very close to the outlet, which means that the chamber itself doesn’t get up to speed.

MEASUREMENTS -

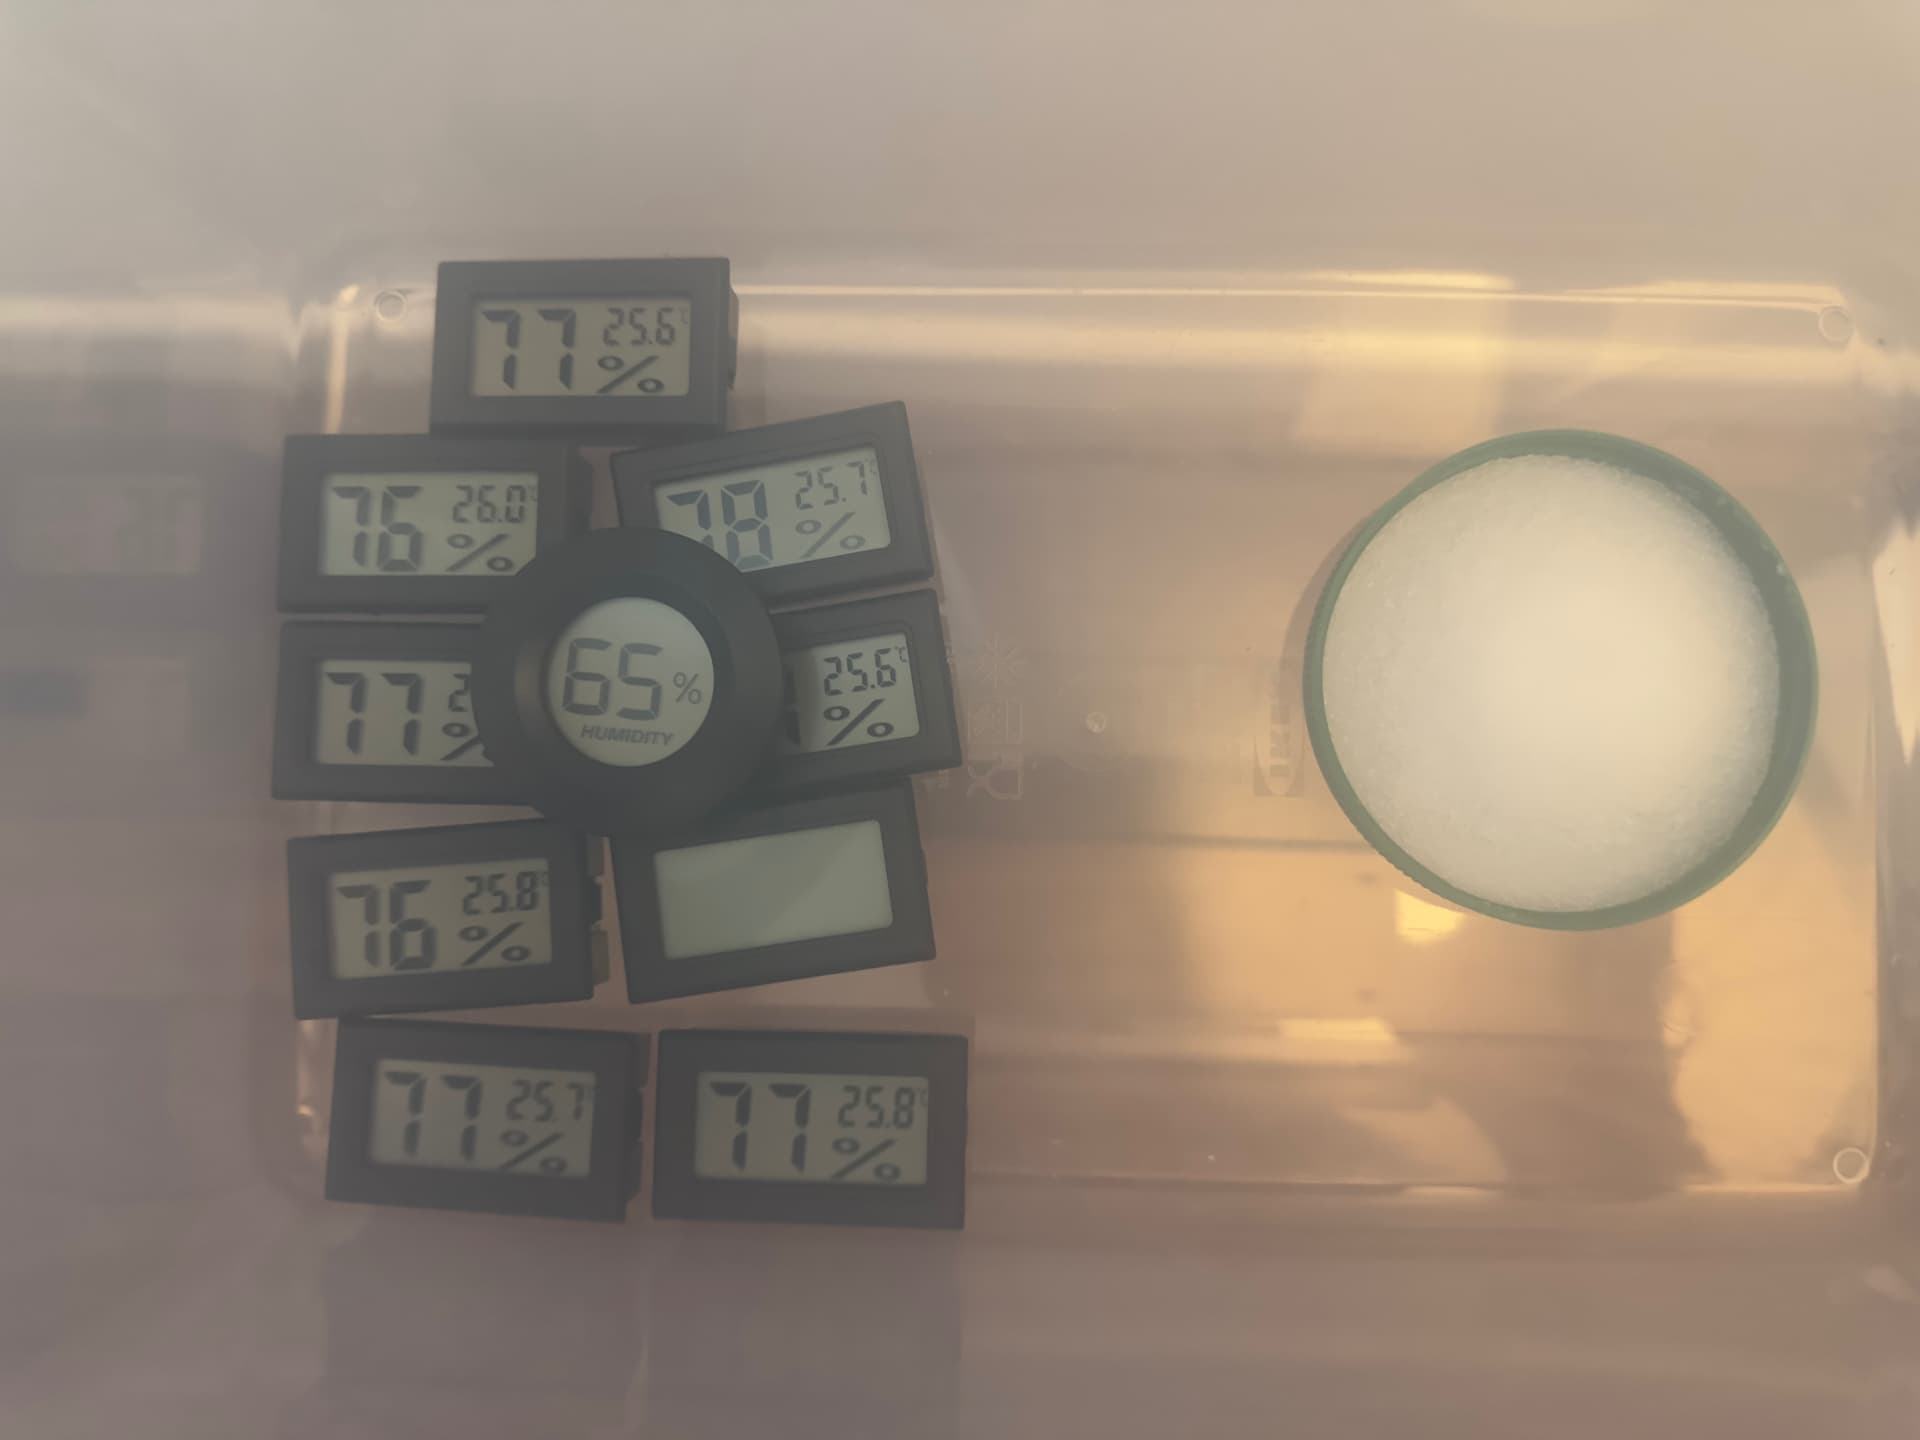
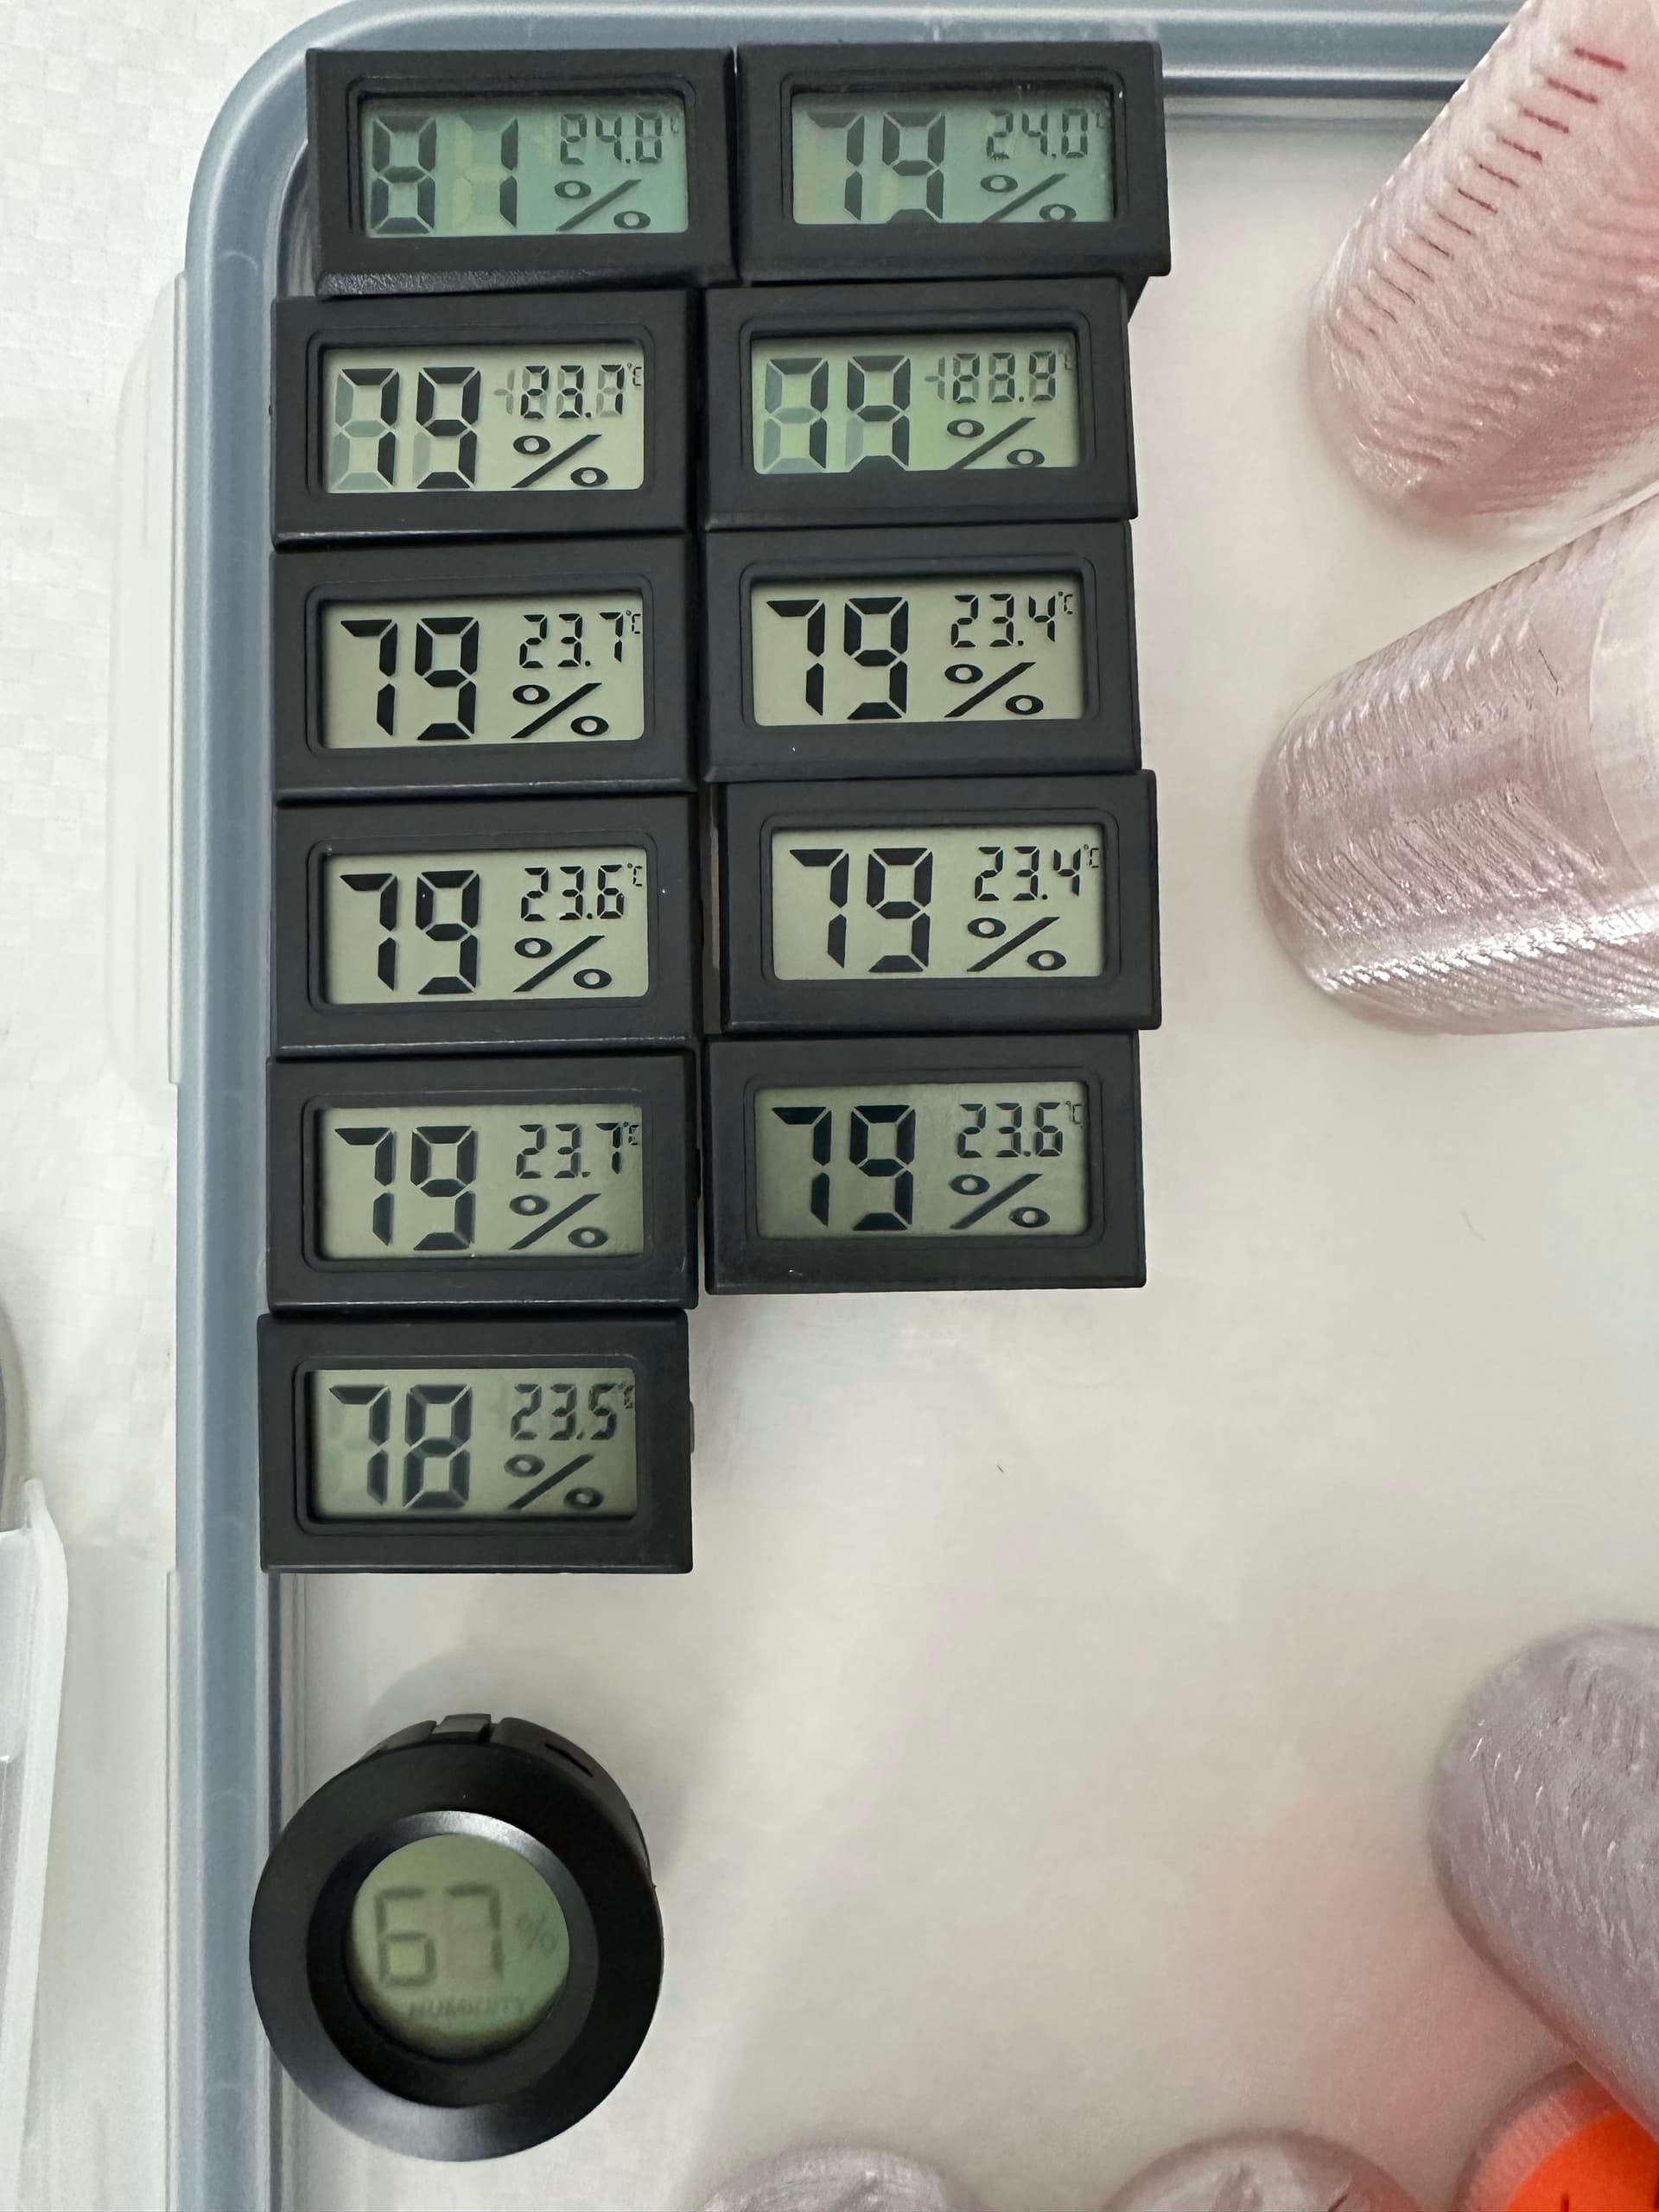
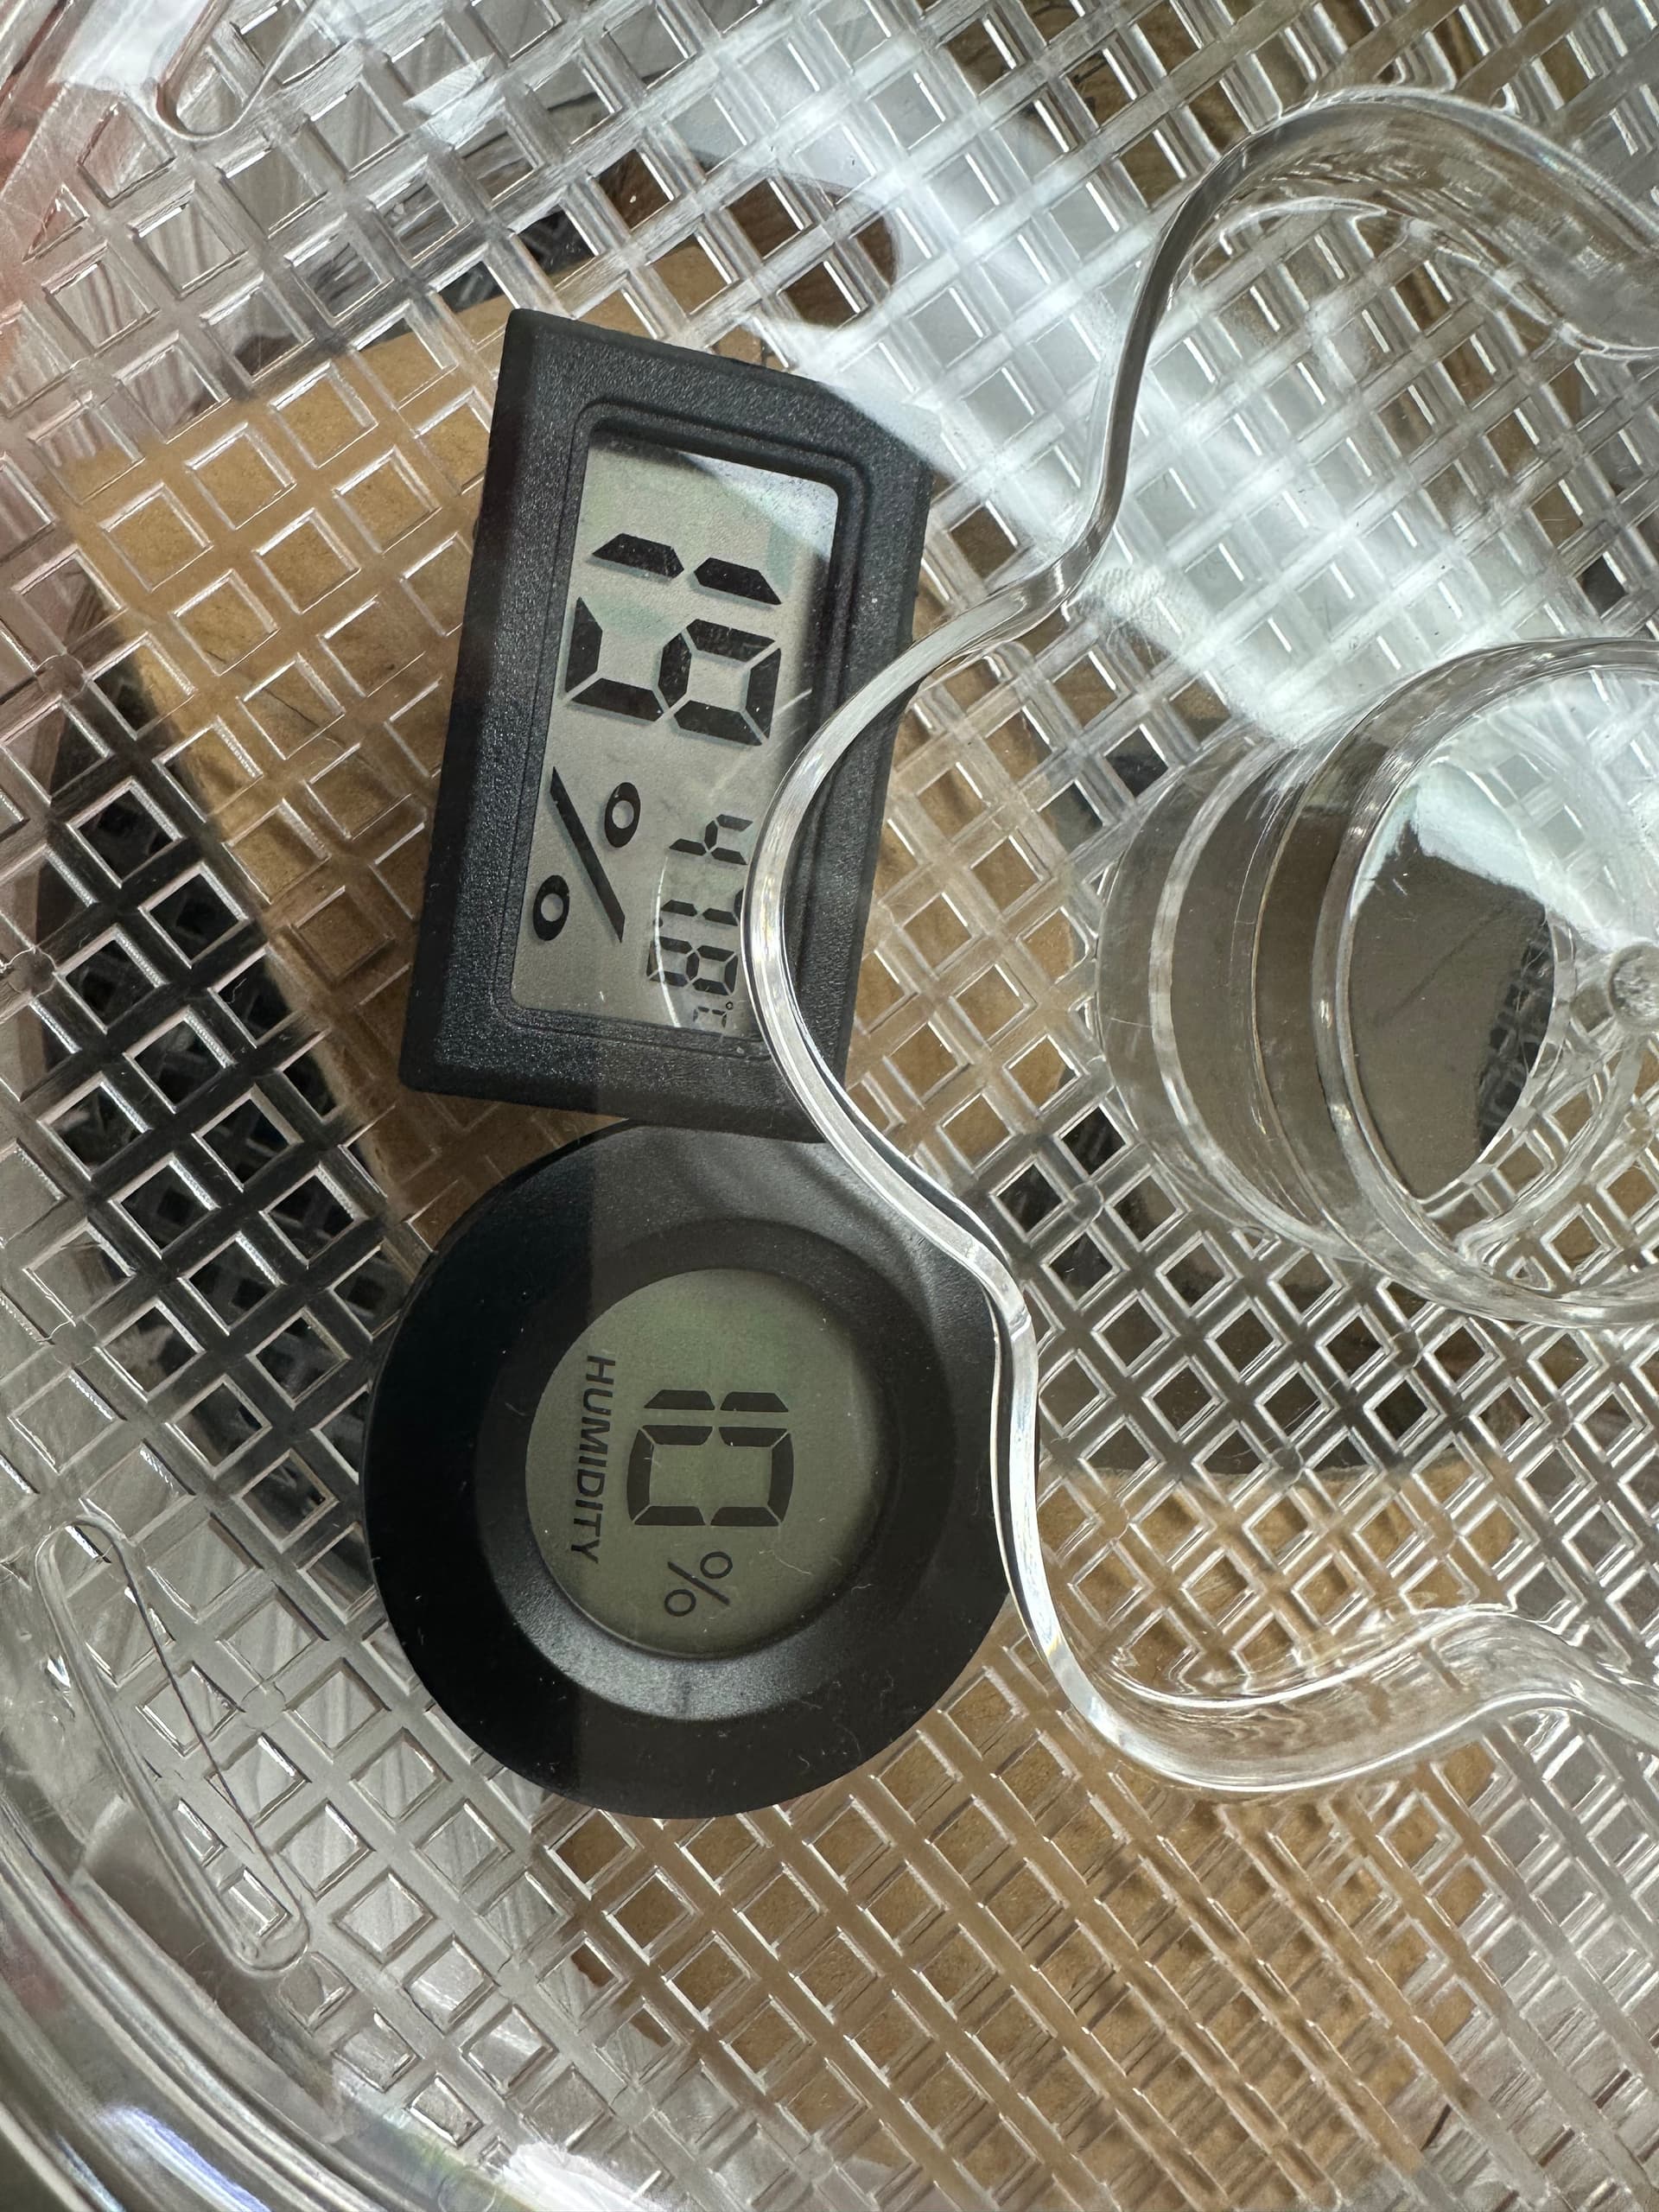
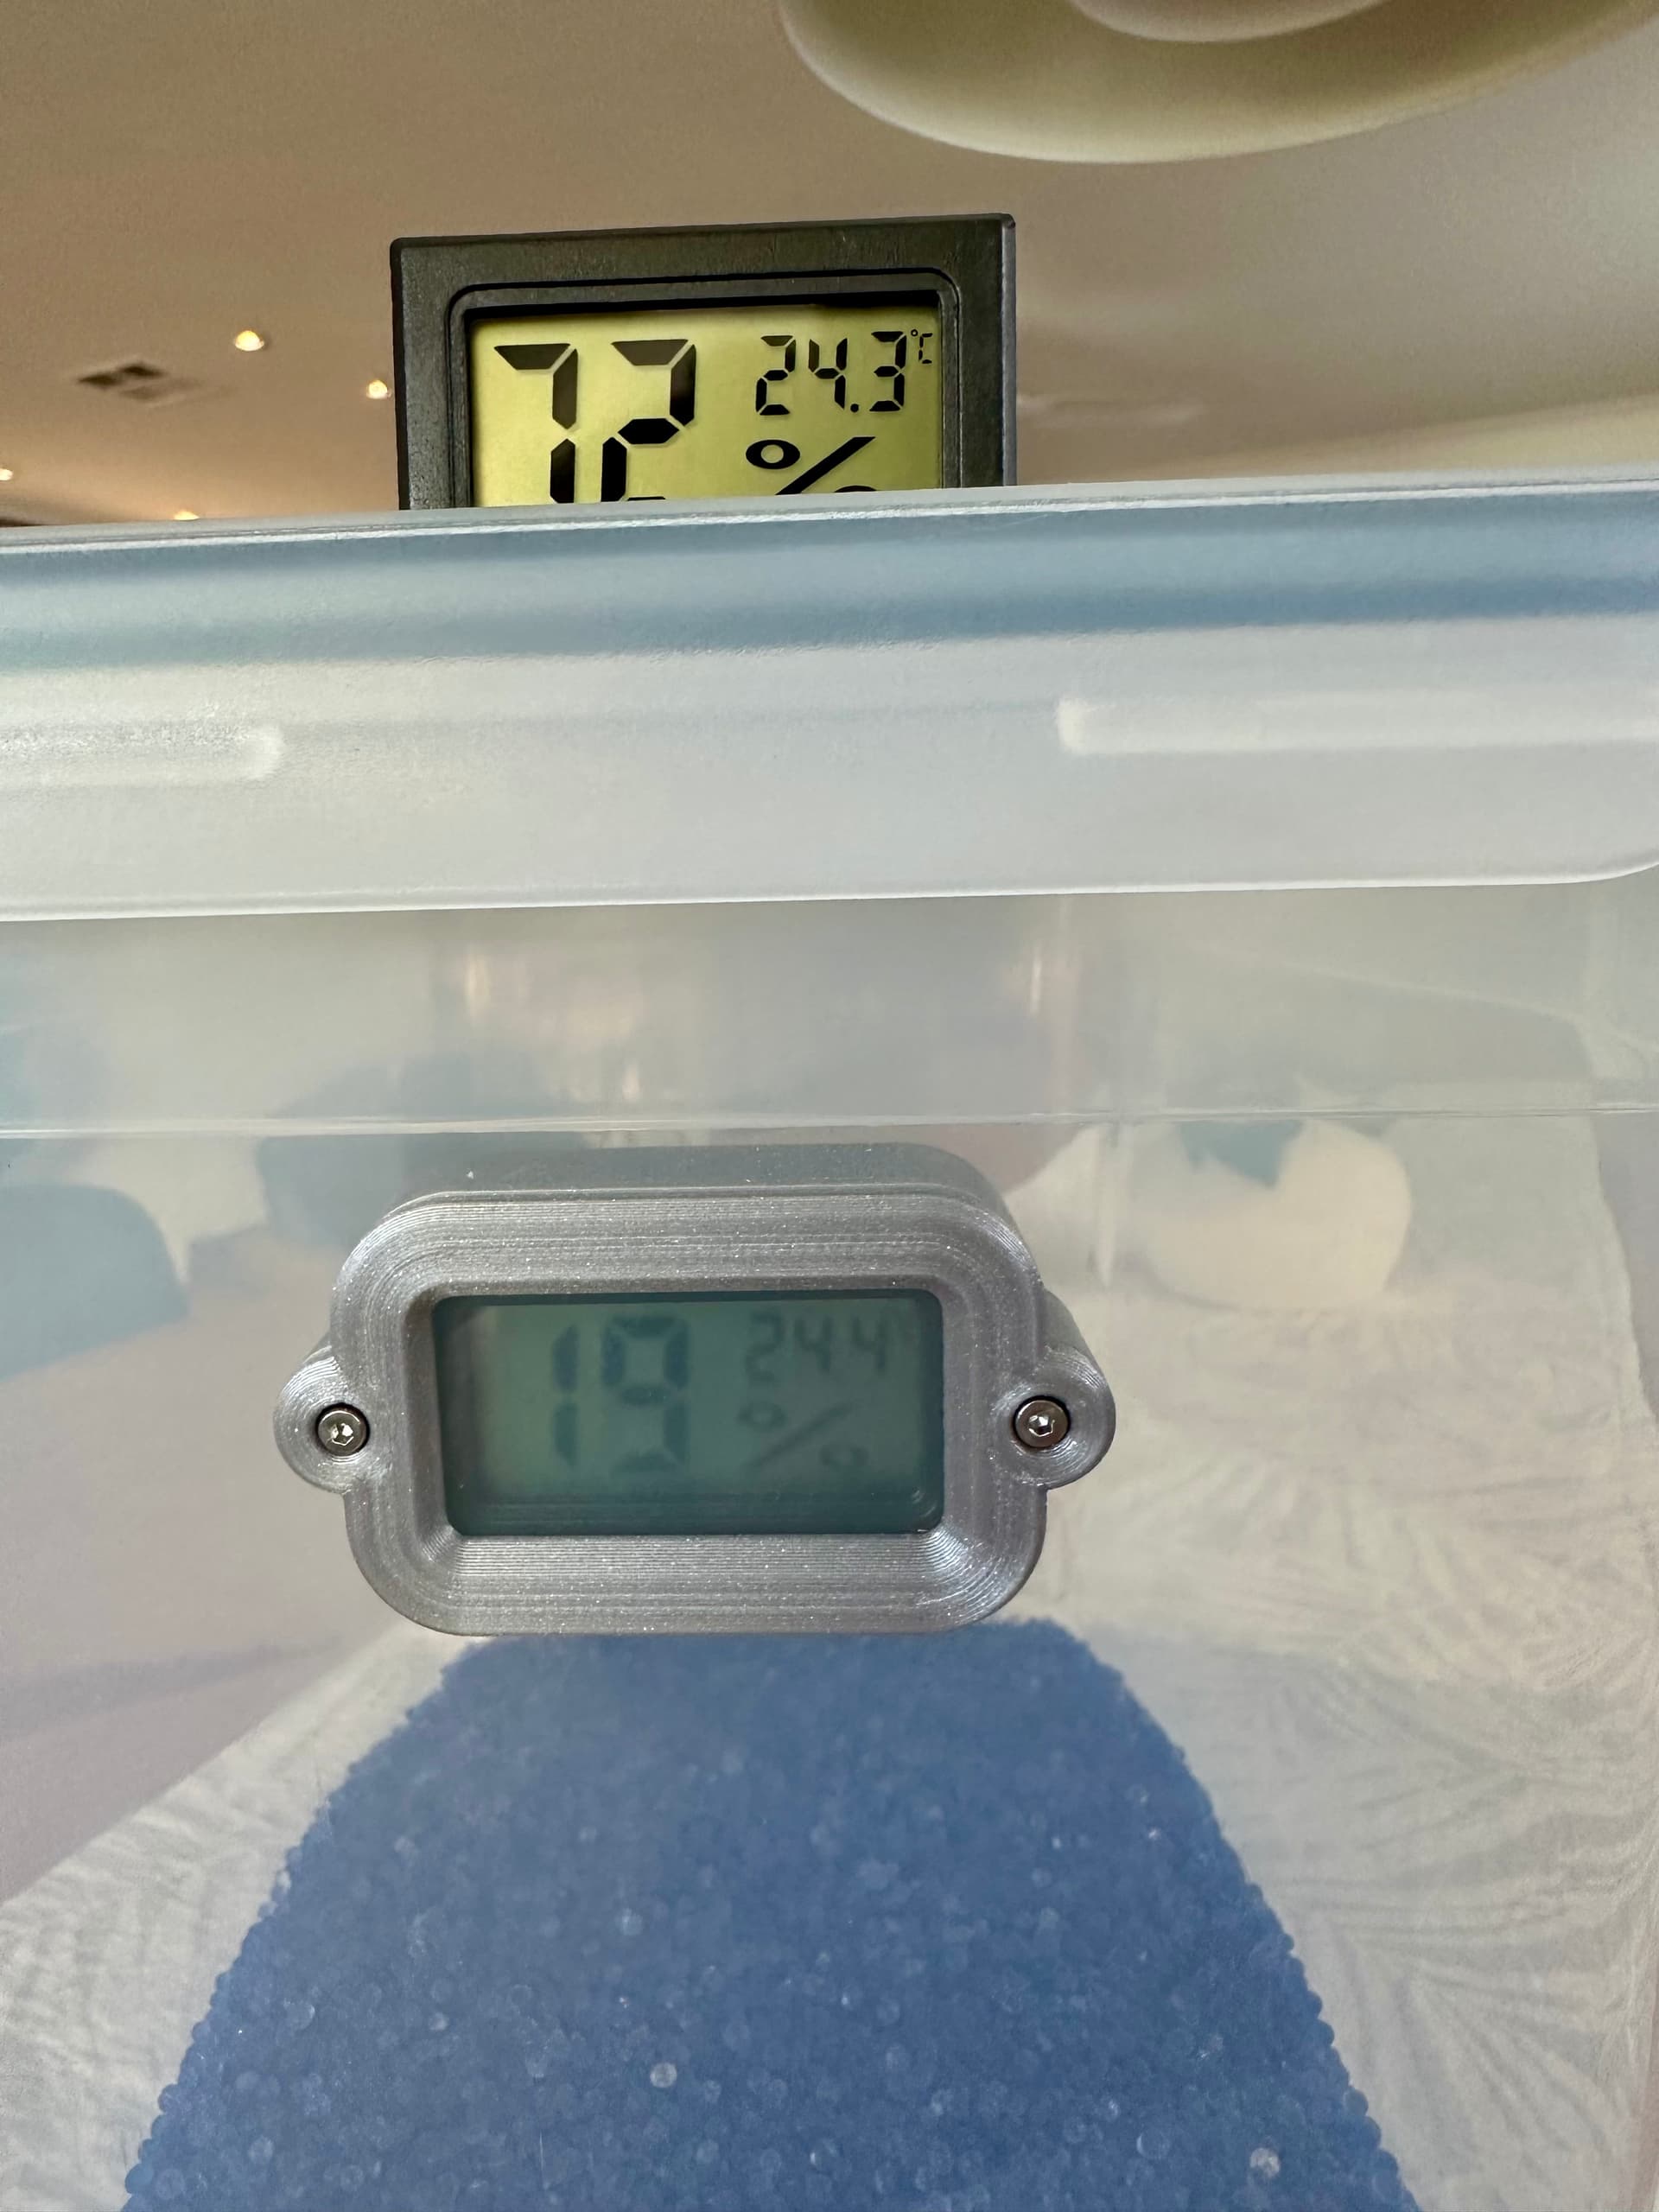
With a few bits of rubbish to disrupt the airflow to simulate on spool, after forty minutes at an indicated 70°, the top of the chamber was indicating 51°, barely two degrees more than the food dehydrator. I have no doubt that this would continue to build over time, but that really is where the problem lies. Curiously the Eibos humidity gauge started to read the same as the other, and probably because of the seriously hot air at the bottom of the chamber, we’ve gained a few percentage points in the dehumidifying stakes over the dehydrator.

However some other measurements (with my el-cheapo laser thermometer) are illuminating

  • Top side of the grill above the heater (below to where filament sits) 87°
  • The surface of the centre bearing -71°
  • Surface of the thermostat - 61°
  • Bottom surface of the timber batten spanning the axles -68° ; given that timber is an insulator it seems fair to think if this were plastic it would be closer to the 87 if the grill directly (12mm) below it.

IS ANY OF THIS FIXABLE?

Leaving aside the question as to whether one should be in the position of doing so, I think I can make it usable at least.
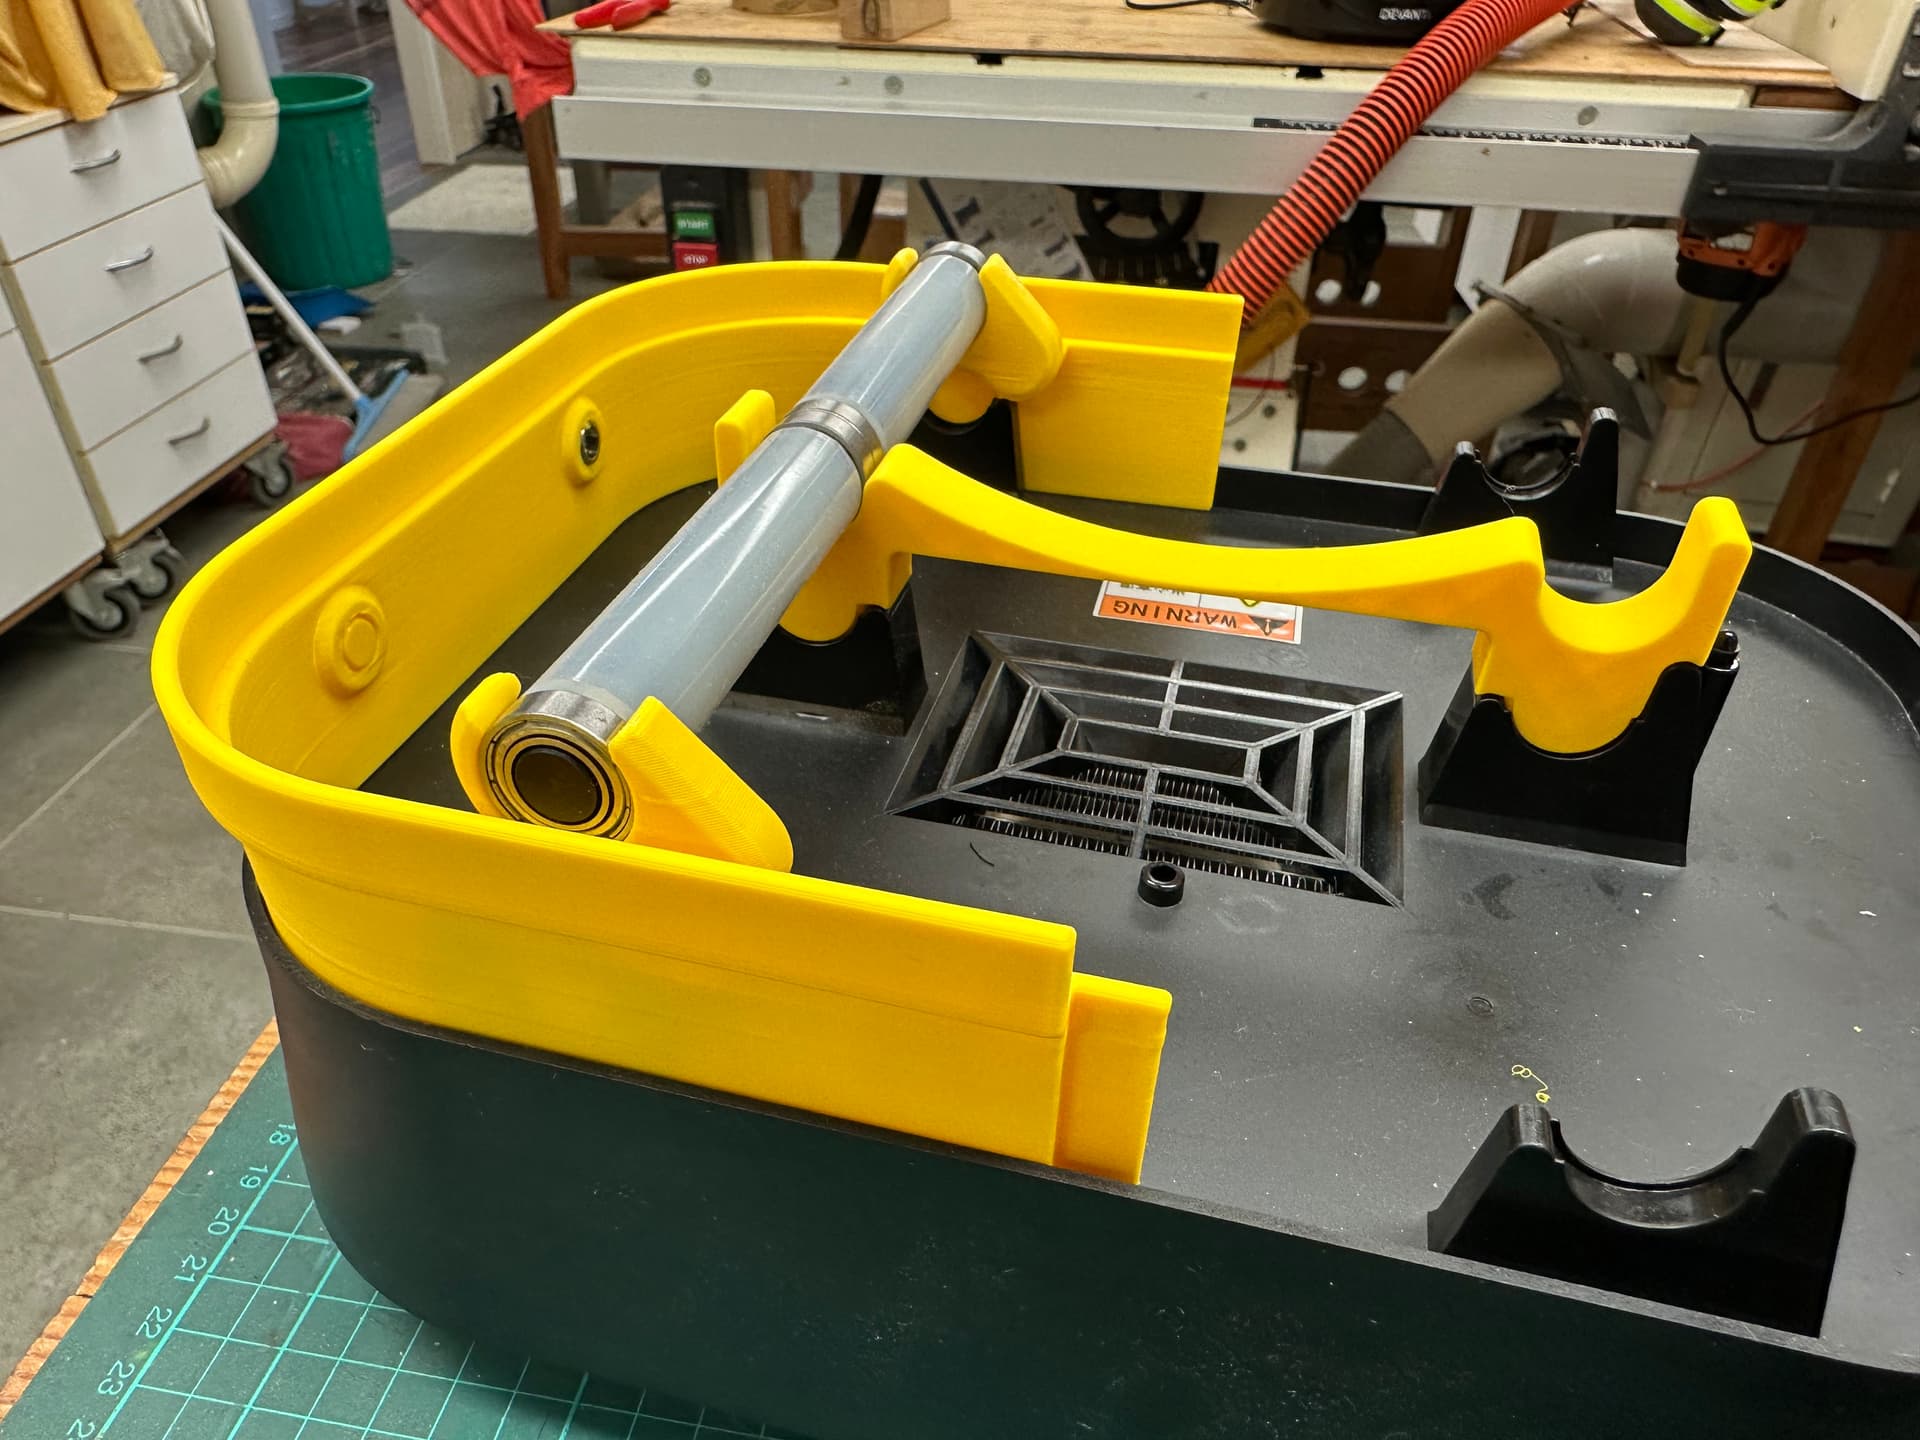
Handle
I made a pretty new handle immediately and that is what attracted the attention of the company.

Keep the filament Moving
After others had reported the melted filament (and in some cases melted spools and melted vent grille) a warning was issued to keep the filament moving when not printing.

Someone on Printables developed a small electric drive, I made my "kinetic" gears to link the axles, and later simply made a key to link the two axles, so that when the active spool moved, so did the other.

The problem with these solutions is that you still have to keep the rotisserie moving when not printing, but in use my PLA filament clips softened, the filament unravelled (even while turning in the “counter” direction to the wind, and things just got generally discouraging.

Move the filament away from the heat source -
There are a few solutions about which incorporate spacers to lift the filament a few inches to keep it away from the most direct heat source - some direct the bowden tube through them to give a much more satisfactory loading situation. IMHO just lifting the spools doesn’t do anything for the fundamental design floor which gives a 30° temperature difference in the chamber, and it does provide a considerably larger volume to heat.

The food dehydrator seems to maintain a similar temperature through its entire volume.

Shield the filament from the heat source

There are also a few solutions which involve a plate or baffle between the outlet grille and the bottom of the spools, but again, given the really tight distance I can’t see any benefit in terms of air distribution.
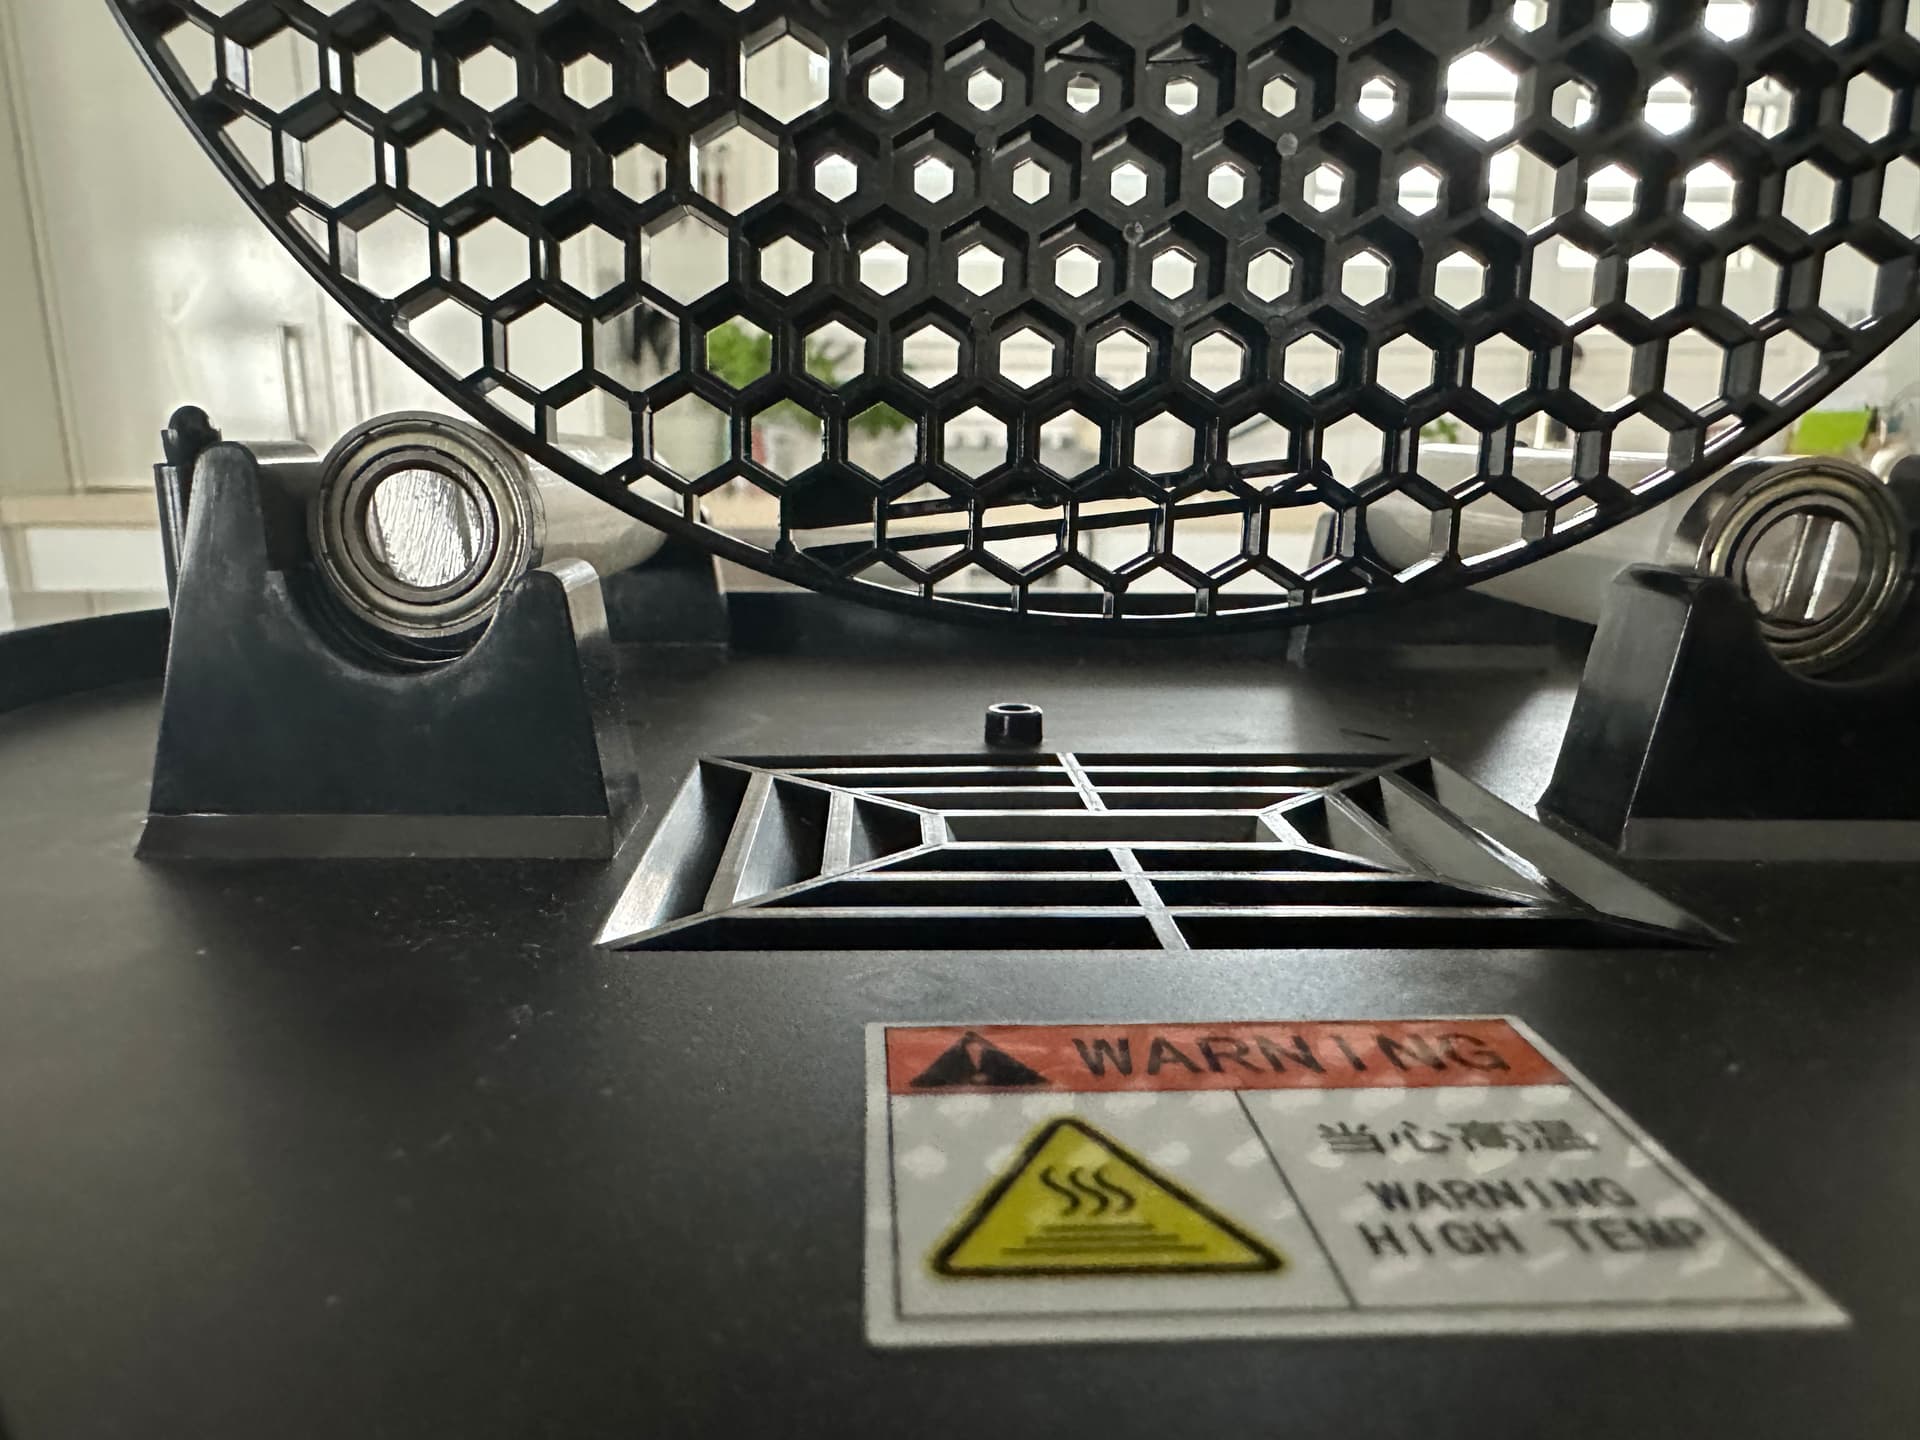
EXHAUST AIR
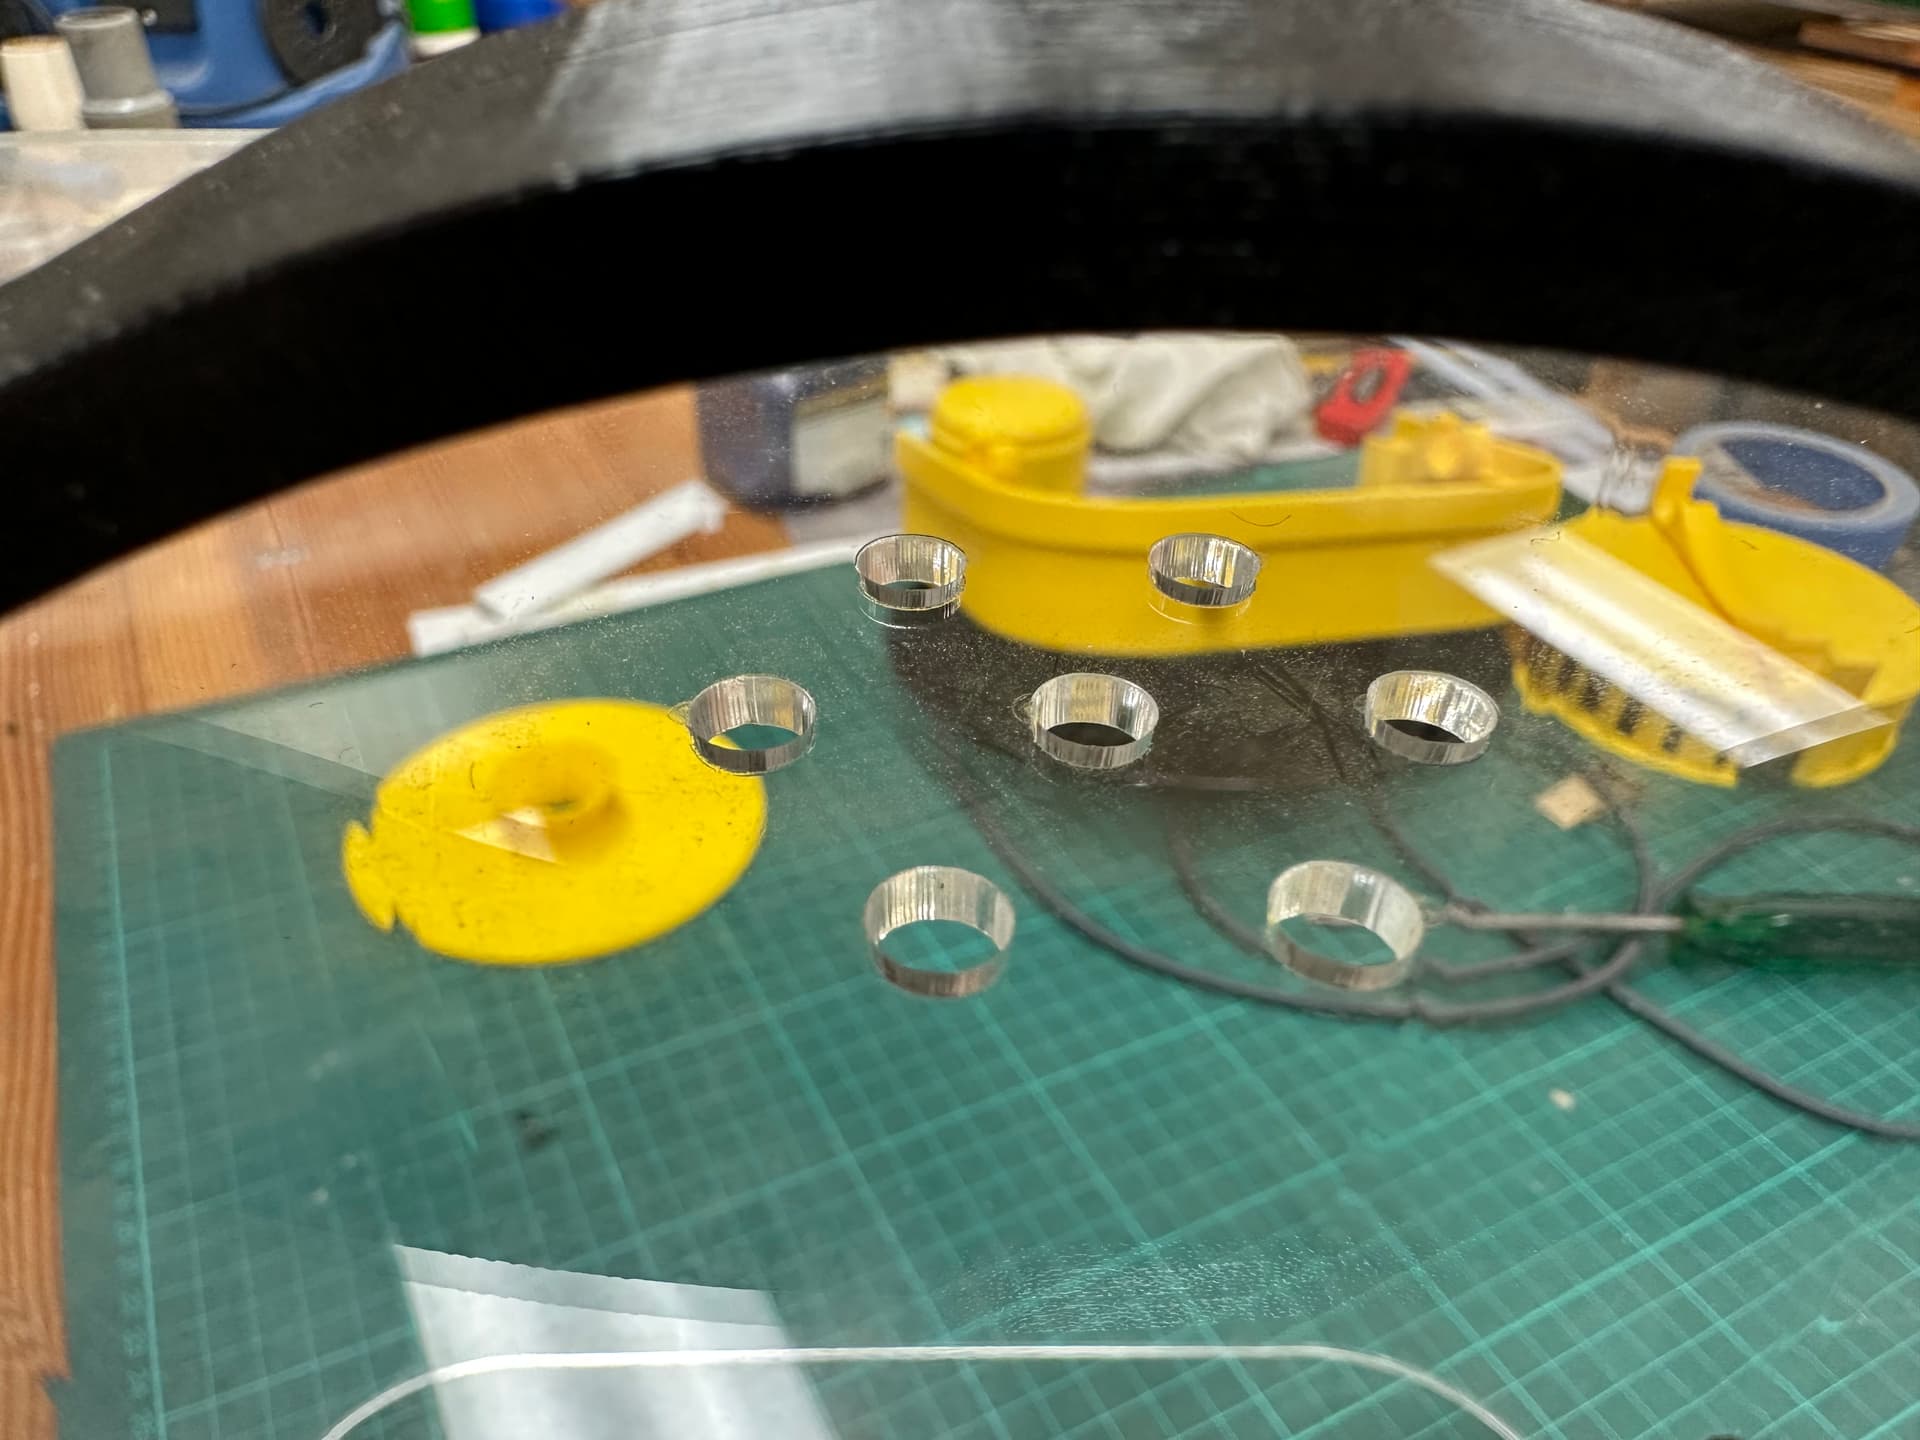
There must be a reason why the dehydrator exhaust totals 600 mm2 (6@4mmx25mm approx). The Eibos has seven 5mm diameter holes at or 140mm2 - one additional 25mm diameter hole would even up the score!

I have no idea what the optimum is, but watching people modify the original eSun dryer (Rick Impy) it would appear to be at least as much as the dehydrator, although that also might contribute to the slightly lower chamber temperature?
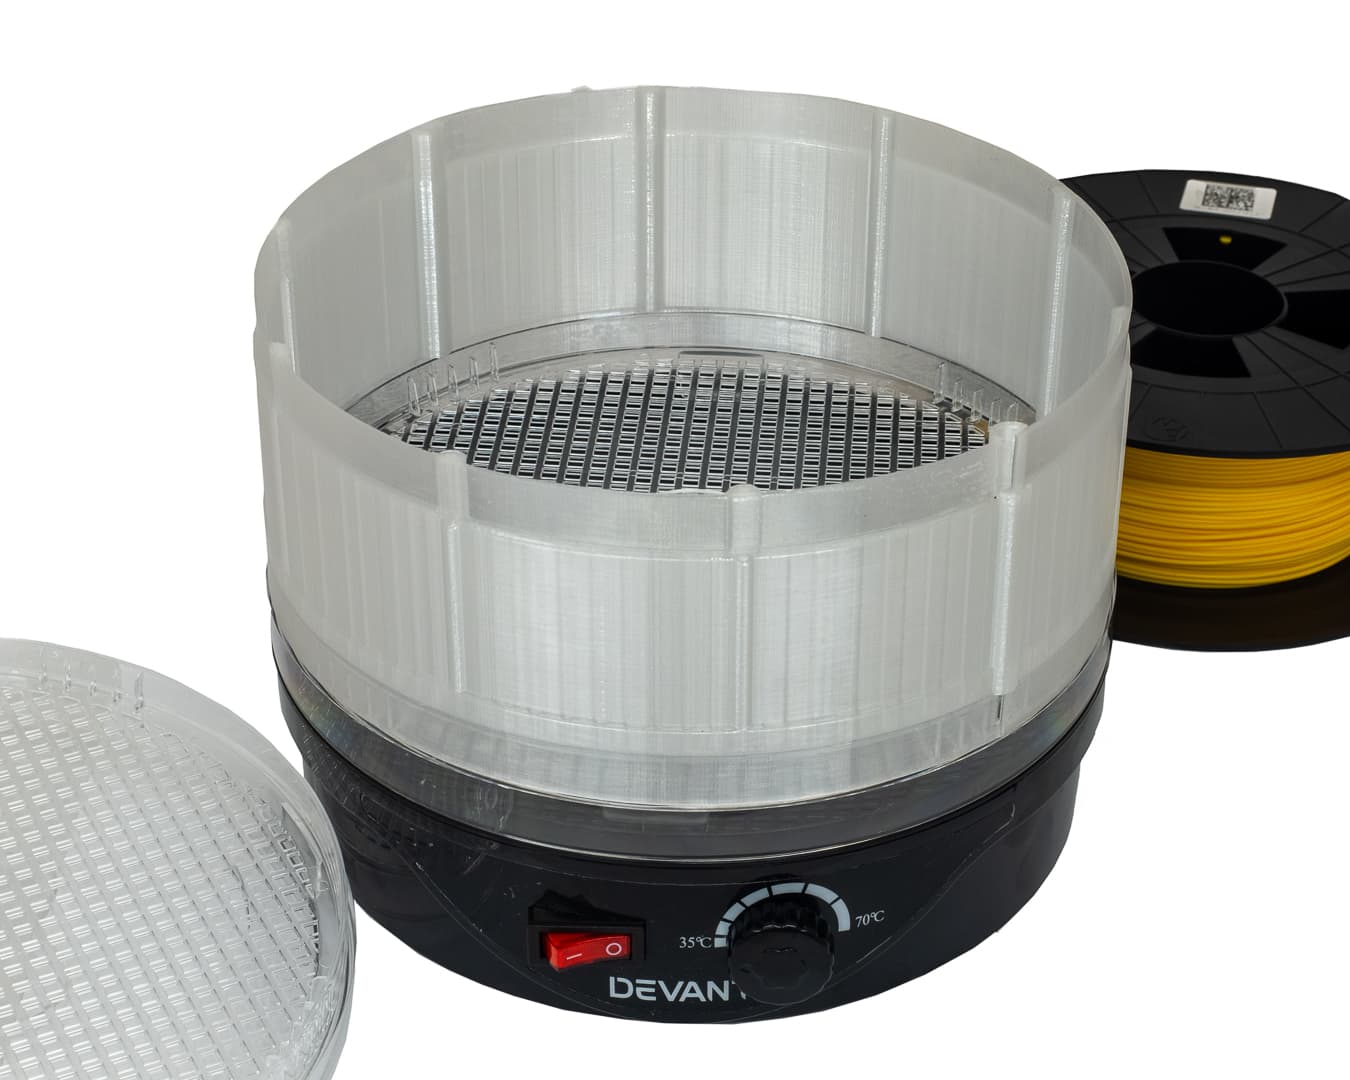
MY SOLUTION!

It’s at the prototype stage only, but here we go -

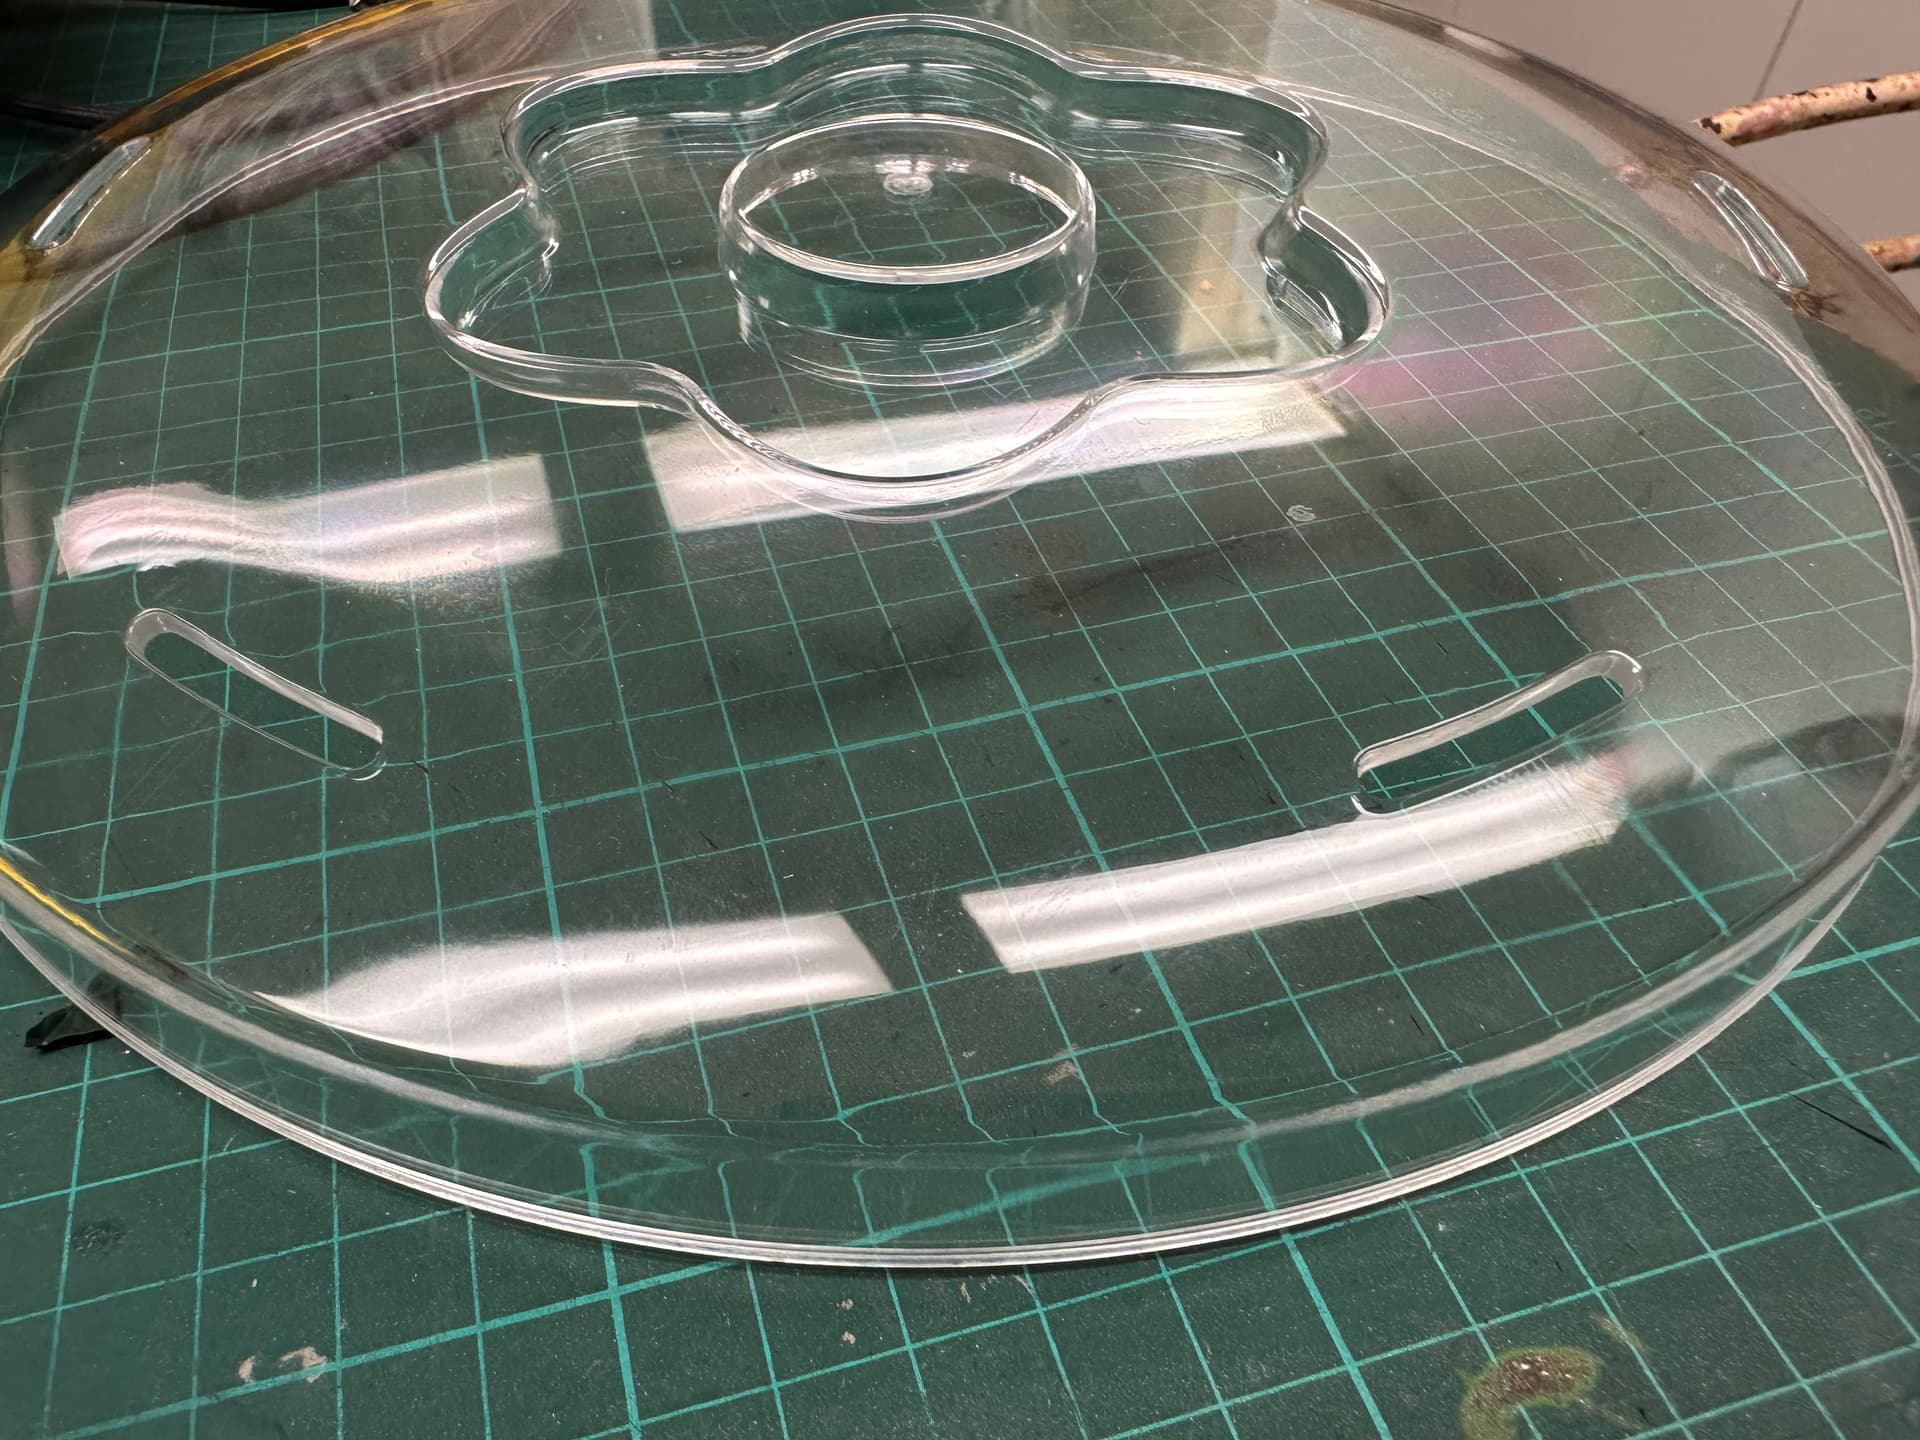
Yes I am going to lift everything, but by 35mm which I think is the minimum I need to reroute the Bowden tube, even at that I’ll have to bring it under the spool and it might be a bit shonky.

That 35mm though, will give me the ability to make a plate and a diffuser, modelled more or less on the one in the dehydrator to send the hot air out to the perimeter of the box rather than just straight up.

I’ll print it in PC I think, which might be marginal - but I’ll give it a coat of heat paint inside because I can.

I think it will all look a bit “factory” but it would be better if it works! All I have to do once the filament arrives, is print it and drill some bigger holes in the lid.

It woudl be good if I could work out how to smoke test the before and after, because I’d like to be able to say that’s one job closer to starting the LR4!

I did tear down both gadgets, if anyone wants pics I’ll upload them, but surely that’s enough for now!

2 Likes

And then I thought - there must be a commercial solution. What do the big boys use?

I have no idea if this is any good, or how it deals with “4 hours at 70°” or whatever, but I do know that I’d rather have most of a Prusa XL and a bodgied up Eibos!

The cost of the Drywise deserves some analysis. It’s priced at €1899 (US$2070), and the optional pre-heater adds another €349 (US$380), totaling €2248 (US$2450). That’s a steep price compared to the cheap food-drier options one might consider.

On the other hand, US$2450 is less expensive than having a massive drybox that holds your entire inventory of spools, which the Drywise can absolutely handle. Remember, your entire inventory of spools is effectively in a dry box because you can use them at any time with the Drywise.

1 Like

And then for $160 US, there’s THIS

.

If it’s selling for $160 - you might like to work out how this works!

3 Likes

I don’t see why it is advantageous to be coaxial. The desiccant should be cooled, or at least not heated, for the air to have minimum water content.

Heating the air and filament and pumping the air backwards through the tube does seem good though. The drying effect can extend beyond the length of the heater. With a small, controlled heat source and forced air, you could have a somewhat long drying zone. Then it comes down to how dry your desiccant is, and how do you maintain it.

1 Like

More progress - no progress!

I’ve got the second floor in the dehydrator - I have kept the standard trays to leave a circulation gap between the bottom, the two spools of filament and the lid.


I tested it for 90 minutes with two spools of filament - in the bottom a half spool of Prusament which has well ventilated spool sides, and a generic solid sided spool of PLA on the top.

I set it flat out (70° on the dial) and it was consistently 51° everywhere I measured. The bottom of the bottoms spool hit 57 which is getting a bit dicy for PLA, but there’s a dial for that and I was exploring!

My conclusions are that the extra height actually helps temperature, but slowing down circulation. Every thing I measured other than the surface of the bottom spool was around 50-54° - the outer surfaces of the spools, the outer surface of the filament and the inner core of the spools.

The sad reality is that this is certainly good enough for drying PLA and TPU - I think it would be “good enough” for PETG, and perhaps as a pre-drying gadget for more difficult filaments.

It certainly has a much more even circulation than the Eibos, but I’m still working on that.

Hold my beer…

1 Like

The setup is probably running the element at full power so your temperatures will likely be at least somewhat related to airflow. If you want to up the temperature a bit then you can choke down the airflow and it should rise.

I suspect you don’t actually need much airflow. Just enough to keep everything around the spools well mixed. 20 degree C air at 60% RH has around 10g of water per cubic meter which will lead to 10% RH at 60 degrees C. So adding 10g per cubic meter will only add 10% RH. A Noctua 80mm fan in free space will move 50 cubic meters an hour so it’s reasonable to expect that you’re probably somewhere in the 1 to 10 cubic meters an hour range, so even at the low end of that removing 10g of moisture over an hour would lead to a 10% higher RH at the exit than the inlet, which shouldn’t affect much. Most tests I’ve seen don’t see much more than 10g of shift on a 1kg spool.

1 Like

Here’s a cupboard with a pair of fans and a small dehumidifier.

I asked him a year ago how it was going and he said “works great”.

The rolling storage unit is a bit over the top, but I keep coming back to the cupboard…

Yesh I would think for a purely heat based dryer, the ideal would be like a convection oven or air fryer where the warm air is aggressively circulated within the chamber and a relatively smaller flow in/out with ambient to keep the humidity from building too high.

A once-through flow can also work, but you’ll throw away 90% or more power just heating the room. And the increased difficulty of maintaining uniform heating is an unfortunate side effect.

2 Likes

I was playing with my store-bought filament dryer last week. I had an older roll of PLA that has been sitting out for quite a while.

I ran it through the dryer and it only helped ‘some’.

I ended up buying more silica gel and was able to get the inside of the dryer down to 10% after quite a few hours of running.

The PLA is printing much better now.

1 Like

Now you are baffling me with science, and this is the internet! :smiley:

I understand/don’t understand everything above - I agree on the airflow - you need just enough to allow the moisture laden water to escape, but it seems from observation that “just enough” has been worked out by the food dehydrator guys. In my dehydrator, I’ve kept the standard trays in (bottom, mid and top) to ensure the airflow remains disrupted.

I wish I had a simple smoke machine to observe what’s happening!

I am nowhere near understanding why the drybox which has all of the silica in it is still around 18%, a couple of days later.

I presume that even in a fan forced oven - (2hrs @100°) there’s a limit to how much moisture can be pulled out of the air when the ambient humidity is in the 70’s at 27°C - can you cast any light on that? Would another hour fix that? I am about to find out!

The odd thing is that for all my carrying-on, and my storage boxes usually sitting up near the 50% - I have almost never had a problem with PLA, and only with one cheap brand of PETG.

I have had an issue with PLA snapping from being overheated around the edge of the spool from my Eibos machine though.