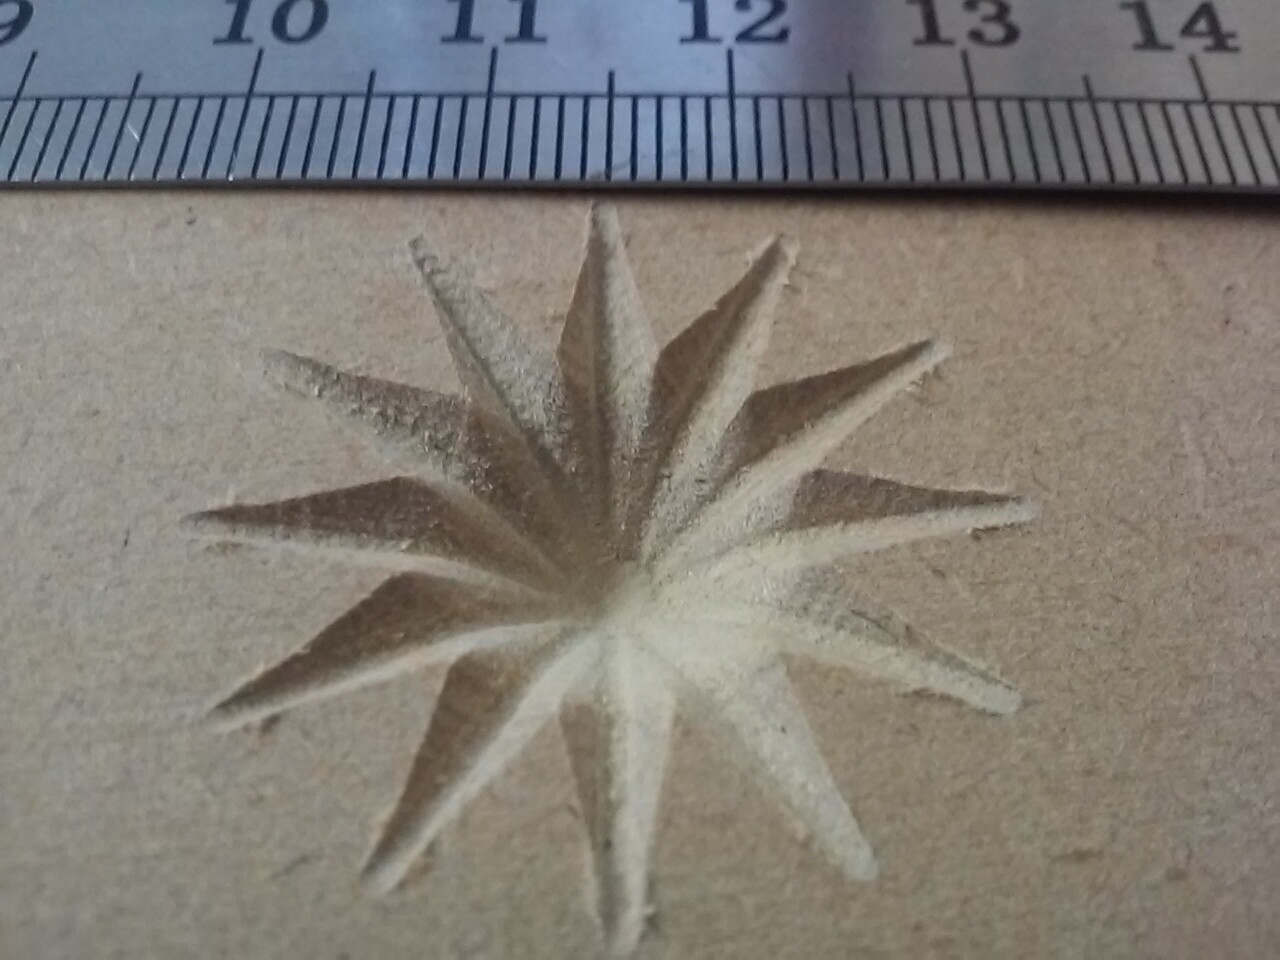
so I am able to carve stars no problem. however the finished look is not exactly what I am going for. no matter what I do, I cannot get the star to come to a point in the center… see the image below. I have seen stars come to a point using other software but I cannot get this to do that. any help would be most appreciated.

1 Like
What’s the angle of your cutter?
60 degree v bit
I think you need a bigger angle and/or diameter V-bit (or smaller drawing), that Estlcam is going as deep as it can (and cutting a flat at that V-bits max depth of cut/5.5mm) with your chosen tool/drawing.
2 Likes
okay… chatgpt told me to set the tool diameter to 20mm LOL the image came out correct but have not had a chance to give it a try since all of a sudden, my esp32 will not stay connected to the software… keep getting alarm and no files are visible…. worked fine up until today turning it on. bummer …
Unless your bit has a cutting edge that is much longer than the tapered section, this sounds like a great way to crash the machine.
It will plunge diagonally downwards until the cutting edge is below the material and shove the shaft against the workpiece.
figured it was not to be tested… in the meantime, the machine is not even usable now… it just decided to quit.
constant alarm state.. have open post on troubleshooting section.
I will look for a larger bit as suggested above.
To see if ChatGPT got it right (that a 60deg V-bit would need to be >= 20mm in diameter to work) you could temporarily change the 60deg V-bit diameter… and v11 max carve width to 20mm and see if the Estlcam Preview Max depth (double click to side view) is 17.32mm (max cut depth for a 20dia 60deg V-bit per my Carve Calculator)… Using v11 you’d need to manually rotate and measure.
Have you tried increasing the depth limit? I’m not sure how it decides “automatic”. But it looks like it doesn’t go deep enough.
In Estlcam, I have tried that but not actually ran the file yet… given the issue that began yesterday (the board give Alert when the sdcard is inserted) but even with entering a deeper depth it still shows a flat bottom in the center of the star. More on this once the new sdcard arrives today, found a 32GB class 4 so hoping the card was the issue. Then I’ll get back to the star carving tests.
Automatic/Ask (v11/v12) allows the tool to go to the maximum depth possible, e.g. 5.5mm for that 60deg 6.35dia V-bit… Any manual entry larger than that Estlcam calculated max depth will change nothing (despite such a claim further down the page).
@HyeBuilder posting your drawing would help.
Used one of my drawings resized to work with my 16mm diameter 90 degree V-bit. Note: CAM will have a gray area in the center if the tool isn’t big enough. I don’t know what I might have been doing wrong, but I couldn’t get this to work in v12.
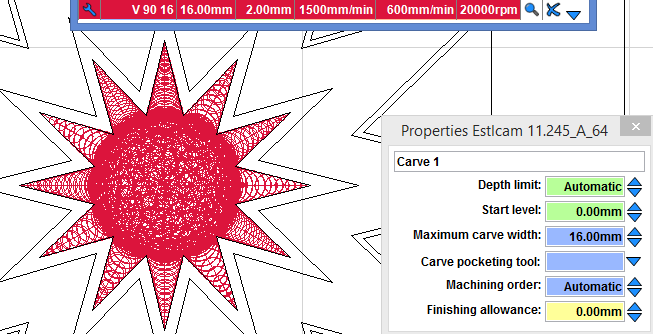
I think it’s not going deeper than what it calculates the tip is? I don’t know, just guessing. ![]()
Maybe @christian-knuell will have a good answer for this. I know I sure don’t but I am very curious
Stars are American flag stars that measure 1.2″ diameter… and when i model this in easel, it shows the cut to a point.. but can’t do any v-carving with the unpaid version so it looks right but is of no use. LOL. Besides, i have too much of my time in Estlcam now and just want to know how to make this work given this software and such. Maybe as Jonathan Jones suggested, @christian-knuell can help a fellow out. LOL.
1 Like
If he cant help we are screwed on this one ![]()
But it might be a few days before he responds. He isn’t here all the time
The example above measures about 1.1” across and required a 16mm diameter tool. As my first post said:
As my second post said:
side view is pointy. Reduce the diameter until it’s no longer pointy and you’ll know the minimum diameter tool needed. You could also use the main CAM window and decrease the diameter until the gray center reappears (post 4). You could also post the drawing and let us figure it out (post 3).
Well, today was not all bad. Got the new 32MB C4 micro SDcard and popped it in, fired up the machine and attempted to connect via WebUI. And ….. it worked!
I quickly, before the machine decided to pull a fast one on me, loaded up that one test star where I defined the depth to 15mm, well in excess of what was normal for the 1/4 shank 1/4” this was actually a 90-degree v-bit, (not a 60* V-Bit). And it worked without issue. Actually too good as the pit in the center of the star is too deep (or deeper than I would prefer). Will play around with this some more after dinner.
Appreciate everyone’s input…. I am not under any illusion i will find the right thing or way to do this, but, at least if I can use a hack to carve these two flags for the upcoming golf tournament I promised to donate, then I will be happy.
Picture will come in a bit
1 Like
Yes, you can calculate it yourself using the link in my second post. The results will match v11 internal calculations, v12 typically calculates a slightly smaller max depth.
The only way you can increase the Estlcam calculated maximum depth for a tool is to lie about the tool diameter and max Width (>= tool dia). Estlcam will not exceed the maximum calculated depth (used when Depth is set to Auto/Ask) no matter what you enter in the Depth field.