itll also work in stealth mode without needing to connect to the server if its put in LAN mode.
1 Like
yes, you can, if you put it in LAN mode, which doesnt require a cloud handshake to start the software.
3 Likes
I’m an old hat going back to the glass bed Lulzbot AO-10x days using my secret weapon:
And…
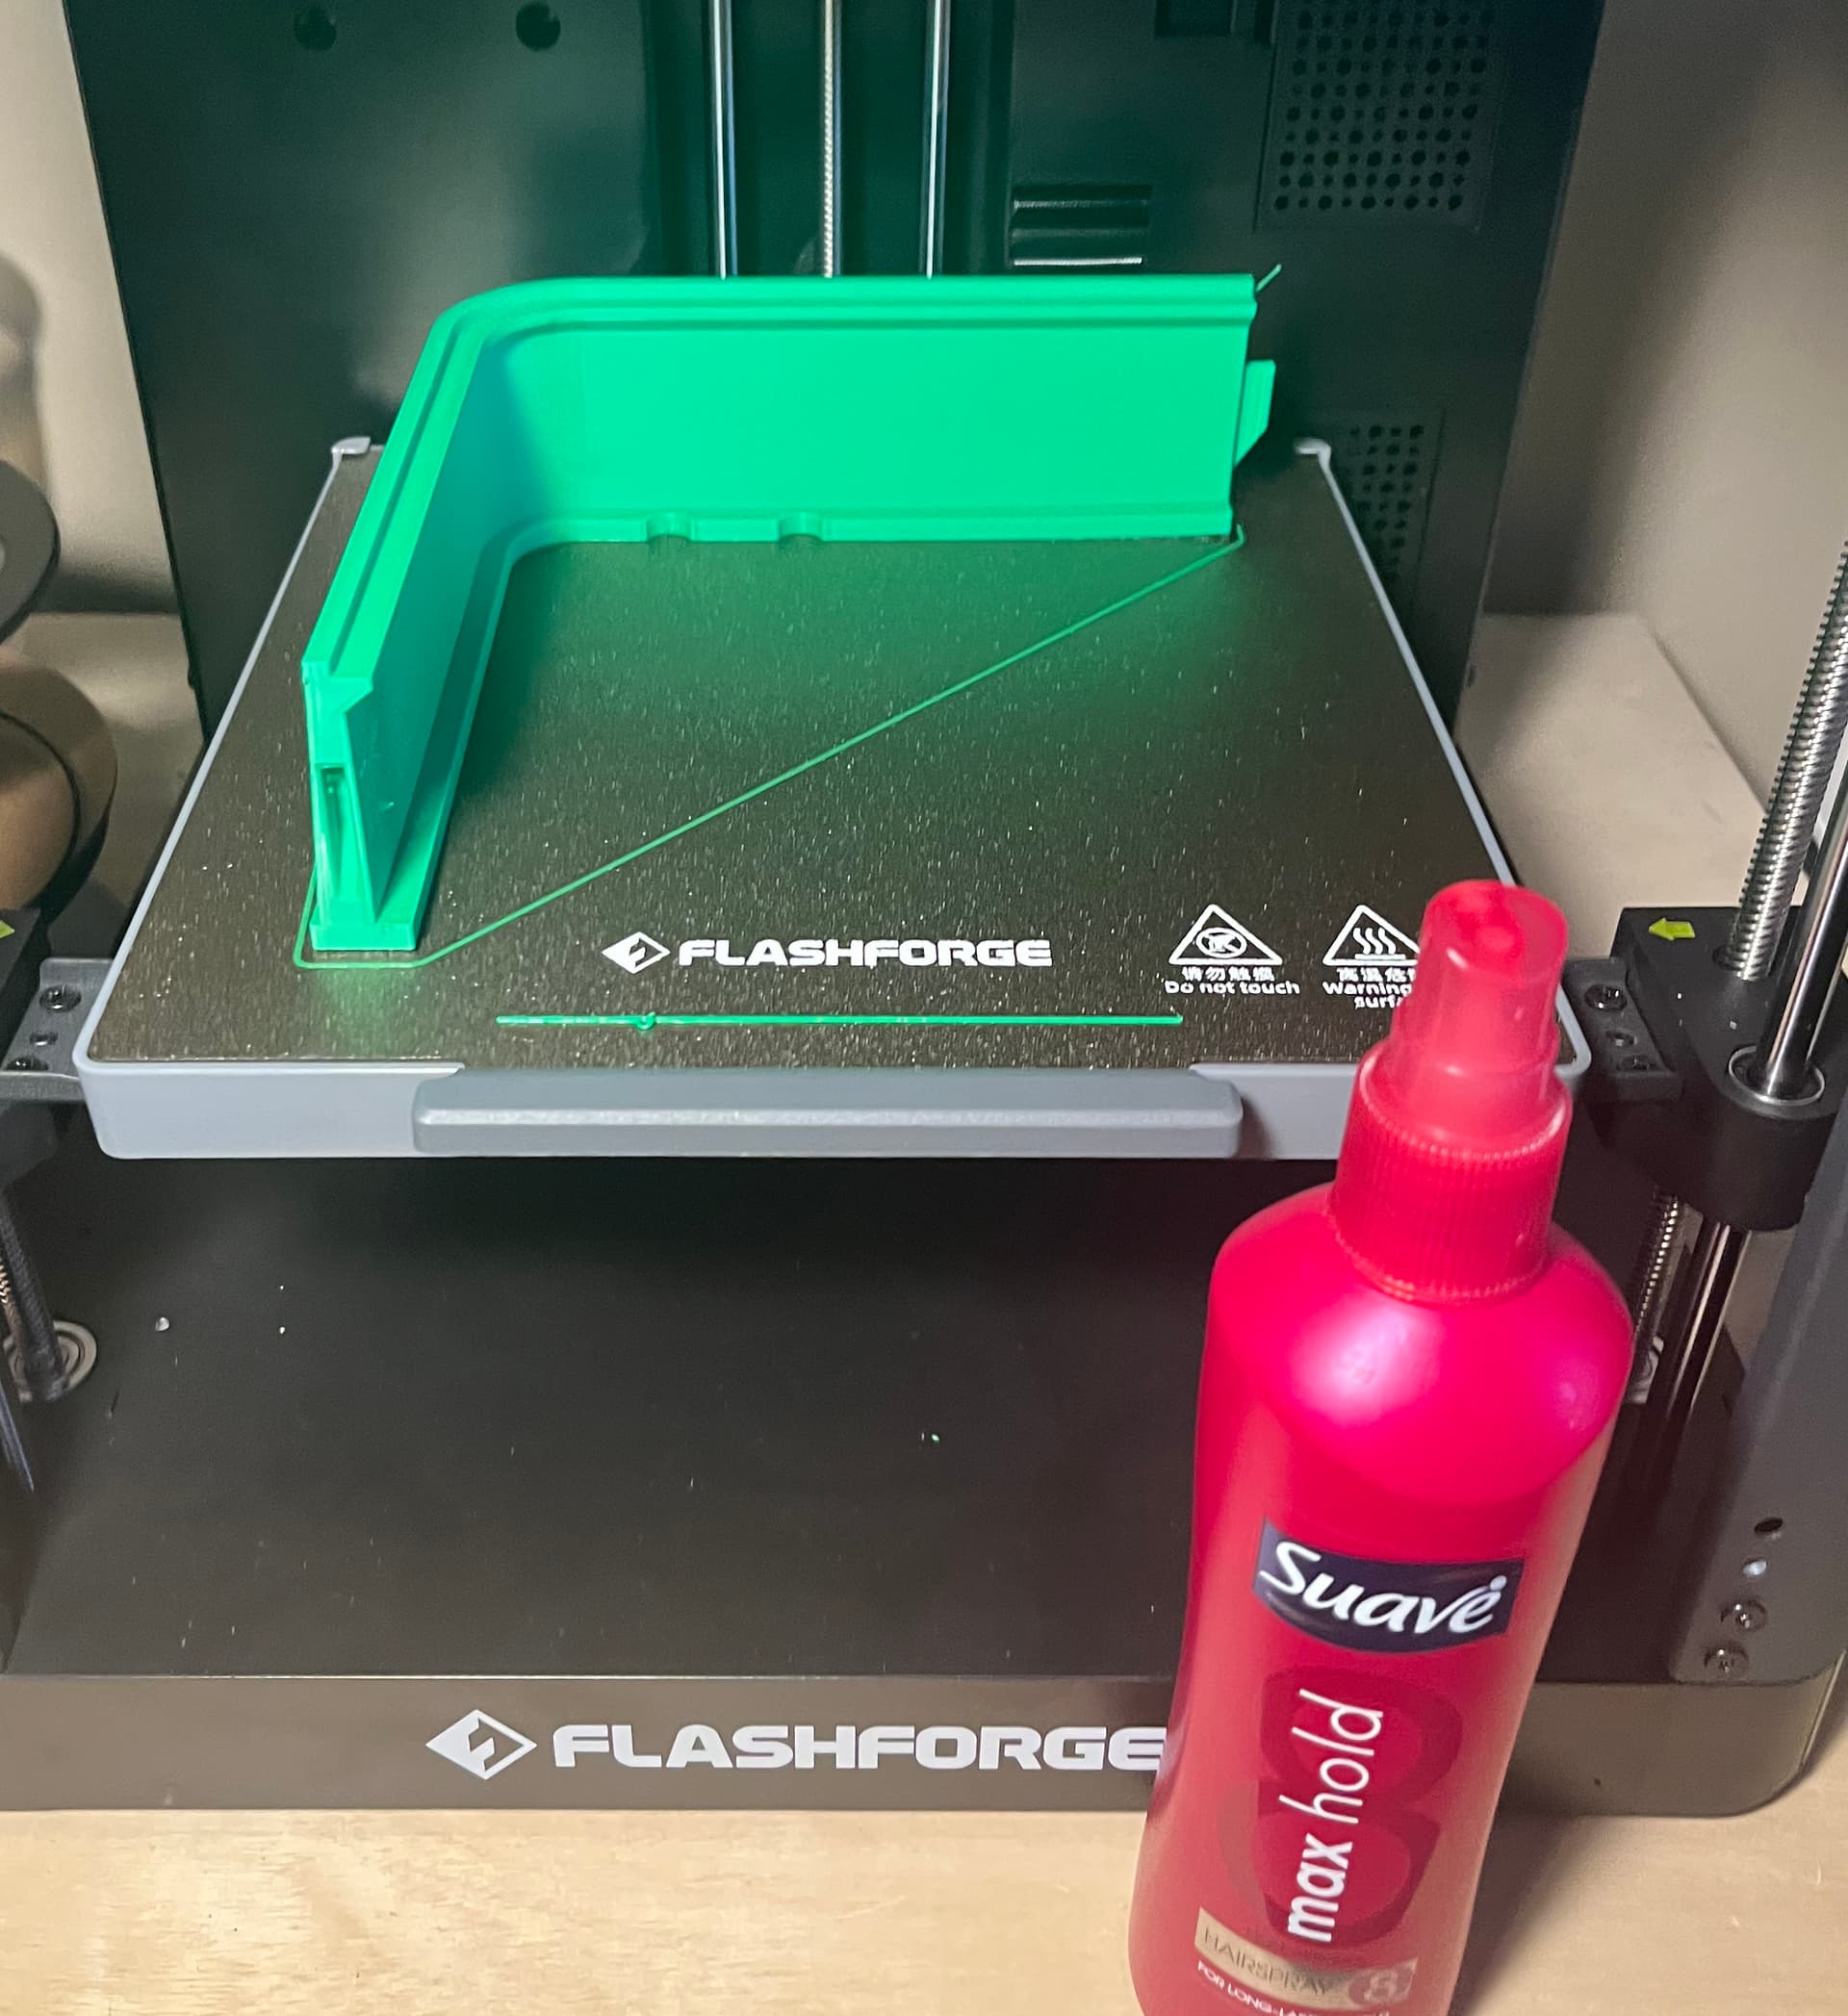
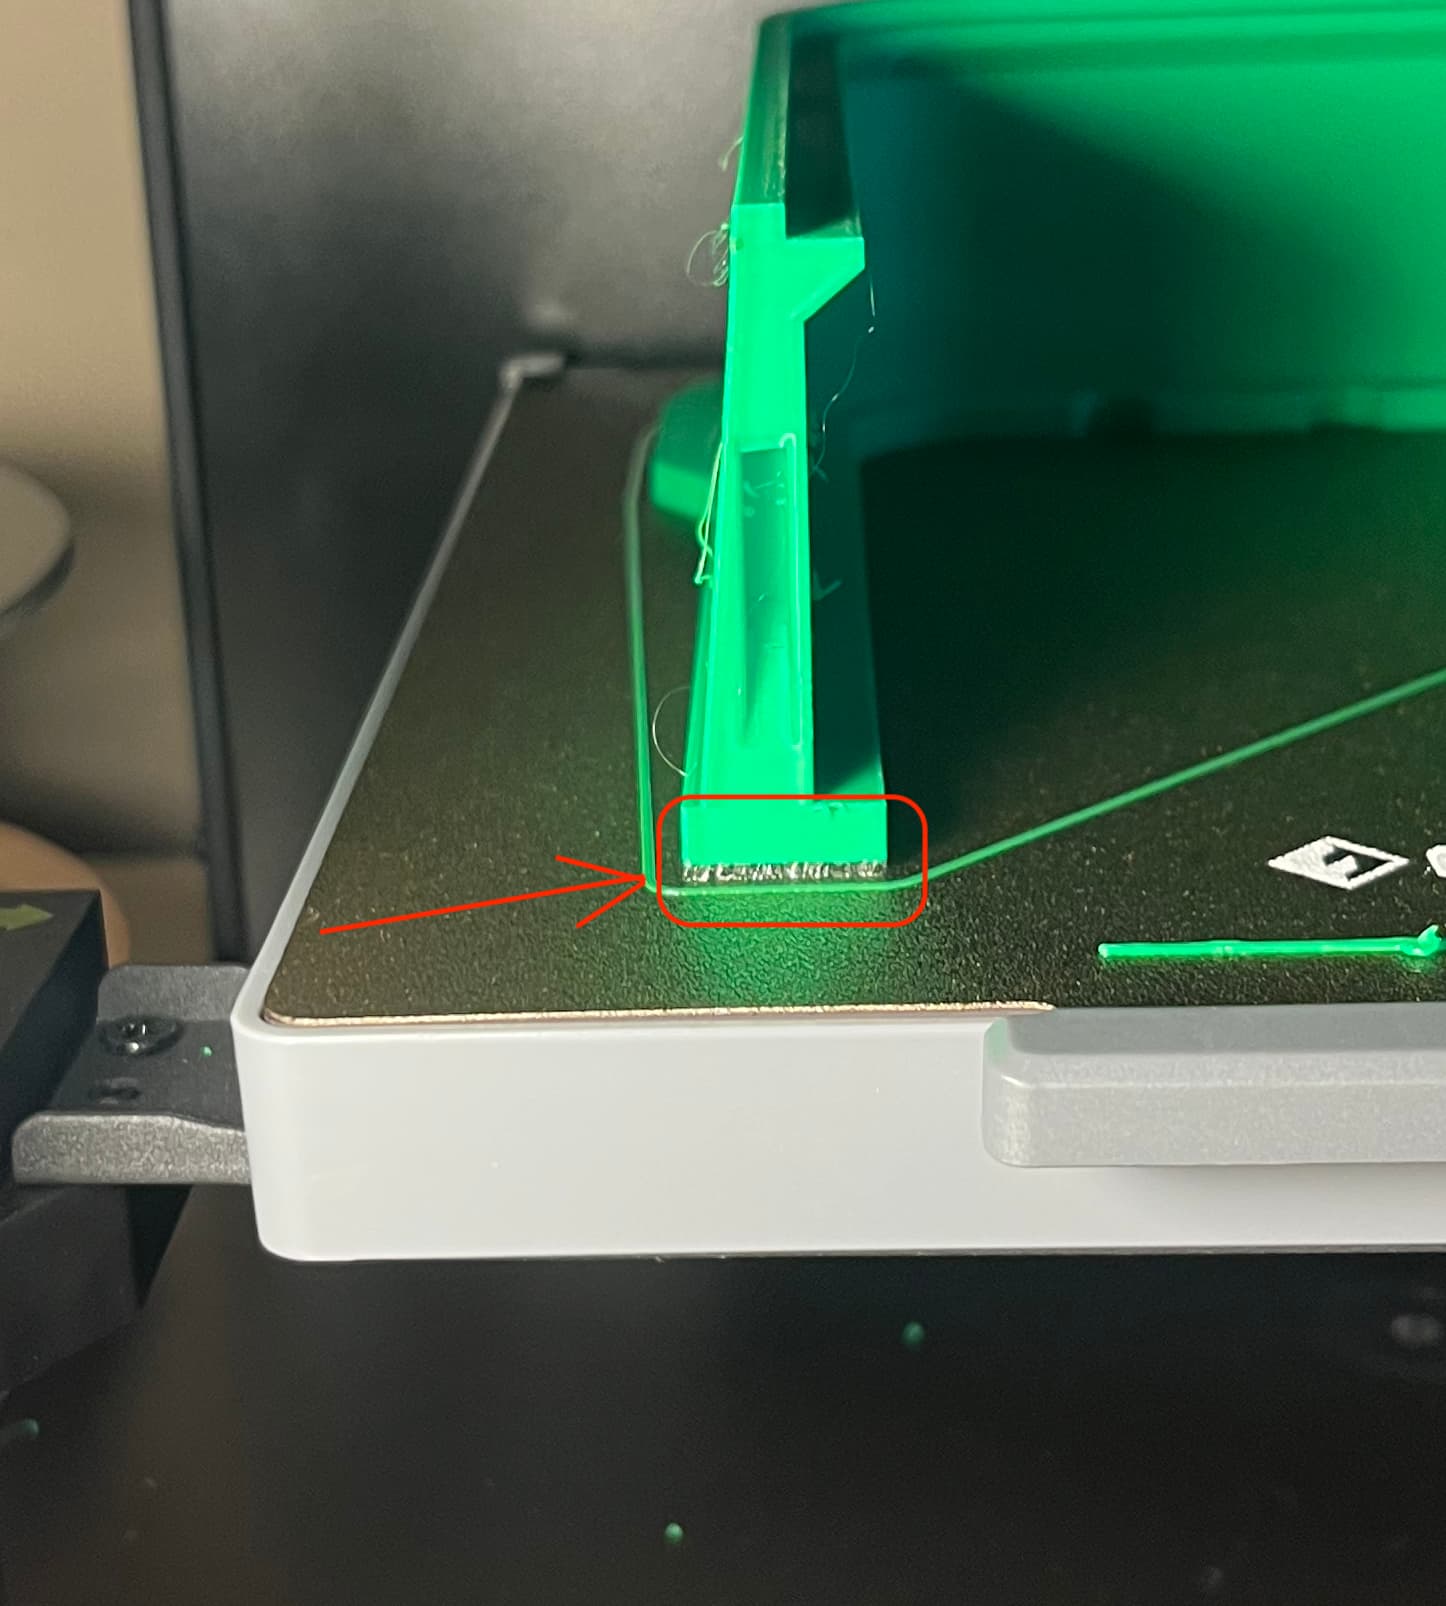
It still lifted. This Polymaker green PETG is printing poorly, it must have additives to try and lower temp print. I’m going to finish out using it, but will switch to another brand in this printer.
1 Like
Some pieces of that enclosure were a real pain. I printed with PETg, too.
FWIW, I’m still not actually using the enclosure, I haven’t bolted the lower parts to the frame yet. I’m also not very happy with the top piece that holds the LCD, but the top parts are in place.
I had an issue with the acrylic parts. I received them already cut and the top and front were frosted, so couldn’t see well through them. I could have had them redone, just haven’t bothered to do it yet.
I have noticed that some PETG prints nicely and some is a real bother. The standard PETG profile seems to work OK if the room is really warm, less so if it is not. I noticed that the profile in OrcaSlicer is hotter extrusion and cooler bed than I’ve always used with reasonable success. I don’t get great surfaces with it either.
1 Like
@MakerJim is not printing the original DIY enclosure but rather my newly remixed minimal enclosure.
In this new one, the LCD does not get moved. It’s in the stock location, mounted on the steel frame.
The plates I got were always clear, both in buying from Flashforge namebrand and buying from an a third party maker. Whoever on earth would ship a frosted door when a clear one is “clearly” what was intended and what everyone is expecting!?!? Wow.
A friend who works in a sign shop using leftover scrap. He checked the first piece (used for the sides) and when he grabbed another, (covered both sides with protective paper) it wasn’t clear. For what I didn’t pay, it was just kind of funny.
I might try your minimal one, as the relocated LCD is kind of a beef with the FF one. Does yours properly accommodate the camera? (I assume so, since I recall you have one.)
1 Like
Random thought: Are you using any part cooling? I had super weird issues with the eSun Black PETG because the default Creality PETG profile had the cooling fans on. Turning them off solved the warping and brittleness issues together.
2 Likes
This is the best part so far, I really like that you don’t have to mess with the LCD mount.
I used to get bit by this in the big makerspace when I was a community member there. With scraps, you can never assume they’re the same even if you think they came off the same original piece. Often times they did not. Protective film on both sides makes it ambiguous.
Good suggestion. I’ll go check the stock FFOrca settings, but I’m using the stock FlashForge PETG material profile. (Unless maybe that got overridden in the exported .3mf I’m using.)
I have a flat parts sheet on the printer now, will check settings on the next plate I slice/print.
2 Likes
Yes. This new minimal enclosure means the stock, normal distance between the camera and the touchscreen remains unchanged, because the touchscreen does not move. Access to the screw hole used to mount the camera, is offered in both the original DIY enclosure and this new one.
In the original DIY enclosure, the camera stayed put, but the touchscreen moved, and the cable between them became too short!
I had previously found a way to get around that by designing a new printed mount box for the PCB of the camera, effectively raising the camera as much as possible, barely getting its short cord in reach of the moved touchscreen. It worked, but barely, and sometimes the tension on the cord would result in the camera becoming unplugged. Frustrating.
Now that the touchscreen does not move, the camera cable is more than long enough.
I like these aspects of the new enclosure (touchscreen mounted more securely in original location on steel frame, and camera cord not being stretched) so much that I’m seriously considering redoing the DIY enclosure on my #1 and #2 AD5M’s to match the #3!
Now it makes total sense. At first I thought you bought a kit that shipped with frosted. Regarding an individual mistaking frosted for clear becaus of the paper — I did that very thing myself on the first AD5M I bought! I cut an entire set without peeling the paper to check, and it was all frosted. I located the clear and redid the whole set. For printers #2 and #3, I bought kits.
Ummm, yeah, I just spent all day printing the top parts and the handles ets (not side parts) in burnt titanium PLA, after watching the official video.
I don’t have any PETG at hand (and don’t feel like buying any) - is it really necessary?
I printed my three enclosures all out of PLA. While using those enclosures, I’ve printed both PLA, PETG, and TPU. No problems.
I gather there are some high performance filaments that require a heated chamber that might be a problmatic temperature for a PLA enclosure, but I don’t any such and not likely to buy such.
1 Like
I’ve now got a first cut of everything but a spool mount printed, and all the front/side panels and parts installed. I’ll work on the top stuff tomorrow most likely.
There are things I like and don’t like about the remix.
Not moving or messing with the LCD is a big one. I really, really like this.
The modified handle that needs no supports and the relocated filament sensor part appears great.
We mentioned the issue I was having with warping- but that’s mostly on the PolyMaker PETG.
Present state:

Some more issues:
The hinges suck. They didn’t break free for me, and instead when using force to try and snap them free, they broke at a layer line. Maybe bad adhesion, but honestly it’s a terrible design. (from the original FF parts onward.). I found an alternate part on Printables which was a multi-part print, then had to re-size the hinge pins to make them installable. Good idea on that remixer’s part, terrible execution. But it worked eventually.
The four back parts on the sides, these are only retained with a single screw each. The original FlashForge enclosure parts (that were not minimalist) wrap around and there are more than one screw to secure each part.
Honestly, only using one screw to retain a part like this is a terrible idea. These should get recesses in the side opposite the screw to install a magnet in each part near near the edge opposite the screw.
Just after I took the picture above, I used some blue painters’ tape along the back sides to get them to lay down.
Edit to add-
The four side bottom parts have guide slots for the acrylic panels. These print as unsupported overhangs. They printed, but I had to do some trimming with a hobby knife to get the acryilic to slide in.
I plan to re-print the top parts with a different brand of PETG which will arrive Monday.
I also plan to do the 3rd party firmware upgrade, but it appears to have stalled out- the last update was 9 months ago. I’ll still upgrade, but it’s making me nervous.
One other rant about the stock firmware which has nothing to do with this great attempt at a minimalist enclosure: There’s no damned way in the stock FlashForge firmware to correctly eject a USB stick from the printer!
My workflow is presently to put files on the USB stick from the Windows box running FFOrca, move them over to the printer to print. Then when I pull the USB stick out, windows sees it as corrupt and refuses to deal with the USB stick. Over to the Linux box to check and fix the USB stick file system so it can then move back to the Windows box to repeat.
We’ll see how the 3rd party firmware goes, but between the complete garbage web-required slicer and this USB handling I’ve soured greatly on the printer. It’s mechanically decent, has great potential, but if the 3rd party firmware doesn’t right it then I’ll change my recommendation to be a “hard pass” for others.
The hinges are a big frustration. My effort to increase the tolerance from 0.1 mm to 0.15 mm is obviously not enough to prevent fusing on all printers and all filaments.
I have a hinge that I had designed for a cabinet door, and it uses an M3 screw as a hinge pin. I may look into redoing the hinge from scratch to get a more workable thing.
On each of those, I CA glued the top and bottom parts to each other, so the resulting part has more than one screw. But this is part of the remix that needs attention, no doubt. I had limited bandwidth in the midst of various nudges to post the remix (people asking for it) and I put it out there half baked.
I printed those with supports, but forgot to mention that in the description.
I think they got to a workable project without a lot of known buggy issues, and shifted attention elsewhere. The project works great for me, with the only exception being the time lapse feature does not work.
I had noticed something strange about the way Flashforge was handling USB drives. Going by memory here. It was something like, if the root did not have the print file in it (was in a subfolder) they had some script that created a dummy (fake) print file in the root. Or something like that. Deleting or moving that dummy file while on a a computer, seemed to cause issues. This may or may not be related.
But switching to WIFI upload does away with this issue. WIFI upload can happen between OrcaSlicer and the printer, whether the printer is using stock UI or the UI choices from the Klipper mod. I only use WIFI upload of print files for the longest time now. I have each of my three AD5M printers on its own static IP in my home network, and when the printer is on, OrcaSlicer knows the URL to send to, and it works great. Flawless for me so far.
I love the effort so far, just giving candid feedback.
1 Like
I revised the description based on the feedback, to give more of a heads up on some things, and if I can manage some more bandwidth on this, I will try to improve some of the weak parts.
When I get the top side parts finished, I’ll post a make.
Thanks for your efforts!
1 Like
i really hope you sort out your printer issues, i bought mine in early December (and Loving it), received it close to Christmas and besides some test prints before me not liking the orca flashforge variant, went straight to the Mod following @DougJoseph guide-video, found some issues with the wifi in orca and device tab, if i use the browser webui works perfectly, used the petg/pla stock profile for printing my enclosure (black petg & white pla) and worked first try. Copied into orca part of the bambulab profile for pet-cf and went to do calilantern stuff. this printer is amazing (but in case you will do this fancy filament: limit your printer to 80/280 degrees in the settings for the filament or you will get some nasty errors).
other than that: i hate the placement of the filament runout sensor after the enclosure mod OMG
pet-cf doesn’t like humidity but it breakes a lot with the weird kinks of the ptfe tube from my dryers to the sensor. @DougJoseph filament cutter mod doesnt like those high temperatures and will cause issues. for petg/pla i dont see the problem
OK, so what would be needed to correct that? less of a bend at the start of the PTFE tube?
I have been looking at the bends on the cable chain with the enclosure mod, and I’m sure that I don’t like it. I’m not sure what I’m going to do about it.
I’m curious what errors you found. I’m not planning on printing with a build plate above about 80C, nor the extruder above 250C.