If you’re not happy with the auto discerned Z-offset, you can tweak it with the Z offset buttons in Stock UI (if you’re using that) or in Fluidd or Mainsail (if you’re not using Stock UI). NOTE: remember to make a new bed mesh after editing the Z-offset.
1 Like
The previous klipper mod we used was a nightmare with z offsets. Glad to know its sorted out with this. So excited to try now
1 Like
For me the major hiccup I went through with the Klipper Mod, was apparently related to Klipper itself, not to the mod, in that I expected the Z-offset to be loaded at boot up, and did not realize it was not, and that a bed mesh made before an edit of the Z-offset would ignore any updated Z-offset. For me the key then was simply to remember to make a new bed mesh after editing the Z-offset. I just edited my previous post to add that statement.
1 Like
Also, the Forge-X mod has two ways of having the current Z-offset loaded at boot up. 1) that’s the default behavior if you are using the Stock UI, and 2) you can invoke a one-time command in the Console to make that the behavior, if you are not using the Stock UI.
If you created a bed mesh, then later altered your Z-offset, then even if you have Z-offset auto loading at each boot, I think you still will want to create a new bed mesh. I’m a little hazy on what happens with an old bed mesh while a newer Z offset is also loaded.
2 Likes
I am seeing a message in the console. This whole time, even prior to Forge-X I had it on the default of Auto, so what was it doing?
info Replace Spiral/Automatic Z-Hop. The printer does not support it.
info In Orca. Printer profile → Extruder 1 → Type of Z-axis lift. Set to Normal or Inclined
Running this printer with Z-hop set to auto generates an error message, and the error message may or may not be seen depending on whether it’s running on stock firmware versus say, either Klipper Mod or Forge-X.
People who ran their AD5M on the Klipper Mod did see an error message in their Console every time that this was encountered in the G-code, but the error message was cryptic and didn’t give any useful information on what was causing it or how to fix it.
By contrast the error message in Forge-X is meaningful in pointing out what is the issue and how to fix it. I consider that an improvement.
I am not expert enough on the differences between the Z-hop options and how the printer got around an option that it did not accept or understand.
1 Like
Did you have to do anything to get the camera to show up after installing Guppy Screen? Mine isn’t showing up now.
By default, the mod starts in a mode of the screen being used for Stock UI, and the Stock UI controlling the camera.
Whenever you use any other option besides the Stock UI, there is a console command to tell Forge-X to take over control of the camera. It’s in the documentation — here: ff5m/docs/CAMERA.md at main · DrA1ex/ff5m · GitHub
There are reasons for switching to the mod controlling it (more economical use of resources) discussed in the first part of the docs. There are key parts after that about customizing if your camera’s output is not what you want, and about how to disable Stock UI control and enable Mod control. I am hesitant about copy and paste because docs get improved over time, while my copy and paste would be stagnent.
The console command is:
SET_MOD PARAM="camera" VALUE=1
After that reboot.
1 Like
Thank you Doug. That fixed it.
1 Like

I was excited for this new firmware to try out, which does seem pretty cool, but I might be throwing this printer in the trash if I can’t ever get it to print right again. All of a sudden one day it started printing terribly. These are a couple examples that no matter what I do recalibration wise even where things got way off and I fixed them, still prints like garbage.

The printing problems here must have a cause other than the firmware. The firmware on the main board was always Klipper straight from the factory, and remains Klipper on both the Klipper Mod and Forge-X. My point here is that if the cause is not the firmware, the fix has to be unrelated to firmware.
The Klipper Mod was really only about offering additional user interface options.
The Forge-X mod does offer a new, more bug free version of Klipper, side-loaded beside the original. But it’s still Klipper firmware.
In analyzing the possible causes of the print issues… there can be problems with cooling fan being off when needed, or on when not needed, temp of bed being wrong (for a given filament), temp of nozzle being wrong, ambient temp in enclosure too low or two high, loose grub screws on belts, over-extrusion, under-extrusion, partial clog, etc, etc.
In this image:
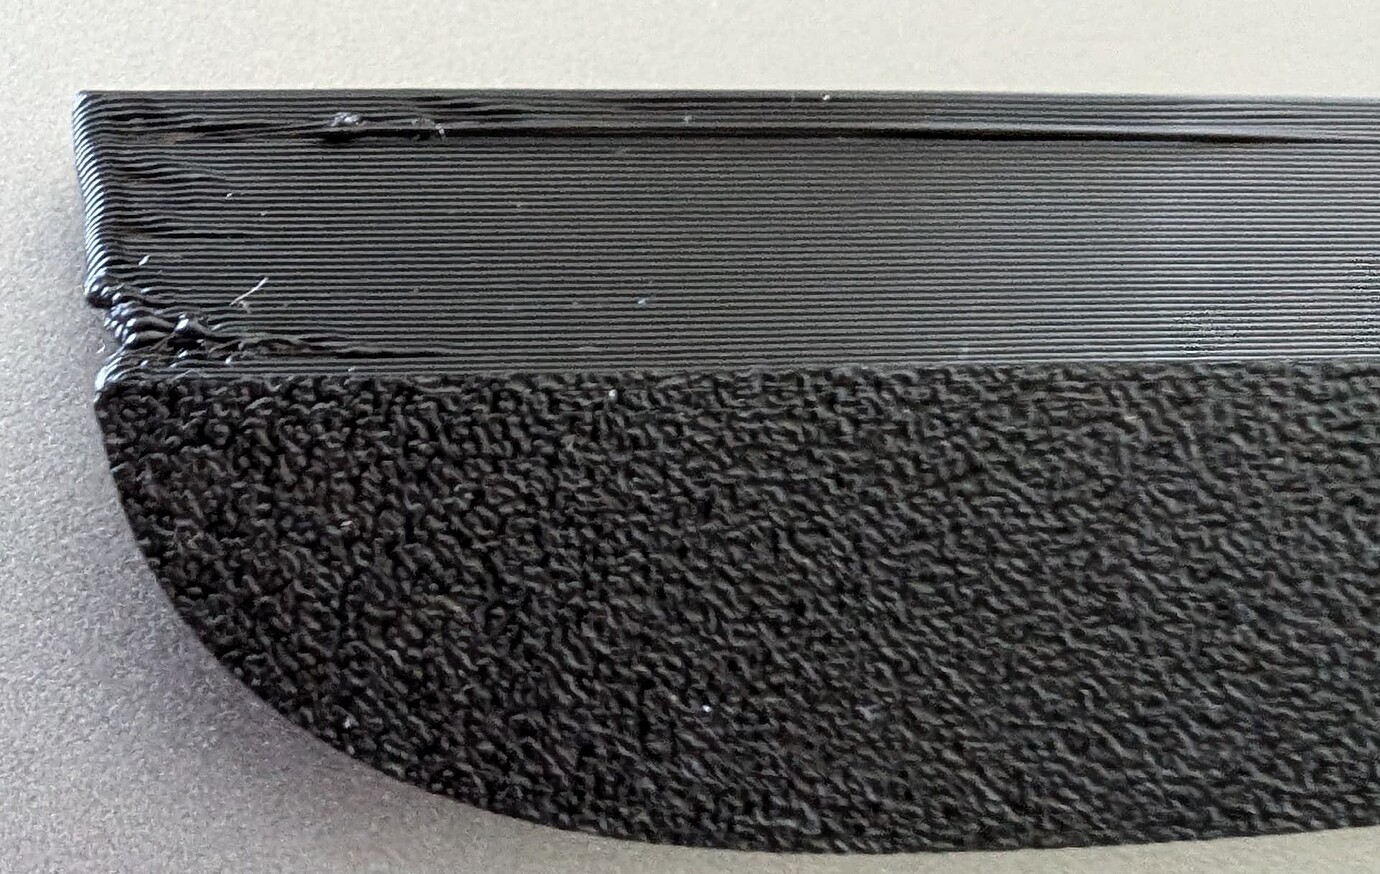
…It looks like the lower part of the image is the underside of the first layer, having a pattern like it was against the bed. Then it looks like the top of the photo is a steep overhang with long bridging, and that’s always a challenge for any printer. I cannot be sure though, because it only gives me a limited glimpse into what was being attempted.
In this photo,
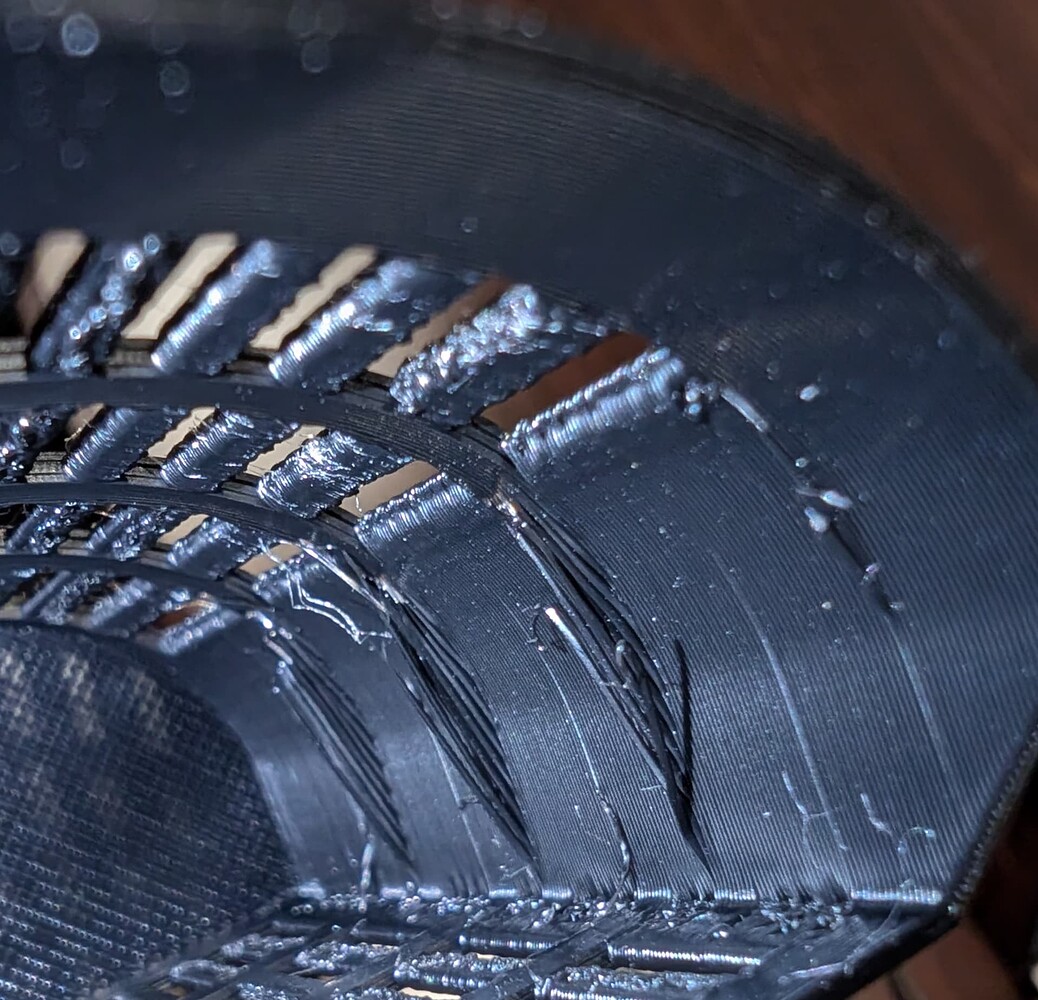
…I don’t have enough information from just one pic, to be able to know for sure, but it looks like it could possibly have been attempts at printing unsupported overhangs, which is problematic for virtually any normal 3D printer.
Can you share the models you were trying to print here, so we can get a better idea?
1 Like
Thanks, Doug. I wasn’t saying it was the firmware, although it may have seemed that way. This started happening prior and eventually I decided to switch over to it and if needed and expected, try to rectify then.
First photo model is this. Printables model #1305684, desiccant lid.
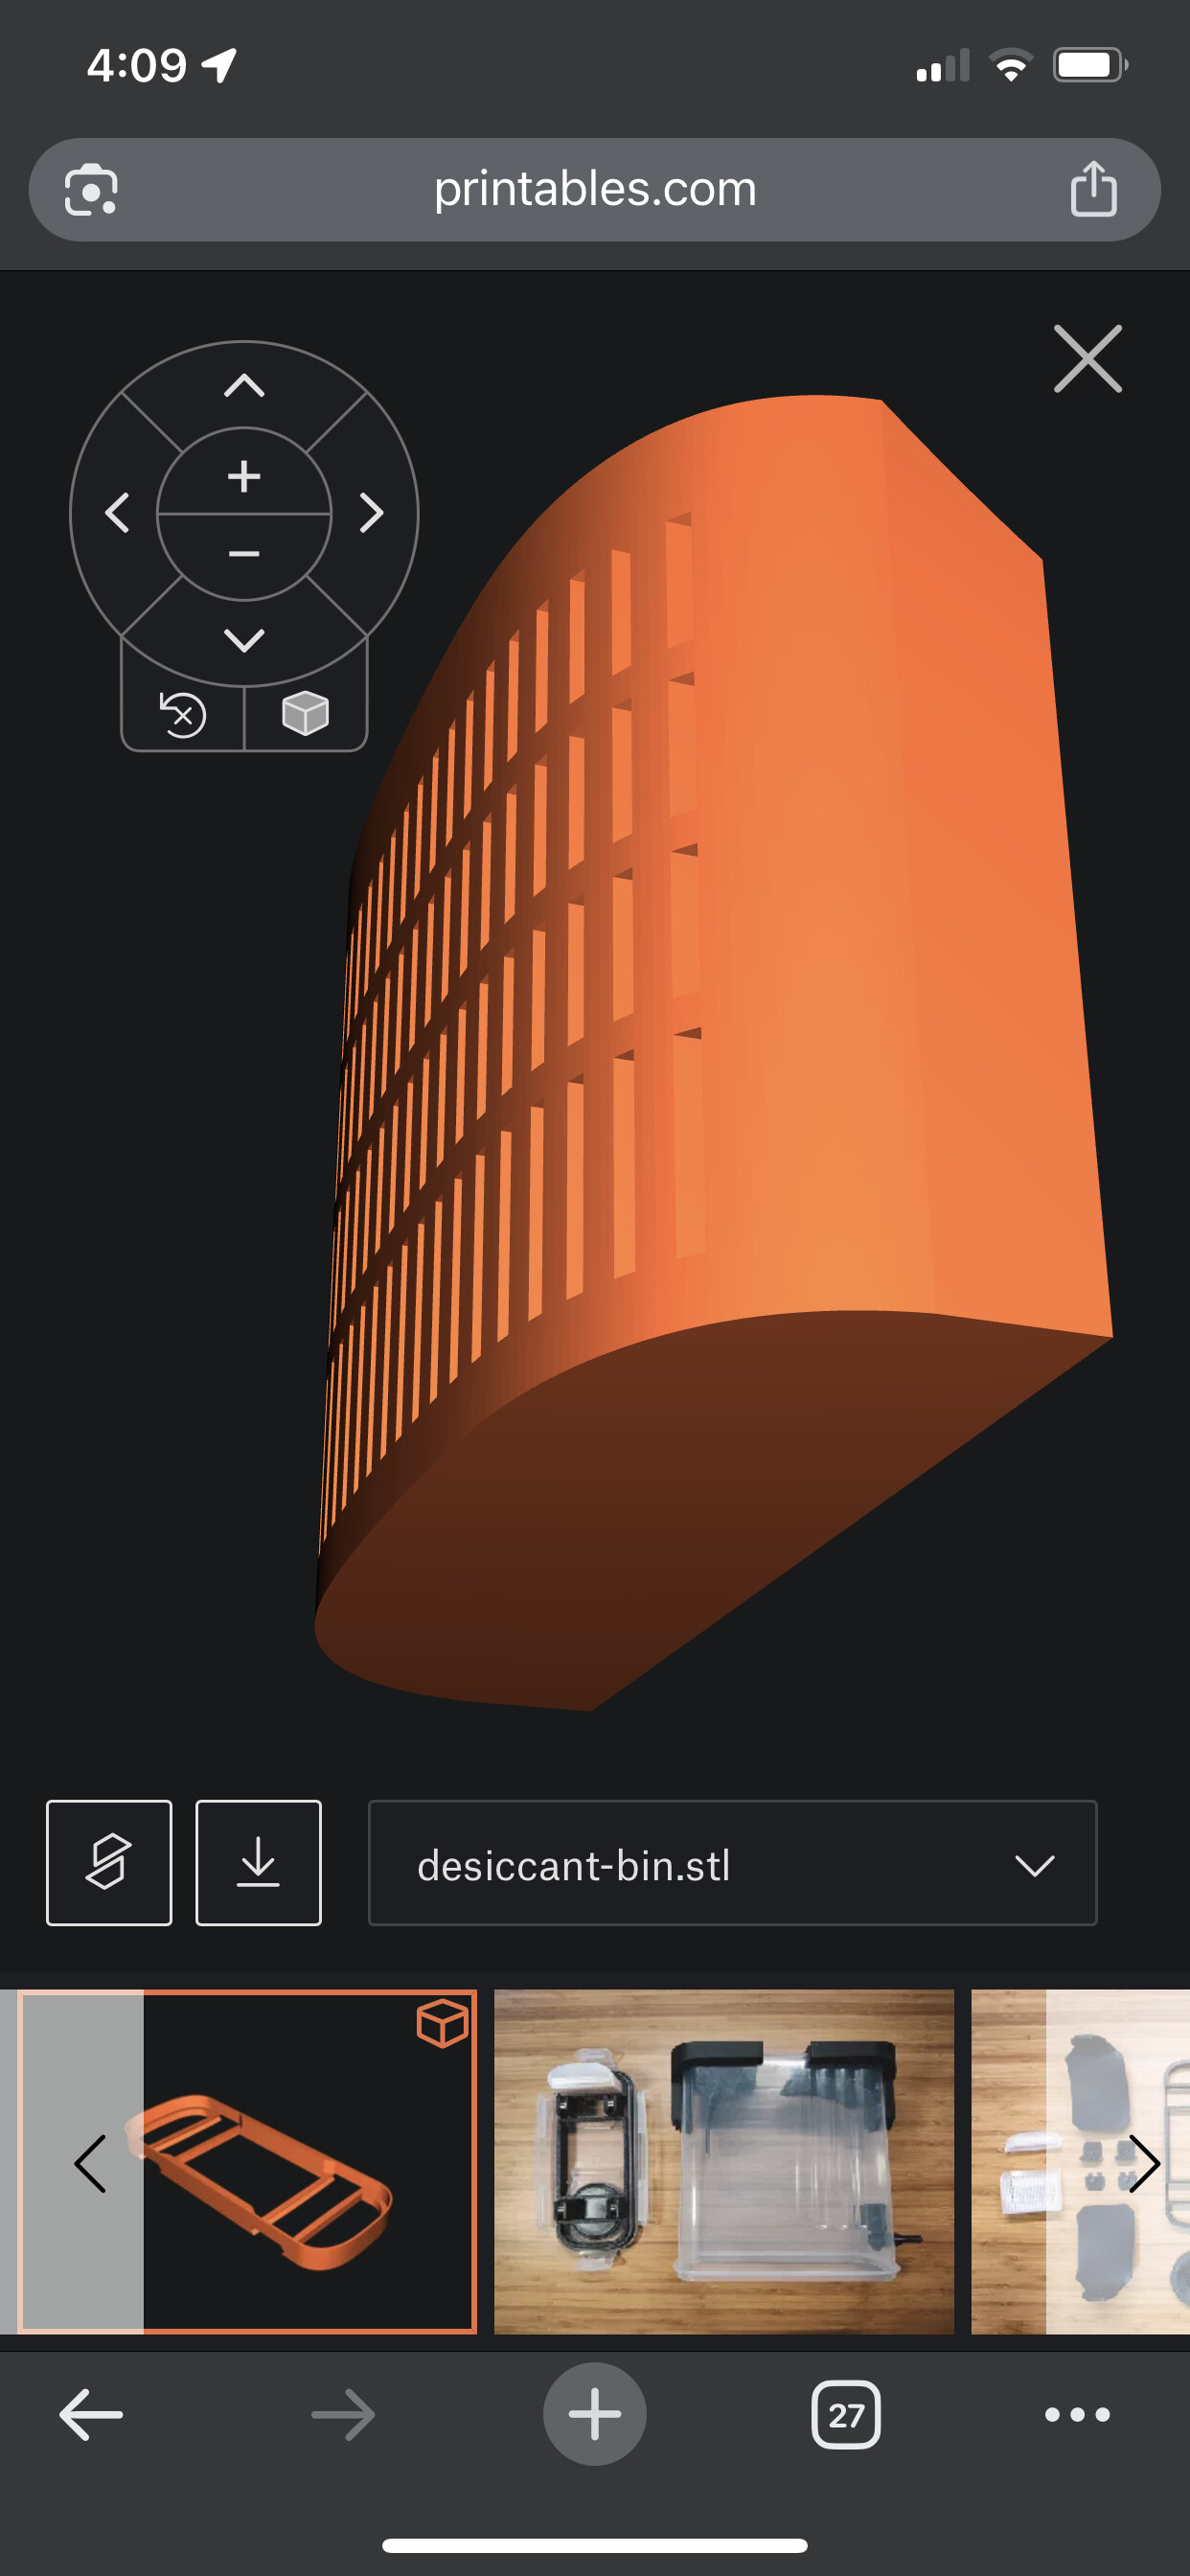
Second is the desiccant bin. I can’t include links in this post for some reason.
In first, I’ve had similar prints go way better and the quality of this has varied through the many times I test printed it.
In second, that is inside and I do not know why it has overhangs sticking out like that. That should’ve just been part of the wall.
1 Like
OK, I looked it up.
That first part definitely has an extensive 45° angle overhang,
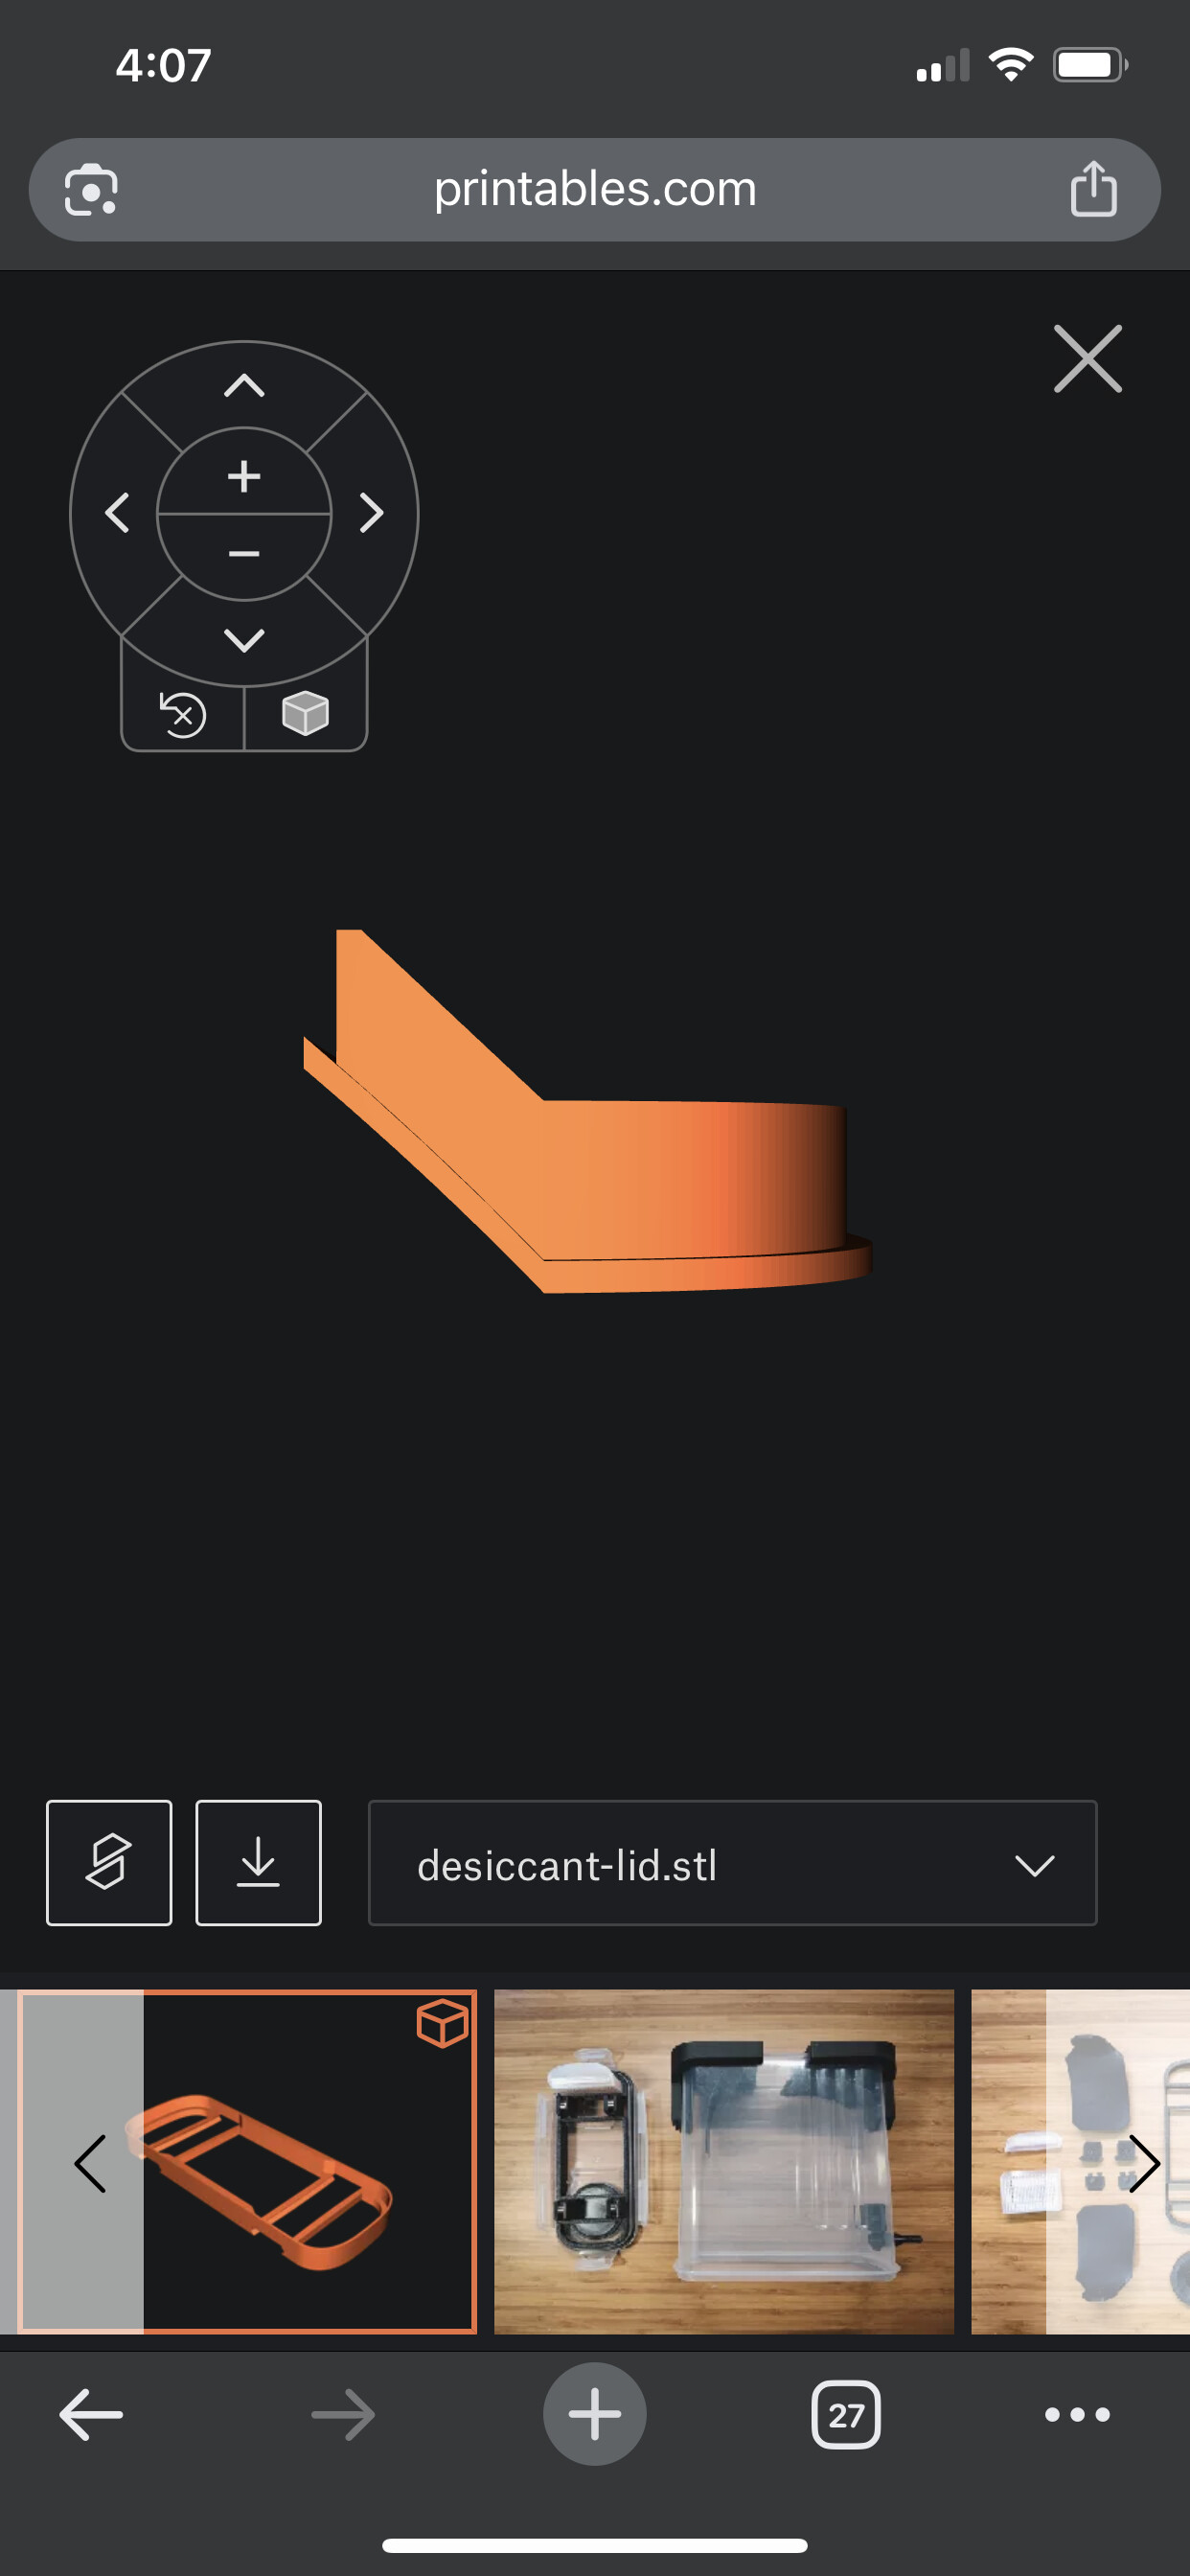
…which means you need to have good extrusion (not a partial clog, but good flow), and you need to have a good cooling — part cooling fan needs to be running full blast, — and you need to not have a high ambient temperature, so if you have an enclosure definitely have the lid off and perhaps the front door open and if you’re in a hot environment, it’s going to be a challenge to print a steep slope overhang like that.
Speaking of having good flow and not partial clog…
Your photo of the inside of this part, really looks to me like you have under extrusion/low flow/possibly a partial clog.
Filament can have impurities in it, including tiny bits of metal, tiny bits of rock, bits of sand, etc.
If you have another nozzle and you swap nozzles and it fixes things, then it was definitely a partial clog.
There are ways to help get rid of a partial clog such as a “cold pull” and alternatively heating the nozzle up real hot and pushing lots of filament through it to try to get a clog to move on through, but it can often be easier to get it back out the top through a cold pull rather than to get it to push all the way through the bottom. Think of the 3-D printer nozzle equivalent of trying to pass a kidney stone.
1 Like
I may have had a partial clog in my old nozzle, but I recently switched to a brand new nozzle to check that and visually it looks better coming out of the nozzle when loading/etc, but it didn’t appear to make a difference at all when printing. I did rerun the flow rate test and the same 0.95 flow for my Elegoo Rapid PETG still looked the best. I had 0.076 PA after initial calibration, reran, was way off, had to change to 0.128, but that didn’t make any difference either.
How would I run full blast at that particular part of the print? IIRC, it was using my max fan speed, which I played around with but is currently at 25/50, but overhangs/bridges are 100% fan. I could be wrong about what fan speed was at any current time though, but those are my current settings. When I lowered fan, part would warp and be curvy, but overall look nicer, but at higher speeds it was straighter overall, but uglier.
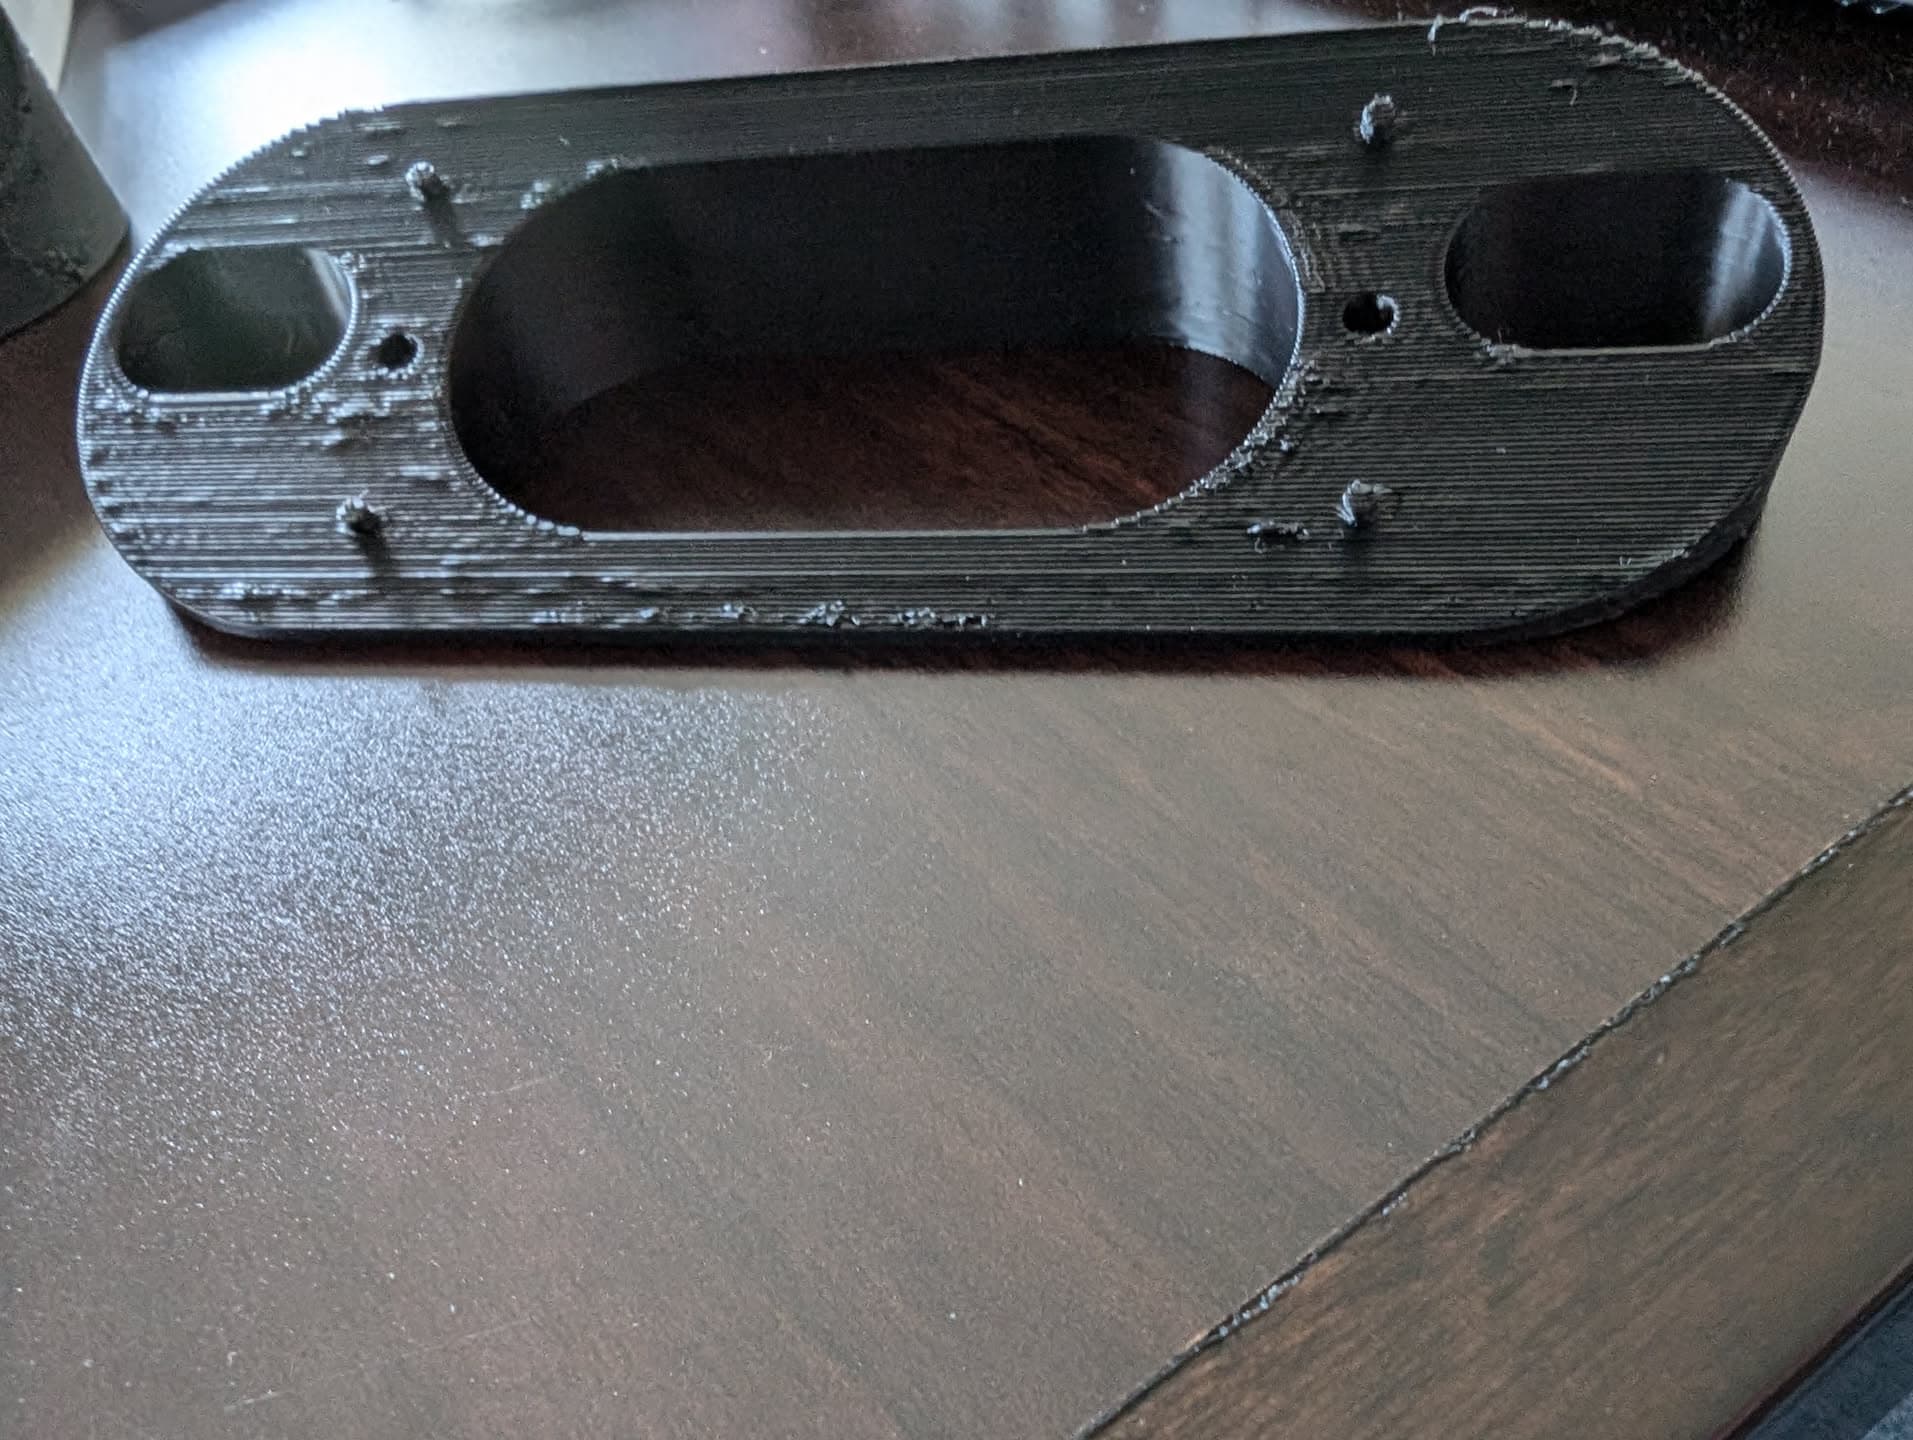
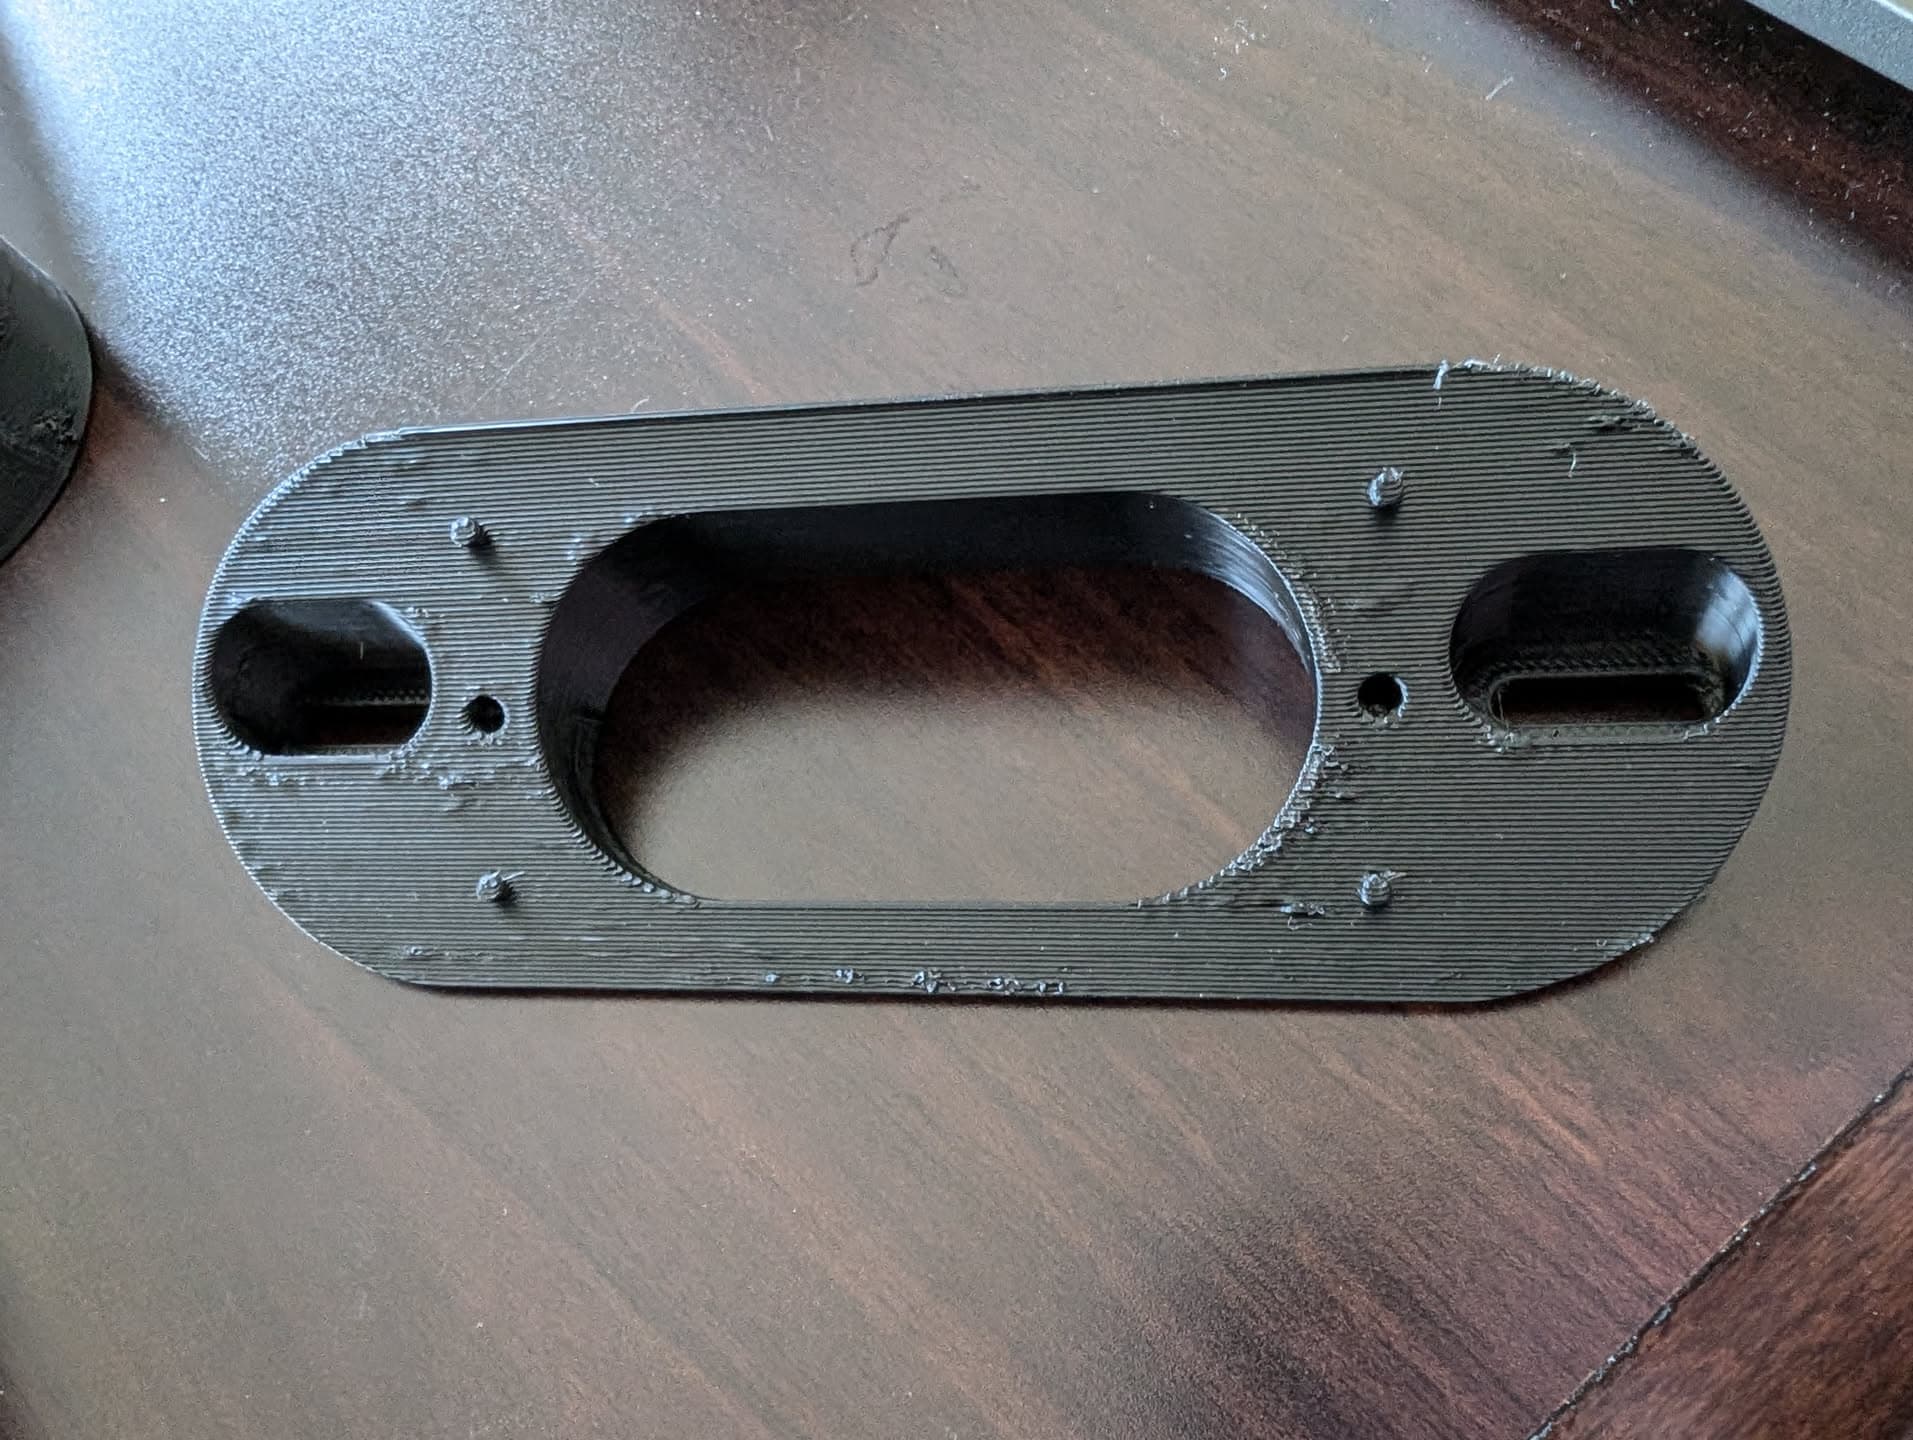
Here is another pic of something I test printed partially almost 20 times. Printables, model #624146. 25 degree version. As it slopes up, the infill it looked like would not lay down right and sometimes from the side I could see bits of it spiked up, it was worse the closer the Z-Offset, but I wouldn’t blame that as I had to raise way too high to get it to not be as bad, so then when the straight layers that would make up what is the top as it sits on bed, front of mount, they would be bumpy as the infill wasn’t laid down well, sometimes I even saw it not adhering well to previous layers when watching from the side.
This should probably go to a topic specific to your printer.
Try doing that print in an entirely different filament.
When you open that topic, tell us What slicer, with what profiles, what firmware and which filament you’re using.
More in the new topic
1 Like
All I can say (not terribly constructively I know!) is that you are either going to love or hate your new Prusa!
I will watch that with interest! ![]()
1 Like
Before getting a Flashforge running on Klipper, Marlin was all I ever knew, and my impression is that Prusa is at the pinnacle of nice implementation of Marlin, so I think I will be right at home!
1 Like