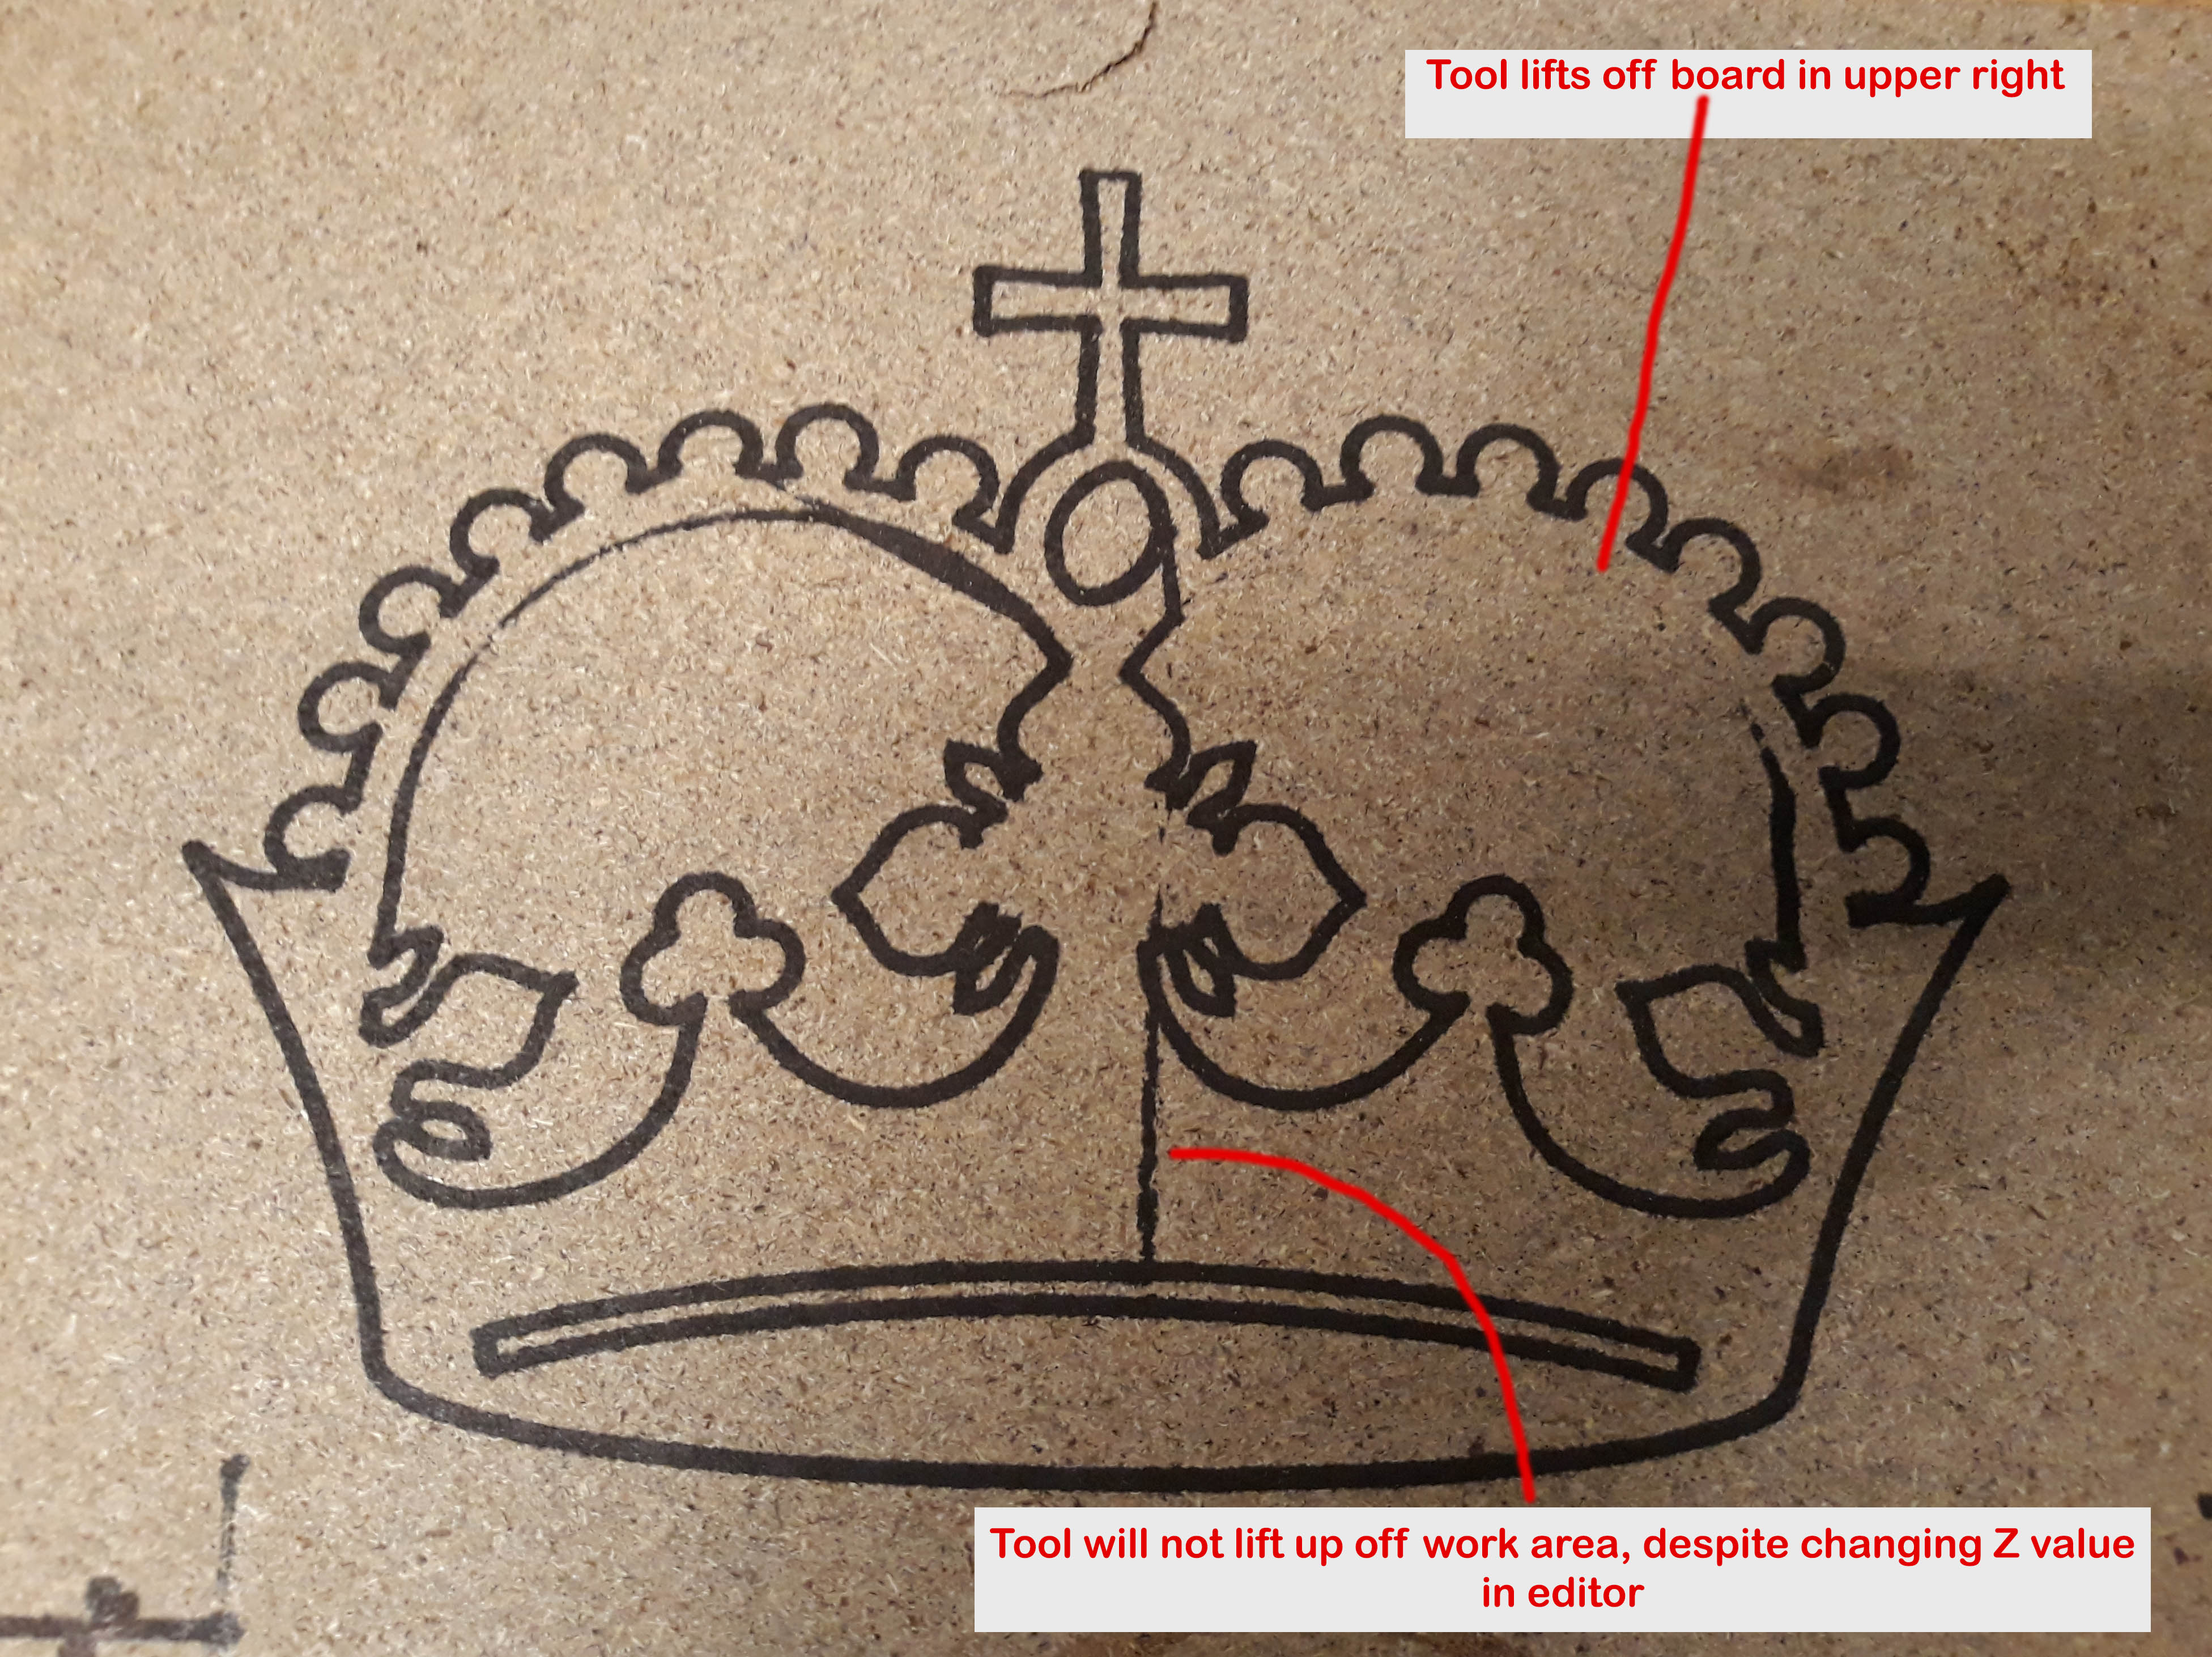
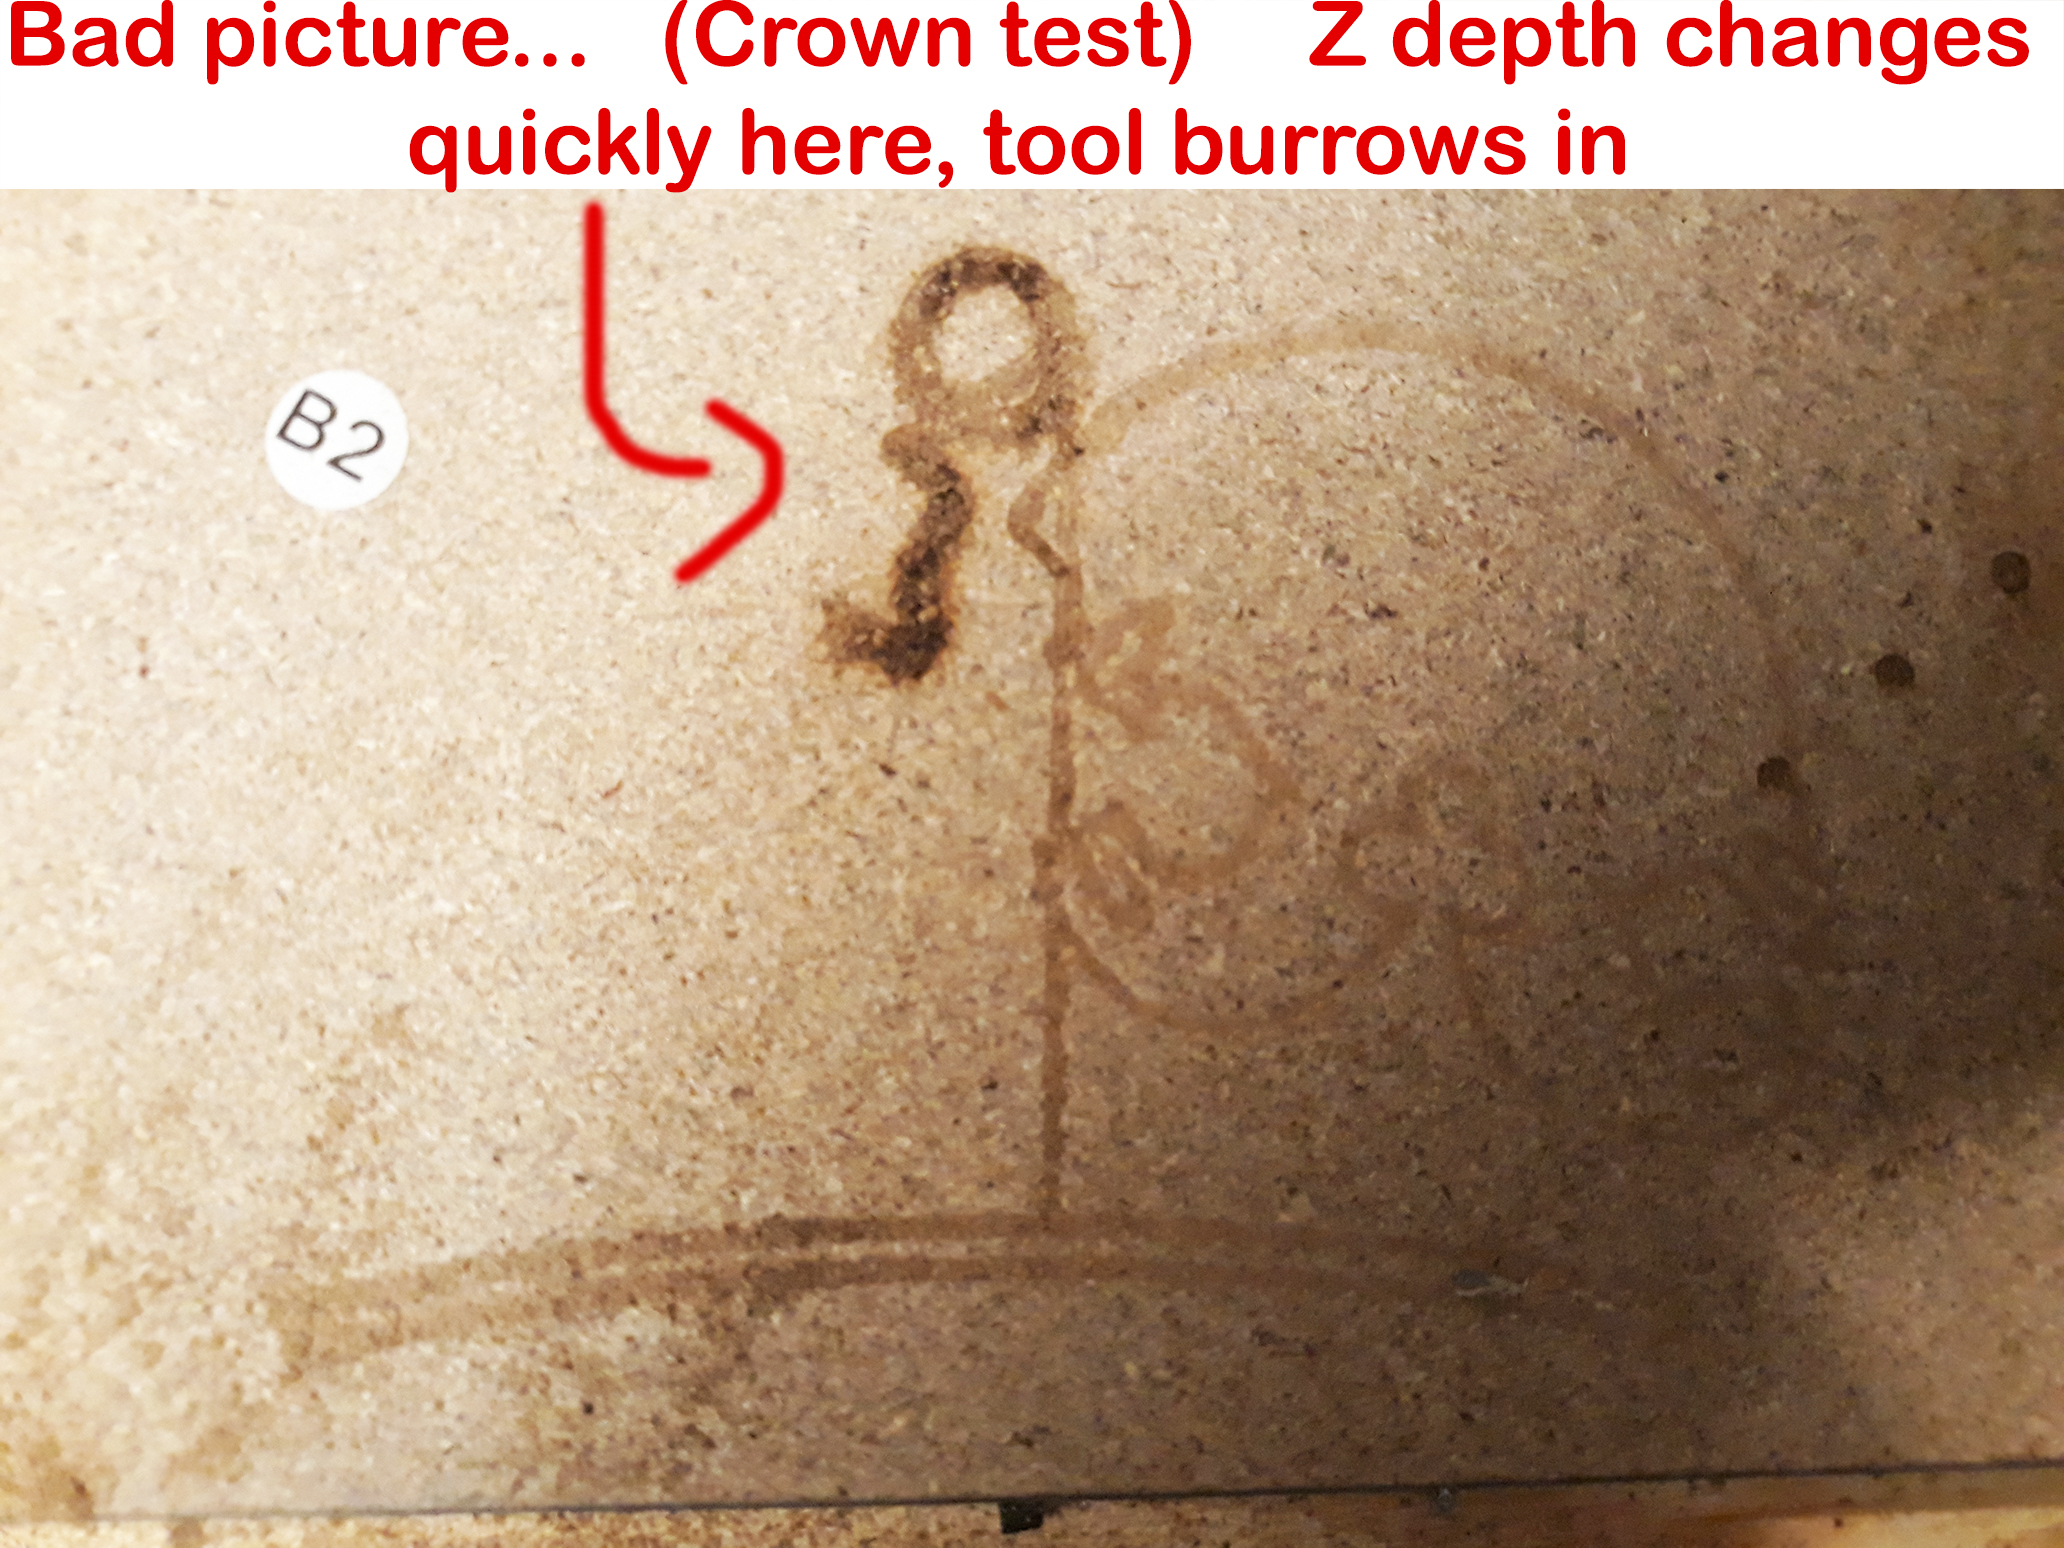
Finished building and wiring my machine, and I have run the crown test with both pen and router a few times. Invariably, when running the crown test file (also tried another test file), the Z axis gradually creeps up or down–sometimes it begins carving/drawing into the air, other times it buries the pen/router into the board. There is also one part of the tool path where the Z axis refuses to lift the tool off the work piece, and just drags a straight line across–see picture.
In preparing each test, I moved the gantry and set X0, Y0. Set the pen/router bit to rest on work area, then backed off 0.1 and declared this Z=0.
The behavior I’m experiencing is similar to this post: https:// forum.v1engineering[dot]com/t/z-axis-acting-up/18843
The build
2’ X 2’ burly/classic MPCNC build
*No limit switches
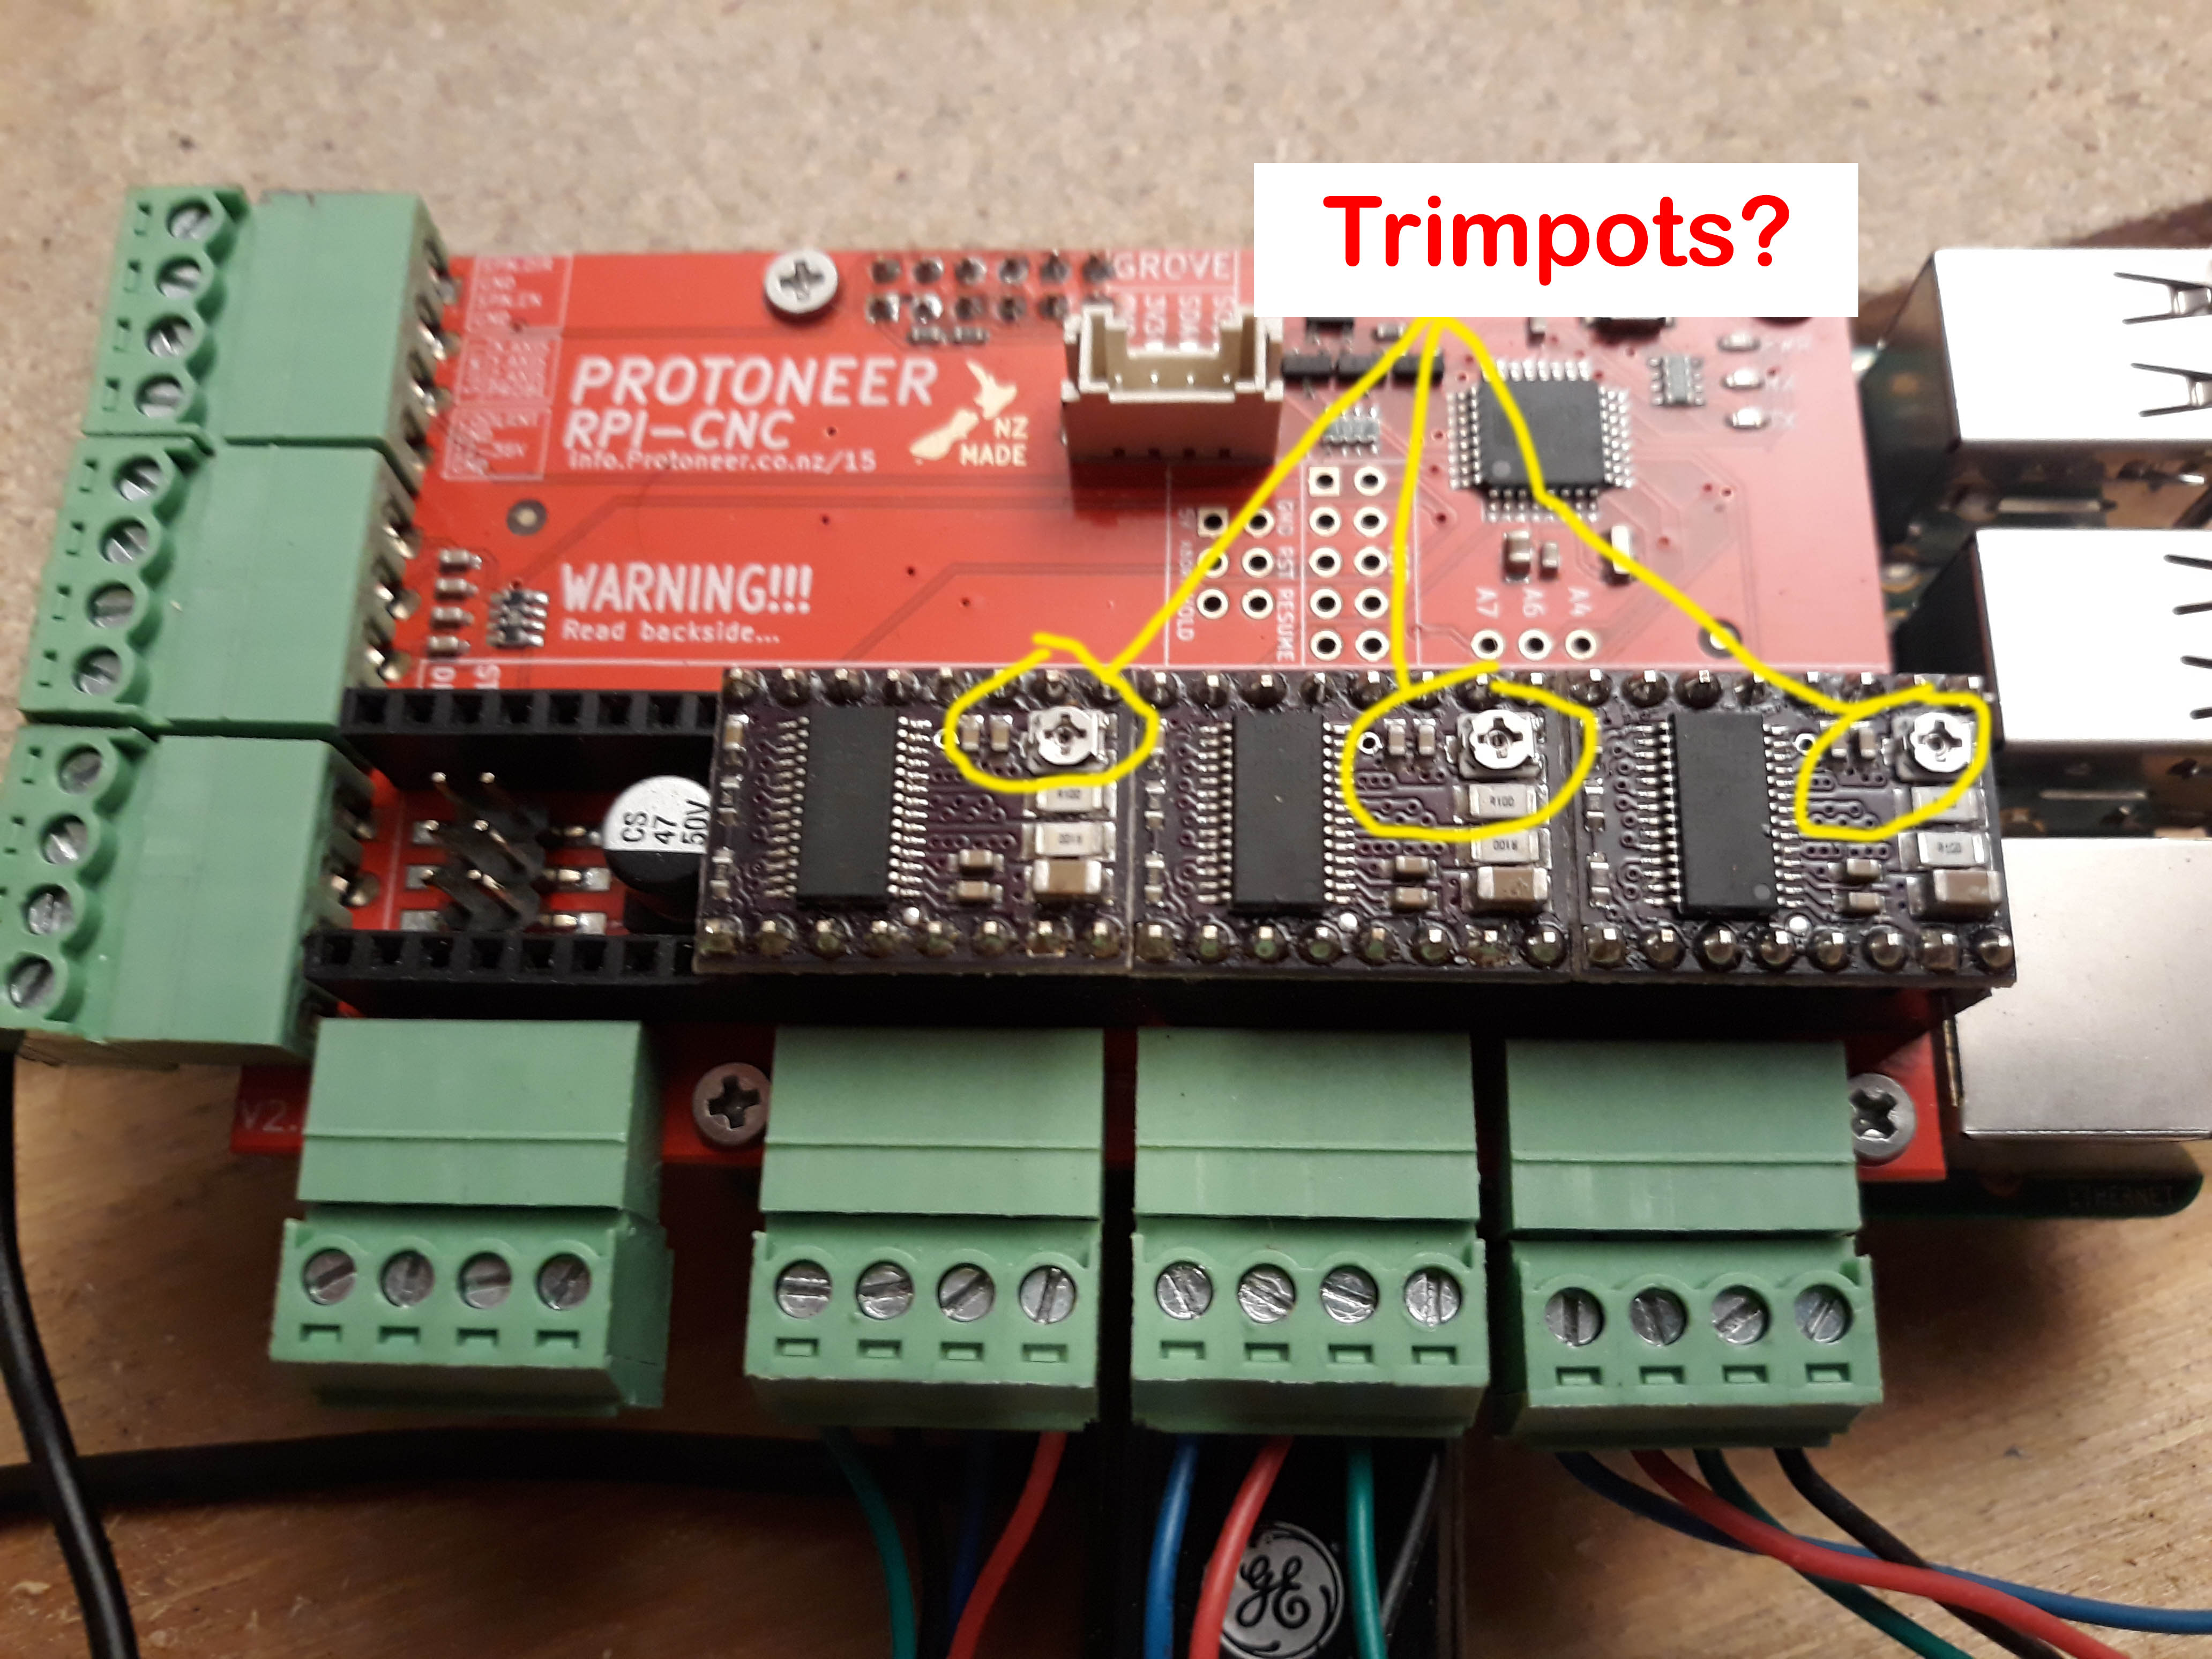
Raspberry pi with Protoneer RPI-CNC hat; not running headless-using the Pi as a full control computer with monitor and mouse/key
Have used both bCNC and Universal GCODE Sender for executing test runs
Diagnostics so far
I checked squaring the travel rails. All corners are 90 degrees (+/- 0.3 degree ish max).
I checked leveling of the 4 corner support legs–confirmed same.
X and Y carriages all at equal height
Tool is perpendicular to work area
Thoughts
I spent some real time making sure the machine is square, and have checked to confirm. The behavior is repeatable at all positions withing the 2X2 work area, leading me to believe the issue can’t be due to leveling (picture below to see what I mean).The issue is also repeatable using at least 2 software (bCNC and Universal GCODE Sender) with two separate test files (Ryan’s crown file and another).
Reading through the responses to the previously linked similar post, I am thinking it promising to investigate Z speed setting. I haven’t fully poked around in bCNC to see how to edit these parameters.
Kind of dovetailing into another question here… is it possible to run ESTLCAM/Repetier-Host on Raspberry Pi? I bought the RPI-CNC off a guy who had used it previously for MPCNC. Sort of wishing I bought a RAMPS board so I could be on the same page as everyone else, though in theory the nuts and bolts should be the same across all platforms.
Hopefully I’ve documented the issues I am experiencing thoroughly, pictures are included for clarification. Save for moderate 3D printer usage, this is all new territory for me. Totally capable of getting in there and poking around in settings, I would just appreciate to be pointed in the right direction. I am super excited to get this awesome machine fine tuned, after a few hiccups I feel like I am 99% there, in the home stretch. Thank you so much!
I used to use that controller and I really like it. Make sure your driver’s trim pots are set right. If you don’t have enough current it can cause skipped steps. Too much and the driver can overheat, which will shut it down until it cools off.
What kind of pen holder do you have? Is it the 3D printed on Ryan designed?
Speeds. Yes. What kind of leadscrew do you have? Or just as useful, what steps/mm is your Z? You should be able to set the max Z speed with a ‘$’ command. I can’t remember which one.
Gcode sender or bcnc shouldn’t cause a problem. Does your pi image have cncjs installed? That is another useful program for controlling it, but I highly doubt that is the issue.
One really useful test would be to jog back to 0,0,0 and see if the Z was different. If it is, then it is skipping steps, if not, then it is just something to do with the pen or the board.
Setting trim pots on driver… I will look into this. Admittedly, this is my first go at working with RPi or similar boards. Taking an educated guess here, that the adjustment is done with these small screws, circled in yellow? I’ll do some research on how to check and adjust.
I didn’t use a mount for the pen holder, just some wire ties and tape. I expected there would be tons of slop as the pen got pushed onto the canvas, so I’m not placing too too much stock into the pen test performance thus far. Although now that I’m aware of it, I will print out that pen holder. Here’s the thing, my terrible pen mount not withstanding, the erroneous motion was pretty much exactly the same when tested with the Dewalt 660, which I have the correct mount for. Notably, the failure to lift after completing the curvo-rectangular part of the crown (bottom note on image in my original post).
T8 lead screw; same one as recommended in “official” parts list. I haven’t dug in deep enough to look at the steps/mm, will do tomorrow. I have barely explored the software end of things, as I wanted to see what the ‘out of the box’ performance was. Not ruling anything out, but I suspect the issue lies somewhere in this neighborhood…
Re-reading Ryan’s ESTLCAM tutorial I am realizing that I totally overlooked setting travel feed rates, and his warning not to exceed 8 mm/s. I am wondering if this is my glaring mistake…
I do have CNCjs installed. I too doubt the software itself to be the troublemaker, but I’ll try it out for the sake of due diligence.
Will try the jog test tomorrow.
I purchased this machine disassembled from its original owner who abandoned it, for a nominal price. In ways, this is a bit of a ‘refurbishing’ project. Given that, I have been completely anticipating these speed bumps–it just a matter of reducing down the variables until I find the source of my troubles. Thanks again for your response, you’ve given me some things to try!
Those are drv8825 drivers and you’re trying to adjust the current. That will help if you are trying to find a guide. But basically you want everything powered up and energized. You want to be really careful not to short something, and you want to measure the voltage between the top of the screw and ground. Turn the screw slowly until you get about 0.7V or a tad less, 0.675V. If these aren’t set, it would explain everything.
Are your X and Y motors wired in series?
For now, test with Ryan’s test crown. That will remove estlcam from the list of worries.
But before that, make sure your steps/mm is set right. Move each axis 10mm and make sure it isn’t moving 5, 12, 20. I think your numbers should be 200 for x and y and 800 for Z.
You can easily set the steps/mm and check them with $ commands to grbl. If you just send ‘$$’ it will print out all the basic settings:
Then $100=200 will set X steps/mm to 200, etc.
Looking at Ryan’s rambo firmware, the max speed he’s set is 50,50,15 mm/s for x, y, z. And 180,180,80 mm/s/s for acceleration:
Also worthy of note that the DRV8825 trimpots are backwards, so to speak, as standard thinking would suggest. Clockwise turns the current down, and counter-clockwise turns it up.
Guys, thank you so much for your advice, I am thrilled to have it working now. I had to adjust the trimpots to 0.67-0.68 as they were all set at like 1.5 ish. Then, went used GRBL set the XYZ steps/mm. They were all at default 250, so X & Y were moving too far, and Z was moving too little. For XY, 200 steps/mm was right on the money. I did some testing and algebra to come up with Z=770, as 800 wasn’t perfect.
The crown test (using an actual printed pen holder) worked like a dream. For good measure, I manually controlled X & Y to draw lines and angles in 5, 10, 50 and 100mm increments. These lengths were all right on target, and my angles are 90 degrees (checked with digital protractor). I may fine tune the Z just a little more, but otherwise my MPCNC is on, on, on!
I’m trying to figure out how 770 ended up working for your Z. I am worried you’ve got something loose that is giving you a small error, which gives you the wrong input to your algebra.
200 whole steps/rev.
32 microsteps/step
0.125 revs/mm (from a T8 leadscrew with 4 starts should be 8mm/rev)
=800 steps/mm
770 is almost 4% off. If the coupler was loose or the grub screws were loose, you might get an error on one end of the measurement.
If you’re happy, I’m happy. It is just something to look out for.
Yes it bothered me a bit that the other two numbers were right on, but the z step wasn’t. Needed a brain break but I’m likely going to check the coupler and/or re-seat as needed tomorrow. To be honest my expectations for getting all of it running were low without major major headache were low, so I’m relieved to be in the neighborhood. More fine tuning to come