Would you rather them tear apart your printed parts?
It could also be the endstops are too high and not getting triggered. one or the other I did not watch the second video.
I am heading in for dinner I will check back in a while.
OK, so we saw from your M119 test that all of the endstops CAN trigger.
We also saw in at least one of your videos that you did have the machine homing Z upwards, which is correct.
When I said to flip the endstops, I don’t mean spin the endstop on it’s jumper. I mean take the Z1 endstop connector and plug it into the Z2 endstop connector. Then plug the Z2 endstop connector into the Z1 endstop location on the cotrol board. Do a test home. Better, or worse?
Let’s tackle this one thing, one test, one interaction at a time.
Yes, we’ve discussed that above. If the endstop wiring swap doesn’t address things then this is the next thing I’d try to look for and correct.
I flipped both the z motor wires z1 and e1 as well as the ebdstop pins.
Ive done every combination thinkable. All this stuff is just doing things that didnt work to hope that when u guys tell me to it will somehow work.
I mean what i said. My x and y axis are set in the rught directions. The only thing I didnt know was wrong until an hour ago is that the motor should move away from the endstops if using a + command.
That isnt the case for z. And thats the only thing I can think of might be affecting this bs
Ya i flipped the z endstop wires back and forth. No change
I dunno. 1500 didnt seem to really do anything ither than they didnt droop.
I changed steps per mm from 400 around to different numbers and that had an affect.
But then I reset the firmware afyer your comment back to defaults
Next steps then.
I’d trace the wiring from each size. Make sure that the Z motor and the Z endstop for a side are actually matched.
You said your machine is homing up, so that’s good.
The next thing to try and identify is the thing Ryan and I have suggested that you may have something mechanically misaligned such that when the Z gets up to the top, something else is hitting before the endstop triggers. That’s more difficult to troubleshoot via video because you almost have to see the axis struggling and verify that the switch has closed electrically.
But at this point that would be the next thing to work on verifying.
I can’t emphasize this enough. That’s not the problem.
A stock build with recommended parts uses the default settings.
The reason I installed different leadscrews from the ealier vids and pics was becUze they seemed too short. So now I have the superlong ones. Neither set works so far
I don’t believe that’s true. I saw a machine moving, so the leadscrews work. (They only move the axis up and down).
It isn’t a leadscrew problem, it’s that the machine cannot correctly identify the steps in the homing sequence. Even if somehow the first leadscrews were too short or misinstalled such that it couldn’t home then that’s not the case now with the long ones.
Right. At least it gets rid of that possibility. Could thos be some baudrate thing?
Computer wont connect to it so that seems like the next issue Ill have to try and focus on.
No, let’s focus on fixing the homing. We can get to the computer after that.
The machine would be perfectly usable without ever connecting to a computer- and many are used this way.
Did you feel the top of the drivers? Have they melted through your case yet?
Your drivers will thermal shutdown depending on your current weather/temps at above 1100 typically, and at about that same current when you run them for more than 10 minutes they will start to melt the printed parts.
There are thousands and thousands of these builds out there. I promise I am not saying it just to make you do something.
I set it back. Was just trying to be proactive
I’m trying to maintain a respectful and helpful tone here. Not sure if I have succeeded…
To me, this is the root of all of your problems.
My advice (and I mean this respectfully and in a helpful manner) - STOP!
Take one step at a time, and don’t take a second step until you have fully assessed the results of the first step (and until someone more knowledgeable has also had a chance to assess it.
Stop throwing darts at the dartboard hoping it will fix things. It won’t.
So to address one issue - your “Homing Issue” video doesn’t actually show you using the homing command. Instead it shows you repeatedly pressing Move buttons, usually several at a time, and frequently before the previous move has completed.
You don’t seem to grasp the difference between Move and Home. The endstops DO NOT WORK when doing Move commands. If you send a move command that causes travel beyond the endstop, the motor will attempt to move beyond, but will eventually skip steps and turn off. If the command is for the Z axis (which only has about 70 mm of travel total, depending on where you set the Z=0 at) that will cause one or both (often just the end where the core is parked) ends to fall to the ground (presumably this is what you mean by “drooping”).
How do you stop this from happening? DON"'T COMMAND THE Z AXIS TO GO HIGHER THAN THE ENDSTOPS!
Changing out your SKR board for a Jackpot board (as you have said you are planning in another thread) won’t help either. The problems that you are experiencing will still remain, unless you slow down, take a few deep breaths, and follow the documented steps in a logical and sequential manner.
Or you could continue to take a random, scattershot approach to troubleshooting and end up endlessly and needlessly frustrating yourself (and the people here trying to help you).
@Just_bright - let’s get back to working the homing.
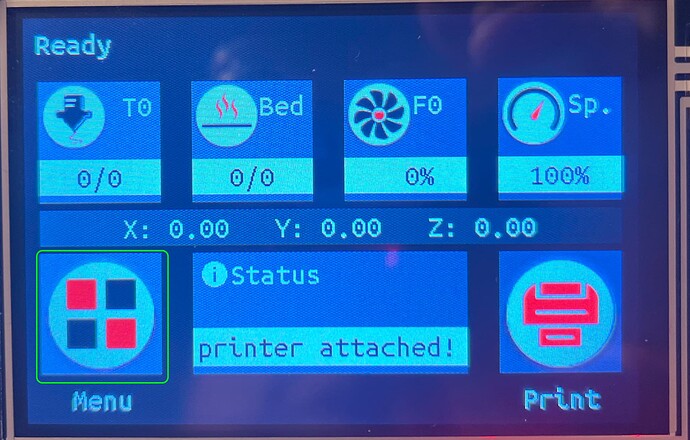
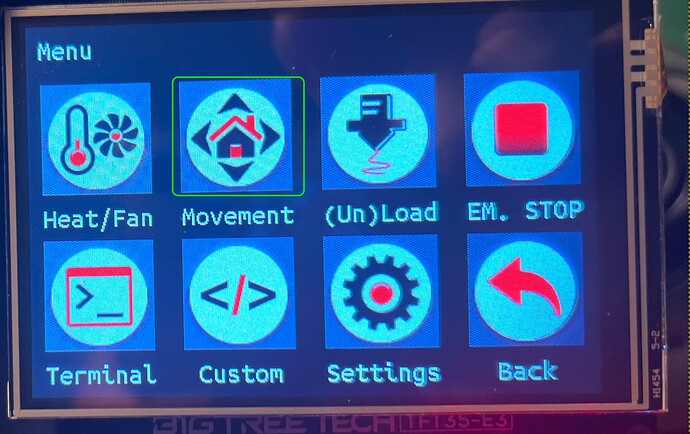
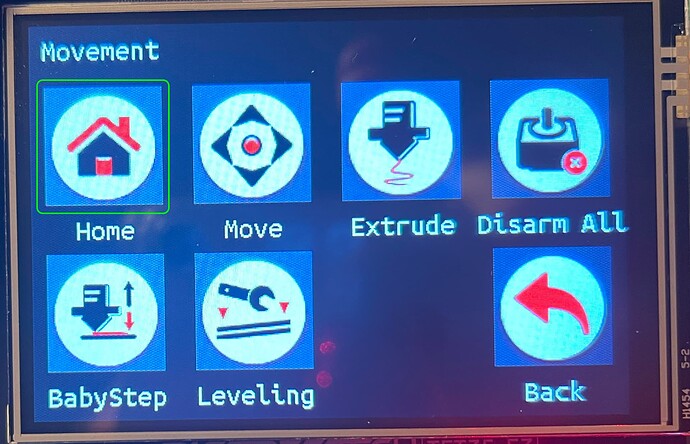
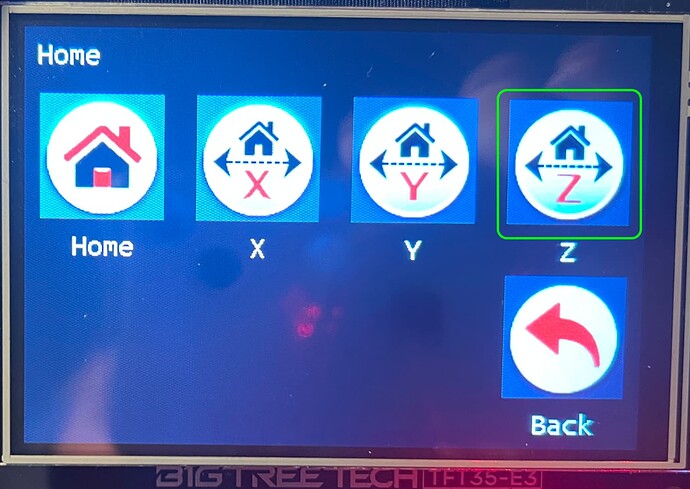
I’ve taken some pictures of the way to do this from the TFT.
These are from my own testbed setup.
SKR pro 1.2, V1 LR firmware, V1 TFT firmware.
So it should match what you have exactly.
In each step, press the spot I’ve noted with a rounded green rectangle.
Start by pressing Menu.
Then chose movement
Then chose home
Finally, chose Z
Tell us what happens.
A +Z should lift the gantry up, towards the endstops. -Z is moving the gantry toward the table.
The endstop pins shouldn’t need to be swapped. If you are seeing triggered and open, then they are (or at least were) wired correctly. Whenever you change anything on those wires, recheck M119.
What we wanted you to swap was to unplug the Z1 endstop and plug that endstop into the place where the Z2 endstop was connected and plug the Z2 endstop into the Z1 location. My initial guess was that they are being triggered by the wrong motor.
The folks trying to help have a mental map of everything you’ve posted about and they are trying to fit the evidence to a guess as to why it isn’t working. When you change more than one thing at a time, or give incomplete information, it is hard to keep track of which evidence went with which test. That is why they are hoping to slow it down. But they also don’t want you to break something on the way to fixing a smaller problem.
It can be frustrating though, when you’re right there trying to get it working and the responses aren’t immediate. I am guilty of that a lot when I ask for help. I do 2-3 things before I even check for responses to the first question. I think the best medicine for this is to focus your energy on learning and absorbing as much as you can. That includes asking questions about “why” when something isn’t matching what you expect. I can already tell you’re going to be getting into this pretty deep.
Thats exactly what everyone says i dont do in the video. watch it again guys!
But ya same result because I never am just moving it im homing z…every time.
the things everyone keeps bringing up were things i already did.
swapped estop pins…nothing changes.
One thing that everyone needs to be doing here is using the quoting feature. It’s impossible to follow when there are simply replies with no quoting.
I watched the video from the post which contains

(I hate that the forum doesn’t number posts so you can’t refer to them that way.)
In that two minute video, you do hit the right button sequence. The Z axis is homing up.
You pan back and forth, but sadly the camera is always pointed at what I don’t want to see at each step.
It appears to me that the right side endstop is triggered, backs off, and is trigered again while the opposite side motor is continuously driving +Z (up), and losing steps. At the tail end of this is the behavior that you are calling droopiness:
That’s not droopiness. What has happened here is that your firmware has detected an error, and has disabled stepper drivers. Once the stepper drivers for the motors are disabled, there is no holding torque…
The weight of the axis can now overcome the limited friction of the leadscrew and one side or both will drop.
Your problem results in the firmware having an error that is causing the firmware to disable the steppers.
To be really clear- firmware is DETECTING the error, firmware is not the cause of the error. No amount of tweaking settings or code in the firmware will fix this. The firmware is just detecting the issue and responding as designed and appropriately to the error.
The Z axis dropping is expected behavior for when the stepper drivers have been disabled, whether because of an error or because gcode has a command to disable them, or because a user manually disables them over the control interface. We don’t need to solve the axis dropping. We need to solve the error that causes firmware to disable the steppers. This is an electrical and/or mechanical issue with the build.
We’ve talked about the potential causes above, but I can’t follow along with you making multiple changes between replies and steps.
I’m not sure how to better help you through this.
The clicking/tapping sound that is heard at the end of the 2 minute video above appears to be coming from the opposite side (left side in the video) as the right side is doing the tap/back off/re-tap activity. I don’t hear that the far (left) size stops driving up until the board throws an error and disables the steppers. That clicking sound is the far axis losing steps.
My guess is that you have some kind of mechanical/electrical problem on the left size that is causing the axis to either bind or to otherwise be unable to trigger the endstop.
Being methodical, I’d have you film just that side, with the camera having a clear view of the endstop switch. I don’t need paning or a view of the TFT. I can see that you are using the correct homing key press sequence. I want to see and hear the whole homing sequence from a clear point of view of the left side endstop switch.
I’m about to turn in for the evening, so I may not be able to respond again until tomorrow.
Edit: I wnet back up and watched the previous video in the thread. The one containing 20240521_162110.mp4.
In that video, I see the left side during the homing sequence. It drives to the point where the endstop should triger and never backs off. It keeps on driving up and losing steps.
I still don’t have a clear view of the endstop while that is happening.
That can only be the things we’ve been discussing.
Either the axis has bound up in some way that prevents the endstop from being triggered, There is something preventing that switch from being triggered, or similar.
That’s what we’re trying to track down.
I’m pretty sure your issue is most involved with the left side as the right side looks to me to do the tap/back off/tap routine.
Let’s find out why that left side is behaving that way.
Actually it does, and you can. When you quote, the post number is displayed at the top of the quote in the edit screen. When you are reading posts, the post number and total number of posts is displayed at the side (yours is 239/239 at the moment, soon to be 239/240)


