I’m a little confused how to set up a full depth finishing pass without needing to ‘change’ tool. Is it possible?
Currently the only way I can manage a full depth finishing pass is by making a new tool and setting DPP/DOC full depth, and doing a tool change (re probe etc) for it.
I can’t figure out how to use the same tool for both regular DOC (say 2mm) with 0.2mm finishing allowance and a finishing pass at full depth (15mm) with 0.0mm finishing allowance. (Is that correctly setup?)
I entered a different DOC in the tool settings for regular and finishing passes, but how do I actually set a finishing pass up so that it uses that doc and knows it’s a finishing pass?
& have a path for each tool, but it requires a tool change. It’s not a huge thing, takes a minute to reprobe and whatever, but my thought is there must be a way to use just Tool A for both paths (else why would there be a finishing DPP value in the tool settings as well as regular DPP)
/
Oh wait, basically copy Tool A completely for the new path (with the two different DPP values set)? Does that make ESTLCam register the second path as a finishing one?
Cheers, so basically just an exact copy of Tool A (where regular DPP is 2mm and finishing DPP is 15mm)? Use that for an identical second path and ESTLCam knows it’s a finishing path and will use the finishing DPP rather than the regular DPP?
Thanks, I’ll try again tomorrow and report back, I must be missing one of these settings somewhere - so it should be a single path and single tool right?
I do it the same way Jason shows. No tool change needed.
Yup as long as you have the same tool selected for both in that box Jason shows, and you can click through on your main tool for way more options with the little wrench icon.
I haven’t had a chance to test for real yet, but would it show in the 3d preview in ESTLCam?
I’ve tried a few times and can’t get a full depth pass to work, it always steps down for every path - wondering if it shows in the preview for others using their workable settings?
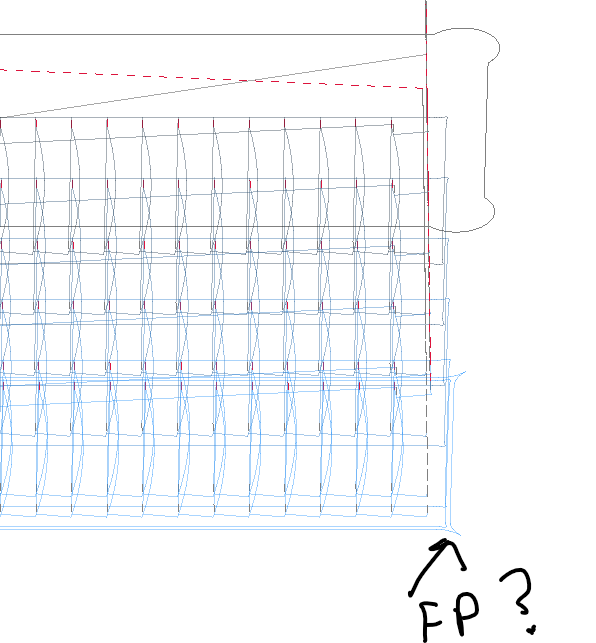
You are going to see stepdown for the normal path. If seeing it up, check whether there’s a second, lighter colour line around the part. That’s the finishing pass.
In this preview, the final/deepest layer has like a pointy outline, which must be the finishing pass. That is done last, after all the other layers are done and stepped down one by one.
So the mistake I was making was thinking finishing pass had to be set to 0.00 somewhere (in my thinking I was like.. ok I want 0.00 exact for the finishing pass.. I don’t want to leave 0.20, that’s only for the roughing path - so I’d have finishing at 0.00 on my ‘finishing path’ and 0.2 on my ‘roughing path’ which was just completely backwards)
What actually happens then if I’m understanding it, is if you set finishing allowance to 0.2, it will do roughing passes at 0.2 allowance and then come back to make it 0.00 at the end (at the depth set in tool settings for finishing doc) - you don’t actually set any finishing allowance at 0.00.
I’m fairly sure the popup in ESTLCam actually explains this but it just confused me and I didn’t get that from it.
Yes. When a Finishing tool is selected in the primary/default Path properties a second path is created. That secondary path can only/will always cut to the line using the Finishing DPP, RPM, etc. settings for the selected Finishing tool. The Finishing allowance just offsets the primary path from the line by the set distance (no Finishing tool required). Both paths can be cut with the same tool, e.g. ‘Tool A’
Instead of setting a Finishing tool/secondary path a separate primary Hole path could be set to cut the sidewall Finishing allowance left by the first path. This would allow cutting outside the line (-FA) and require a semi-duplicate tool, e.g. ‘Tool A (DPP 15mm)’, to avoid a tool change. While neither a primary finishing path or a semi-duplicate tool are needed for the example pocket, both have their uses.
Is there a way to make the finishing pass automatically match the cutting depth of each Gcode program? Or doesn’t this need to adjusted manually with the tool edit each time overall cutting depth is changed?
You set the depth of the finishing pass in an extra setting in Estlcam’s toolsettings. You just put the maximum depth your endmill’s edge is, for instance my 6mm endmills can cut 21mm deep in one go, so you just put that in. The idea is to do a full depth finishing pass if your endmill allows it for an immaculate look.
When doing a finishing pass, it’s going to use this depth up until 21mm, after that it will split the pass in two sections.
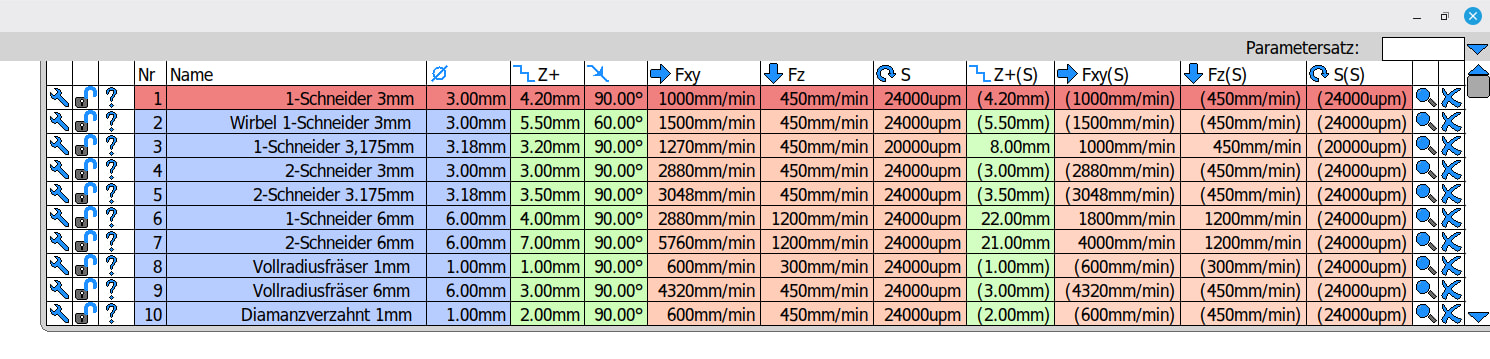
The fnishing pass is the Fxy(S). If the value is in brackets, it’s the same one from the “normal” cutting (so basically I never used it with those tools). The ones without brackets show you where I changed the values.
okay and so the 21mm you’re referencing is only a maximum doc? ie. if I’ve set the overall doc for a project to say 12mm, the finishing pass will be done at 12mm or will it try to plunge to 21mm?
It will then only do 12mm. The Z+ you set is always a maximum depth, also for the “normal” Z settings.
The factual DOC is then set when programming the toolpath and Estlcam calculates whether it can do it in one pass or several. So for Z, always set the maximum Z depth you are comfortable with for normal cuts and for the finishing pass set the maximum depth to the length of the cutting edge of your endmill.