now it looks like a monkey with green ears.
2 Likes
Badger…
3 Likes
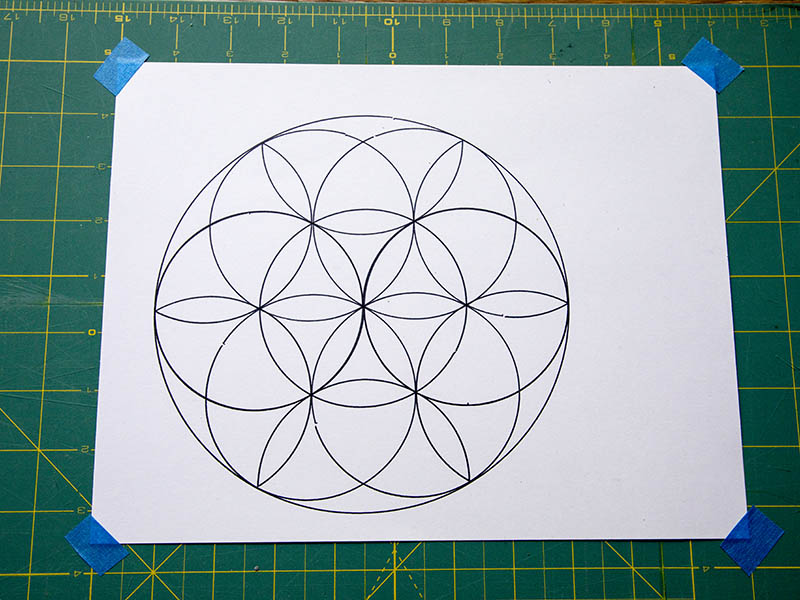
Enough of the geared design for now. I attached the real 444mm GT2 closed loop belts today & they make the world of difference over the TPU 3d printed belts. I adjusted the steps per mm once, but am still 102.5mm instead of 100mm. Will adjust it closer next time I run it. I am really happy with its performance now. Here is a video drawing a 180mm diameter flower of life design. The outer circle measures 185mm along wheel axis & 180mm along the v-slot axis.
There is a little gap where the pen up/pen down occurs, but it drew back over those circles almost perfectly.
9 Likes
That looks really nice. Good job!
1 Like
I had a problem tuning in the steps per mm until I realized I am using 2 different drivers for the X-axis & klipper wants both of them defined. I wonder if it could roll along a long arc with the steppers set differently? The steps are quite close to correct now. I broke the endstop for the wheel axis today, but was easy to replace. I had just redesigned that mount the other day so it was underneath instead of above the machine, so it should be in a safer location. I had seen that limit lever stretch a few times with it on top. I also broke one of the O-rings for the wheels the other day. That was probably from taking them off & on too many times. They are a stretch fit & a little bit bigger Diameter ones would probably be better. I designed some 3d printed ones to fit in the same O-ring groove & will test print one soon to see how well they work. I am also thinking I need a wider connection on the pen rather than the M3 screw, maybe an v-cut endcap that holds the pen tighter.
Of course my 2nd test of using the belts had to be cutting a pattern in the pan of backing soda. With the Pen Up/ Pen Down makes the flower of life look quite good I think. For the 1st test which I didn’t upload, I used a 6mm ball end Allen wrench for cutting the pattern & it cut a little too deep. A smaller size allen wrench would probably have been close to what the pen did. Here is a video of bad sharpie pen cutting the pattern.
6 Likes
This really looks good. I guess it’s about time for a “rolling needle cutter” for the RC guys out there… 
I guess I could just take my FoamRipper’s gantry off its interior door worksurface and set it on the floor for a start…
3 Likes
I will release the files when I can get them all together if you want to modify the design for your needs. You could certainly change it to use EMT instead of V-Slot, but the V-Slot sure makes the connections a lot easier for this simple machine. The V-Slot you can also get from Zyltech.com now for a little less. You can usually find a code to get 10% off or so from zyltech. I also bought a 50 pack of T-nuts from aliexpress that work pretty good. I could make some sort of build guide if there is interest.
2 Likes
Not sure how I can use this feature, but had to see if Klipper would let me move the plotter around an arc since it lets me set different step_distance for each of the wheel motors. I moved it +500mm in the X & then -500mm in 100mm increments & it worked well. Here is a video of it. Too tight of an arc makes the short arc wheels slip.
1 Like
I think this is a very impressive build, David… and I doubt there’s a great deal of modification beyond what you’ve already developed to add a needle cutter. I’d be very interested in building one to see if it can be adapted and made suitable for that purpose. Thanks for the offer to release those files… I, for one, would be very appreciative.
I suspect that if EMT was used it could be similar to the gantry from my version of Moebeast’s FoamRipper machine, as I alluded to in my previous post…

Driving the skate wheels would free it of the need for belts on the worksurface and could also make it possible to operate with, or without, the worksurface; i.e. rolling on the floor, possibly against a curb/straight-edge, if necessary.
But I also like V-slot and would prefer to build your basic machine. I already have a pretty well-stocked junkbox and several suitable pieces of 2020 and 2040 V-slot on hand from my previous build of Edward Chew’s TimSav foam-cutter machine… a “minimalist” 2-axis CNC design sporting a compact needle cutter head. It should be fairly straight forward to adapt this basic needle cutter head to your machine’s Z-axis, for starters.
Keep up the good work. This looks like a fun machine to build and play with.
– David
1 Like
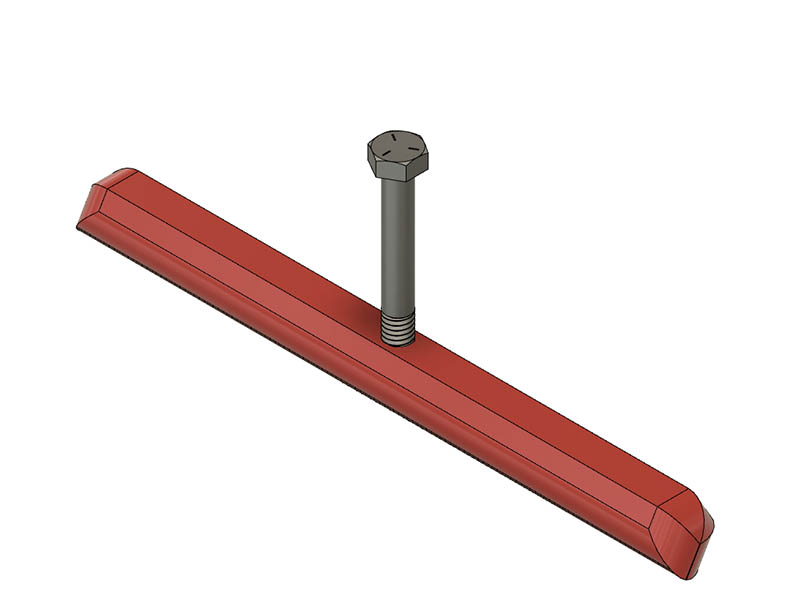
I made a 200mm length wiper blade to attach a 5/16" bolt to & level the baking soda with. The bolt will mount where the pen mounts. I am hoping that will level the sand easier. I am printing it upside down to have a flat surface on the bottom. Here is what it should look like.
2 Likes
Yeah, run it off of a lipo, and you can run it while you’re flying.
1 Like
I have no idea how well they actually work in practice, but omni wheels would theoretically allow the whole machine to move in any direction arbitrarily.
1 Like
This is what I plan to use for the battery. https://www.thingiverse.com/thing:4226726
I remixed it from this https://www.instructables.com/id/Battery-Adjustable-Power-Supply-Ryobi-18V/ to be able to mount to the V-Slot. I am just waiting on the DPS5005 power supply for it. I won’t print it until I receive it since I want to add the USB connection to it that I ordered with the unit. It should be here any week now.
Pete, I have seen those omni wheels & thought about trying some, but the ones to buy are rather expensive. I might would try the 3d printed ones 1st.
3 Likes
I created a build guide today & covered as much I could think of. Can you look over this PDF of the guide & see if it looks reasonable for a start?Assembly Guide for Rolling Plotter.zip (1.2 MB)
I probably need to add a little more detail about klipper firmware to the guide. I also have a Marlin 2.0.4.4 configuration file I will add to the files. I am mostly using klipper because it handles servo motors better than marlin at present.
4 Likes
Oh, wow! I hope you didn’t do all that work just for me… 
I’m sure there are other folks interested as well and I know this’ll be a big help. The motion mechanicals and assembly appears pretty “sporty” to me… so I’ll definitely be referring to your document a lot. I also ordered some 444mm GT2 closed belts this morning… no telling how long it’ll take for them to get to my doorstep. And I doubt I’ll use Klipper… it seems a bit more than I can handle at this late date.
Unless I’m missing something, it appears to be a 2-axis machine with a servo-driven Z axis… quite similar to Edward Chew’s TimSav needle-cutter machine I built just a few months ago. Since that is the same functionality I’ll be looking at here, and I’ve grown fond of Grbl… I’ll probably just use the same little Eleksmaker ManaSE v3.2 controller board, paired with a Pi ZeroW and Jeff’s V1Pi/CNC.js, that I used for that machine. The little Nano-based controller is loaded with the “robottini/grbl 0.9i (w/ Servo motor support)” firmware and works a treat.

I also don’t really see my machine moving very far – just over the extents of a sheet of foamboard --so it will probably remain tethered for now by the +5v and +12v power cables for the Pi and motors.
Thank you so much for all the good work and your willingness to share your design.
My best to you.
– David
1 Like
I was planning to make the build guide anyway. It also helps me document it in case I need a reminder later of what I did. I had not seen that Eleksmaker board before. Looks like they also have a 3-axis board. This is only a 2-axis machine with the servo for Z, so that board should be fine. Does that board have connections for Endstops? Guess you don’t really need them with your application. That board looks like it has 2 connections for Y & 1 for X. That being the case your carriage will be the X-axis & the wheels the Y. I have mine setup for X along the wheels & Y along the carriage as I wanted the long way to be the X-axis. Homing with klipper is probably the only thing that annoys me about that firmware, it wants you to home x & y before doing any moves, even a G92 X0 Y0 Z0. I have a keyestudio cnc shield v4 I bought for my eggbot which I got side tracked from while building this machine. I started this machine while waiting on parts for that one. That keyestudio board has 2 - 3 pin connectors that could be used for servos 7 a simpler board than UNO+CNC shield. It also uses Nano plugged into it. https://wiki.keyestudio.com/Ks0152_keyestudio_CNC_Shield_V4
I got one of these for $6 from aliexpress. I initially looked at using an Uno board with shield & grbl, but not sure why I decided against it at the time. This board probably would not work this machine since I need 2 separate drivers for the wheel motors. I guess this wiring kit from Ryan would be a good way to use one stepper driver on the board. https://shop.v1engineering.com/collections/parts/products/wiring-kit-1?variant=30442010578
Glad you ordered the belt. It took my package about 5 weeks to get here from aliexpress. The TPU 3d printed belt will work for testing, but just not as precise. Here is an interesting method that just popped up on hackaday for stitching a closed loop belt from a length of GT2 Belt. https://hackaday.com/2020/04/12/stitching-up-custom-belts/
The only other parts I couldn’t find in the States were those F695zz bearings. You could use other idler pulleys, but these worked best for me. It is a small space they need are located. These bearings are 15mm on outer most diameter. I bought this pack of 10 awhile back. https://www.ebay.com/itm/10-x-F695zz-Mini-Metal-Double-Shielded-Flanged-Ball-Bearings-5mm-13mm-4mm-/141339438982?hash=item20e87caf86:g:BFAAAOSwDk5Tt1~Y I had some cheap idler pulleys, but had to back off the screws for them to roll & they were not nearly as smooth as the F695zz pairs.
The best and least expensive place I have found the #328 O-Rings is a 10 pack for $5.85 from https://www.grainger.com/product/FABORY-Round-328-Very-Hard-Buna-N-41UN40
I used #327 O-Rings because I only needed one more as the harbor freight assortment had 7 of them. If you just need this size they are cheaper from Grainger.
Size on wheel for the O-Rings
51.02mm ID (2")x 60.54mm (2.38") OD x 55.78mm (2.19") Center Line Diameter
#327 O-Rings 1 3/4" ID x 2 1/8" OD $5.55 for 10 & $11.70 for 50
#328 O-Rings 1 7/8" ID x 2 1/4" OD $5.85 for 10 & $12.50 for 50
I wonder how well a tangential cutter would work on this machine that someone did for the MPCNC awhile back. I would have to go to a real Z-axis & another motor for the turning. Then I wonder if it would be possible to put a glass cutter on that. I have a friend that does stained glass. This machine could certainly draw the cutout lines though.
How well would these thicker needles work for the needle cutter. Seems like the thicker 1mm might be strong enough. I have some of these with .35mm size for cleaning my .4mm nozzle. https://www.aliexpress.com/item/32953629957.html?spm=a2g0o.productlist.0.0.6d806b7f75XLZI&s=p&ad_pvid=202004130542299737599468931460010275835_1&algo_pvid=c1c899d9-e825-475f-b087-968d12715b88&algo_expid=c1c899d9-e825-475f-b087-968d12715b88-9&btsid=0ab6fb8315867817495118043e4611&ws_ab_test=searchweb0_0,searchweb201602_,searchweb201603_
1 Like
The little Eleksmaker boards are pretty good quality boards IMO and I’ve bought several of them… both 2- and 3-axis. I also have a couple of 2.5 watt Eleksmaker laser modules… so the hookup then becomes quite straight-forward. There are no provisions for endstops on the controller boards… but I never use them anyway, so don’t miss them.
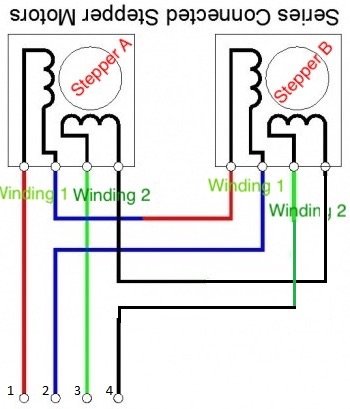
I’ve also become a fan of series connecting stepper motors (ala MPCNC) for the small machines I do… and fashioning a little harness from Dupont jumper wires to connect two motors isn’t difficult at all. Therefore, I really don’t pay much attention to which axis on the controller board might have the doubled-up connectors… I only need one per axis anyway.
I’ve got several of the inexpensive Nano-based controllers… including a couple of KeyeStudio boards. They’re pretty nice but also pretty basic and don’t bring out the laser and servo connections to board’s edge as the Eleksmaker boards do. But I am a fan of Grbl and the little inexpensive Nano-based controllers generally perform quite nicely… and they’re so easy to use.
I ordered the GT2 closed loop belts but didn’t study the info enough to see what all bearings and gaskets might also be needed. I’ll cross that bridge when I come to it, I guess… and either make do with something I’ve already got or just bite the bullet and wait for an order to arrive.
I’m not sure about the tangential cutter… I’ve never built or used one so have zero experience.
I make my needles from 0.025" piano-wire… and a package of the K&S Engineering 36" lengths will make a lot of needles. There’s no problem with the straightness or strength… way back when, I torture-tested my cutters by cutting cardboard and even coroplast. They held up surprisingly well to the abuse. If properly sharpened to a conical point (like a sharpened wooden pencil) and appropriate feeds/speeds are used, foamboard offers little resistance to it. I’ve never measured it but there is a gigantic amount of force concentrated on the tip of that needle… so watch your fingers. It cuts equally well in all directions and leaves little/no debris in its wake… i.e. it punctures and displaces the material (like a rapier) rather than blowing it out (like a bullet); i.e. think “exit wounds” 
The “rolling plotter/needle-cutter” should be a fun build… when I can get to it. Right now I’m trying to help SIL with his children’s theater decorations and massive foam props at his church… and trying to learn how to CAM for and use the TimSavX2 hot-wire machine I built for the task. It’s basically two “identical”, near-stock, TimSav machines, standing on edge, side-by-side, with both axes slaved together, and a length of heated nichrome wire stretched between… and it uses the series-connected motors and that same little 2-axis Eleksmaker controller discussed above.
– David
1 Like
I should have this project ready to upload to thingiverse today or tomorrow. I was researching O-Rings for metric today as that is the only item in this design that there was not a metric equivalent to. The O-Rings I am using are 3/16" or 4.76mm CS & closest Metric equivalent is 4.5mm or 5.0mm, so I made a wheel alternative that uses 4.5mm CS.
I might have to try one of those needle cutters sometime. Do you have a guide for sharpening those? Not sure how well I would be at sharpening them. That 0.025" piano-wire is .635mm. Seems like those .6mm or .8mm nozzle cleaning needles would make that simpler. I am wondering if those are actually acupuncture needles?
From your comment on the series wiring, will that wiring kit Ryan sells for MPCNC work for the 2 wheel motors here? I was going to give a link to it in my BOM for those that want easier plug N play. I know there are 2 sets of wires, so they will have an extra set. I had wired the 1st version of the MPCNC in parallel I think. I do have a set of the wiring kit that I could test just for my education.
2 Likes
Fantastic, Dave! I’ll be looking for it.
Most certainly Ryan’s series wiring harness will do the job of connecting two stepper motors in series. I’ve ordered and used it before… but my only issue was all the excess wire I had to fold up and hide. For the small machines I do, I now simply make my own, similar to this
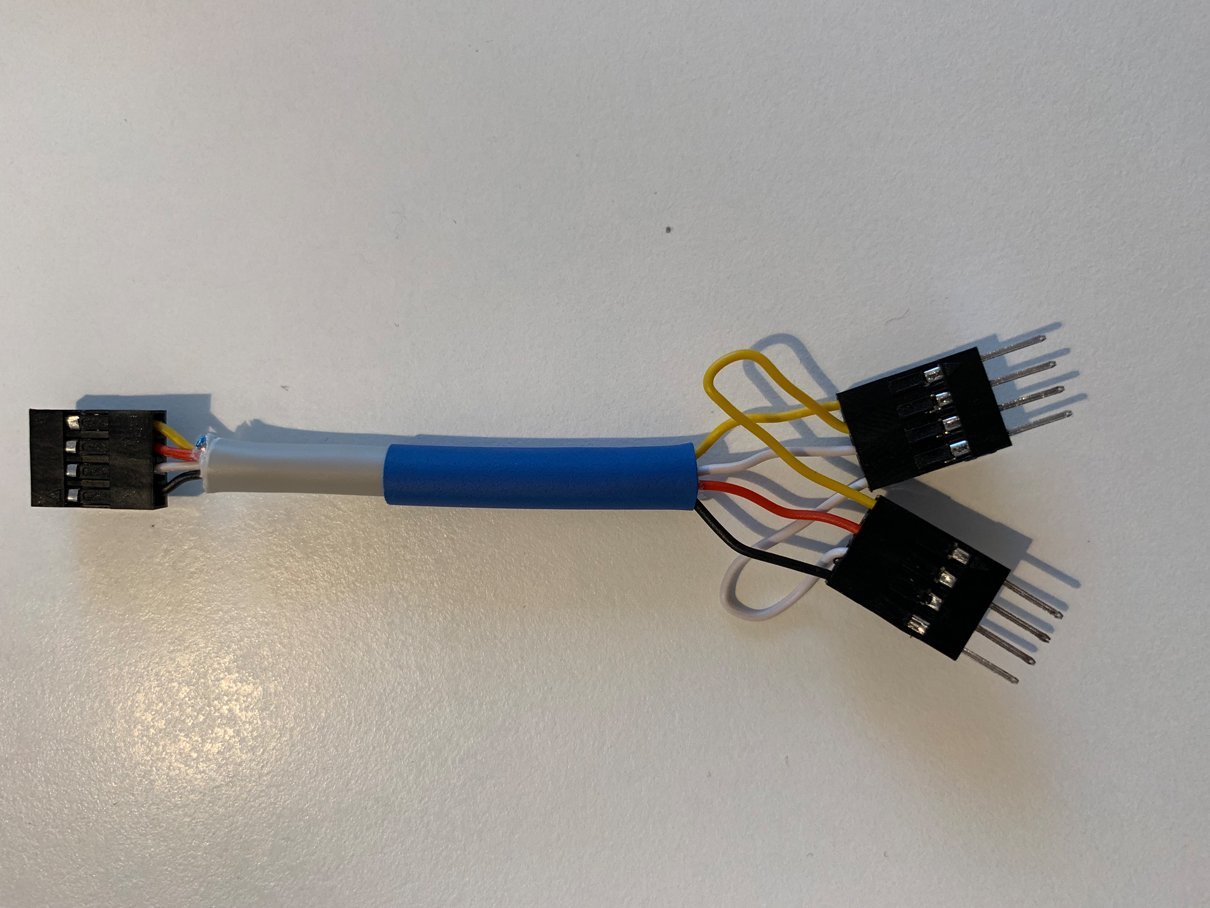
With this Elegoo Dupont jumper wire kit (40 each… M-M, M-F, F-F) and an assortment of Dupont connector shells… it’s real easy to rearrange the connector pins/sockets according to the following schematic diagram (NOTE: the 2nd winding cross-over isn’t really necessary in this case since each motor has its own connector, which can be flipped to get the direction needed).
The needle cutter I figure to use/adapt would be similar to this one…
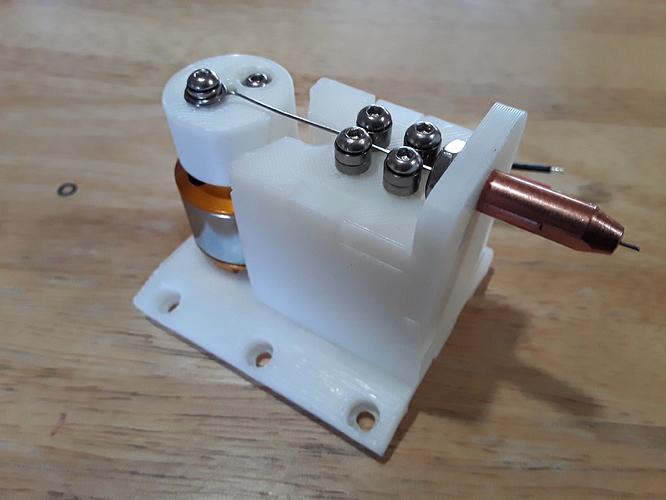
The piano-wire needle (cut to length but not sharpened in this photo) is usually hand-made with a couple of loops at the top, to surround the outer race of the eccentric bearing… and is cut to length to bring the needle tip even with the tip of the needle guide (a Mig-wire welding tip) at top of stroke. And sharpening is no big deal at all… after cutting to length, lightly touch the tip of the needle to the side of a grinding wheel, while “twirling” the needle between the fingers. It takes no more than a second or two to form a conical tip, like a sharpened wooden pencil, with a little practice.
Later. – David
2 Likes
I finally put all the data together. Here is the thingiverse link for this build. https://www.thingiverse.com/thing:4287150
4 Likes