I use these. I only use the other twist in when I forget to put the better one in the slot.
3 Likes
Curious what the motivation behind the linear rails on the Z-axis is? They aren’t seeing a whole lot of motion versus XY Unless there is a huge accuracy issue it would appear that 10mm optical shafts would cost about half and rollers direct on the extrusion even less
1 Like
I have been finding it hard to get quality, cheap Lm8uu or similar style bearings and rails these days. They would be a bit less, I just do not think they would last too long. Unless you find nice ones.
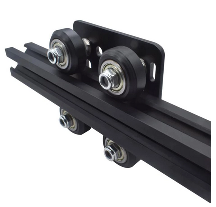
The urethane wheel setup you show I believe ends up being more than a linear rail setup and bulkier.
3 Likes
I’m seeing the loaded urethane wheel setup in the $15-$20 range for the 3 versus $40+ for cheap rails. Sure, in the grand scheme of things that’s not a big deal. Putting cost aside I see them mounted in the same plane as cube faces with the plate facing inwards. The bed brackets would be mounted on the back of the plate. Agreed, they’re a bit bulkier but mounted the way I suggest this bulk occupies the cube wall thickness, a space we probably don’t care about anyway. They may even allow you to bring the bed brackets a touch closer into the frame? If you already have the 2020 frame there then they seem like an obvious choice.
Now, I don’t have a clue whether the quality and tolerances stand up to the task at hand because I’ve never actually used them.
In this case I am sure they would work. Maybe when I do a revisit
2 Likes
The linear rails still work for the CNC cut MDF/plywood frames, the rollers don’t. There can be some movement with the CNC cut frames of course, and it’s difficult to correct it, but for most of us, it will remain accurate enough if basic precautions are taken.
I am still deciding if I want to build another Repeat or update to the V2 for the new build, which will involve buying another linear rail for the X axis… either way, I’m most likely to go with a wooden frame though.
3 Likes
After a 3 week hiatus, I finally made time to get back to this. I figured out my BLTouch issue (had to switch to PIN PA2), and I think everything is working as expected. Going to run a bed level sequence now to see how that works out.
I’m pumped about this. I can’t wait to actually print something.
3 Likes
Well. I got everything calibrated, and up to the point of attempting a single layer print.
But I guess I have a power supply issue, because I can heat up the bed or the hot end by themselves, but if I heat them both at the same time, the SKR crashes and reboots.
This power supply is from a 24v printer that worked just fine, but I didn’t like. Weird that it isn’t working.
But I’m done for the day.
1 Like
How many amps is it rated for?
1 Like
If your bed or hotend are made for 12V, then running at 24V will increase the power by 4x. That’s probably not good, and if your hotend and bed are made for 12V, you’re probably better off getting a 12V power supply, rather than getting a bigger 24V one.
What voltage/wattage of PS are you using?
What resistance do you measure looking into the heated bed and hotend heaters?
The hotend for a 12v system should be around 4.5 ohms, and a heated bed around 1.2 ohms (depends on how big the bed is, big heated beds and 12v supplies are not a good match)
The hotend for a 24v system should be around 15 ohms, and a heated bed usually around 4 ohms (again, depends on how big the bed is and the total wattage)
Did you ever get an affiliate link with zyltech? I think I’m going to order the set linked in this thread and use that for my slowly moving Repeat V2 build.
You guys are awesome. I honestly wasn’t sure where to start looking, as this is the first printer I’ve ever built.
I will check when I get home. It came originally from a Monoproce Maker Select Plus, which is an i3 clone.
The bed I used was made for an Ender5, so it is 24v. The hotend is brand new ( AmazonSmile: Genuine E3D Hemera 1.75mm 24V Direct Kit : Industrial & Scientific) and I ordered the 24v version. I didn’t confirm that I got a 24v version, I just assumed that I got the right thing.
I will measure these when I get home.
2 Likes
No, but they do have a sale going today!
1 Like
Input
Input: 100 - 120v, 4amps
Output: 24v, 8.8 amps
Looking at various models on Amazon, seems like I might be underpowered. Seeing lots of options that are 17 amp, 15 amp, etc. So the 8.8 seems pretty paltry.
A 200x200 24V heated bed requires 7-8 Amps at 24V. plus some steppers and the Extruder. That is for a quality PS that can handle 100 duty cycle. I would think 15A would be a safe minimum.
2 Likes
Ouch. My bed is 235x235, so I’m surprised I was able to heat it up at all. Also explains the panic when I started to heat the nozzle.
If I hadn’t already had a heated bed on hand, I would have gone with an AC (110v) heated bed.
Oh well, looks like power supplies are pretty cheap, so I just ordered a 600w monster – 24v @ 25amps.
Every time I think I am getting close to printing, something else happens. But still having fun. And the first print will be so much more gratifying for all of the effort (and learning). It does feel like the number of hurdles has to be getting smaller and smaller.
1 Like
It’s alive!! Printing first layer calibrations right now.
2 Likes
@vicious1, I’m having this issue where the lower belt in the back right corner binds against the right hand Y carriage when I attempt to go all the way to the back of the bed. Everything still functions, but any X motion makes a very unpleasant sound until there is some forward motion on Y.
I’m wondering if I did something wrong, or if this is expected. I have a 235 mm bed, and right now, on the Y axis, I think about 190 mm of it is usable.
Did you scale it to fit your bed, or did you use my 200x200 mm files as is?
My files will fit about 208mm.
Pictures of your build will help, might want to start a new thread and tag me in it by adding @vicious1 anywhere in the post.
2 Likes