I am hoping the broad design assembly meets the following broad criteria:
-can be assembled with 1 - 2 people and no rigging.
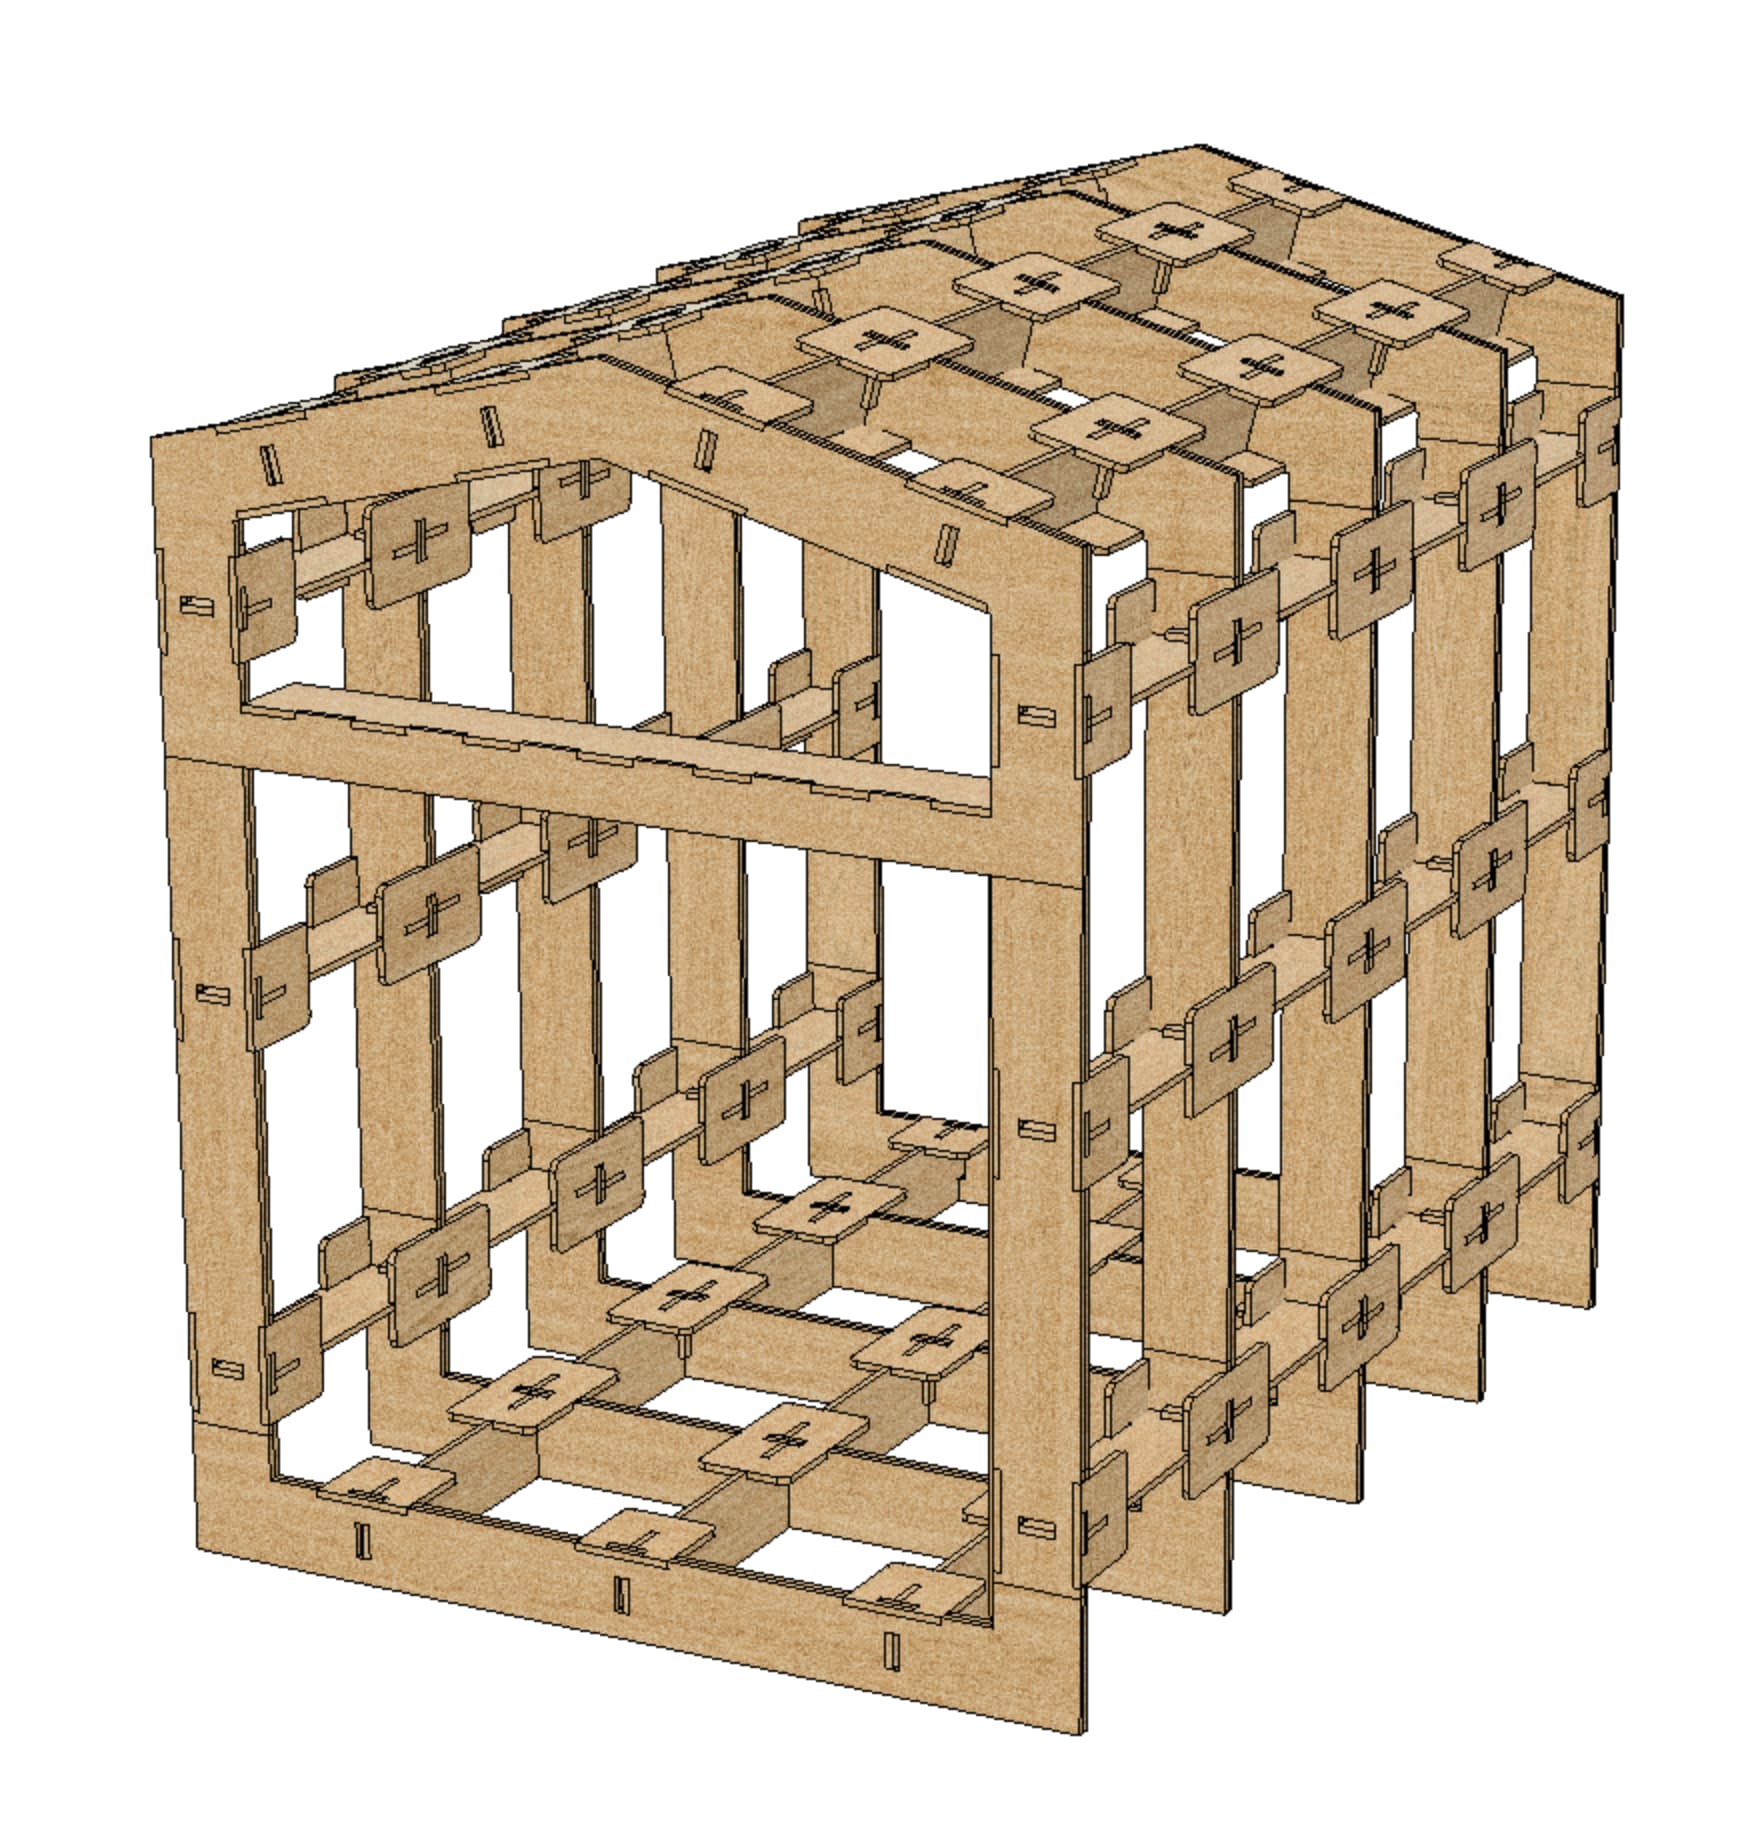
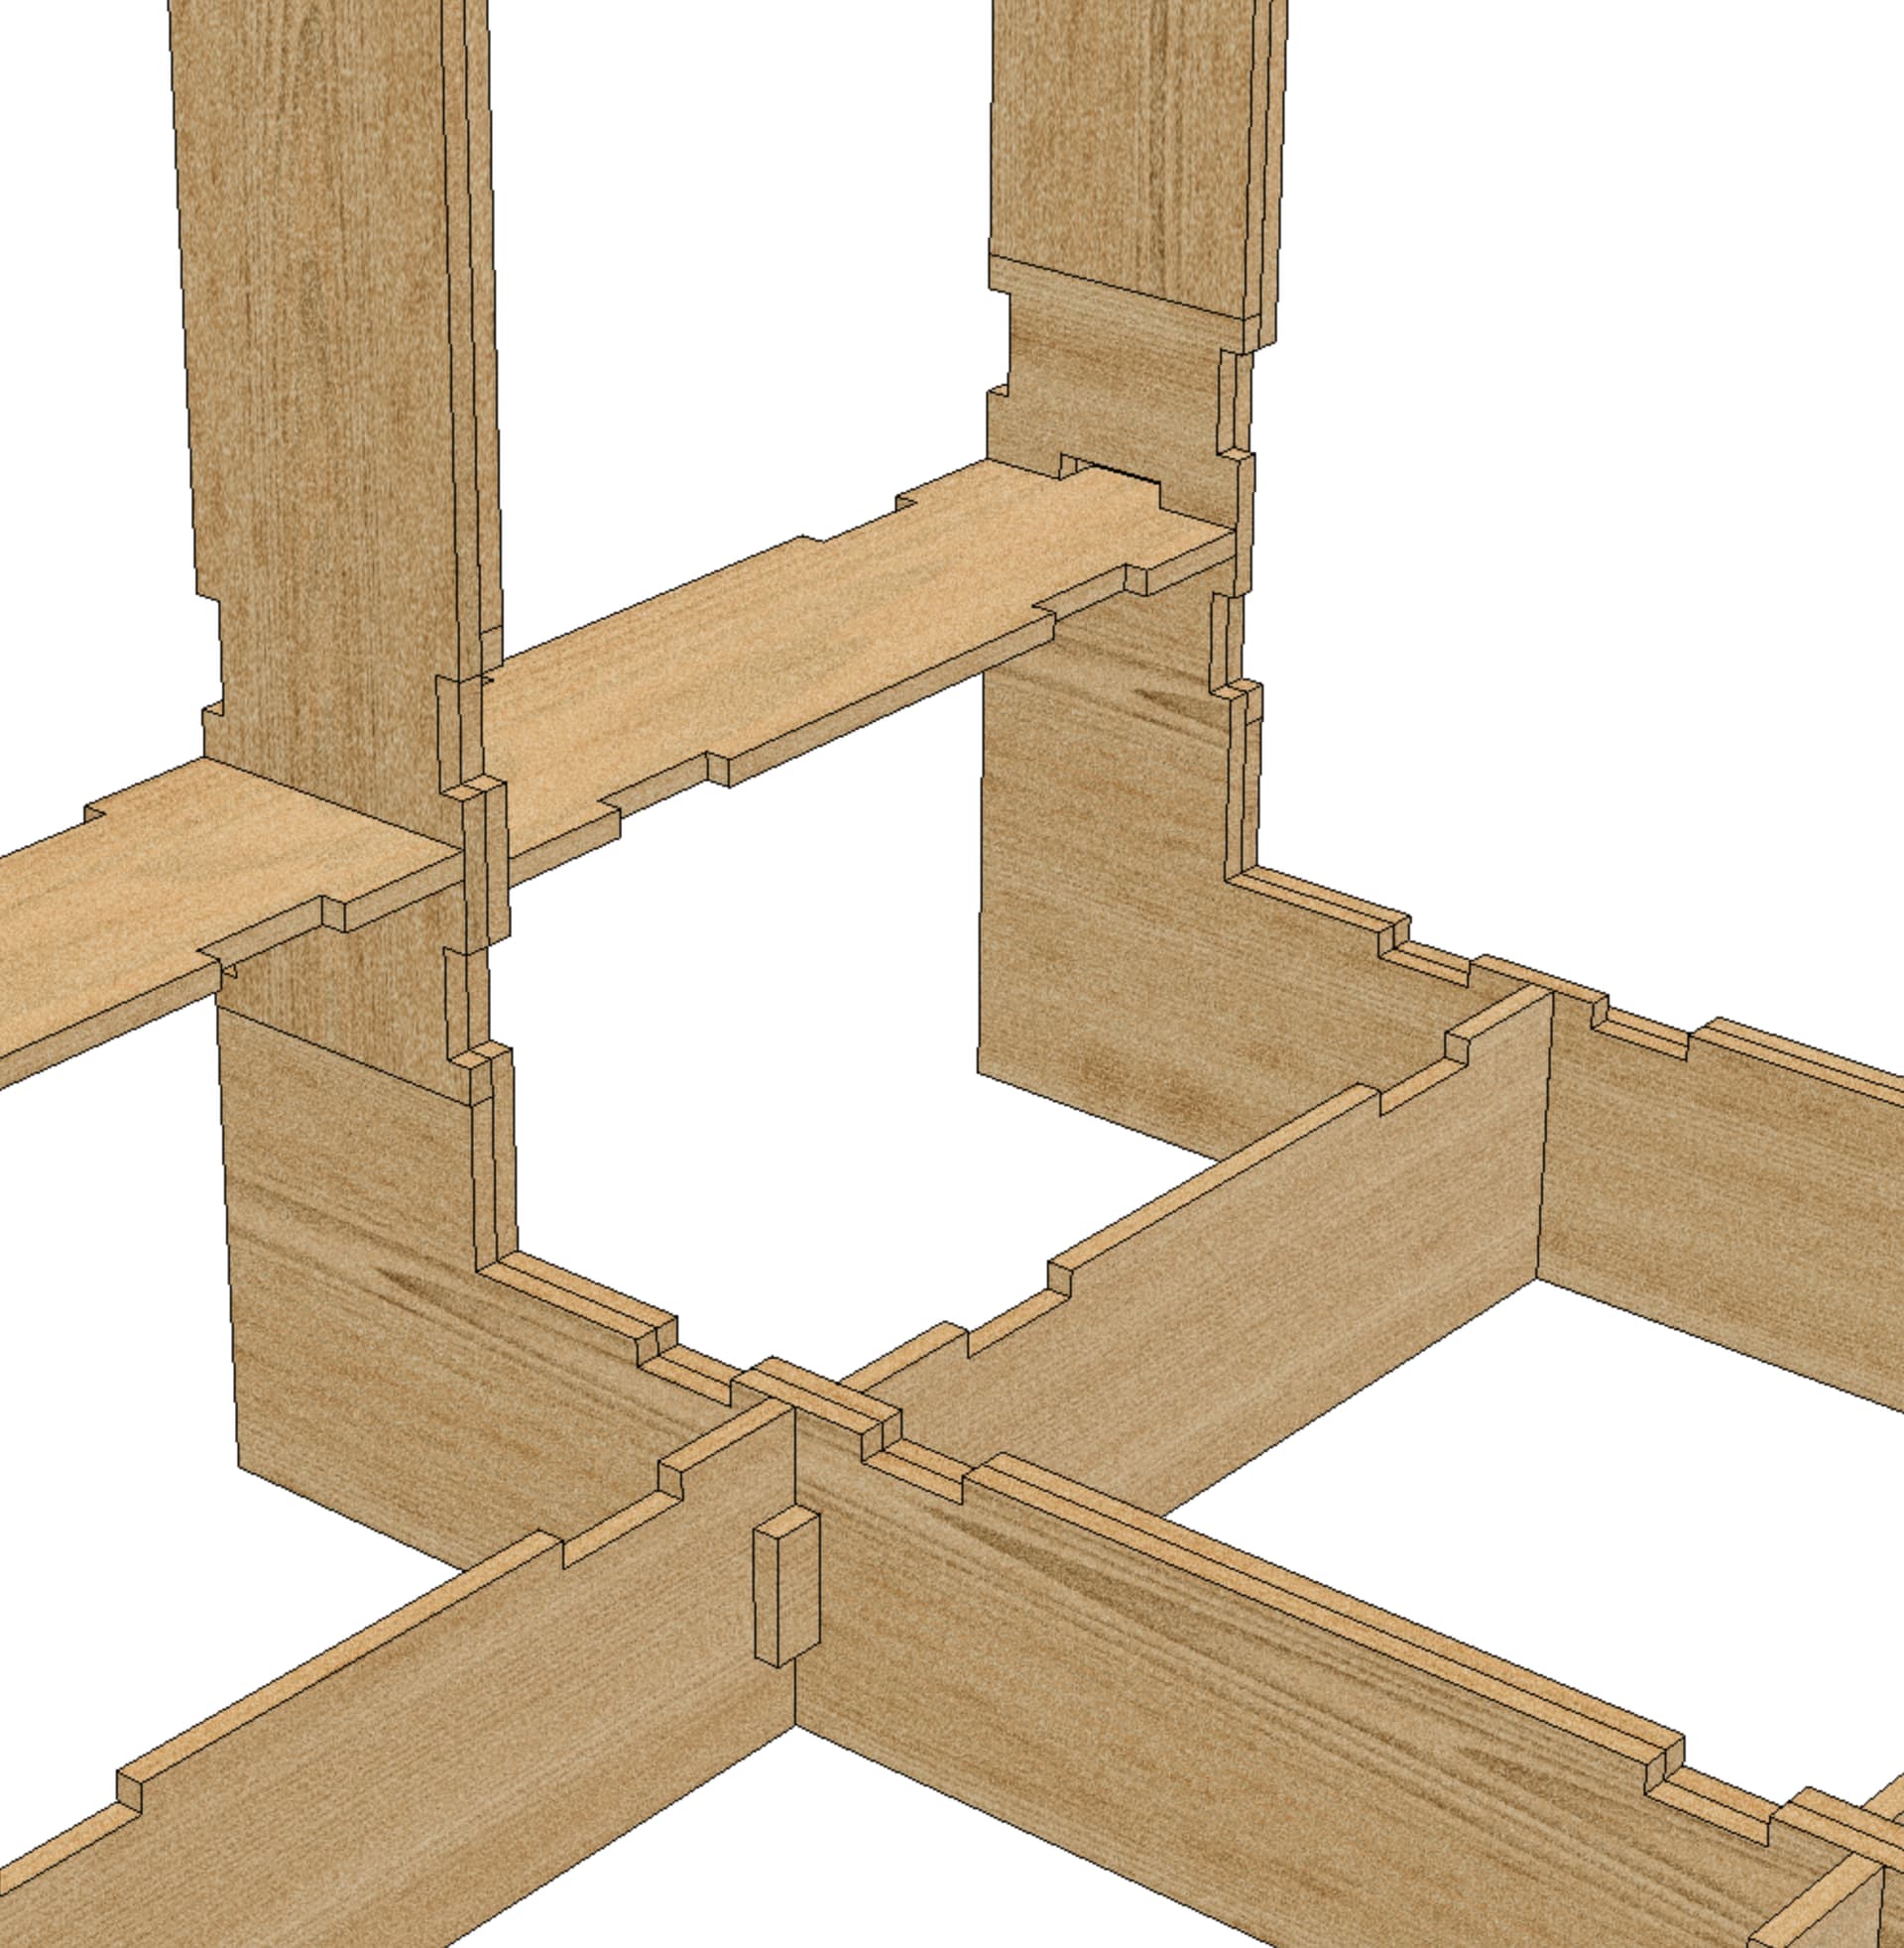
-incorporates the joinery and rigidity of timber frame building
-can be built on a platform and transported
-modular
And in terms of sauna design:
-bays fit two Rockwool R30 16" OC insulation. 29 inches between joists/frames.
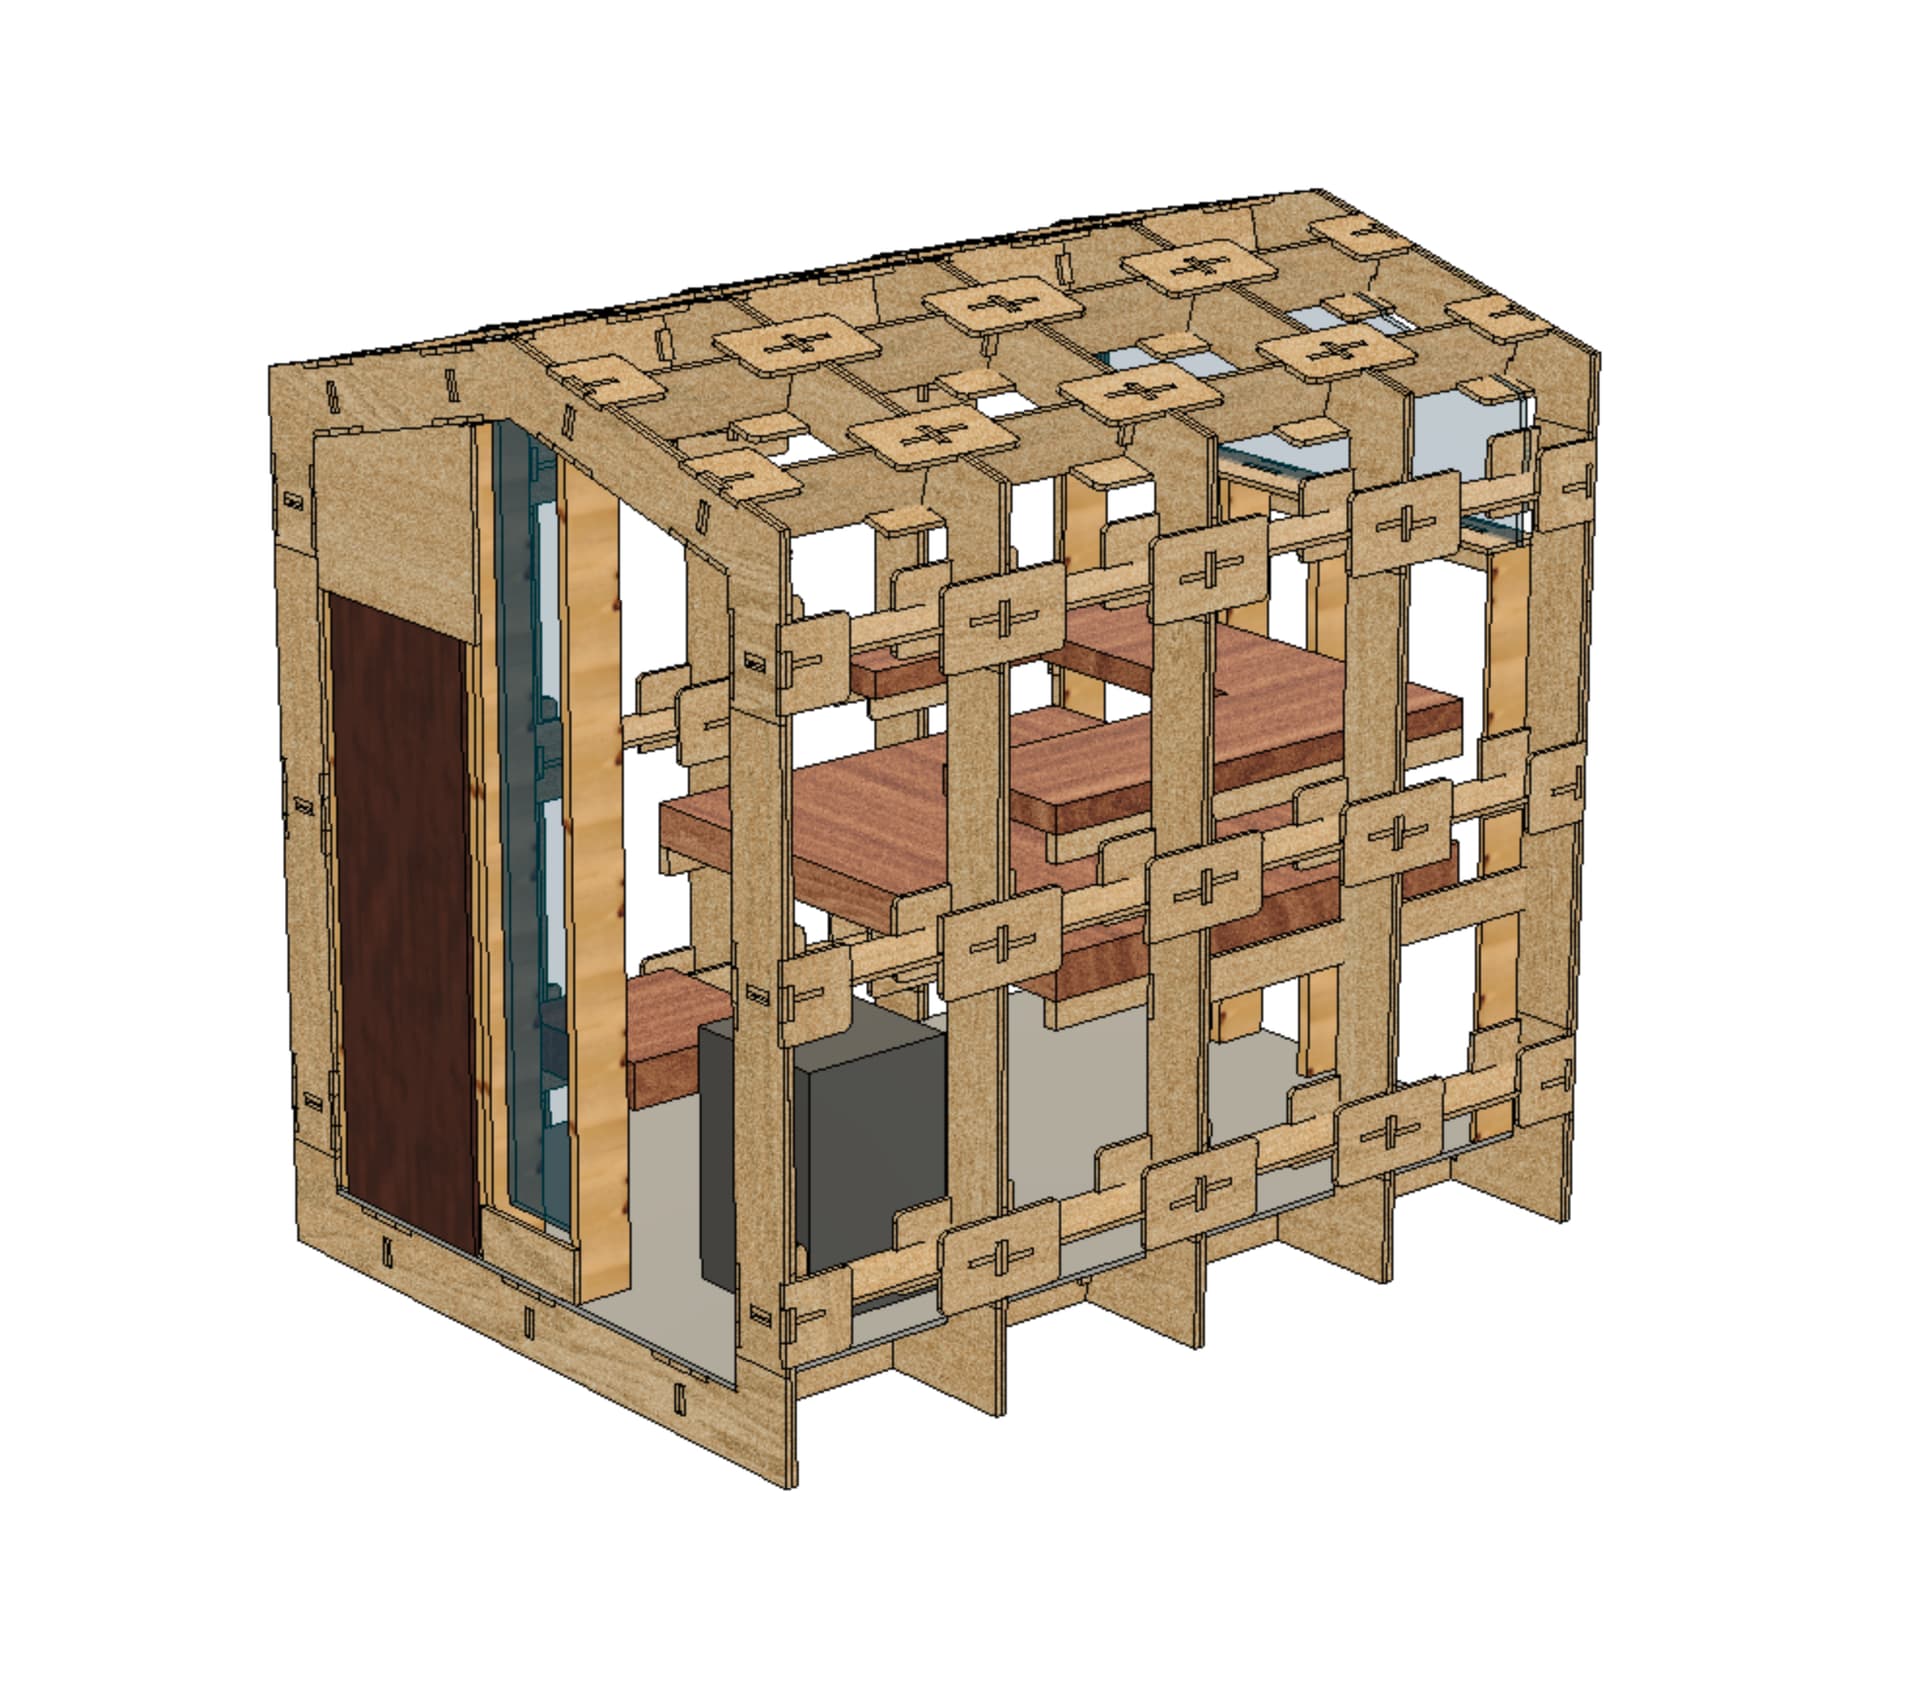
-high ceiling so feet are above the stones. Interior is 8.5H X 8.5D X 7.5W.
(I love the platform of this sauna build a lot.)
I am still deliberating about the front. Right now it opens directly outside. Ideally there should be an ante-chamber to prevent heat loss. I am mulling making a smaller second building (6’ deep) that is more of a greenhouse and clad in double wall polycarbonate. That way one could see the structural design that will otherwise be hidden on the sauna section…
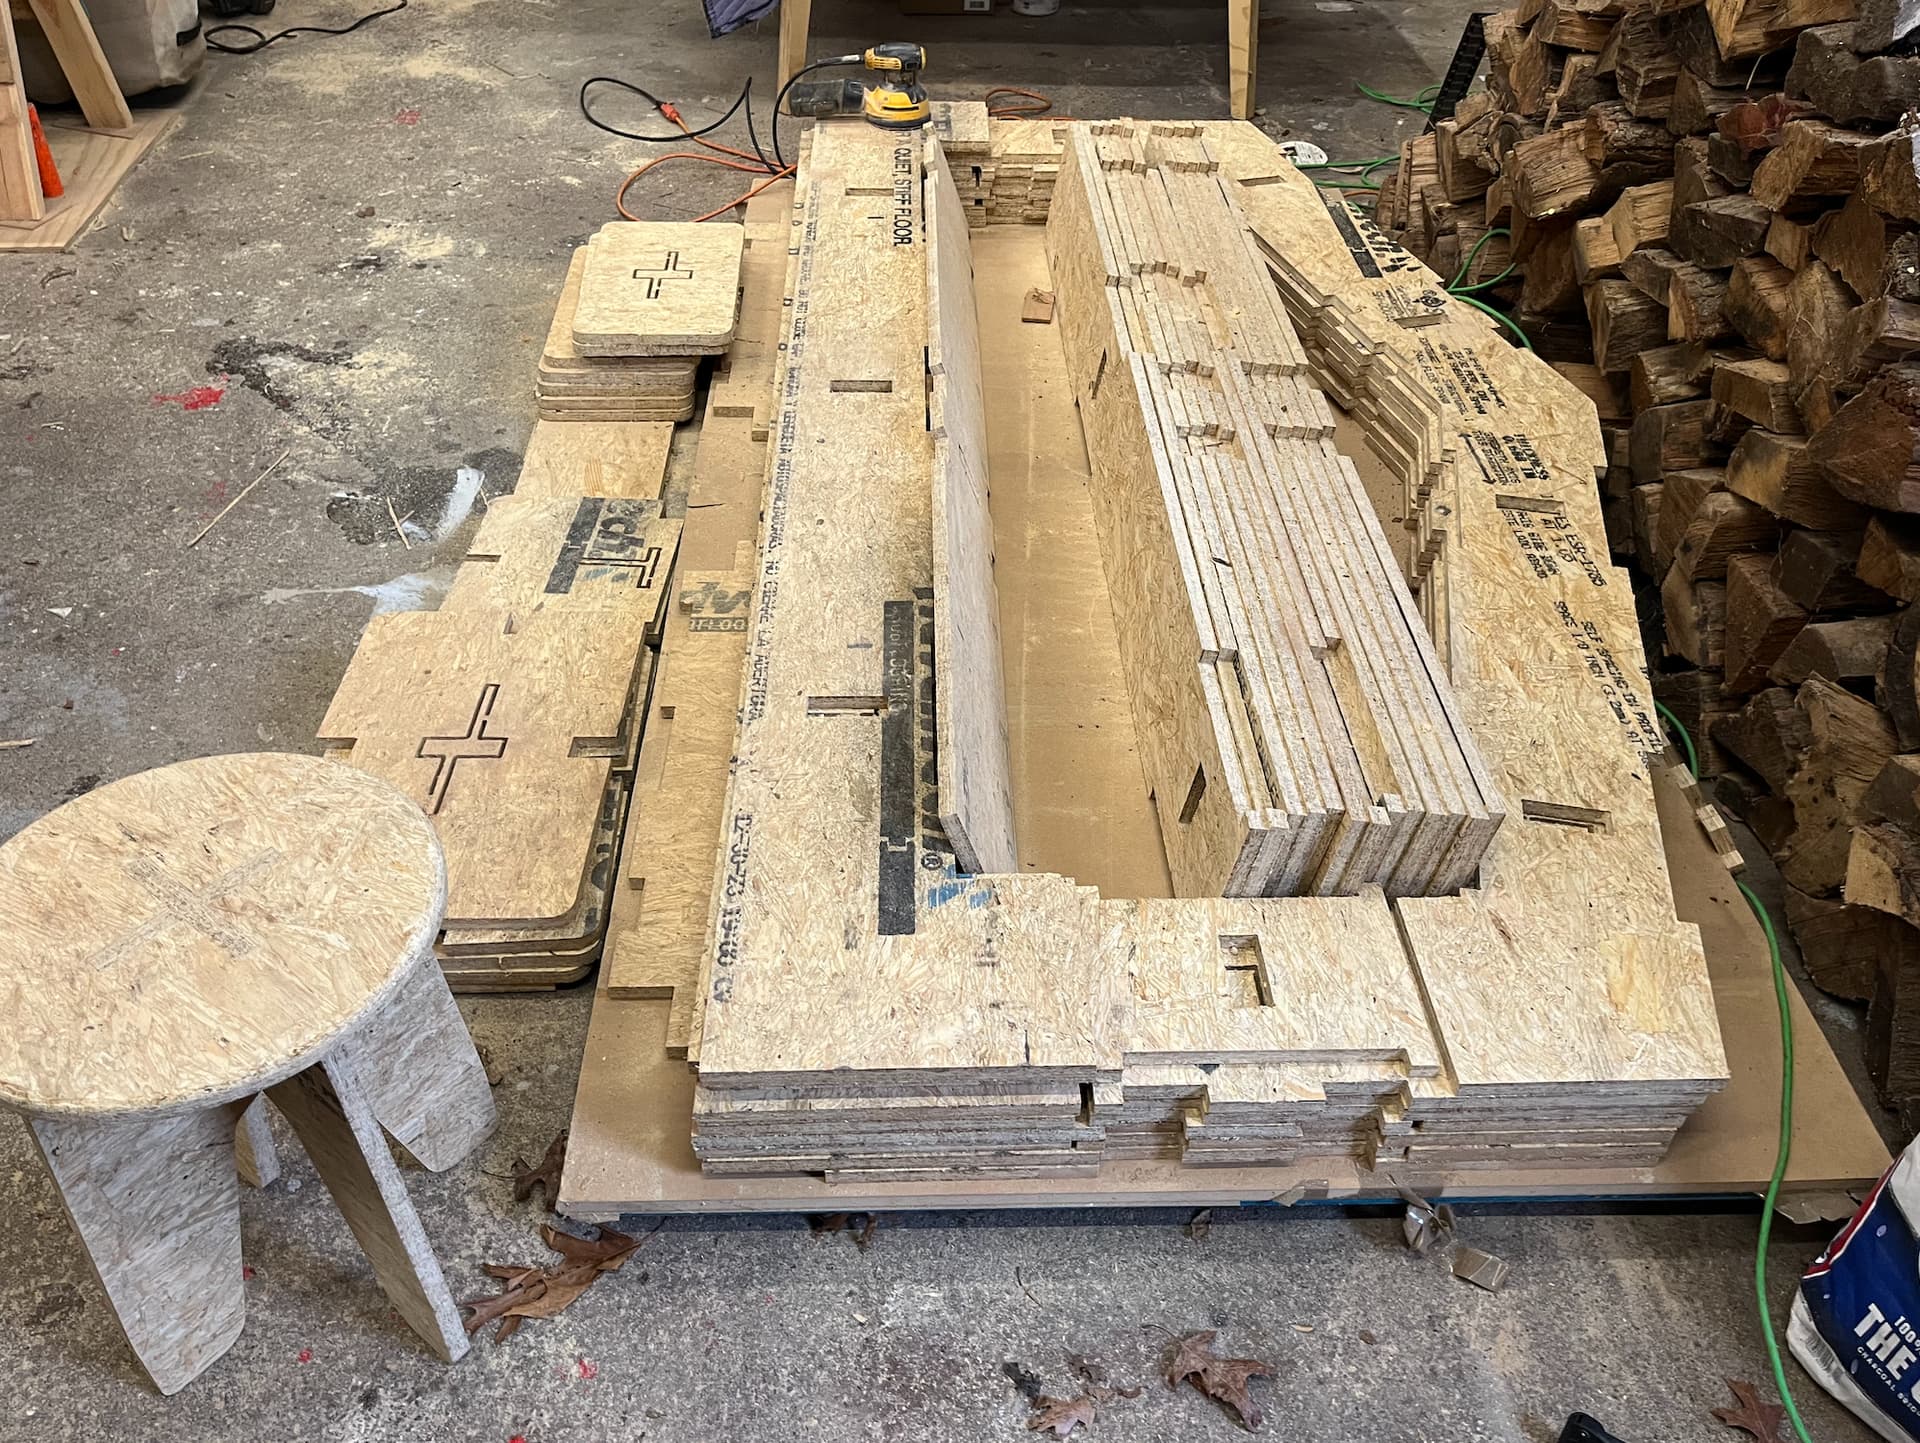
After trying a couple different techniques I seem to have achieved the fastest cutting speed with a .25 upcut bit, 5.25 DOC, 10m/s. I switch the bit out every sheet and half (is that normal?). I almost started a fire with a .25 compression bit that got jogged. Where a .125 inch bit might break and prevent things from getting out of hand there is no room for error with .25. I go round all day with watching the camera and listening for any high pitched aberrant noises…and also the complete works of Charles Portis.
Okay, you got me. I am following. This is too freaking cool!
What about just a small corner entrance, and small second door. If you didn’t like it you could just take it out. Just as you have it now with a small second door at a ~45.
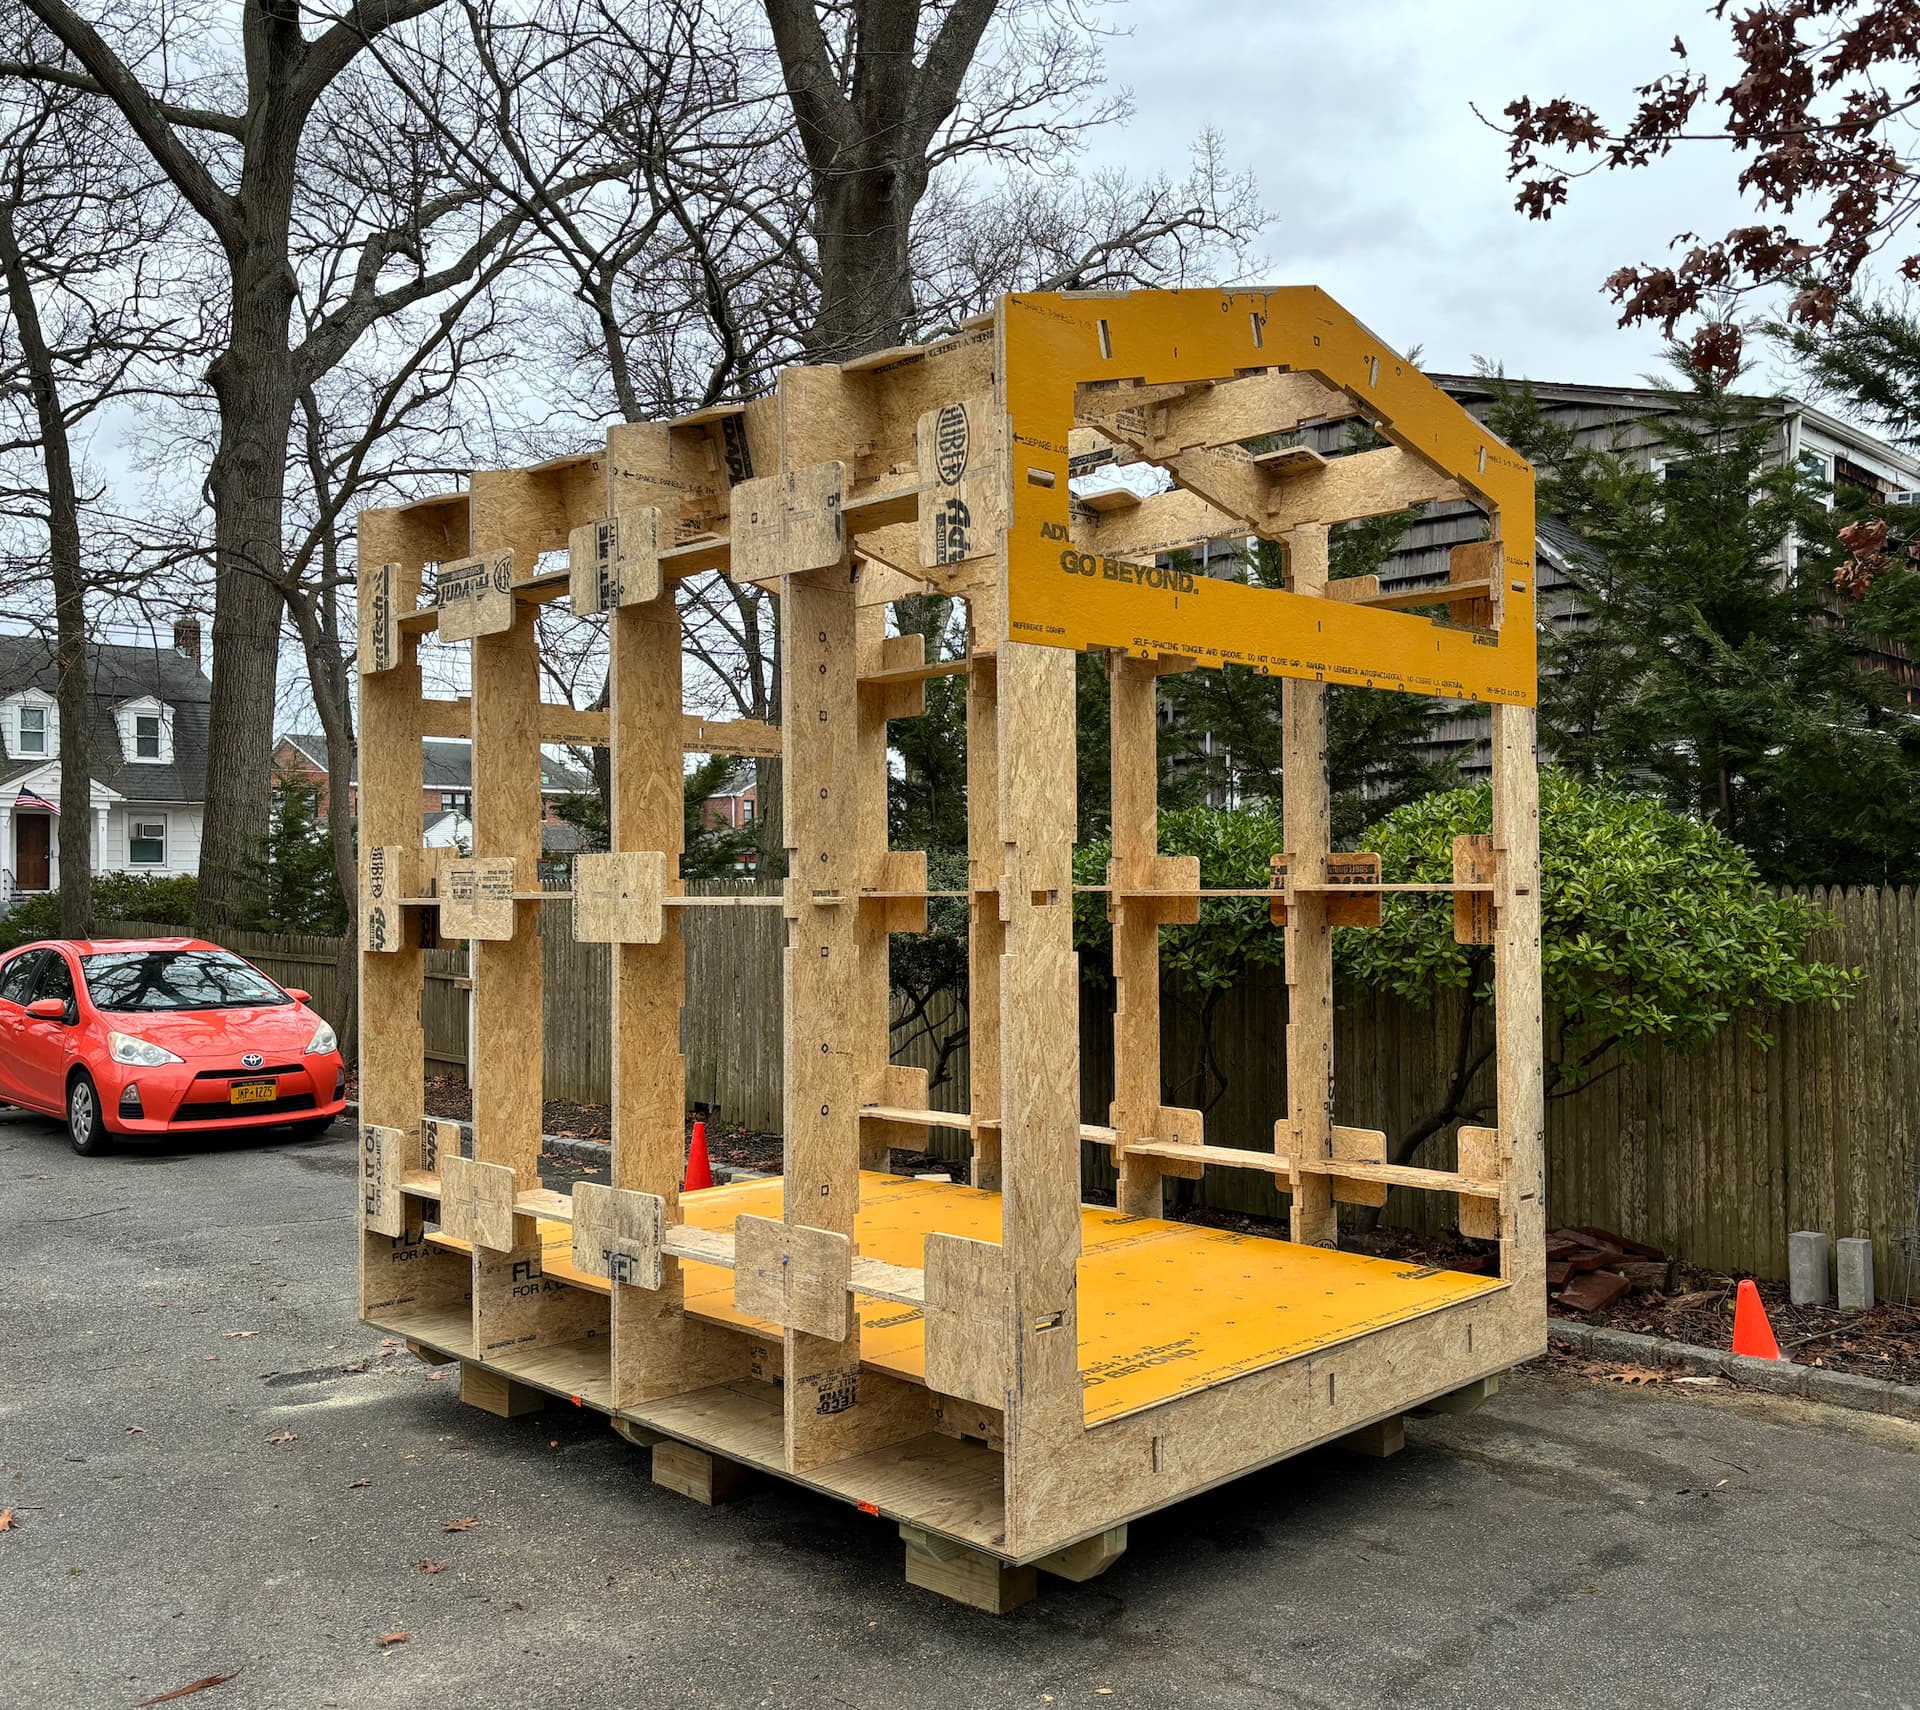
That’s a ‘Habanero Orange’ 2012 Prius C for scale.
The best part of Jan was spent CNCing the parts out of approx 20 sheets of AdvanTech; the base w/runners had to be made (2- 3 hours); and the 5 “ribs”(anyone got a better term?) laminated (3 hours); but then it only took 2-3 of us to assemble this in 4.5 hours. There was a couple minor delays but nothing to really derail the process. I need to complete the window/door openings but I should be able to start sheathing in next couple hours.
Updated computer rendering below. Moved window to side of door, and made door shorter so heat wouldn’t escape. Now I get to relive my teenage years in Ireland, growing six inches and suddenly slamming my head against ever door header.
Amazing! This’ll change your life! I followed Glenn’s guide a few years back but your plan doesn’t look like you’ll hit the same snag as I did (distance to combustibles……my sauna is wood-fired). Reach out of you have any questions at all, happy to help.
One advance tip? Forget about the vinyl cement patch on the cement board if you’re using the board on any of the walls or ceiling. Mine, despite following ALL instructions to the letter have started to crumble off. The stuff on the floor is fine though.
Thanks for writing! Yeah, I was thinking about using the cement boards as a heat shield on walls in corner. Why is it cracking there and not floor for you?
The floor is very sturdy (I think) but that being said I constructed this so it could be slid onto flatbed truck so there will definitely be some movement at that moment.
I could use a nice linoleum on floor. What are your thoughts there?
Still spinning my wheels on wood stove. Thinking maybe Harvia pro 26? I may have to do some mods to roof in terms of chimney but not too worried.
I have decided to shingle the whole thing in wood. Didn’t want to be looking down on an asphalt roof from our house. Feels like a fun exercise to do with unsuspecting friends.
I bought my wood stove about a year and a half before I built the sauna because it was a floor model and a great deal. A little oversized for my sauna but no problem. I will eventually replace it with the one Glenn always recommends - the Kuuma I think it is? But that one is more than $1500 + shipping so quite costly. That said, I located my chimney in such a way that it’s in the right place for when I do upgrade. For me that means technically my stove is too close for the approved distance to combustibles for my specific model. There is no other wood stove with the amazingly low distance requirement than the Kuuma (that I could find). I think it’s something like 11 inches? It’s allowed to be crazy close whatever the distance is. However I’ve had the top of my stove glowing red hot several times and the cement board hasn’t burst into flames yet!
The biggest thing for me - which won’t be an issue for you is that the plans from Glenn essentially said build a 12 x 8 shed and split it in half. Because of the distance to combustibles requirements of my stove and the way I wanted to set my benches there’s no way I could have in a six foot hot room. So I made my hot room seven and a half feet and the change room shrunk. But I love it this way actually. The trouble for me was, moving the separator wall meant moving my stove also which then moved the chimney framing I had already built in the roof so I had to do some reframing after the fact on the ceiling joists. I was not happy. Also, I had to insert some cleverly placed additional wall studs to accept the new location of the separator wall.
The only other issue I ran into was my mistake, not reading things through and thinking them through enough. He says to insert some horizontal studs in the wall, face flush with the inner edges. It’s to these pieces of wood you’ll later attach the ledge pieces that your benches will sit atop. Which means you have to put them in 2 1/2 inches LOWER than your desired seat surface. Well, I put mine AT seat height. So I couldn’t install ledges and rest my bench on top of them, I had to screw the benches right into the walls. Not really a terrible thing but I was mad at myself for missing that detail.
As for why the cement patch is flaking off the roof and walls behind the stove? No clue. I preferred the board before applying the patch and let it cure properly in my heated garage. Maybe the building is flexing a bit and the bond just can’t handle it? Under my stove are two cement patio blocks, the rest of the floor just plywood (sloped to the drain as per the guide). And then it’s all coated in the cement patch which is not cracking or flaking at all. I also followed the guide and built the floor up the walls so it’s all sealed up but we’ve yet to have so much water splashing around in the sauna such that it needs to drain. We haven’t graduated to the ritual of vihta beating.
About the linoleum on the floor…the cement patch is nice because it absorbs all the drips and will never be slippery. Linoleum might get quite slippery which might find someone slipping and coming into contact with the hot stove or stones (you DEFINITELY need a tall pile of stones). I built some nice cedar “tiles” that I set where needed. Better foot feel than the cement patch.
When I get home (just out on a job for a few days) I’ll post some photos.
This is very helpful information. I will mull it over!
There is some more matte/non-stick linoleum that I have seen used. I was thinking under duckboard, if it was a bright color it could look cool. Basically, I just want to excuse to visit all the flooring showrooms in Long Island.
Truthfully if you follow the guidance re: the big gap at the bottom of the door for fresh air in, the floor won’t get super hot except right around the stove so as long as it was moisture friendly I don’t think you can go wrong. And to be fair some might find it gross that the moisture the cement patch seems to be absorbing is human sweat but I don’t think it actually absorbs. I think it hits the surface, spreads sort of like it was absorbing but actually then evaporates. If you had a floor that the sweat just sat on top of I’m not sure how long it would take to evaporate.
About the air gap. When I first lit my sauna I only had a 1 inch gap at the bottom of the door. I DID have a sliding vent on the opposite wall cut in as per the plans. It was fine but the more I used it, the more I considered all that I’d read about the bigger gap. Sure enough, when I opened it up to 2 1/2 or 3 inches I got more comfortable sauna rounds at higher temperatures than I could stand before.
Good to know. I’ll design the door with some wriggle room for trimming at bottom.
The cement is ultimately better than vinyl/lino - it’s just that in this case sauna will probably be moved in next year so there will be some torquing/movement in floor. It would be a pain if there were cracks in the drip area hidden behind paneling or something. With the lino I can rest assured that the basin is intact.
Too many desert critters around here would take advantage. I’d have to have screened vents and a well sealed door to keep scorpions out. And I do wonder how enamored I’ll be with sauna when summer hits the desert (I’m a noob.)
My wife thinks I’m crazy going into the sauna in the summertime but for me it’s therapy. I’m a chainsaw carver and before the sauna came into my life I’d have pretty constant ache in my hands and elbows. Since the sauna - barely any pain any more. But I’m pretty religious about it. When I’m working lots I’ll be in there every 2-3 days, four rounds mandatory. The challenge in the summer months (and in the desert I’d guess) is cooling between rounds. You can get away with the garden hose but I believe (I WISH someone would prove it with science one of these days) that the magic healing of the sauna is actually the cold shock between rounds. I read somewhere, maybe on Glenn’s site, that the cold shock makes the body react and release a flood of white blood cells. So now I use a cheap “portable bathtub” from the Amazon - about half a rain barrel size, filled with the coldest water I can get from the tap and then chilled with ice as close to 50 degrees as I can get. Lucky for me I’m also an ice carver so I’ve got access to, well…ice.
200-210 degree dry heat for 15 mins, ice bath until you “feel the cold in your bones”, reheat another 15 mins, hitting the stones halfway through (feels SOOOOOO good after the ice bath), back in the ice water to chill the bones. Back to the heat, this time hitting the stones every 3-5 minutes as long as I can stand it and then back to the ice. Last 15 minutes are dry again (I usually lay down for the last round and relax) and after that no ice, just a cold shower until I don’t gasp at the water and then dry off and bask in the feeling. It’s so amazing. The first time I hit the ice I told my wife “I think this is what ‘euphoria’ feels like.”
She thought I was losing my mind and freezing my brain cells. I don’t think I could survive without my sow-na.
As a kid, my grandparents had a Japanese bath at their house. Slightly different, but an application of heat like that does wonders for the muscles and the joints, and the nights that I took a bath in that hot water I slept better and didn’t hurt at all the next day, even after some pretty strenuous days. (I was, of course a kid, and still didn’t really appreciate the concept of “recovery time.”)
Several decades later, and my recent trip to Japan had me doing very strenuous kendo practices for about 10 days straight. For 2 days, the bath at the hotel was out of commission. After the first night of that, the day after hurt. The day after that, I went to the local hot spring and had a long soak after practice, and after that the hotel bath was fixed. (The hotel bath being a hot-spring style bath.) Of these, the hot spring resort did have a cold pool, which I dipped my toe in and noped out, so I didn’t get the hot-cold cycles. It’s possible that also has an effect, but for me, at least, I can get most of the healing and recovery from a hot soak or a sauna from just the heat cycle. Oh, and I was in southern Japan at the end of June/beginning of July, so it was hot and humid there basically the whole time. cool-down took some time, but was largely facilitated by cold beer. (Cold beer consumed on the bench in front of the convenience store where I’d bought it. (Maybe not so weird for some of you, but it was practically surreal for me. Can’t drink in public here, nor can you buy alcohol from non-licensed vendors.)
I’m pretty sure that the heat just helps the bloodstream remove and dissipate the lactic acid build-up in the muscles and joints, as well as allow the muscles to relax.