New printer time?

The printer I built into a box is still running well. Definitely did it because a) I had a cnc - or two - and b) much cheaper (mdf).
I’m sure you would make a better use of space than I did, and use better parts as well (mine was all anet kit until I upgraded the board because I decided not to fix my ender).

My next printer is going to be a box with the extrusion from my ender for the motion. I think I have the idea worked out for x, y, and z to use just the crap I have.

Basically, I think it’s gonna be tough to go wrong either way.

1 Like

It seems to me that many of the extrusion based builds use it because there’s no need to be careful to build it square, the extrusion will just make it so.

To be fair, the vast majority of the time, it is. It’s that one time where you tightened a bolt with the corner brace about 1mm out of place, and now nothing on God’s earth is ever going to make that angle 90° ever again short of replacing that length of extrusion and the corner casting, and maybe the other extrusion that it was bolting to. There is (Or was, it might have been junked now) a printer at the local makerspace that’s like that. It’s fine for making vase mode prints, or little knick-knack ornaments, but anyone trying to make (for example) a Primo on that is going to have a bad day putting it together.

So, while I don’t have a problem with Al extrusion, I never want to count on it to make stuff square.

When it comes to tools, (And I count a 3D printer as a tool) I like functional aesthetics. I’m not too concerned about things like colours (though I do pay attention to them) as I am about how they function.

One thing that I’d like to say, is that I’ve had three 3D printers from kits. One used threaded rod, one used laser-cut plywood, and one was extrusion based. I have my self-designed one, and an extrusion based 3018 CNC, and I’ve now built an MP3DP. The MP3DP was far smoother for assembly than ANY of the kits. I remember assembling the base and wondering how I was going to square it up. (I’d cut one of the base floor pieces, which I assumed would do it.) It was perfect. Right from first assembly. Diagonals were right on to within a quarter of a millimeter. None of my kits did that. My self-designed one did, but that was cheating since I made it so that it absolutely had to be, or else it couldn’t bolt together. But I designed it that way because the kits didn’t. Unfortunately I also designed it using cut acrylic which gets a little wobbly, but it’s reinforced with 3/4" aluminum square tube. (I suppose that I could have used 2020 extrusion, but the tube is much cheaper, and worked more than well enough with cheap hardware.)

Ryan’s designs have been a cut above for building all the way through. To build my design 3D printer, I think that I did a pretty good job. I have no real complaints about its performance. I’d absolutely hate trying to make it into a kit. 3mm screws, 4mm screws, 6mm here, 10mm there, 18mm in places, 20mm other places, square nuts here, regular hex nuts there, One-of parts all over the place. Hey, it worked, because I designed for what I had. The kits I’ve bought seem like they were designed that way, too. For what someone had. “Use the 10mm spacers and 18mm screws here, use the 6mm spacers and 12mm screws there. Use 3mm screws for this, 4mm screws for that…” and so on. Often with no discernable reason for or advantage to the unique parts.

So @vicious1 can say that I’m really looking forward to seeing what you come up with here.

3 Likes

No pressure…

:grinning_face_with_smiling_eyes:

I do agree with you, not to toot my own horn but my printers have all been extremely square and perpendicular, I have never actually adjusted one. The kit I did assemble was absolute garbage (a long time ago) and I am not having the luck you have with extrusions. I cut them very accurately and tried two different types of corner brackets. I can move the frame significantly and it will stay deformed.

I had fun making a part. Assembled it, immediately wanted to make some massive changes. So far it looks like it will work making it for either style but I have not gotten far.

I have looked at a lot of designs and asked for some advice and I have a feeling this might take a while. There are an absolute mind-boggling amount of options and decisions to make. My desk is now a pile of printer bits (again).

1 Like

If you make them from wood, you can make them in a box and stackable. If you make them from MDO, it should be fairly stable and not warp over time. Having it be a box would make it more stable, and being mostly an enclosure, wouldn’t be too hard to keep the parts being printer warm and out of drafts.

That’s why the railcore and most other large core x/y printers have side panels. They panels add most of the structure and stiffness. Somewhere there’s a photo of Tony standing on his railcore to demonstrate this. These guys are built from 15mm extrusion and hdpe panels.

1 Like

That makes more sense.

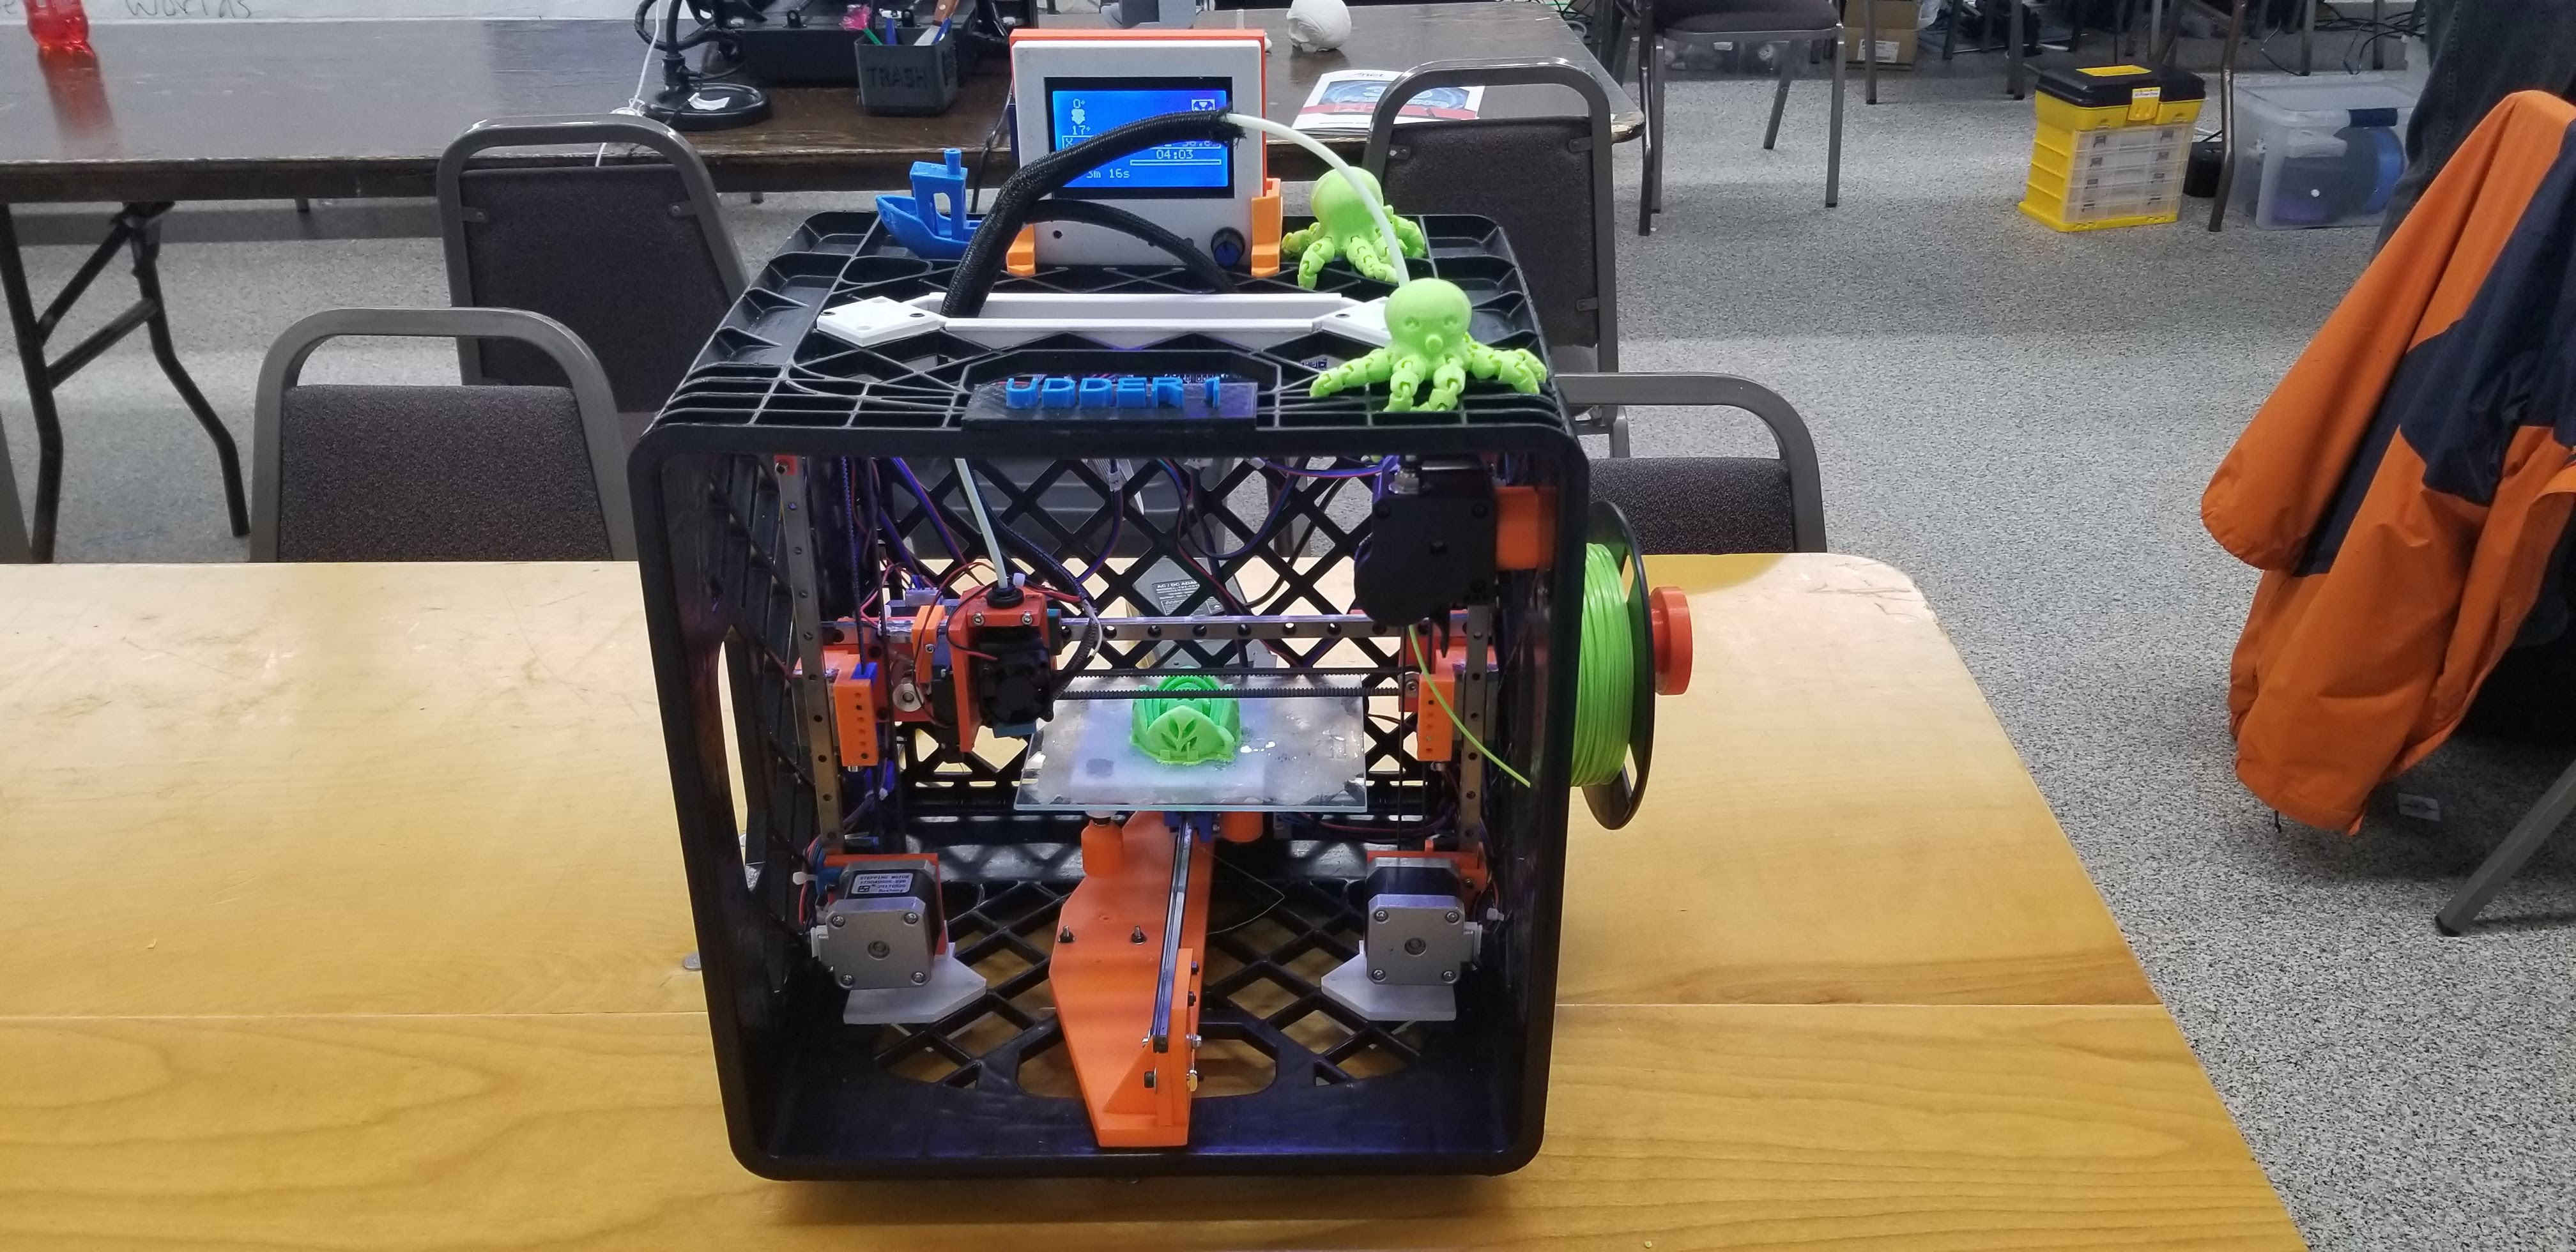
You could go the milk crate route like we saw at mrrf.

7 Likes

Exactly my problem… I get wrapped up in decision paralysis.

1 Like

This is why I’m excited about the next lowrider revision. I really borked mine up cutting corners, but wifey wants a full sheet machine in the new shop.

Tangentially related(to the thread, not Ryan’s design) …mdf seems less prone to catching fire. Is it just me?

1 Like

mdf smokes and smolders more, but once the dust catches, it goes off like gun powder.

1 Like

Guess I just need to try harder :grin:

No, try dumber, not harder; take the bag out of your dust collection and get as much MDF dust up in the air as possible, then introduce flame…

Reminds me of my childhood home, where my room was the first second-story structure on the sight-line from a grain-bin.

1 Like

That is the best thing I have ever seen :laughing:

Did you go to MRRF this year Barry? I am sorry but I forgot to tell you I heard one of the guys on a podcast say, tickets are sold out but they would not turn people away at the door. They sent me no information whatsoever except in like January asking if I wanted a refund for last year’s sponsorship or just carry it to this year. I carried it forward but received no other info.

1 Like

I was going to rebuild and enhance my MP3DP. I like the inductive proximity sensor on the Prusa i3, but some other enhancements ideas are to

  • Embed E-Z Lok(s) in the bed for the screws/springs to go through. Getting those nuts on is a pain.
  • Use a T5 lead screw with a small stepper to raise and lower the Z-Axis stepper (with a coupler), essentially a worm gear built into the left Z-Stepper bracket. Getting to the screw is a pain and requires raising the Z-axis to get to it for every small adjustment.
  • I have also been think about ways to adjust the bed screws from the bottom (using the same stepper and some printed parts), and making room underneath by increasing the base height.
  • A removable extruder would be nice, even with screws, if you had an easy way to take it off and clean up jams. Maybe use a pluggable connector like this one (actually manufactured in Germany), vs. the very expensive embedded conductors (which I considered at some point).
  • The removable beds are nice.
  • I also considered using sensors to measure the platform and X-Axis tilt relative to each other.
  • A built-in filament sensor would be nice in the extruder with a more straight feed and dual gearing like the Hemera. Or just allow the Hemera to be used.

I would love if my next printer could print up to 3-4 different materials at the same time, one of them being a gel (not a hotend).

1 Like

Nope, last I heard they weren’t letting anyone in without a ticket.

1 Like

I know what a bummer. I really hope they get someone to deal with public relations. In the podcast he said something like the most unorganized, organized event. I don’t really agree with half of that statement.

My 2 cents…

I would love to build a printer with a stationairy bed. So a core-xy is a good choice. How about a bit of Voron with a Ultimaker-style wooden enclosure…
Perhaps the x-y axis with Aluminium extrusions.

1 Like

i kind of get it. The “cool kids” are using aluminum extrusion and getting fantastic results with it, but take a step back and think of what the extrusion is for.

In a nutshell, it’s for precision placement of the fittings in it, and for getting nice square corners, for when you don’t have say, a CNC machine to get that precision.

The aluminum extrusion is not and was never intended to be an inexpensive solution. It was meant to be a solution for those who want a platform which can be used as a basis for precision fittings with relatively low weight and good rigidity.

With a CNC router, we really don’t need it. There is no reason whatsoever that we can’t get as good or better precision, nice square corners and excellent rigidity with lower cost materials, once there is a CNC router in play, assuming that the CNC router is properly squared up.

If you want the aluminum structure, we should be able to use 3/4" square tubing, which is readily available, and much less expensive than 2020 extrusion. More importantly, it doesn’t depend on the T nuts and fittings that get stupid expensive really fast. For less money you can buy thread taps for common bolt sizes and use those to fasten everything together. Or instead of tube, use angle. This can be thicker, and you can have easy access to the other side for nuts or other fasteners. With a CNC machine the options are much greater

So in terms of a CoreXY mechanism, which is really cool, and keeps the moving mass to a minimum, resulting in better possible speed and precision with less ringing and other artefacts, we have some nice lightweight options that are superior to extrusion available to us simply because we have some tools available to us that most printer builders do not.

Being able to (for example) put holes in a piece of 3/4" aluminum square tube every 25mm to bolt a piece of MGN12 linear rail to will give very similar options to a piece of 2020 extrusion, but at about a third the cost, before even getting to the specialty fasteners. Or put those holes in a piece of 1/2" MDF for the stationary rails.

I don’t mind the bed moving in the Z axis, but for sure, my next printer design isn’t going to be a bed flinger.

I’m going to go for something that can compete with the guys who are putting out 4 digit price tags for print quality, but stay as far as I can away from things that are needlessly expensive.

I see extrusion profile as something that is a substitute for better tools, except I think that the Primo/LR2 are the better tools.

5 Likes

You’re a thinker, ain’t ya?
Those are all really good points, though, especially the thoughts on angles vs extrusion.
As for placing holes with the cnc in the enclosure, that’s exactly how I did my last one to locate some printed parts, and I was just tickled at how well it went together. It really is a step above extrusion frames imo, and I don’t think i can say that emphatically enough.

Well so far it is actually pretty easy to design for both. For a printer you only need three planes, from there know that extrusions are 20mm on center and that is done. As long as you do not wrap corners it translates flawlessly, wood doesn’t care where the holes will be. So three planes…multi frame material compatible, done.

I am close to assembling a test machine. Don’t get too excited I am trying a few new to me things. One of which already has a shortcoming, just not sure how big of a deal it actually is.

I still lean very strongly to non-extrusion, but you know what it does well…quick accurate prototypes. Isn’t that what it was designed for? When I have it ready or a lot closer I will start popping holes in wood instead of all these dang t-nuts. Just working on the last tensioner part and some sort of tool mount layout.

Oh, I have a serious question. When people use these linear rails why the heck do they put a screw in every single hole? I can’t see needing more than 3 screws in a 300mm-500mm run. Am I missing something?

1 Like