I build the whole width in X and went shorter in Y so I could always just build a longer table. That was my compromise with myself. ![]()
2 Likes
Fair enough, and if that’s what V1 is selling, then go for it!
I could envision, however, that a short line in a 3DP may not pick up much interference, but you are going to have several times more induction between the wires of a 4’x8’ CNC than an 8"x8" or 12"x12" 3DP, just due to the longer parallel wire runs. I ended up getting more spools of wire than I’ll ever use when clearing out my parents’ house, and some of it is multi-conductor shielded cable, so I may just go with that as extra insurance. I’d say twisted pair is the minimum I’d trust personally without experience to the contrary.
One reason this project keeps getting pushed aside is that there’s no obvious, immediate “need” for it. I could certainly see marketable uses for it, though, and as one component of “retirement” (what’s that???) income, it could certainly be useful.
Aside: It looks like you made the edit, but originally you wrote that your BBQ is in sow motion. I thought that was a pretty good pig joke. If you need tasters for your product, I might know a guy.
1 Like
That’s pretty much my plan. EMT conduit and belt are cheap; I could build full-width and something under 8’ length and then expand later. That part is still TBD.
I haven’t looked at the various torsion box table options lately, but @DougJoseph 's was what I was leaning toward - especially with the steel channel on the edge.
1 Like
I thought about making a table that you can expand in sections, but besides the idea there are no concrete plans. ![]()
1 Like
Welp, I’m back. Only 2.5 years later…! ![]()
I was just reading through the posts where I left off when this whole project got shelved. At some point I may list all the other projects that got in the way, but for now, just enjoy this short video of my first X homing command after finishing assembly of the gantry and end plates.

BTW, I settled on the Octopus Pro board, and I’m currently running Klipper and (mostly) loving it. Just trying to get my stepper_z and stepper_z1 motors to run at the same time now.
7 Likes
Welcome back!!
1 Like
Glad to see you back Bill, ALOT has changed, new version of lowrider, jackpot controller, etc etc. But I have stuck with the lowrider 3 since I am this deep and not even finished myself. Anyway I look forward to seeing your progress.
1 Like
Thanks, @adammay5 ! How’s the BBQ + crafts business lining up?
Mmmmm, LR4… For a short minute, I was tempted not to put in the effort to finish my LR3 and just jump ahead to the LR4, since that’s what I’ll probably want anyway. Then my sanity returned and I decided that I’m this close to finishing the LR3. Go ahead and learn my lessons on this one, then I can apply those lessons if/when I upgrade this machine to the LR4. Or maybe the LR7 by the time I get around to doing that.
I knew I had printed almost everything, but as it turned out, the only thing I had to print to finish the entire assembly here was the X tensioner. And I already have a pile of 30-month-old Y rail holders in my box…
2 Likes
Awesome! I am also running klipper on my LR4, which although unconventional, I tend to find easier. If you have any questions, ask away, I know there are several folks on here running klipper that would be happy to help.
Still working on them. I am currently re motivated and moving forward!! Like you I had a lot of life and other things come in the way.
That was my exact thinking. When I got started back again I spent another couple of weeks thinking about abandoning ship, then the same thing you said. Finish, learn, and then figure it out. “LR7” you crack me up.
1 Like
Nice – glad to know I’m not wandering the Klipper fire swamp alone.
Turns out, the web was no help getting my dual Z motors working. Everything I could find seemed like my config was correct. But I tend to try things incrementally, and I was testing my motors without my Z end stops connected to the board. Once I did that, and then corrected the logic in the config (removed the ! before the pin number), it all started working!
Now I have two axes completely functional!
1 Like
And FWIW, I never really left; I’ve been lurking here the whole time. Just reading and whetting my appetite!
2 Likes
I have a question about alignment of the Y belts. It seems that the Y belt tensioner and Y belt bases put the belt lower than the drive pulleys on the endplate. The tensioner and belt base that I compared had slots at the same height.
As I’m writing this, and going back over the list of parts files, I do see that there are different files for left and right. Do the two sides have the belt at different heights, or are they just mirror images? Different heights would seem odd, because the end plates should be at the same height, I had thought.
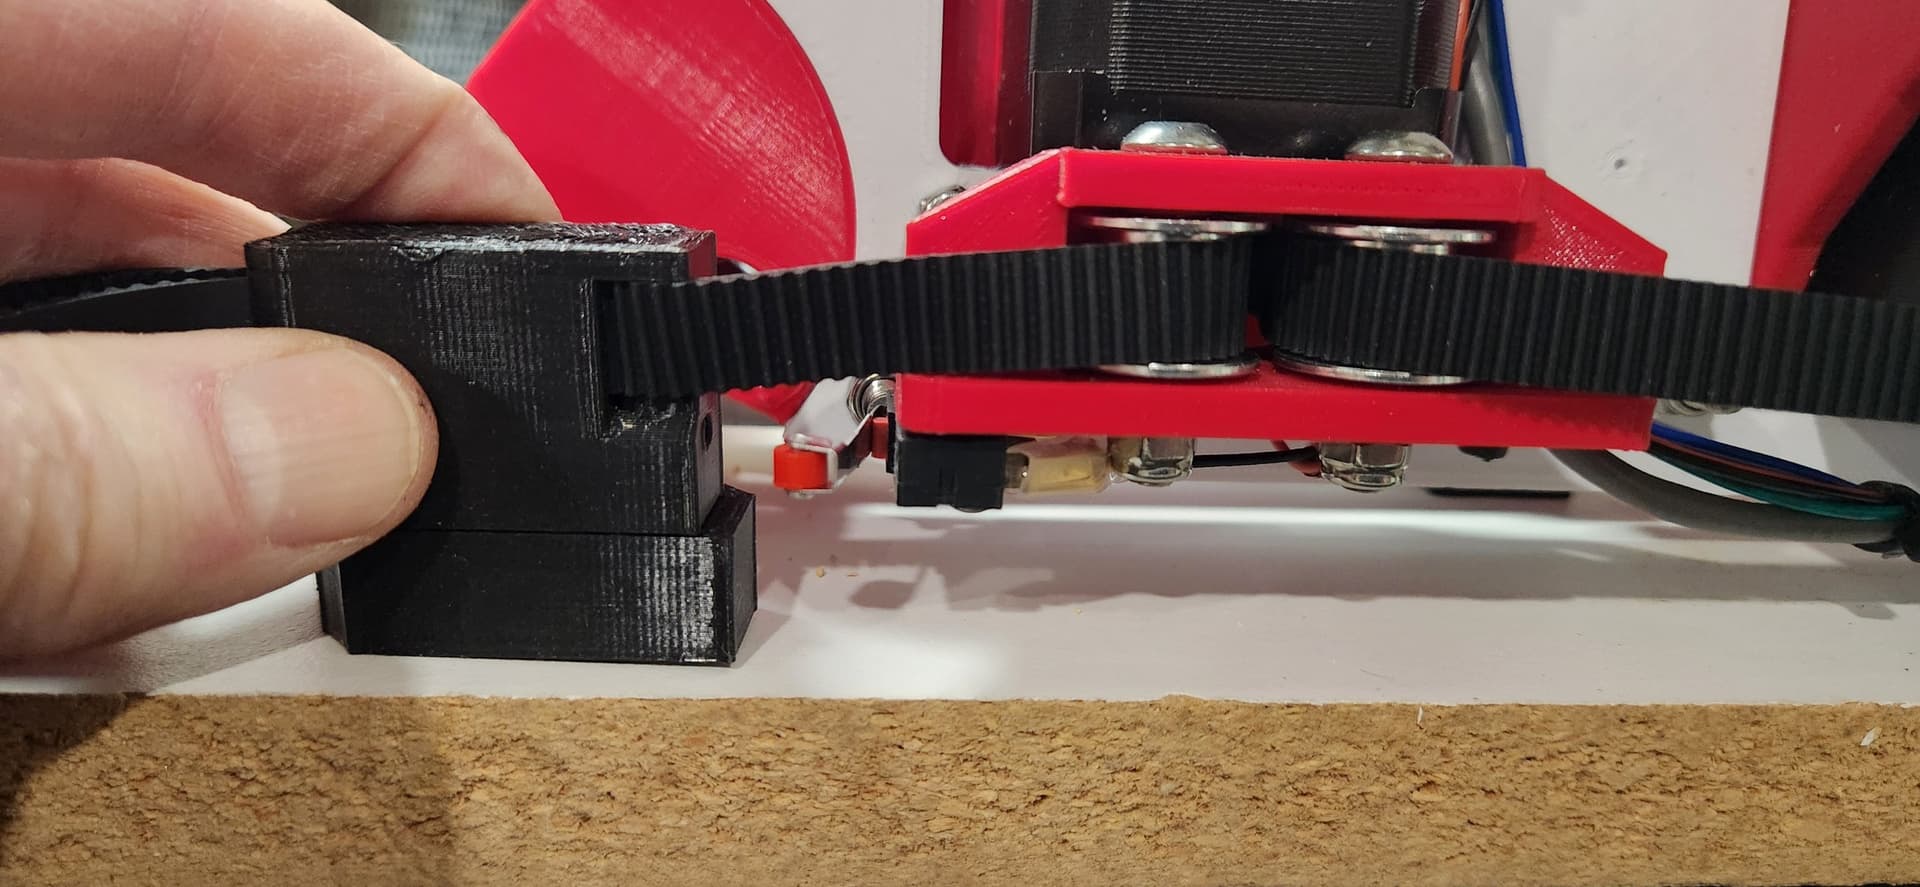
Do I have something mixed up? Should I shim up the belt pieces? Or is this normal and just not a problem?
There’s something not right - the stepper and idlers should be parallel with the table, yours look tilted. Can you take a picture of the whole side assembly.
Ahhh, brainfart #2 for the evening’s work. Yes, the other end of the gantry was sitting lower – much lower – when I noticed the issue.
As soon as I read your reply, it dawned on me. Thanks for the quick correction!
#1 was cutting the Y rail too short. Back to Home Depot for another stick of pipe. ![]()
1 Like
Much better with the far end at the right height. Thanks again, @Dreyfus!
Got both Y belts installed and ends/tensioners screwed down to the table. Stuck with the too-short Y rail for now but ran the belt long. This one’s good enough for drawing a crown, as soon as I can get to that point.
1 Like
Could you elaborate a little on your board/ klipper? I am assuming you are running a Pi of some sort, but i don’t want to just assume things and look silly
Cant wait to see the crown!! I am hoping to have mine done tomorrow.
1 Like
Exactly right, @spsully2582. Pretty sure it’s a Pi 3B+. Long story short, I have a stack of those (unused) here at home, so it was no extra expense, and so far, actually easier than building Marlin. I’m still pretty early in this Klipper journey, but if you wanna go down that road, I’m happy to share what I’ve learned along the way.
As for my board, about 2 years ago I bought the BTT Octopus Pro 1.0.1, the newest available at the time. Didn’t think this project would get sidelined for this long! V1E hadn’t yet come out with the Jackpot (I think), and I liked the idea of having all the extra driver ports, fan connectors, I/O pins, etc. On the downside, I didn’t realized I’d be clearing my own path with that decision. In the end, as I get more accustomed to the various components and how they work together, I’d be much less afraid to try a board that goes a little against the flow.
As for Klipper itself, it really does make (re-)configuration incredibly easy. You don’t have to recompile anything; it’s just editing a config file on the Pi. The idea behind Klipper is that the “host” (the Pi) reads the gcode and sort of pre-processes all the hard math. It then sends much simpler motion commands down to your controller board. The Pi has more computing horsepower than most/all controller boards, so overall this arrangement supposedly makes things run more smoothly overall.
Hope that all makes sense. Please ask away if you want to dig deeper.