Hello guys, gals, and non-binary pals. I hope it’s cool to post my build thread before I’ve started building.
My wife and I decided last night, after months of discussions, to move ahead with building the LowRider as an investment in our small woodworking shop. I build home decor, benches, bat boxes, and furniture (but not dining tables). I hope a CNC will improve my work by allowing me to build jigs, components, and boxes to hold Magic cards. I live across the river from Portland, OR in a very obscure city known as Vancouver, Not-BC.
I am terrified of building this machine, but also very excited. I have lurked for a bit and you folks seem very kind and helpful. I also hope to be kind and helpful, though I may struggle to accomplish the latter.
So, first steps:
Buy all the stuff
Build a torsion box table (hoping to adapt the Paulk workbench for this)
If I build it 4’x8’ (1219mm x 2438mm!) will it be less sturdy/rigid to a remarkable degree? My buddy who has built a couple CNCs (not LR) thinks I ought to go with a 4’x4’ max. I hope to use it to make components for furniture (tv consoles, desks, vinyl cabinets) as well as smaller stuff (boxes, templates, jigs, signs).
If I build it 4’x4’, how much of a pain in the peach will it be to build larger later?
Any software recs? Buddy uses Easel, but I don’t love the idea of another monthly subscription.
Any reliable spindles for not much more than a Makita router?
Do y’all think that a decent shop vac and cyclone is “good enough” for dust collection to start?
Thanks for being cool people. Your interactions here in the forums are what convinced me to take the leap to a DIY CNC. See ya in the funny papers!
Going 4x4 vs 4x8 will make no difference to the LR4. The beam width is what makes a difference in rigidity, not the length in Y. I personally have one that’s large enough to cut 50” x 98” (to cut just beyond a full sheet of MDF. It works remarkably well! I think you will be very happy with it!
Sturdiness/rigidity will depend… Will depend on materials (EMT vs DOM pipe), quality of assembly, sharp end mill bits, feedrate, materials, etc… Are you planning to work with plywood, or some super dense exotic woods? I built a full sheet LR3, but mostly end up using my 1/4 sheet LR4 for most projects.
Easy peasy extending a 4’ gantry machine from 4’ to 8’. Most of your time will probably be spent making a nice level enough full size bench.
Lots of people use EstlCam initially (free to try out), the docs cover enough to get you started. There’s lots of options out there…
If you’re likely to heavily use the router with/without the CNC, consider buying the warranty offered by HomeDepot/Amzn when purchasing, I think that’ll cover brush replacement, but third-party parts and install is relatively cheap/easy too.
Shop vac investments people make here seem to be based on a mix of how much time they’re using their machines, what materials they’re working with (e.g. I’d only mill carbon fiber with overkill wet vac setup), the space(s) they’re working in, whether the vac will be used to manage dust spewed by their other machines, etc…
Got a website for your furniture business you’re comfortable sharing publicly?
Neat that you have spousal support and friend(s) with CNC experience. Good luck!
That’s a lot of good stuff to think about. @azab2c. I’ll be mostly working with hardwood ply, some mdf, lots of walnut, maple, ash, and poplar. That about covers what I currently build and what I hope to build.
I wish I could share my website. While I have started one and have my domain and hosting etc (I was a web developer in another life), I have been so busy with word of mouth orders after starting the business a few months ago, that I haven’t had the time! I know better than to make that excuse, of course. I guess I’m secretly hoping I can work on the site while letting the LowRider make some of the product!
Thanks for all your good info. I’ll come back later and ask you what all those words mean. (Only half kidding).
I love my AD5M’s and several here seem to be getting great results from theirs. There are options now. That said, some people on the net have recently reported getting “stupid good” cheap deals on AD5M’s. I glanced again just now, and the best price I found was on Aliexpress in a deal that includes shipping from US stock, free shipping, and pledges to be genuine product. If you are up for the risk of that buy, it’s listed on a sale price now set to expire 9/22/25 of only $207 (US).
I really like using Estlcam, and I love that it’s a one-time buy, not a subscription, and it has a free trial. Do check it out! Lots of videos on how to use it, and it’s surprisingly easy to learn and to use.
Yes. The main draw back is loudness, but then again, running a trim router is pretty loud too. You need to always be standing over, or sitting right beside, any running CNC operation, to make sure you can react quickly if/when something is not right, so you’ll be wearing hearing protection probably anyhow. That said, I have BOTH a shop vac near AND a dust collection system from Harbor Frieght (the kinda famous low cost one). I have the HF unit on the other side of the wall, nearest my CNC table. It’s already “not bad” on noise, and having it in the next room (i.e it’s real close by but separated by a wall — it’s in the unfinished garage side of my basement while the CNC is in the finished side) makes it even better. I’ve made some mods to it, as seen in my Printables pages, and I’ve been really happy with it. I used 4" thin wall PVC pipe (aka “S&D”) to pipe the dust/air to it, plus some 2.5" PVC flex hose for the area near the table/to the unit. Blast gates can be bought cheap or even printed. My various designs and/or remixes related to dust are here: Doug Joseph (design8studio) | Printables.com
The crowd here is indeed helpful and includes some amazingly knowledgeable people. CNC has a learning curve, but with help, it’s a scalable peak!
@Beans I should have mentioned, I have added a “Super Dust Deputy 4/5” to my HF dust collector, which… the Dust Deputy is sitting on top a big trashcan, mounted to a reinforced trashcan lid. For that matter, I altered the HF dust collector to have any dust that makes it that far, go into a bag inside a trashcan, modified to be clamped to the underside of the baffle.
Pics of the Dust Deputy trashcan lid mount concept are in this listing:
And pics / details about the mounting of a trash can to the underside of the HF dust collector are in this listing:
Thank you for the link. I just bought the printer and the DIY enclosure. I think it’s probably legit, because as soon as I placed the order I got a welcome email from Flashforge.
I have watched a few of your videos and seen you helping folks around here (obviously). I went over to my buddy’s house today for a lesson on control boards and when I walked in the shop, he had one of your videos up on the monitor. “I know (of) that guy!” I shouted.
Thanks for all the great advice. I’m going to check out your videos on dust collection and get a plan going. On the noise front, I’m luckily very used to a loud shop. PPE is a must in my shop and I’m thinking this might be my sign to finally buy some Isotunes.
My friend, she is perhaps more excited than I. She doesn’t have to build it of course, but she’ll be listening to my complaints and self-congratulations. She’s always been my biggest supporter and her opinion on buying tools boils down to “if we need it, buy it.”
Lowrider 4 machine X axis are stiffer at smaller sizes, but the machine is stout and will work fine with a 4’ X axis gantry.
Almost no pain at all. X is a pain to extend (Rebuild the gantry). Y you just put on a larger work surface, extend the rail and the belts, and Bob’s your uncle.
Certainly a project to do, but you can bootstrap a LowRider on as simple a setup as MDF on a garage floor or MDF on a couple of old doors on sawhorses. or a ping pong table.
Use the bootstrap setup to cut its own strut plates then make its own table.
Good enough to start, yes. You can always upgrade later if you’re getting a lot of use of your machine.
I recommend building with one of the trim routers first. They’re a near perfect match for the LR4 capabilities.
Ryan has built a great community around his machines. We’ll all pitch in to help you succeed in your journey.
Welcome to the forum- I’m a woodworking word of mouth guy too and running a “kinda-business” out of my basement shop. I’ve had amazing success with LR3, and I just updated to the LR4. Been doing a wide range of stuff from employee appreciation awards, to reproduction 1950’s kitchen cabinet profiles.
If I can be so bold to pimp my own thread, all the details are here. I tend to over share a little bit, lol.
Thank you for the warm (and educational) welcome, MakerJim! Sounds like starting with a trim router is the play here. You’re right about the table of course. I’ve built my share of workbenches and I can still find a use case for a sheet of plywood on top of my heavy-duty horses once in awhile.
Using the machine to build its own table is exactly the sort of elegance that I’m realizing the LR4 will provide. I feel smarter and better looking for being in y’all’s company!
Is it weird that this sentence made my heart beat a little faster? I saw a bit of your thread earlier and I’ll definitely dig in some more ASAP.
On the off-topic side of things, I homeschooled my boy for a bit when lockdown hit and then for awhile afterwards until my nurse wife called the all-clear. He’s in his first year at a fine arts school right now, which is just wonderful and leaves me free to build CNC machines!
I can’t really add much more to what’s been said already other than welcome.
The only other advice I have is don’t wait to ask for help. If you get to a bit in the build that’s confusing or unclear come and say - the docs are new and still a work in progress. Don’t quietly get frustrated and only come for help as a last resort.
When a wise man does not understand, he says: “I do not understand.” The fool and the uncultured are ashamed of their ignorance. They remain silent when a question could bring them wisdom.
[Frank Herbert]
What I like best is seeing what people make - we all want to get you going as painlessly as possible to see what you use it for!
Thank you much! That’s such a great Herbert quote. I’m excited to document my build and show you what I make. I’ve got a 3d printer on the way and this week I’ll be heading down to another forum member’s place to get some hands-on assembly experience.
It’s been almost a month and things have moved along – maybe a bit slowly. I had the opportunity to visit @mbamberg and learn an incredible amount of useful information about how the machine is built, why its important to follow the yellow brick road, software workflow, common issues, and how to plan ahead for future modifications. I got to see two of his machines (and parts of a third). If it wasn’t for the fact that my work queue just exploded, I’d have gone back down for some hands-on build experience. My day with Mike confirmed that I’ve chosen the right path for my needs. He also helped convince me to go with a 4x4 cutting area to start and now that I’ve seen how simple it will be to upgrade to 4x8 later on, I feel good about that decision.
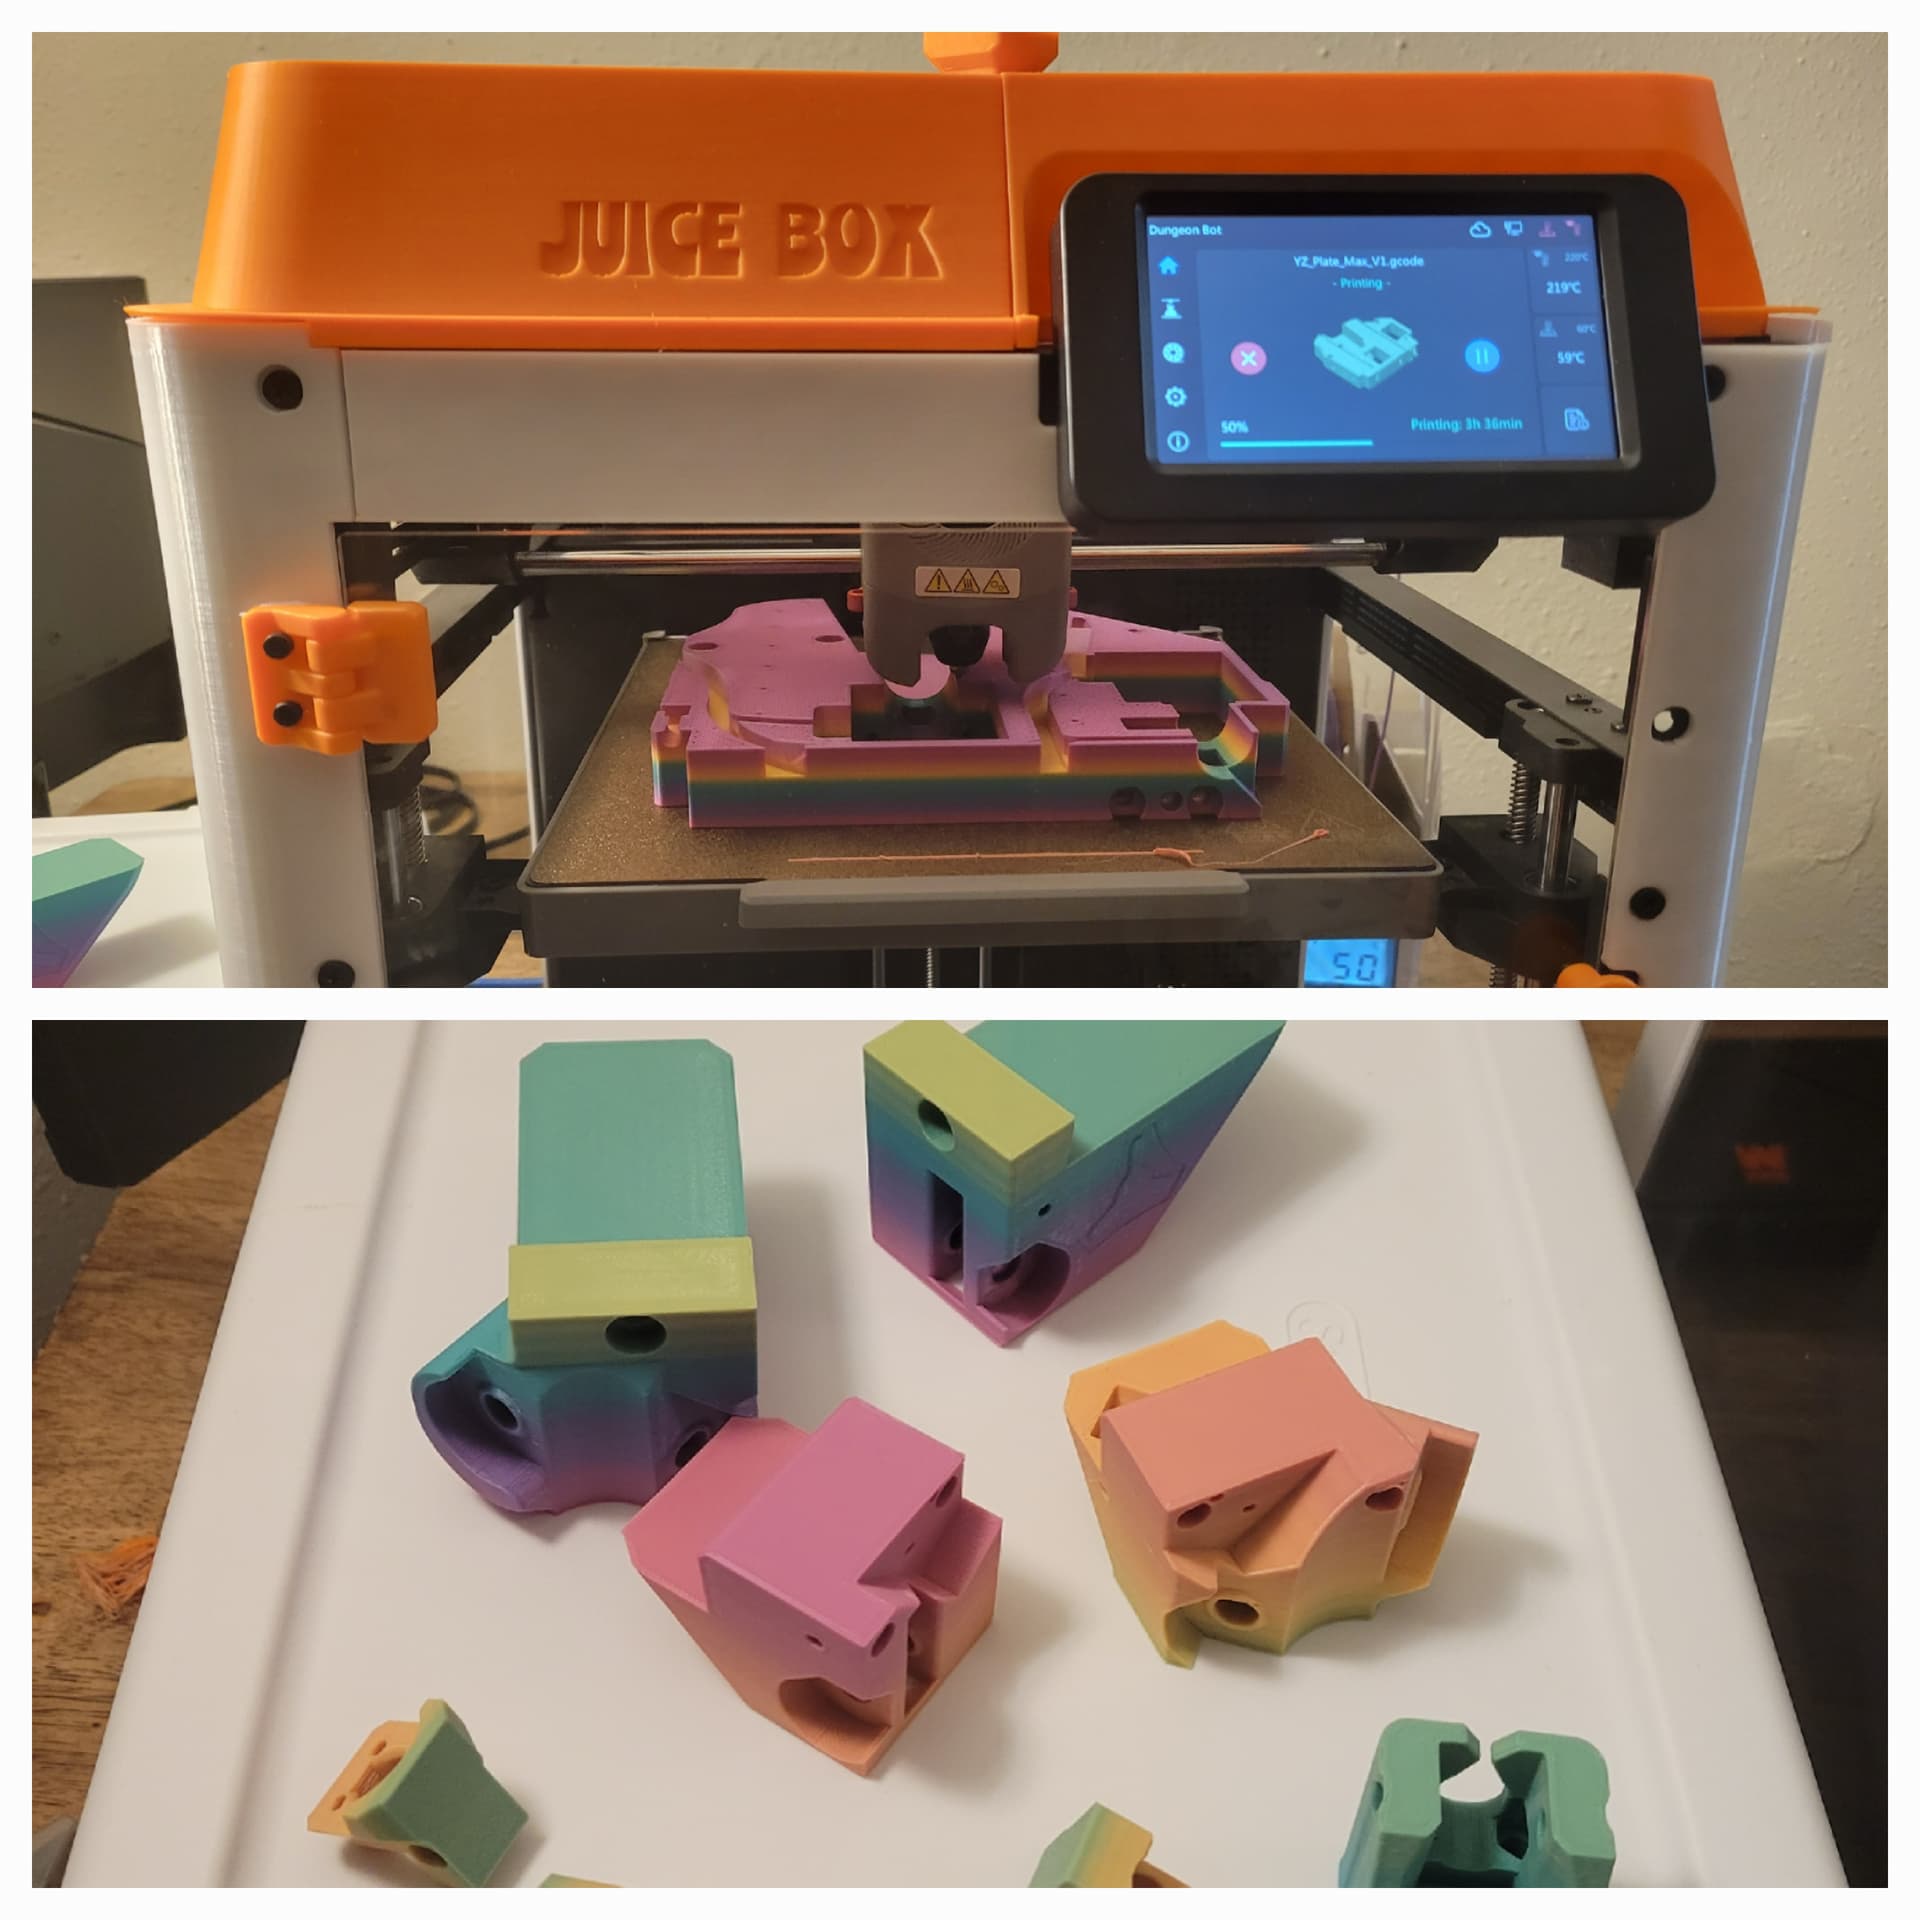
I’ve got all the (non-printed) parts here, along with a Carbide spindle that Mike recommended. I bought the Flashforge Adventurer 5M and built the enclosure according to @DougJoseph ‘s instructions. I have to effusively thank Doug for the tip. I got the printer and the enclosure kit for $265 all-in. The rainbow candy PLA was 2-for-1 on the FF site – extra bonus!