Mp3dp v4 slow build

and after power cycling and the bed falls all the way down, it won’t tilt again because the front left corner is too high for the BL touch… probably need to shim the right side belt stop so it is slightly higher. It isn’t dropping before testing the front left, but it will drop before testing the back or the front right positions. If it is artificially tilted up on the right side, then it will work… I have a video to show, but it is taking forever to upload.

edit: ignore that ugly red thing on the trolley that is holding up the wiring and the filament tube for now… once I get this thing operational, I have a bunch of parts it needs to print for itself…

@Jonathjon had something similar, I think it was the belts that were too tight.

the only belt that might be too tight is the left z motor (z). the rear z motor (z1) and the right z motor (z2) are pretty loose, but the left one skipped because it was too loose and it may now be tightened a bit too much. The issue is that the bed isn’t lowering down far enough after the zero operation so when it goes to tilt for the first point, if it isn’t super tilted like in the video, the bltouch can’t extend far enough without hitting the bed, which causes the tilt to fail.

The tilt appears to work now that the motor positions are set correctly and the probe locations are reasonably close to the motor locations.

Considered 4 point leveling instead of 3? Am getting better overall level from heightmap test after first Z tilting with 4 corner probing.

Example and rambling about my observations @
https://azab2c.com/make?v=5_18&t=33_38_37&r=1.4 seek to beginning of clip to see config am using.

I don’t think anything is wrong with the 3 point, just the starting bed offset once z is homed needs to be larger so the first point can actually be measured. I ran it twice and took video and it worked both times, so maybe I got the offset right now.

1 Like

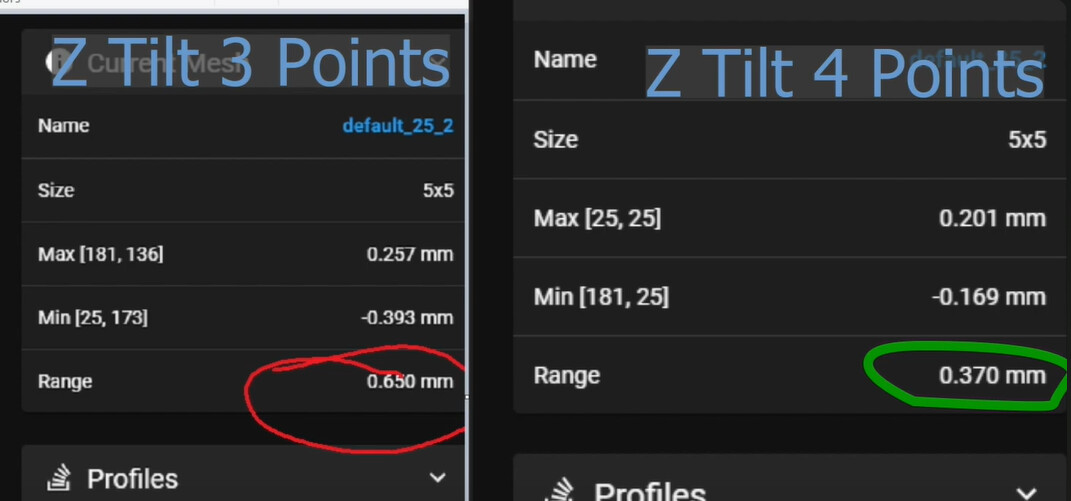
Curious how your heightmap test turns out. Heightmap tests led me to tweaking frame, rails, z-tilt probing, aluminum bed springs, etc…

Edit: Dug around and found observations for my build

https://www.youtube.com/watch?v=ZZ7VMSKSBxs

2 Likes

Next is extruder calibration. Assuming that works out ok, then it needs to start printing.

The magnetic build surface has a plastic protective cover film and it is not likely a printable layer surface. I think the first few surface calibration tests will likely destroy a PEI textured sticker if I had one for it… Should there be a pei sticker over it? What surface do you all print on? If it doesn’t really matter, perhaps some blue tape and glue stick for the first print just to test the nozzle height and start laying plastic.

Can you post a picture on the plastic protective film?

I used to print on glass, then glass with 3m blue painters tape, then textured PEI sheet. All 3 ways gives good results.

I think that answers the question (it shouldn’t be the bare metal). The plastic protective film is a clear cover sheet like the film you get on a touch screen when it is new. You can kind of see the film here… it is dirty on this shot:
image
I’ll need to get a better picture.

I went back and looked at my order… apparently I ordered this:

https://www.amazon.com/gp/product/B09F6Q4CYM

and it is one sided smooth PEI with a protective film, so I should be able to print right to the PEI sheet without the top protective layer with nothing else like tape or glue.

You do need to take that film off.

The product information states specifically to take that off before printing to it. It is sure easier to ask questions on the forum than to stop and actually read the documentation.

Wiring update. It really was a temporary mess.

2 Likes

And then there is plastic

1 Like

That looks great!

1 Like

Congratulations! Squirting molten plastic qualifies for being able to claim a MP3DP serial number

2 Likes

First print with this machine, first print for me with klipper.
It was to be a benchy, but after 17 minutes of heating up, it still hadn’t started printing, so something isn’t quite right… print canceled 2x

Throwing darts here: Picked 205 as extrude temp and 60 for bed. Extruder wouldn’t stabilize and wandered from 205-207 C for 7 minutes. I’m looking to see if there is a pid tuning calibration for the hot end. Perhaps that is why it isn’t progressing. Thoughts?

Edit: the command is PID_CALIBRATE HEATER=extruder TARGET=200

I got 000014

The bed is too close for the first layer. For a first print, it turned out fabulous!

3 Likes

It sure did! Congratulations.

1 Like