MP3DP V4 Build

Yeah you could do that or cut a pattetn in it

This is a bit complex but this is for a Prusa printer

What about the most important reason??

Because you can…and because YOU will know it’s there :slight_smile:

Review and Klipper config video here:

Other options as well:

Edit: The Lulzbot one is open source. Schematic here.

This thread is terrific! You do amazing work!! And, BTW your LR3 is sweet. I’m in the infant stages of building an LR3 and I want to try mill the XZ plates on my newly finished MPCNC.

I have so many questions if you would have the inclination to provide guidance to a novice.

  1. That’s .250 aluminum plate, right?

  2. What endmill did you use?

  3. What was your z-step?

  4. Did you use the same endmill for the holes and the perimeter? It appears that the was no tool change.

  5. That was trichoidal milling?

Thanks for any pointers!

Thinking about this bed deal more. Ive had problems in the past with it not always wanting to finish a bed level. I only have 3 points that the bed attaches…

Bed is 300mm square and the support plate cut like what you see in the pic. I didn’t know it was able to go to 4 points with the bed support or how to accomplish that. I see it now but I still cant quite get the DXF to come out right

Should be something like this…

and have 4 mounting points for the bed. I really think that might support the back corners of the bed better and might keep my bed more level when it heats up but I really don’t know. In this sketch the screw holes aren’t in the right place because the bed is moved back for some reason. If I can figure out how to get the bed to move correctly then I think it will put the 4 holes like it should and give me the correct DXF. Then I could just set in a 25mm offset to the inside and have a better supported bed with a lighter bed support. I have more aluminum that I can cut a new one out of. But honestly I’m really thinking about going to MDF to get it even lighter if that will be enough to support it. I know @vicious1 is super busy but if you have 2 seconds to chime in I would love to hear your thoughts as well

I’m liking the first option. Those I could get for $20 a piece ($60 total) and I can configure klipper to keep the bed up. I have plenty of heater pins open to control the 24v. The second option being open source is great but at $50 a pop that pushes it more than I want to spend.

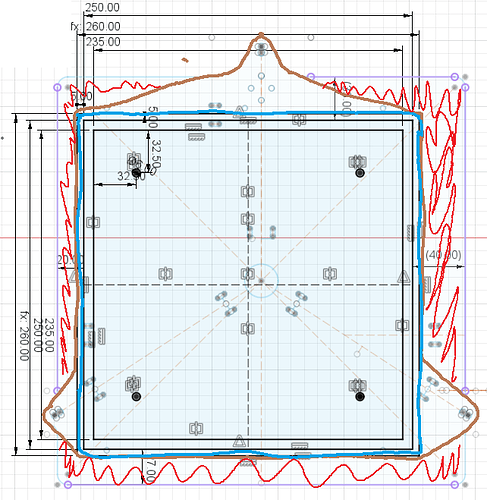
Shared my “plan” for bed support plate in MP3DP v4 - Aza's build - #83 by azab2c. Reality ended up bit different…

  • 1/4" Ply Bed Support Plate, was initially cut based on the sketched outline (faint blue and purple). 2 thick coats of primer paint.
    • However, Bed Support ended up much smaller (Brown outline), trimmed off bunch of material (Red scribbles) so the Filament Spool and drag chains (bed power, and Z Stepper wiring) could fit internally.
  • 1/4" Alu Bed, measured and cut 4 holes for mounting Alu Bed (Blue outline) to Support Bed based on where holes were located in the Mains voltage heater pad.
    • Used 4 bed leveling springs to mount, something like. I use this adjustment option to try and get bed level by hand during initial assembly.
      This reduces how much time Klipper/automated bed Z tilt leveling needs to do each print.

Hope that helps!

Well after recent developments I think I am going to back up and punt on this for now. My current plan is to fix my wiring to get it out of the enclosure better/cleaner. Also I am going to rig up something to limit the Z. A lot of times when I am working on something and need the bed up and out of the way for a short time I will take one of my filament dry boxes and put it underneath it. I’m going to take a similar approach and put something in there that will allow enough Z travel for the things I need to get printed but not enough to let this heavy ass bed fall 375mm. I think with the weight its picking up enough speed before the sudden stop and that’s what’s causing the problem. So limiting the fall to a much shorter distance should mitigate the burning boards. I want to leave it heavy for any testing that needs to be done. That way we will know that whatever new thing Ryan and Mike are cooking up will handle the heavy beds lol.

Man… Its always something LOL. So I took yet another spare SKR and got it hooked up this evening. Only one spare left so hopefully things don’t keep burning up LOL. Well this one is off of my full sheet LR3, Never been hooked to a printer. Never even had power hooked to the heated bed ports. Flashed the firmware and came back to the computer to get the serial ID all set up so klipper could talk to it. Got that changed in printer.cfg and did a restart. It connected to it and immediately shut down due to temp out of range. So I figured I must have missed one of my thermistors ( I have 2 extras reading “chamber temp”. Walked over to the printer and I could smell something heating up. Reached in and touched the bed and WOW was it hot. Looked over at the SSR and its just lit up solid. Hurried up and cut power. Grabbed my Fluke IR thermometer and it was at 305°F. Disconnected the wires from the board to the SSR and turned it back on. On startup the mosfets for the bed and another for one of the 3 heater ports on the side are just pegged. IDK why but glad I didn’t leave the room for a while. No telling how hot that 750w mains heater would have gotten that bed up to. I’m going to switch the bed over to one of the other heater ports that’s NOT messed up and keep a very close eye on it for any more problems. I wish I knew what was causing that.

Sorry for the late response… Been distracted all day.

  1. Yes that is 1/4" aluminum plate
  2. Carbide Single Flute Long – V1 Engineering Inc
  3. Full depth so probably ran 7mm DOC
  4. Yes sir
  5. Yes sir. Usually run a 5-10% stepover at full DOC. around 20mm/s 50% Trochoidal width. And I run an air mist with just a hint of 99% Isopropyl Alcohol to keep the aluminum real cool.

I have a few videos cutting different things from aluminum…

https://youtu.be/6aZMao0523c?si=fn1r67PA_wNTePRu

Do you have thermal fuse, would expect that to trip and cut power when bed’s over ~125C ?

I ordered some for the build but they were the wrong type and I never got around to it again. They are in the cart now and about to hit order…

1 Like

These mains heat pad are ridiculously fast compared to 24v heat on my Ender. With some intentional changes, maybe the MP3DP bed could double as an intentional reflow oven :slight_smile:

Also got some bed springs on order. Now just have to figure out how to mount them…

Guess its time for an update and stop clogging up others threads lol. So I’ve fixed a few things…

When I put the new core on I messed up the belts. The belt for the left motor (upper belt) I had too short. This was causing me to have to run the Left/lower belt WAY tighter than it should be. So I took that off and swapped in a new belt making sure to leave just a little room for adjustment. While I had the belt tension loose I slid the X rail all the way back, loosened the 4 screws holding the rail to the y carriage and pushed everything straight and retightened it. Before it was way out of whack, this time it is MUCH better. I have tried to do that before but never with the belts completely off and that made a world of difference. After that I put the belts back and tensioned them. Left them looser than I ever have before. beam is square and no teeth skipping in the pulleys so we are good.

After that I ran the Ellis tuning accelerations test suggested by @Lithium366. Before now I’ve always had to keep accelerations capped at 1000 or I would start skipping steps. Well after getting even more straight and square, this time without having the left belt pull the beam square, I was able to pass the test at 3k accelerations no problem. But I knew I should have been able to hit more. I went into my printer.cfg and my current was set to .680 amps on the X&Y motors. So I bumped that up to .850 amps. Went back and ran the test again, held at 5k, skipped at 6k. So I bumped it up to .950 amps. Held good at 6K skipped at 7k. I thought about bumping it a little more but honestly I was beyond happy with that result. Up to this point all my test had been 2 iterations. So in the guide it tells you once you find where its not skipping anymore to back down just a little and run a 50 iteration test. So I ran that at 5000 acceleration and did not lose a single step. Man is this thing moving at that speed lol. I set my max_accel to 4500 and max_velocity to 500. And in orca slicer I bumped the normal print accel to 3500. just going from 1000 to 3500 knocked 2 hrs off of a 9hr print! That’s just crazy. I knew it helped but never realized it was that much! I need to run this acceleration test on my other printers LOL.

Also did some bed drop test you can see here…

and here…

These springs will defiantly help with the bed drops. I just have to figure out how to get them installed out of the way of everything.

2 Likes

I used 1/4" MDF for my lower part on my build plate.

Bottom up, my build is:

1/4"MDF
Insulation
Heating element
Aluminum Plate
magnetic build plate

Oh. And I’m only using 3 mount points, so my 1/3" MDF plate is triangle shaped and not the same size as the build plate.

1 Like

That’s how my aluminum brace is. And I guess I would leave it that way since I don’t want to take off the magnet to drill more holes in the bed. I haven’t had any of the leveling issues since early on so no real reason to change it. I might cut one out of MDF and swap it in once I figure out how to mount these springs.

1 Like

I noticed some slight ringing on some of the parts I printed last night and this morning. Did some more digging after my last attempt to figure out input shaper failed and came across this…

Got it installed and it all seems to be working. Its running belt shaper calibrations now to see if the belts are properly tensioned. I don’t plan to adjust them I am just curious on this one lol. Next will be actual input shaper. Will post up the graphs as I get them.

1 Like

Well…

I guess I’ve got more to figure out…

Did you install an accelerometer for input shaper? Or you doing it the old fashioned way?

The EBB36 has an ADXL345 on it. So letting it do all the work. I couldn’t get the fancy pants graph from the old fashion way lol.

Did what I said I wasn’t going to. Messed with the belts just a little bit. They were pretty loose. Running it again now…